
Overview
You will learn
- Which steps are required in order to add and use a new tactic
- This includes…
- adding a new spend type in the model
- adjust the planning applications
- adjust the data actions


Prerequisites
Prerequisites
- You are familiar with the SAP Commercial Planning (CX) Sales Planning content from the xP&A Business Content Suite. Reference: Getting Started tutorial
- You have installed the SAP Commercial Planning (CX) Sales Planning content in an SAP Analytics Cloud tenant. Reference: Business Content Installation Guide, Content Package User Guide
Steps
Intro
The SAP Commercial Planning (CX) Sales Planning content package comes with several pre-defined assumptions, such as the mapping between Tactic – Spend Type and GL Account, which can be used for your planning activities. Nevertheless, you might want to add more spend types according to your own business needs. In this case, you would need to adjust the planning applications, data actions as well as the dimension master data.
In this tutorial, you will learn how to add a new spend type member into the dimension and how to make it available in the planning applications of this content package.
In the first step, it is necessary to add a new member to the SpendType dimension.
In the SAP Analytics Cloud Menu, navigate to the Files section, search for
SAP_SD_IM_SalesPlanningand click on it.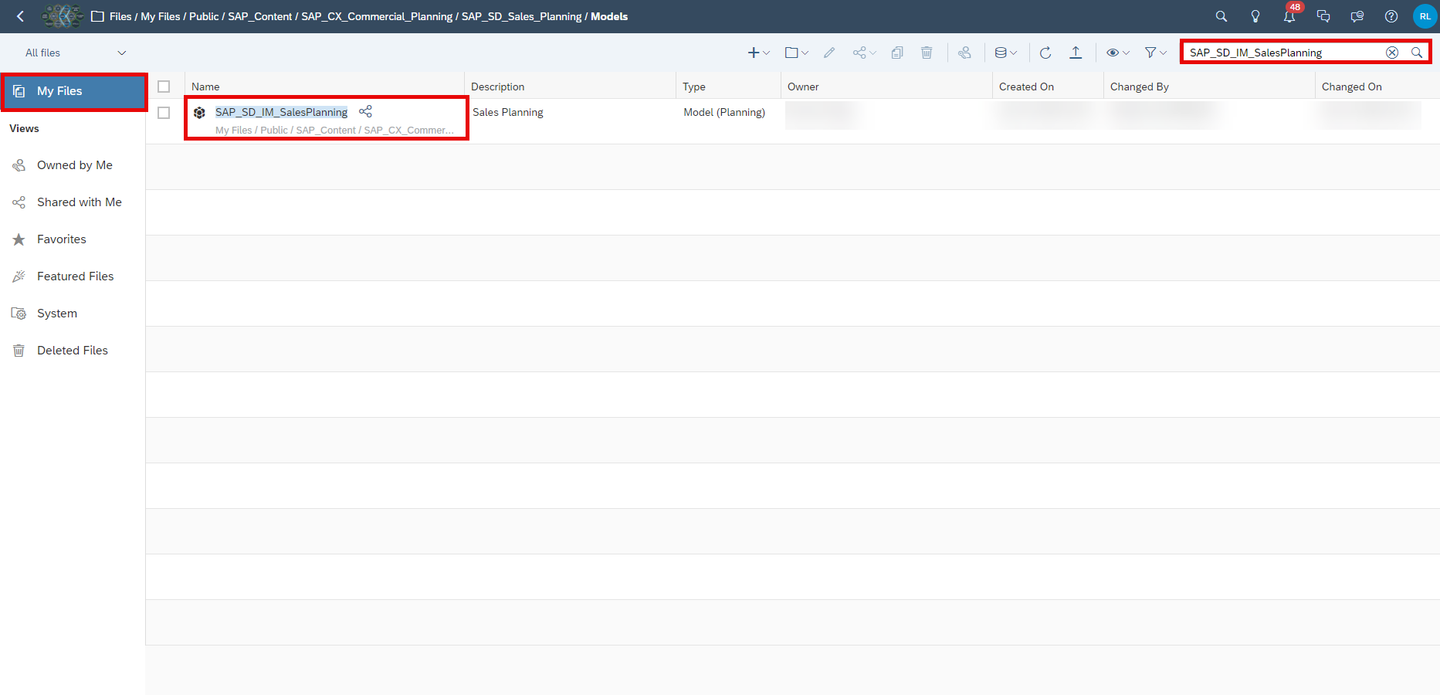
model Open the
SpendTypedimension.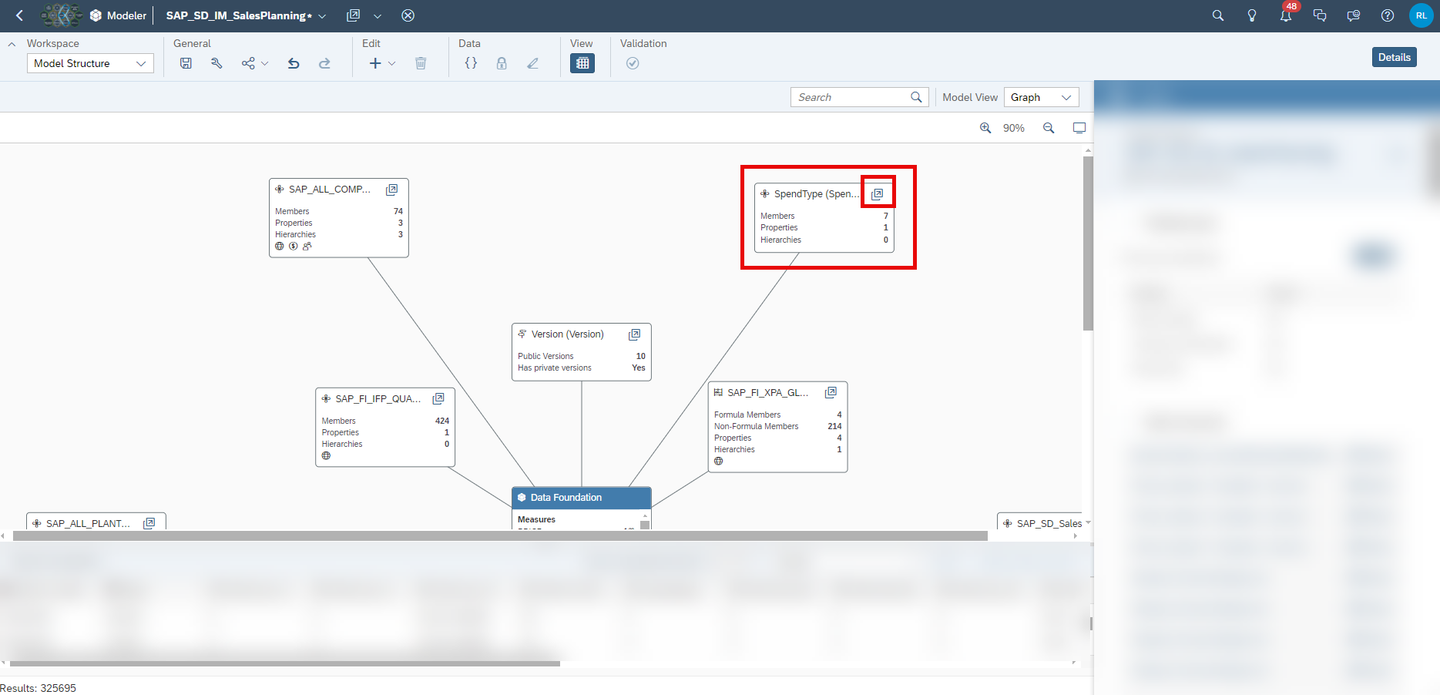
model Add a new member to the
SpendTypedimension. The spend type is meant for long-term regular customers.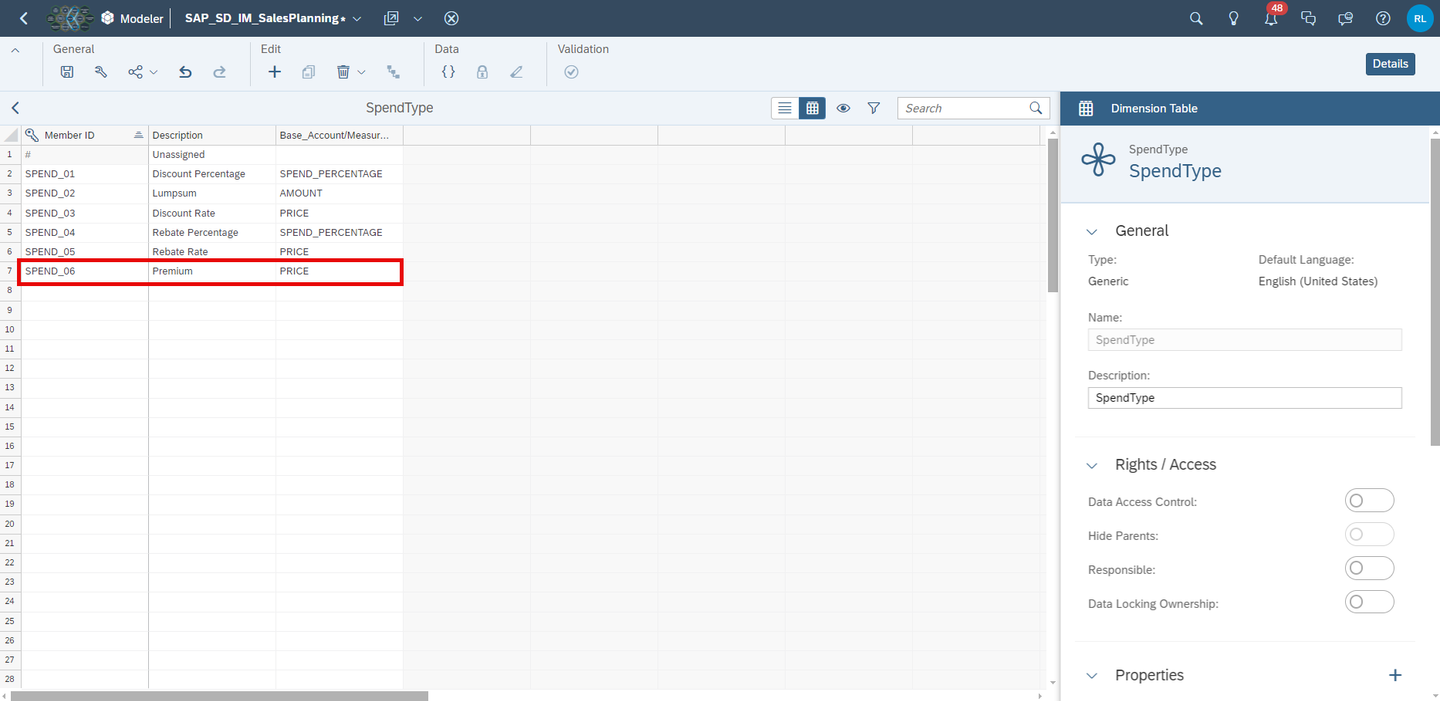
model - Use
SPEND_06as yourMember ID - Use
Premiumas yourDescription. - Use
PRICEas yourBase_Account/Measure (Sales Planning)
- Use
Save your change.
In the next step the Sales Planning Admin Page (SAP_SD_SalesPlanning_AdminPage) must be modified, and a new mapping should be provided for the new SpendType member created.
In the SAP Analytics Cloud Menu, navigate to the Files section, search for
SAP_SD_SalesPlanning_AdminPageand select Open in Story Edit Mode.
canvas_story Select the Mapping page of the story. Right click on the Spend Type input control or select the button More Actions. Click on Edit Filter….

canvas_story Click on Settings. In the members display settings, and select All Members in the Available Members drop down. Then select your newly added Spend Type
Premium. Click on OK.
canvas_story Save your change and go to View mode.
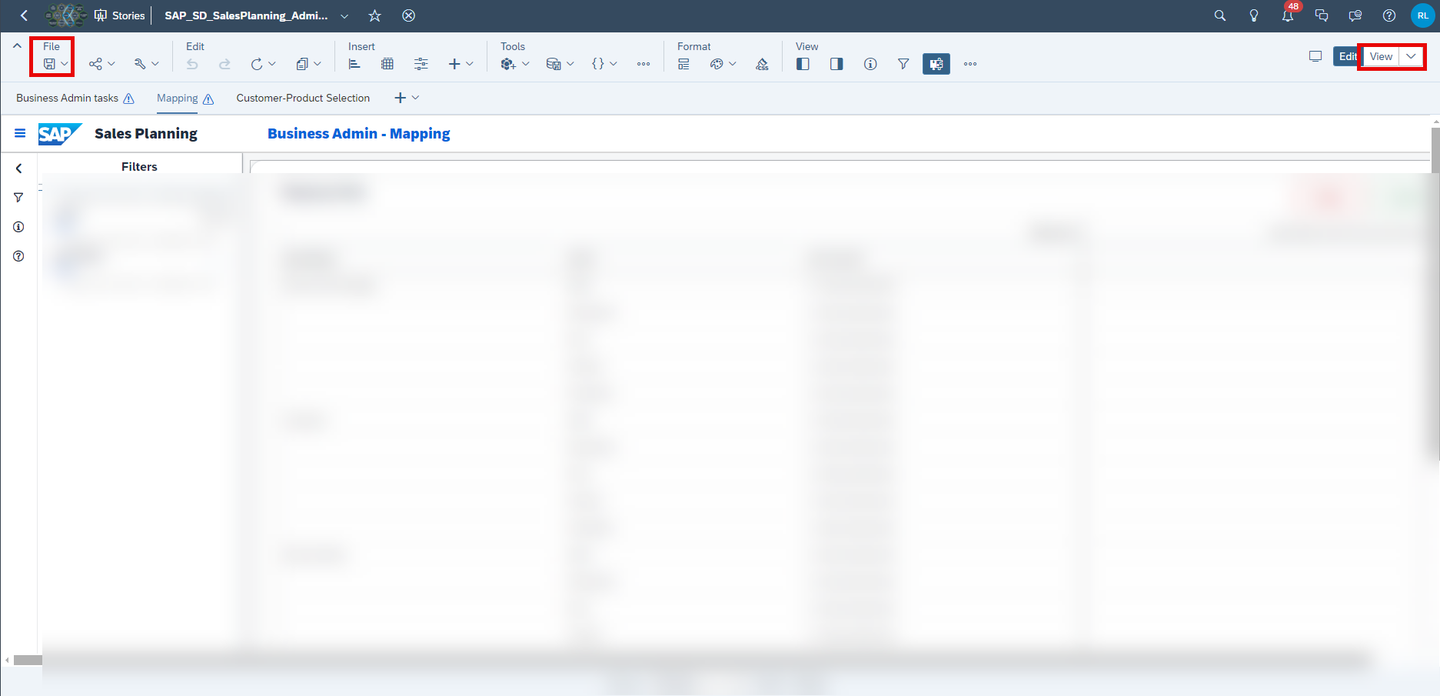
canvas_story Select the Mapping page of the story. Right-click on the column
SpendTypein the Mapping Table. Select the Show/Hide option and select Unbooked.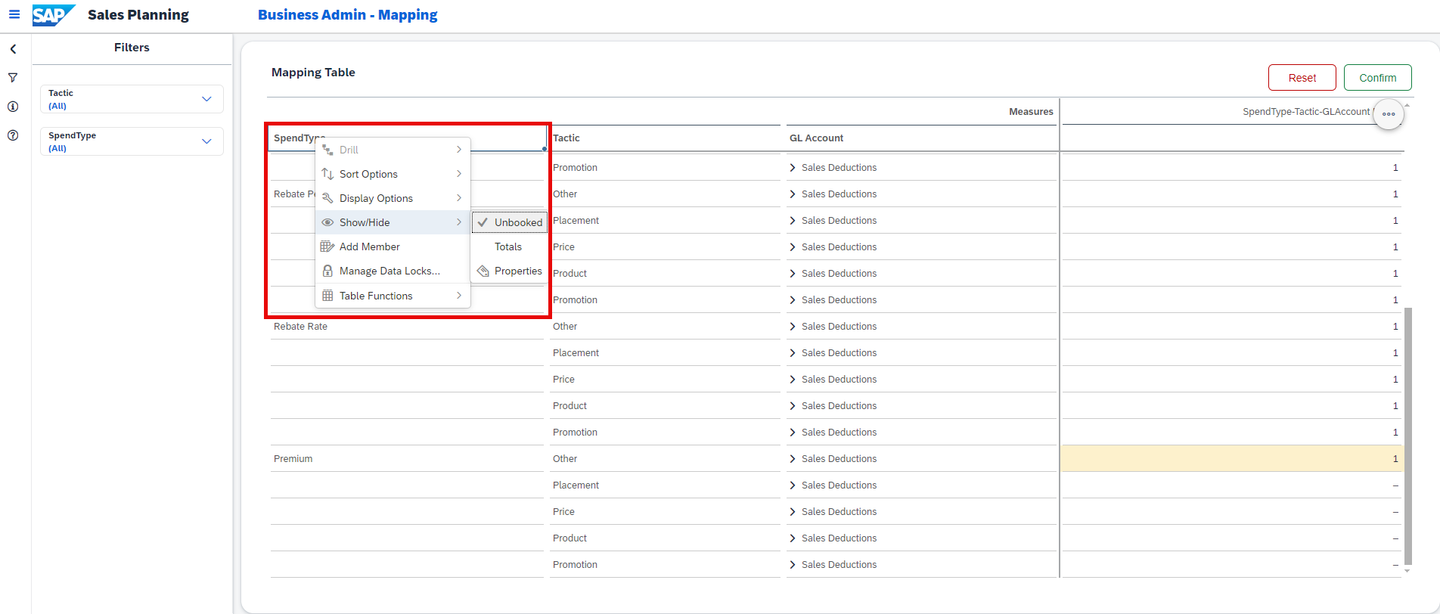
canvas_story The new
SpendTypePremiumis now visible in the table. Perform a manual input on the desired combination ofSpendType,TacticandGL Accountto create a valid driver combination to be used for the sales activity planning.
canvas_story For instance, enter
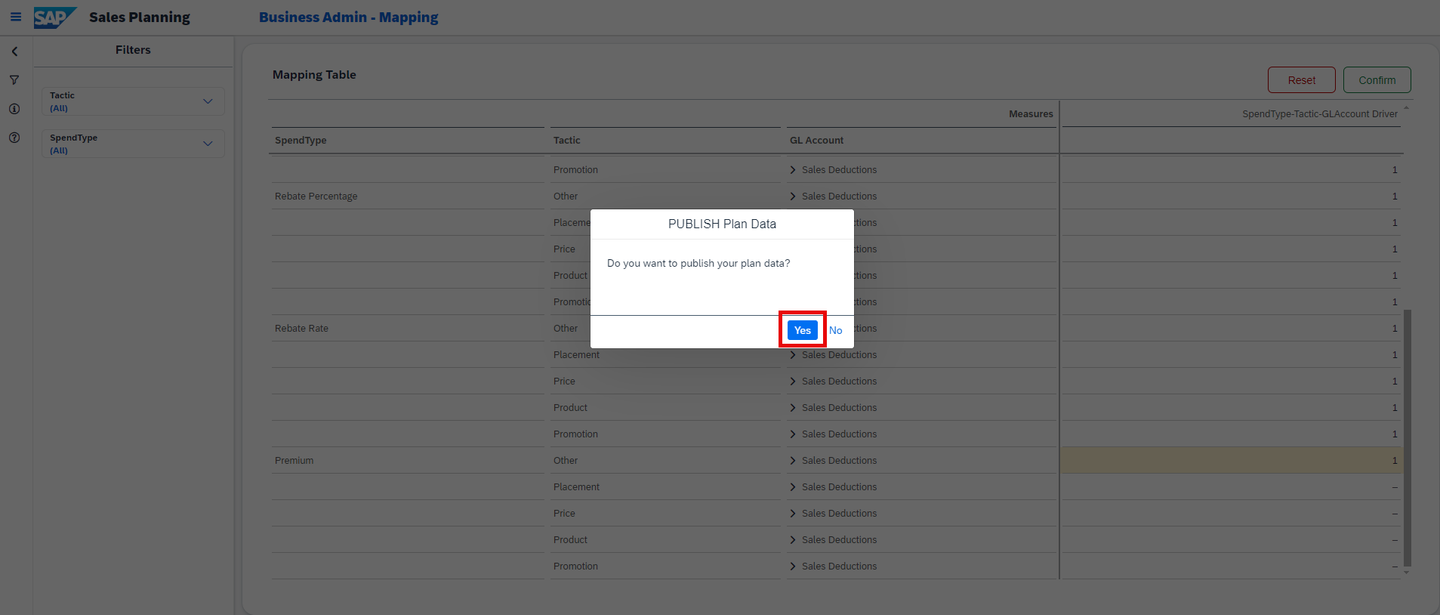
1for the following combination:Column Value SpendTypePremium TacticPrice GL AccountSales Discount - Domestic Click on Confirm to publish your change.

canvas_story Confirm your intention by pressing Yes.
canvas_story
Now, you are going to learn the different ways how your SpendType is treated in the data action.
In the SAP Analytics Cloud Menu, navigate to the Files section.
Search for the affected data action
SAP_SD_IM_SalesPlanning_ActualActivityP&LCalculationand open it.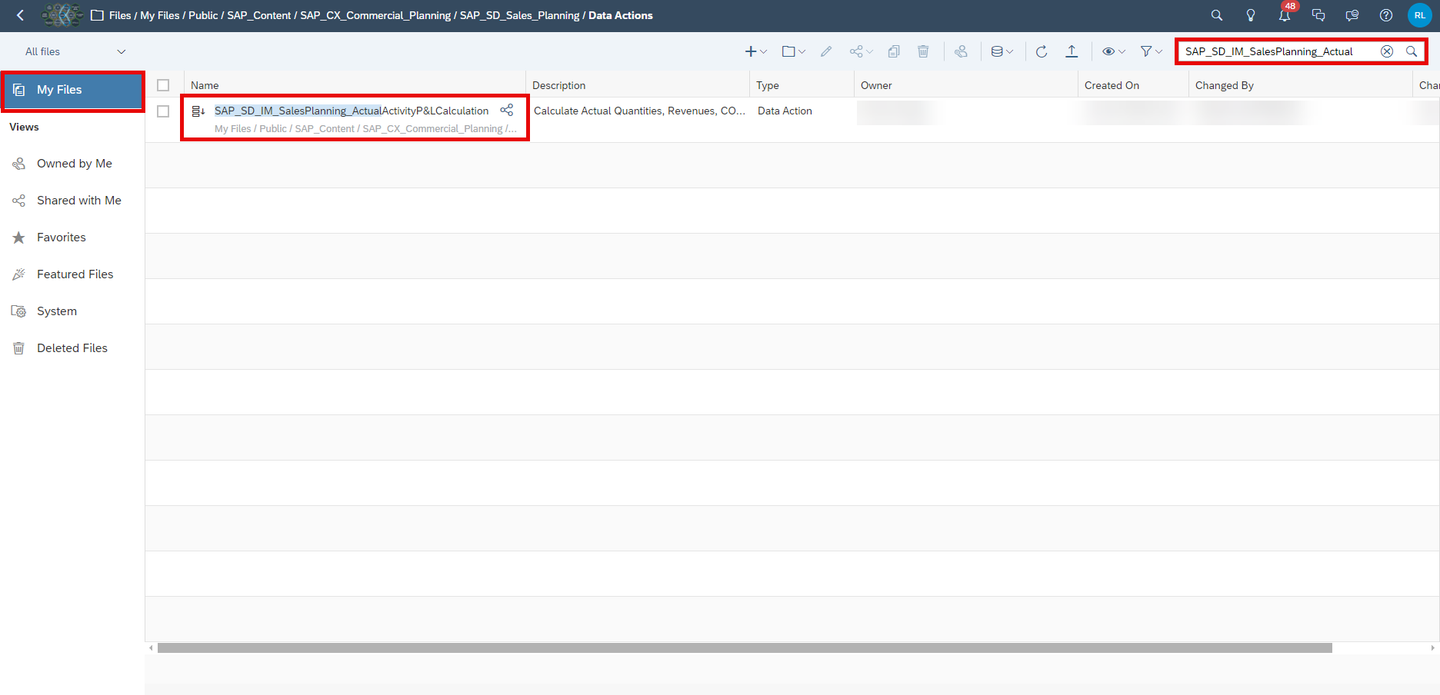
canvas_story Click on step
Calculate Incremental Spend - Rate.
canvas_story The following table explains roughly what the data action step is about.
Line Purpose 1-4 Sets the configuration definition for the advanced formula like hierarchy and time zone. 5-21 Sets the member set for the data action. The data action operates on the previous year, amount, sales deductions (FPA1/023) and by parameter given activity. 24-40 This step only fires based on the Base_Account/Measure (Sales Planning)of yourSpendType, in this casePRICE. It adds the quantity and prorated baseline quantity for the booked drivers, which you defined in the mapping table of the Sales Planning Admin Page (SAP_SD_SalesPlanning_AdminPage). The sum of it is multiplied with the spend input of the given sales activity, which you enter in the pop-up, whenever you edit or create an activity in the story Sales Activity Planning (SAP_SD_SalesActivityPlanning).That means, if you create a new sales activity with
SpendTypePremiumand anSpend Inputof12, this step would sum the quantities and multiply it with 12 to get the incremental spend rate. Because previously we defined that theSpendType PremiumhasPRICEas theBase_Account/Measure (Sales Planning). So line 24 is true.Click on the last three steps and compare them.
Calculate Incremental Spend - RateCalculate Incremental Spend - LumpsumCalculate Incremental Spend - Percentage
The first 23 lines are the same in each step. The data action steps differ in the last part. They distinguish between the
Base_Account/Measure (Sales Planning)of theSpendType. TheSpendTypehas currently three different base accounts: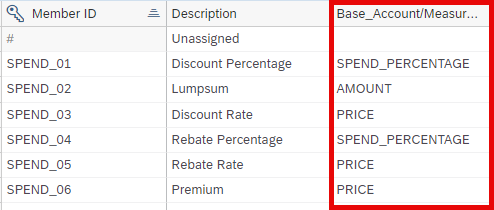
canvas_story SPEND_PERCENTAGEAMOUNTPRICE
If you want to add a fourth
Base_Account/Measure (Sales Planning), you would need to add another step at the end of the data actionSAP_SD_IM_SalesPlanning_ActualActivityP&LCalculation. The step would follow the same pattern like the others you just looked at.
You need to incorporate the option to select your new SpendType Premium whenever you interact with Sales Activities.
In the SAP Analytics Cloud Menu, navigate to the Files section.
Search for
SAP_SD_SalesActivityPlanning, click on More actions and select Open in Story Edit Mode.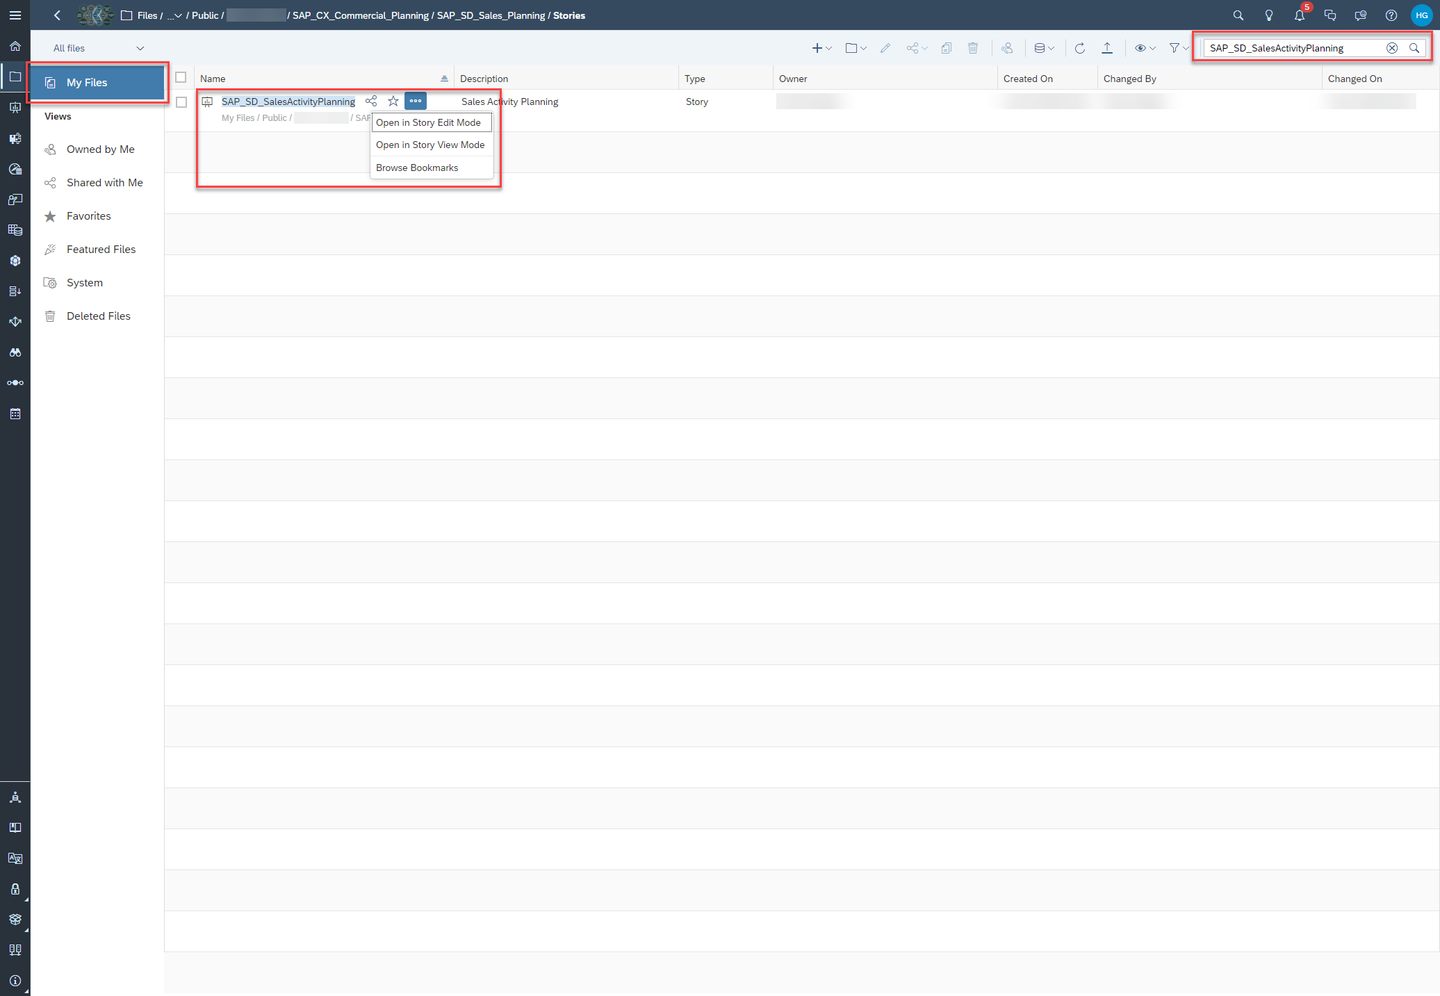
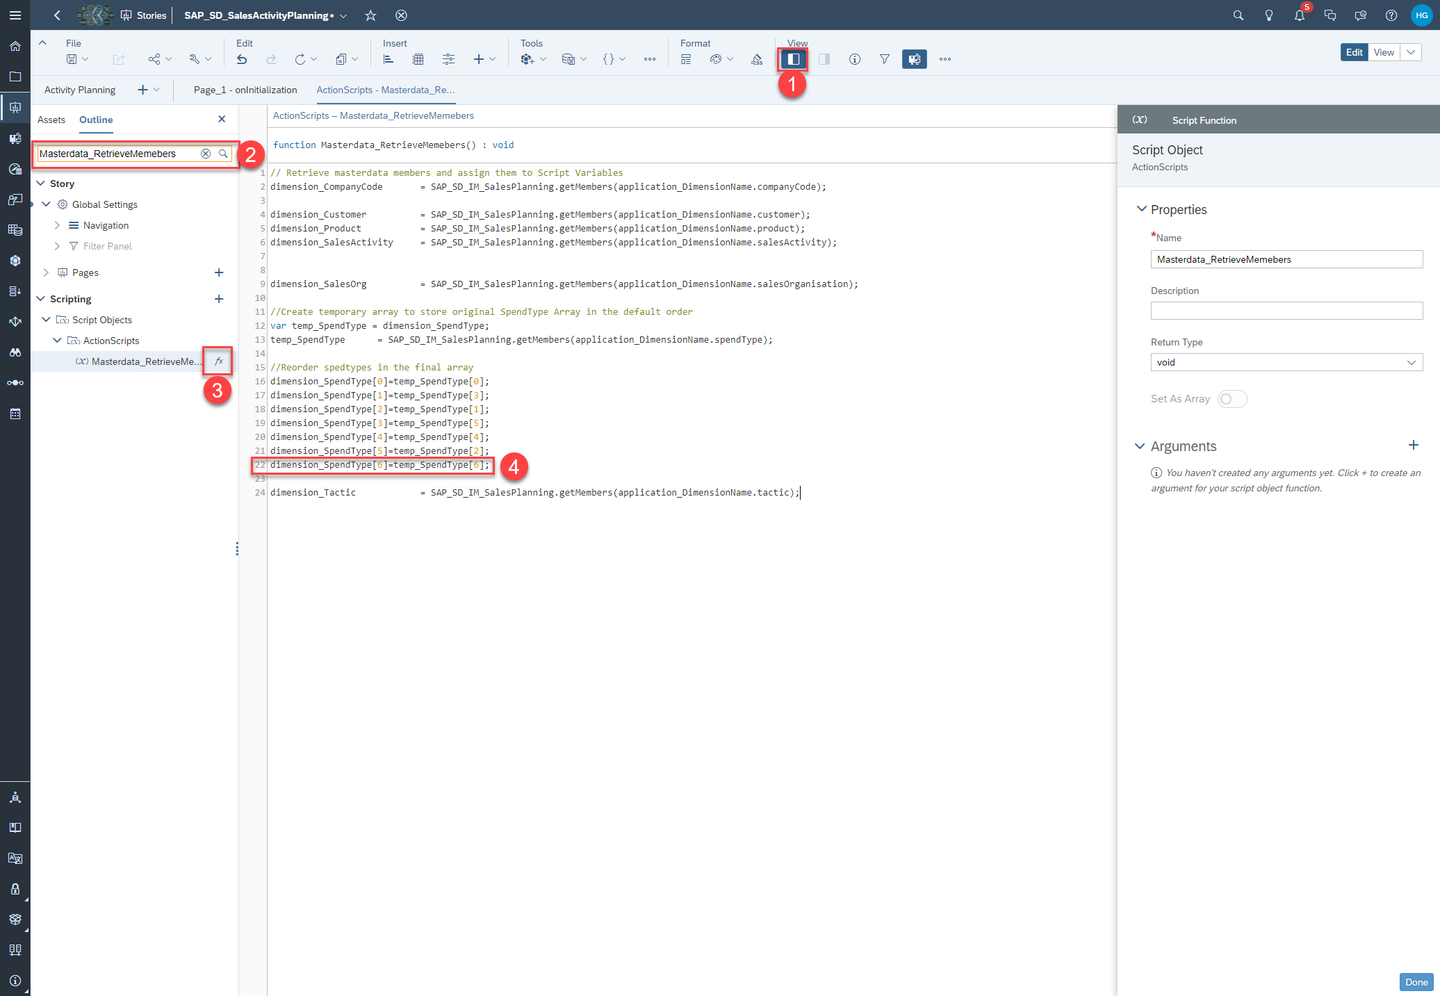
model Adjust the master data.
While the page is being initialized master data is being retrieved and stored in local variables. You need to add your new
SpendType.Click on Left Side Panel
Search for
Masterdata_RetrieveMemeberClick on Edit Scripts.
Add the following line to line 22 to add your
SpendType.dimension_SpendType[6]=temp_SpendType[6];
model Adjust the logic how the values of the rates are stored when you create a new activity.
When you save an activity the rate value is treated in two ways. It is either converted into a percentage value by dividing the entered value by one hundred or it is stored as it is. As a digression please have a look at the screenshot below. It shows the dialog for creating and editing an activity. Once you are done, you will be able to select
PremiumasSpendTypein this dialog as well. You can see the referred value.
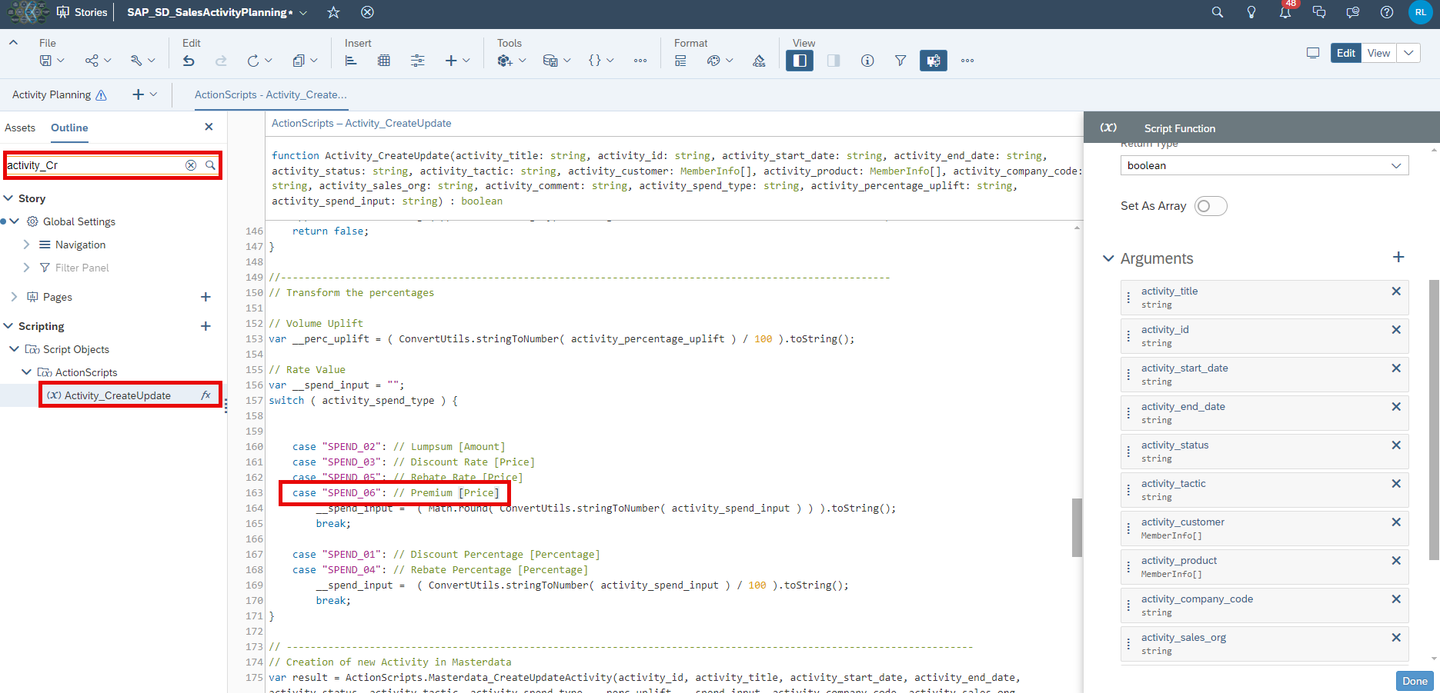
model As of now the value for
SpendType Premiumis not saved to the data model. You need to do the following change to make it happen.Search for
Activity_CreateUpdateClick on Edit Scripts.
Add the following line to line 163 to add your
SpendType.case "SPEND_06": // Premium [Price]
model Adjust the logic how the values of the rates are stored when you edit an existing activity.
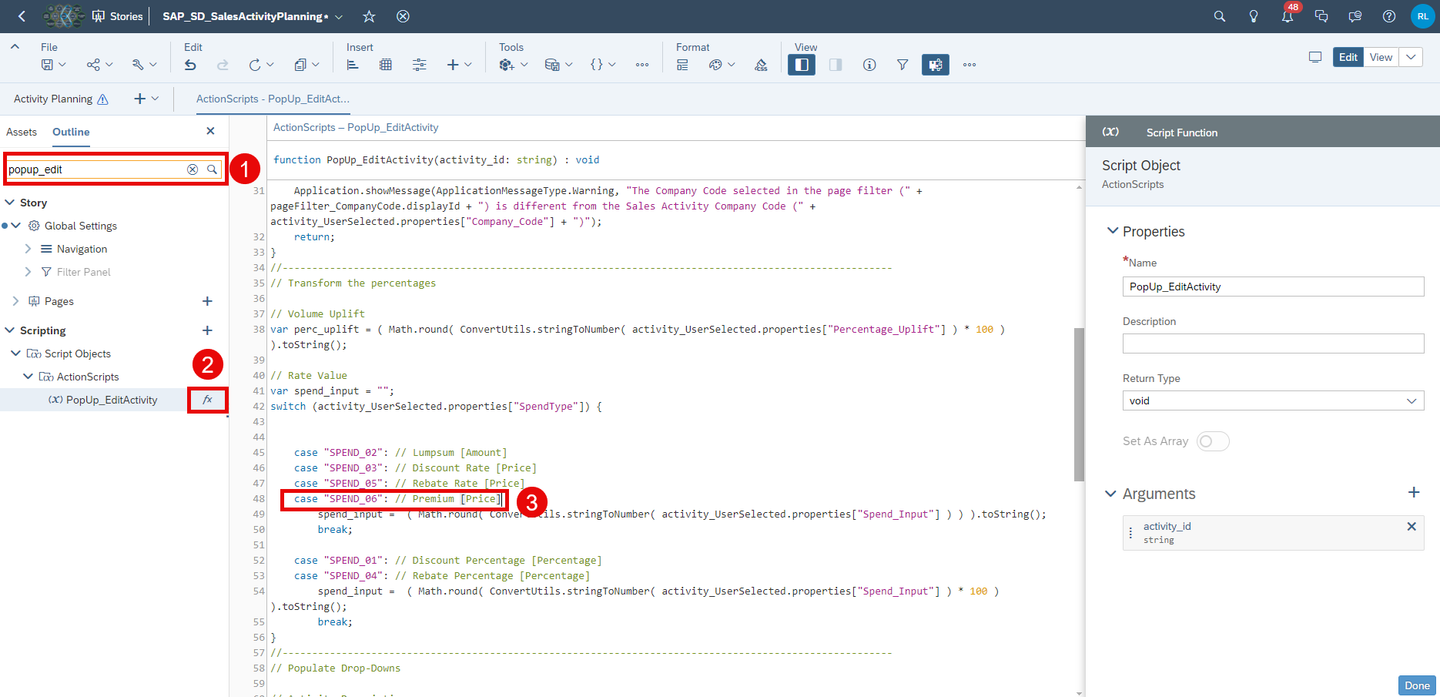
You have to do the same exercise for the
PopUp_EditActivityscript.Search for
PopUp_EditActivityClick on Edit Scripts.
Add the following line to line 48 to add your
SpendType.case "SPEND_06": // Premium [Price]
model Save your changes.
Congratulations! You have now successfully created a new SpendType and embedded it into the planning applications and stories!
If you want to learn more about the other modules of this content package, check out the following tutorials:
- xP&A Commercial Planning - Get to know the Marketing Planning module
- xP&A Commercial Planning - Get to know the Sales Planning module
- xP&A Commercial Planning - Get to know the Portfolio Planning module
If you want to customize the content and adjust it according to your own business requirements, the following resources might be helpful:
- xP&A Commercial Planning - Introduction to the Data Model
- xP&A Commercial Planning - Understanding the technical structure of Stories
- xP&A Commercial Planning - Data Integration
- xP&A Commercial Planning - Manage data loads
- xP&A Commercial Planning - Add additional sections to a story
- xP&A Commercial Planning - Add an additional story to the Navigation Menu
- xP&A Commercial Planning - Customize Default Settings
- xP&A Commercial Planning - Customize Table Settings Dialogue
- xP&A Commercial Planning (Marketing) - Add a new Driver
- xP&A Commercial Planning (Marketing) - Add a new Version
- xP&A Commercial Planning (Marketing) - Extend activity spend dates
- xP&A Commercial Planning (Sales) - Add a new Version
- xP&A Commercial Planning (Sales) - Add a new Tactic
Interested in more xP&A topics and related business content packages? Visit our community page Extended Planning & Analysis Business Content.
Resources
Discussion
Share feedback on this tutorial or join the conversation in SAP Community.