
Overview
You will learn
- How to use Google Workspace to import data from an excel sheet and create a new Google spreadsheet
- How to retrieve the details of a Google spreadsheet
- How to set the values of a specified cells range in Google Sheet


Prerequisites
Prerequisites
- Complete Google Authorization tutorial
- Install and set up the Desktop Agent 3 to run the automation
Steps
Intro
In this tutorial, you will build an automation that will import data from an excel file, create a Google spreadsheet named Order Details with the values from the excel file. The automation will then create a new Google sheet within the spreadsheet named Updated Order Status with values set to a specified cell range.
In the Lobby, select the Google Suite project that has been done as part of previous tutorials as mentioned in pre-requisites.
In Build Process Automation, choose Create and then select Automation.

Create Automation In the Create Automation window, enter Google Workspace-Sheets as name and An automation to use Google Sheets as a description.

Create Automation You will be navigate to the automation editor of the newly created automation.
You will add one input parameter.
In the Automation Details panel, under Input/Output, choose Add new input parameter.
Add an input parameter as follows:
| Field | Input Parameter 1 |
|---|---|
| Name | excelPath |
| Type | String |

In the Automation Details panel, under Automations, drag and drop the Google Authorization automation you created.

Google Authorization Automation You will import data and create a new Google spreadsheet.
In the Automation Details panel, under Tools, search for the Import and Create (Google Sheet) and drag and drop it into the workflow.
Select the activity. For the location parameter select
fileSystemand for thepathOrDriveFileIdselect0 excelPath.The location parameter refers to the type of location from which to pick the data to import and the path or drive field parameter refers to the path to the excel file stored on your local machine.

Import and Create Now search for the Rename Spreadsheet (Google Sheet) and drag and drop it into the workflow.
This activity will rename the existing Google spreadsheet.
Select the activity. For the
spreadsheetIdparameter, select the pencil next to the field to open the expression editor.In the expression editor, copy and paste the following expression:
Step2.spreadSheetDetails.spreadSheetId.
Rename Spreadsheet In the
newTitleparameter field, enterOrderDetails.This will rename the Google spreadsheet that you previously created to
OrderDetails.
Rename Spreadsheet Search for Get Spreadsheet Details (Google Sheet) activity. Drag and drop it into the workflow.
Select the activity. For the
spreadSheetIdparameter, select the pencil next to the field to open the expression editor.In the expression editor, copy and paste the following expression:
Step2.spreadSheetDetails.spreadSheetId.
Get Spreadsheet Details Now that you retrieved the details of the Google spreadsheet, you can get the details of a specific row.
Search for the Get Last Row (Google Sheet) activity to retrieve the details of last row. Drag and drop it into the workflow.
Select the activity. For the
spreadSheetIdparameter, select the pencil next to the field to open the expression editor.In the expression editor, copy and paste the following expression:
Step2.spreadSheetDetails.spreadSheetId.
Get Last Row For the
sheetTitleparameter, select the pencil next to the field to open the expression editor.In the expression editor, copy and paste the following expression:
Step2.spreadSheetDetails.sheets[0].title.This specifies the name of the sheet in which you want to get the last row.

Get Last Row Search for the Get Cell Values (Google Sheet) activity. Drag and drop it into the workflow.
This activity returns the values of the specified cell range in Google.
Select the activity. For the
spreadSheetIdparameter, select the pencil next to the field to open the expression editor.In the expression editor, copy and paste the following expression:
Step2.spreadSheetDetails.spreadSheetId.
Get Cell Values Under the range parameter field, select Custom Data.
For the
sheetTitleparameter, select the pencil next to the field to open the expression editor.In the expression editor, copy and paste the following expression:
Step2.spreadSheetDetails.sheets[0].title.
Get Cell Values For the
startRangeparameter, enter A1.For the
endRangeparameter, select the pencil next to the field to open the expression editor.In the expression editor, copy and paste the following expression:
"A" + Step5.lastRow.Finally, for the
majorDimensionparameter, select rows.
Get Cell Values You will now add a sheet. To do so, search for the Add Sheet (Google Sheet) activity. Drag and drop it into the workflow.
Select the activity. For the
spreadSheetIdparameter, select the pencil next to the field to open the expression editor.In the expression editor, copy and paste the following expression:
Step2.spreadSheetDetails.spreadSheetId.You will rename this new sheet to Updated Order Status. To do so, search for the Rename Sheet (Google Sheet). Drag and drop it into the workflow.
Select the activity. For the
spreadSheetIdparameter, select the pencil next to the field to open the expression editor.In the expression editor, copy and paste the following expression:
Step2.spreadSheetDetails.spreadSheetId.For the
sheetIdparameter, select the pencil next to the field to open the expression editor.In the expression editor, copy and paste the following expression:
Step7.sheetDetails.sheetId.
Rename Sheet For the
newTitleparameter, enterUpdatedOrderStatusand select the text in quotes.
Rename Sheet Search for the Set Cell Values (Google Sheet) activity. Drag and drop it into the workflow.
With Set Cell Values (Google Sheet) activity you push the values of a specified cell range in to Google sheet.
Select the activity. For the
spreadSheetIdparameter, select the pencil next to the field to open the expression editor.In the expression editor, copy and paste the following expression:
Step2.spreadSheetDetails.spreadSheetId.For the range parameter, select Custom Data.
For
sheetTitleparameter, enterUpdatedOrderStatusand select the text in quotes.For the
startRangeparameter, enter A1 and select the text in quotes.For the
endRangeparameter, select the pencil next to the field to open the expression editor.In the expression editor, copy and paste the following expression:
"A" + Step5.lastRow.For the values parameter, select the pencil next to the field to open the expression editor.
In the expression editor, copy and paste the following expression:
Step6.cellsData.values.
Set Cell Values For
majorDimensionparameter, select rows and forvalueInputOptionparameter, selectuserEntered.
Set Cell Values Drag and drop another Set Cell Values (Google Sheet) activity.
Select the activity. For the
spreadSheetIdparameter, select the pencil next to the field to open the expression editor.In the expression editor, copy and paste the following expression:
Step2.spreadSheetDetails.spreadSheetId.For the range parameter, select Custom Data.
For
sheetTitleparameter, enterUpdatedOrderStatusand select the text in quotes.For the
startRangeparameter, enter B1 and select the text in quotes.For the
endRangeparameter, select the pencil next to the field to open the expression editor.In the expression editor, copy and paste the following expression:
"B" + Step5.lastRow.
Set Cell Values For the values parameter, select the pencil next to the field to open the expression editor.
In the expression editor, copy and paste the following expression:
['Order Status', 'Delivered', 'Delivered', 'In Time', 'In Time', 'Delivered', 'In Time', 'Delivered', 'In Time', 'In Time', 'Delivered'].
Set Cell Values For the
majorDimensionparameter, select rows.Finally, you need to disconnect the Google Account.
Search for the Disconnect (Google) activity and drag and drop it into the workflow.
Save your work.

Disconnect Google
Choose Test.
Fill in the Input parameters:
- For
excelPath: the full path to the excel file
- For
Fill in the Environment Variables:
- For
userEmail: your Gmail user email - For
serviceAccountKeyPath: the full path to the json file
- For
Choose Test.

Test The testing was successful.

Test result If you go to your Google Account>Google Apps>Sheets you will see the created
OrderDetailsspreadsheet. Upon opening it, you will see the values from the excel file were imported on sheet1 and a new sheet was created namedupdatedOrderStatuswith the corresponding values that were set in your automation.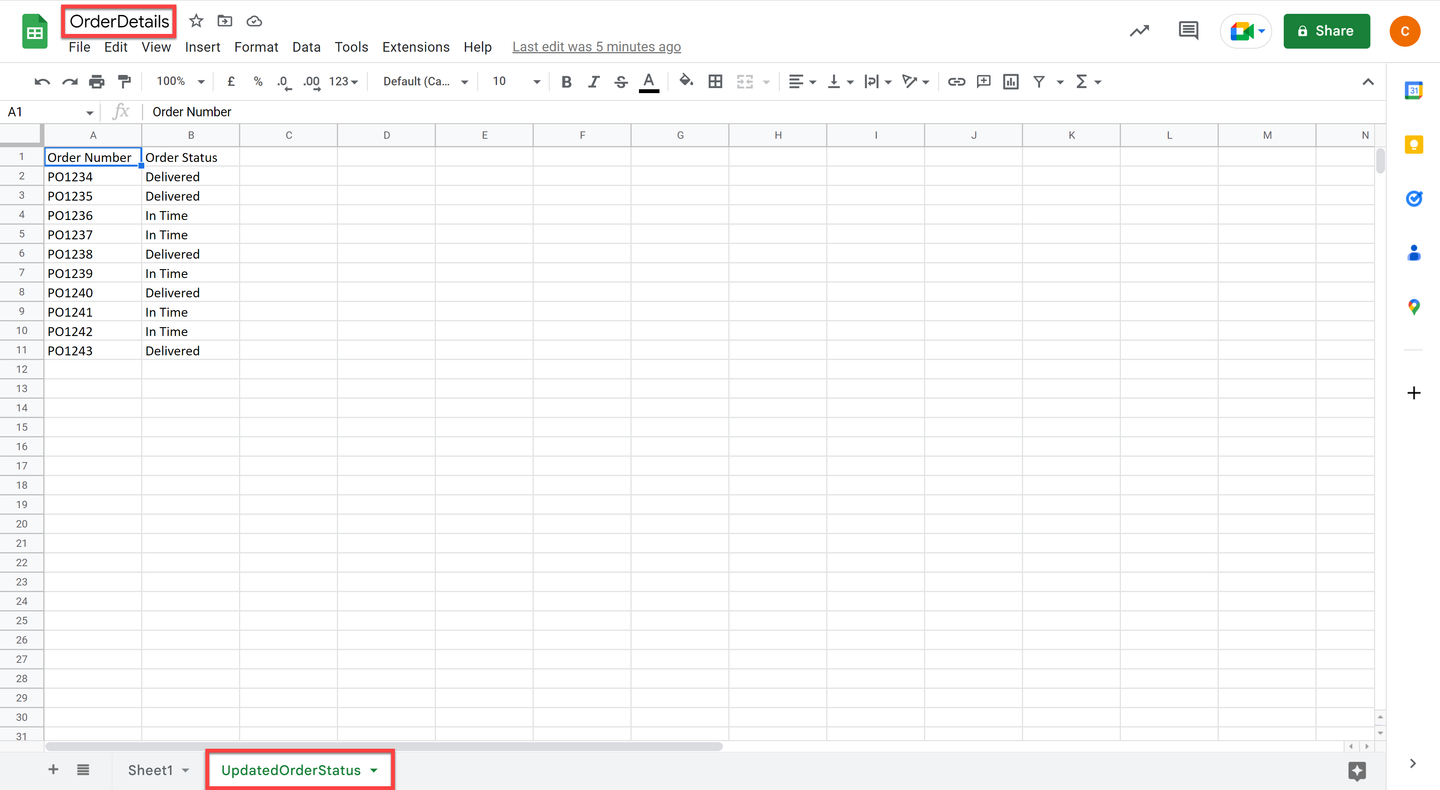
Test result
Resources
Discussion
Share feedback on this tutorial or join the conversation in SAP Community.