
Overview
You will learn
- How to design an automation that will retrieve order details from an application and read them on excel.


Prerequisites
Steps
Now you will create your automation.
In the Overview of Build Process Automation, choose Create and select Automation.

Create Automation In the Create Automation window, name the automation Get Order Details Assistant, add a description and choose Create.

Create Automation You will be navigated to the Get Order Details Assistant automation editor.
You will now create a User Task that will prompt you if you want to retrieve the details on an excel sheet.
Navigate back to the Overview tab, choose Create and User Task.

Create User Task In the Create User Task window, under the Name field enter Order Details Assistant.
You can enter a description and choose Create.
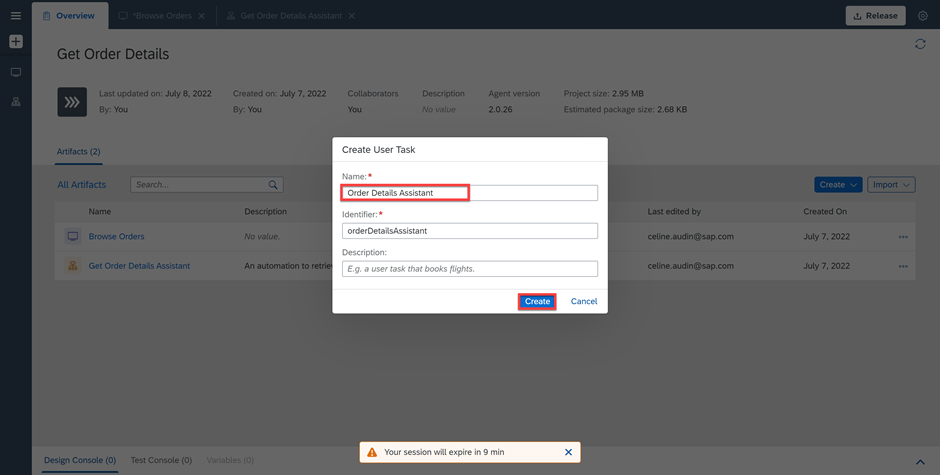
Create User Task You will be navigated to the User Task you just created.
You can now drag and drop components to build your user task. Drag and drop the component Title.

User Task Select the title and enter the following question: Do you wish to retrieve the order details in an Excel worksheet? under the text field, then select the text in quotation marks and hit enter.
Choose + Click to Add a Reject Decision.

User Task Now you have a Continue and Reject button. Choose Save.

User Task
You will now design the automation Get Order Details Assistant.
Navigate back the Overview tab, choose Get Order Details Assistant.

Choose Automation You will be navigated to the automation editor where you can start dragging and dropping activities into the workflow.
In the Automation Details panel, under User tasks, choose the Order Details Assistant user task you just created and drag and drop it into the workflow.

Automation User Task Now search for the Log Message activity and drag and drop it into the workflow.
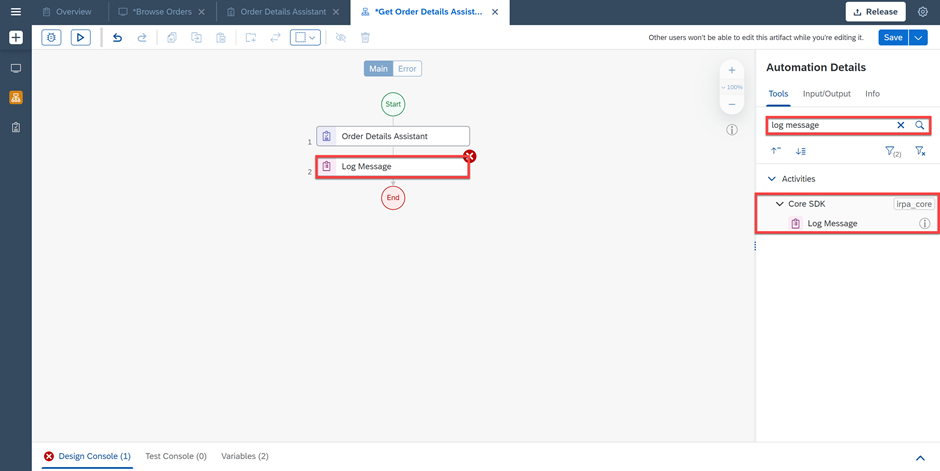
Automation Log Message Select the Log Message activity. Under Input Parameters, select
1 decisionas message.This refers to the decision made: either Approve or Reject.
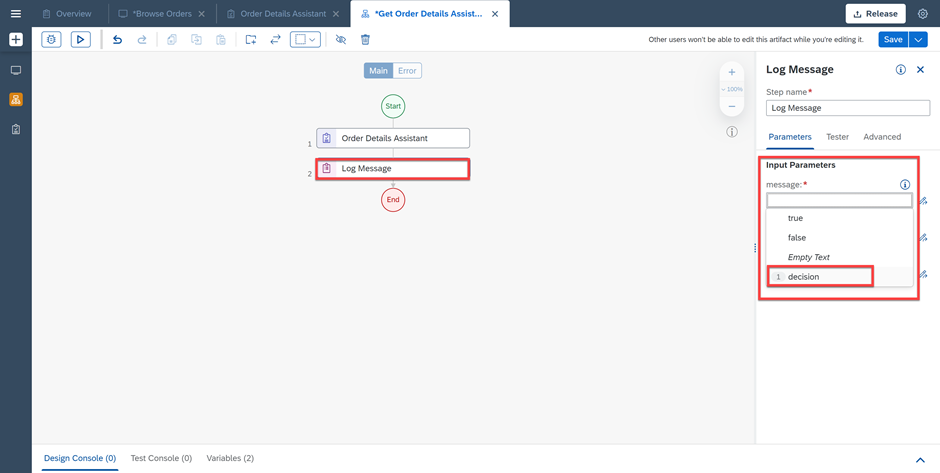
Automation Log Message Search for the Condition control and drag and drop it into the workflow.

Automation Condition Select the Condition control and under the Condition Expression, choose the three dots to edit the formula.
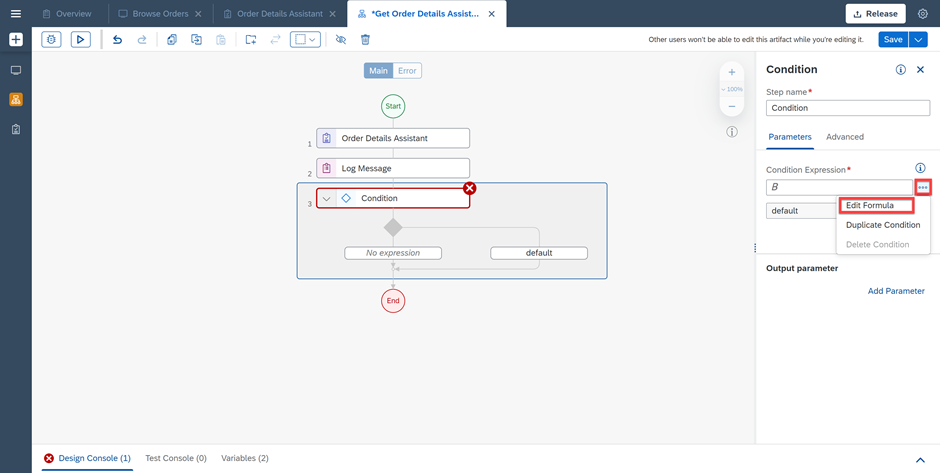
Automation Condition Select the decision variable and add == “approve”.
Choose Save Expression.

Edit expression This means that if the decision approve is selected, the bot will retrieve the details in an excel spreadsheet.
Search for the Log Message activity and drag and drop two Log Message activities under the first and second branch of the Condition.
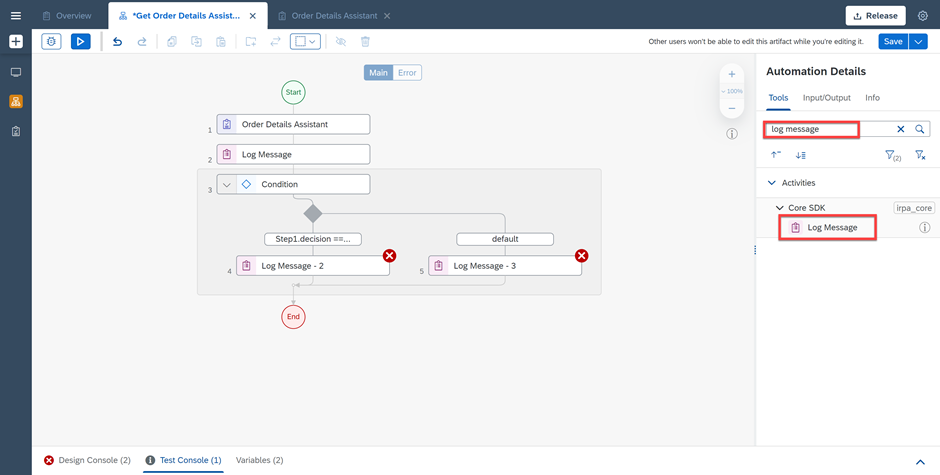
Log messages Now select the first Log Message and under the Input Parameters as a message, enter Confirmed and select the text in quotation marks and hit enter.
Do the same for the second Log Message but this time enter Declined as a message under Input Parameters.
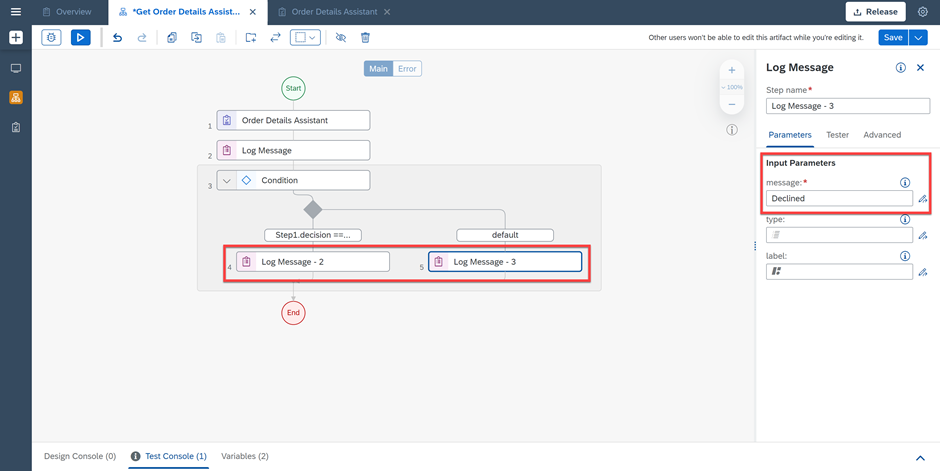
Log messages Change the names of the Log Message step names to Log Message - Confirmed and Log Message - Declined.
Now you will add the screen you captured. Under Automation Details, choose Screens and select Order Details.
Drag and drop the screen into the workflow, just below the first condition branch.
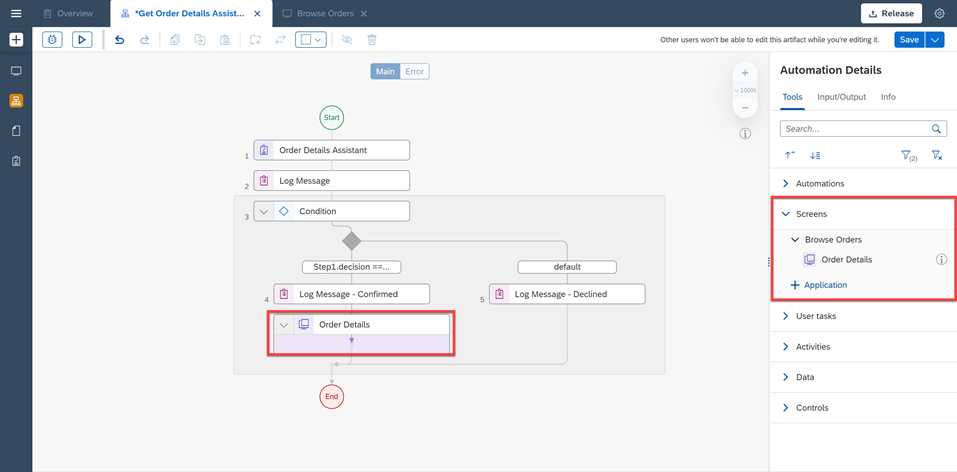
Order Details screen You will now drag and drop the activities you want your automation to perform to the corresponding element you previously declared on the screen.
For instance, you will drag and drop three Get Element activities to get the Customer Name, the Order Amount and Order Reference.
Double click on the Order Details screen, under the Screen panel, search for the Get Element activity.
Drag and drop it on the Customer Name element you previously declared.

Get Element Customer Name Under Get Element activity, set the Output Parameters to
5 customerName.
Get Element Customer Name Now perform the same for Order Amount and Order Reference, setting the Output Parameters to
6 orderAmountand7 orderReferencerespectively.
Get Element Save your work.
Now you will create the Shipping Address Group that will group all the Shipping Address details.
Click on the canvas to go back to the Automation Details. Search for the Group control and drag and drop it into the workflow just below the Get Element Order Reference activity.

Group Select the Group control and change the Step Name to Group Shipping Address.
You may change the color of your Group so it stands out in the workflow.

Group Double click on the Order Details screen on your workflow.
Now you will get the elements corresponding to the Shipping Address details.
Search for the Get Element activity and drag and drop it on the Shipping Address Name element on the screen.

Group Set the Output Parameters to
8 addressName.Drag the Get Element Shipping Address Name activity and put it in the Group Shipping Address.

Group Now perform the same actions for :
- Shipping Address Street, setting the Output Parameters to
9 addressStreet. - Shipping Address Zip Code City, setting the Output Parameters to
10 addressZipCodeCity. - Shipping Address Region, setting the Output Parameters to
11 addressRegion. - Shipping Address Country, setting the Output Parameters to
12 addressCountry.
- Shipping Address Street, setting the Output Parameters to
Save your work.
This is the expected result of your Automation at the end of this step:

Group Shipping Address
Download the Order Details Assistant excel file.
Once you have downloaded your excel template file, you will add it to your artifacts.
Go back to the Overview tab.
Choose Import and then File.
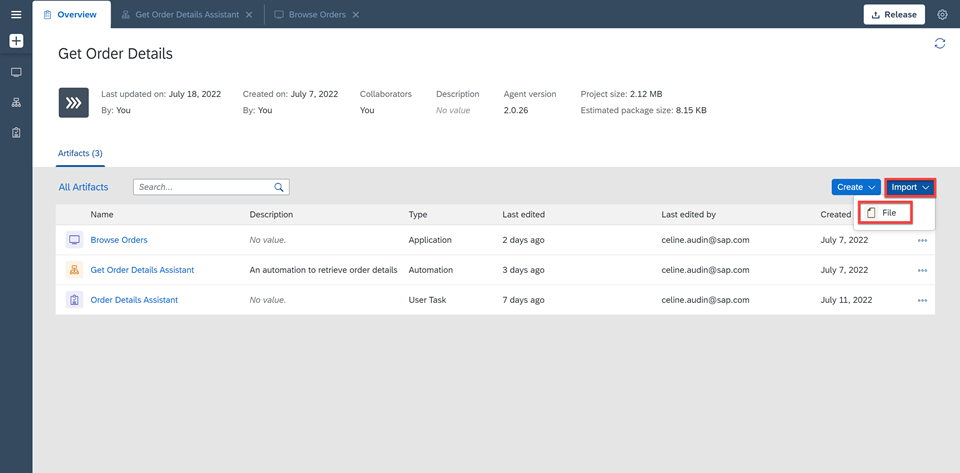
Import file Fill in the Import File window.
Choose Import.
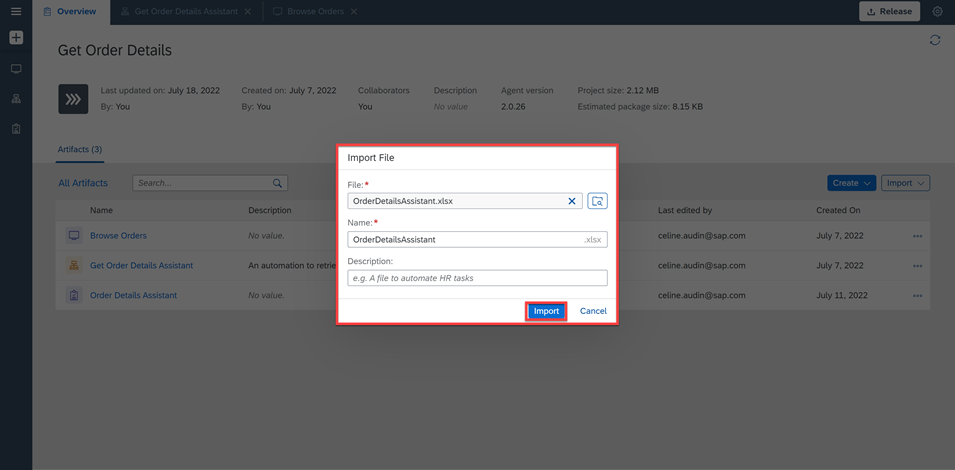
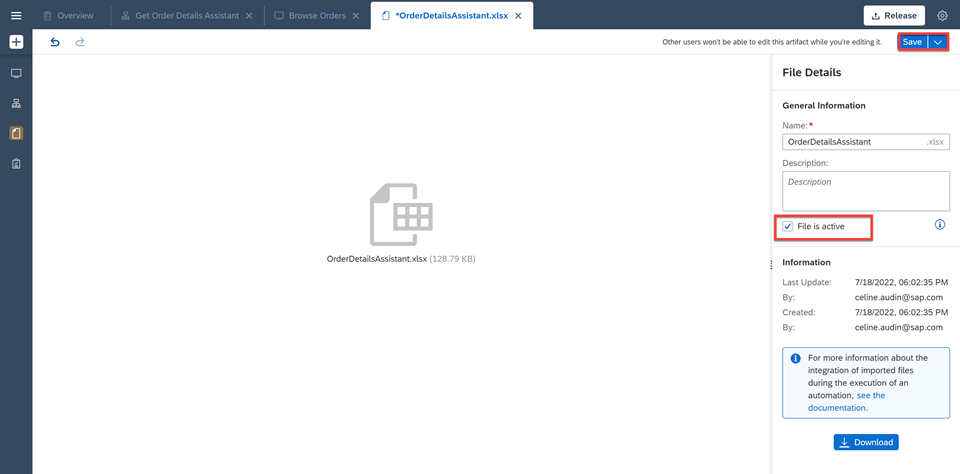
Import file The file has been imported successfully.
Check File is active, this way you may use it in your automation.
Choose Save.
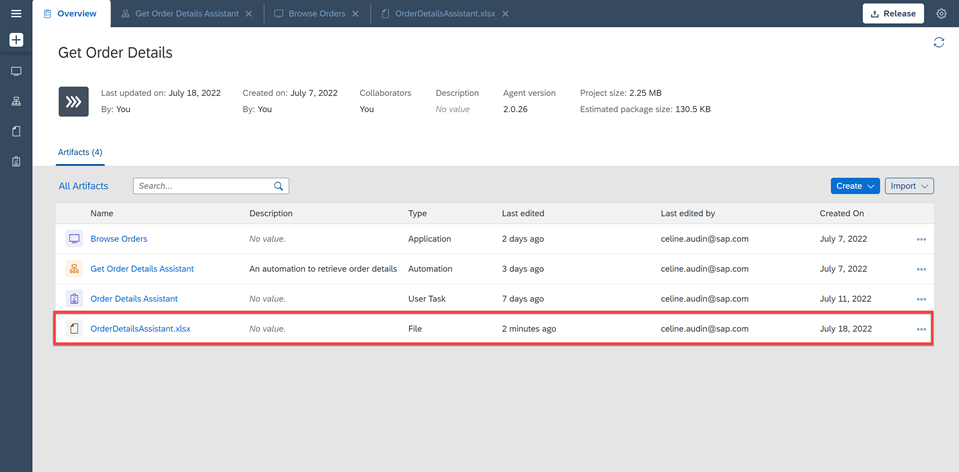
Import file If you go back to the Overview tab, you will see that the file has been added as an artifact.
Import file
You will now create the Excel Group that will group all the excel activities that are necessary to retrieve the order details into an excel spreadsheet.
Go back to the automation workflow. Under Automation Details, search for the Group control.
Drag and drop it into the workflow just below the Group Shipping Address.

Group Excel Select the Group control and change the Step Name to Group Excel.
You may change the color of your Group so it stands out in the workflow.

Group Excel Under Automation Details, search for the Open Excel Instance activity.
This is a mandatory activity when using MS Excel, it opens an instance of MS Excel. Once you open an Excel instance, you can start using other MS Excel activities.
Drag and drop it into the workflow inside the Group Excel.

Open excel Now search for the Open Workbook activity and drag and drop it in the Group Excel under Open Excel Instance.
Select the activity and under Input Parameters, choose the pencil icon next to the
workbookPathfield.Edit the Expression to:
irpa_core.enums.path.files + '/OrderDetailsAssistant.xlsx'Choose Save Expression.

Open Workbook This action opens the excel template that was just imported so that it can receive the details that need to be set in it.
This is the excel template Order Details Assistant that was just imported. You will now set the values of a specified cells range (order details) in the worksheet: Order Reference (D5), Customer Name (D6), and Order Amount (D7).
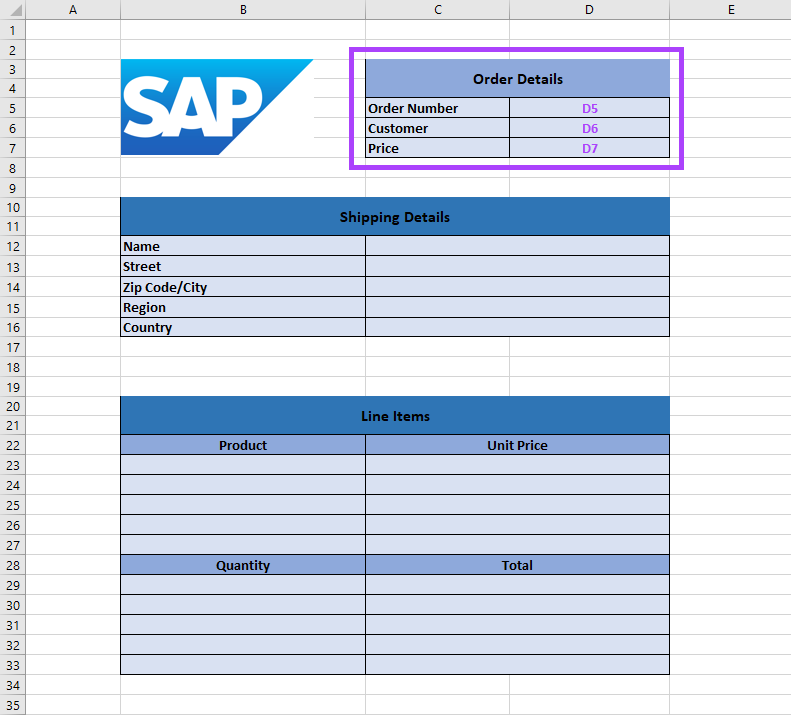
Set Values Order Details Under Automation Details, search for the Set Values (Cells) activity.
Drag and drop it into the workflow under the Open Workbook activity.

Set Values Select the activity and change the Step Name to Set Values - Customer Name.
Under Input Parameters, set the range Definition to D6 and select the text in quotation marks.
For the values select
5 customerName.
Set Values Now perform the same actions using the details in the table below :
Activity Step Name range Definition values Set Values Set Values - Order Amount D7 6 orderAmountSet Values Set Values - Order Reference D5 7 orderReferenceSave your work.
At this step, your automation should look like this :

Set Values
Now that you have set the values for Customer Name, Order Amount and Order Reference, you will set the values for the Shipping Address Details.
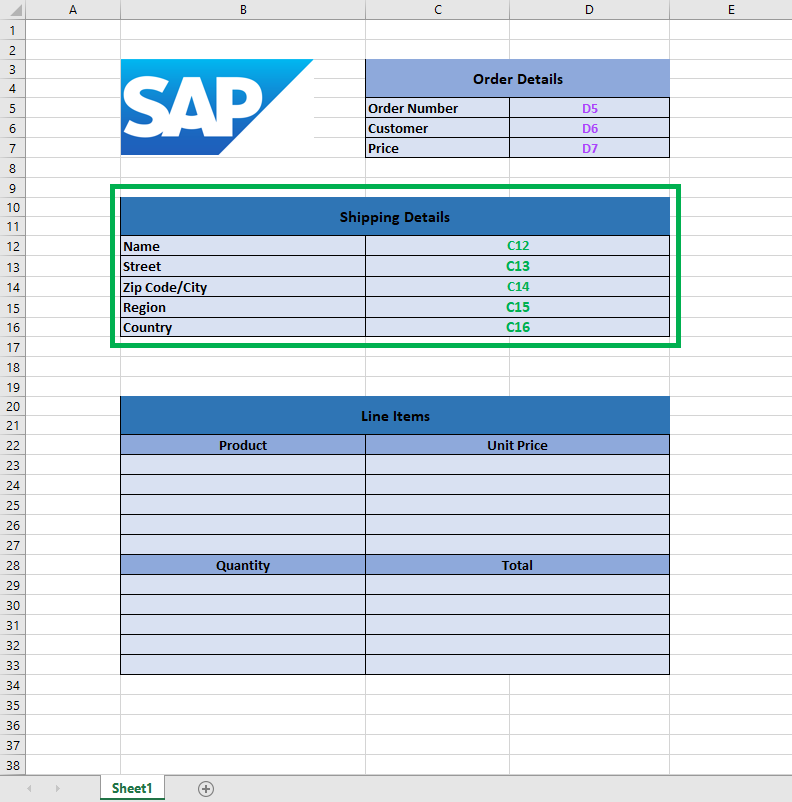
Under Automation Details, search for the Group control.
Drag and drop it into the workflow in the Group Excel just below Set Values-Order Reference activity.

Group Shipping Address Details Select the Group control and change the Step Name to Group Shipping Address Details.
You may change the color of your Group so it stands out in the workflow.
Search for the Set Values (Cells) activity.
Drag and drop it into the workflow inside the Group Shipping Address Details.
Select the activity and change the Step Name to Set Values - Address Name.
Under Input Parameters, set the
rangeDefinitionto C12 and choose the text in quotation mark.For the values, select
8 addressName.
Group Shipping Address Details Now perform the same actions using the details in the table below :
Activity Step Name range Definition values Set Values Set Values - Street C13 9 addressStreetSet Values Set Values - Zip Code City C14 10 addressZipCodeCitySet Values Set Values - Region C15 11 addressRegionSet Values Set Values - Country C16 12 addressCountrySave your work.
At this step, your automation should look like this :

Group Shipping Address Details
You will now retrieve the values in the Line Items table and set them in excel.
Under Automaton Details, search for the Group control.
Drag and drop it into the workflow in the Group Excel just below the Group Shipping Address Details.

Group Line Items Select the Group control and change the Step Name to Group Line Items.
You may change the color of your Group so it stands out in the workflow.
Double click on the Order Details screen to have a view of the screen.
Under the Screen panel, search for the For Each control.
Drag and drop the control on the Table Row that you previously declared.
Select the Item: Table Row with Index: all.

For Each Drag the For Each control inside the Group Line Items.
Change the Step Name of the For Each loop to: For Each Line Items Row.

For Each Now you will get the item values inside the table. Double click on the Order Details screen.
Search for the Get Element activity.
Drag and drop it into the workflow, just below the For Each Line Items Row.
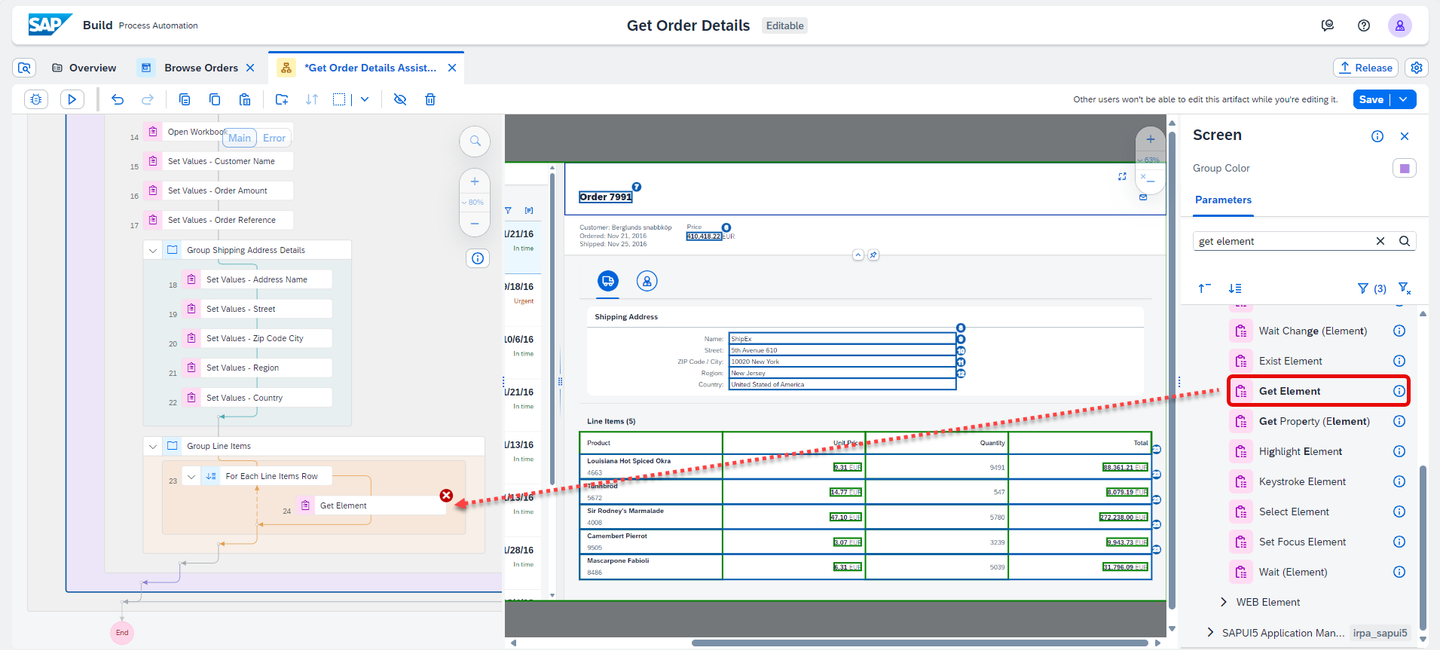
Get element Change the Step name to Get Line Items Table Product.
Open the target editor to set the target element.
Select Table Product element.
Choose
23 indexas index of the element.Choose Confirm.
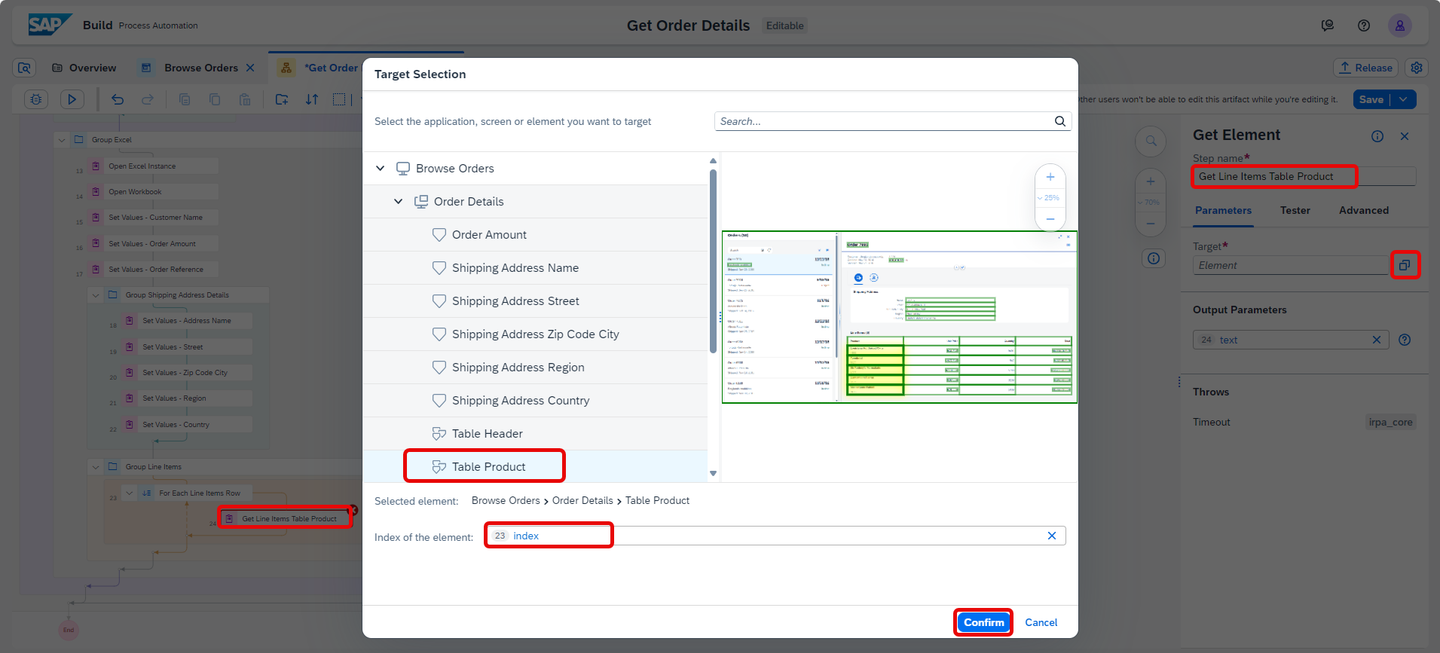
Get element For Output Parameters, change the text to
25 tableProduct.
Get Line Items The last step will be to set these Line Items values in the Excel spreadsheet.

Set Values Line Items To do so, under Automation Details, search for the Set Values (cells) activity.
Drag and drop the activity into the workflow, just below Get Line Items Table Product.

Set Values Now select the activity and change the Step name to Set Table Product.
Under Input Parameters, open the expression editor to set the range Definition.
In the Edit Expression window, set the following expression:
"B" + (Step23.index + 23)
Set Values Under Input Parameters, set the values to
24 tableProduct.Save your work.

Set Values You have set the values of the Product Name into the excel spreadsheet. Now you will repeat the above steps for the other Line Items such as Unit Price, Product Quantity and Total Price.
Similarly, drag and drop Get Element activities and Set Values (Cells) activities respectively into the workflow and for each Line Items: Unit Price, Product Quantity and Total Price.
For Get Element activities, perform the same actions using the details in the table below:
Activity Step Name target Output Parameters Get Element Get Line Items Table Unit Price Browse Orders > Order Details > Table Unit Price > index 26 tableUnitPriceGet Element Get Line Items Table Quantity Browse Orders > Order Details > Table Quantity > index 28 tableQuantityGet Element Get Line Items Table Total Browse Orders > Order Details > Table Total > index 30 tableTotalPlease make sure not to copy and paste the
targetvalues directly in the field but to follow the steps mentioned above.For Set Values (Cells) activities, perform the same actions using the details in the table below :
Activity Step Name range Definition values Set Values (cells) Set Table Unit Price "C" + (Step23.index + 23)26 tableUnitPriceSet Values (cells) Set Table Quantity "B" + (Step23.index + 29)28 tableQuantitySet Values (cells) Set Table Total "C" + (Step23.index + 29)30 tableTotalPlease make sure not to copy and paste the
rangeDefinitionvalues directly in the field but to follow the steps mentioned above.Your automation should look like this:
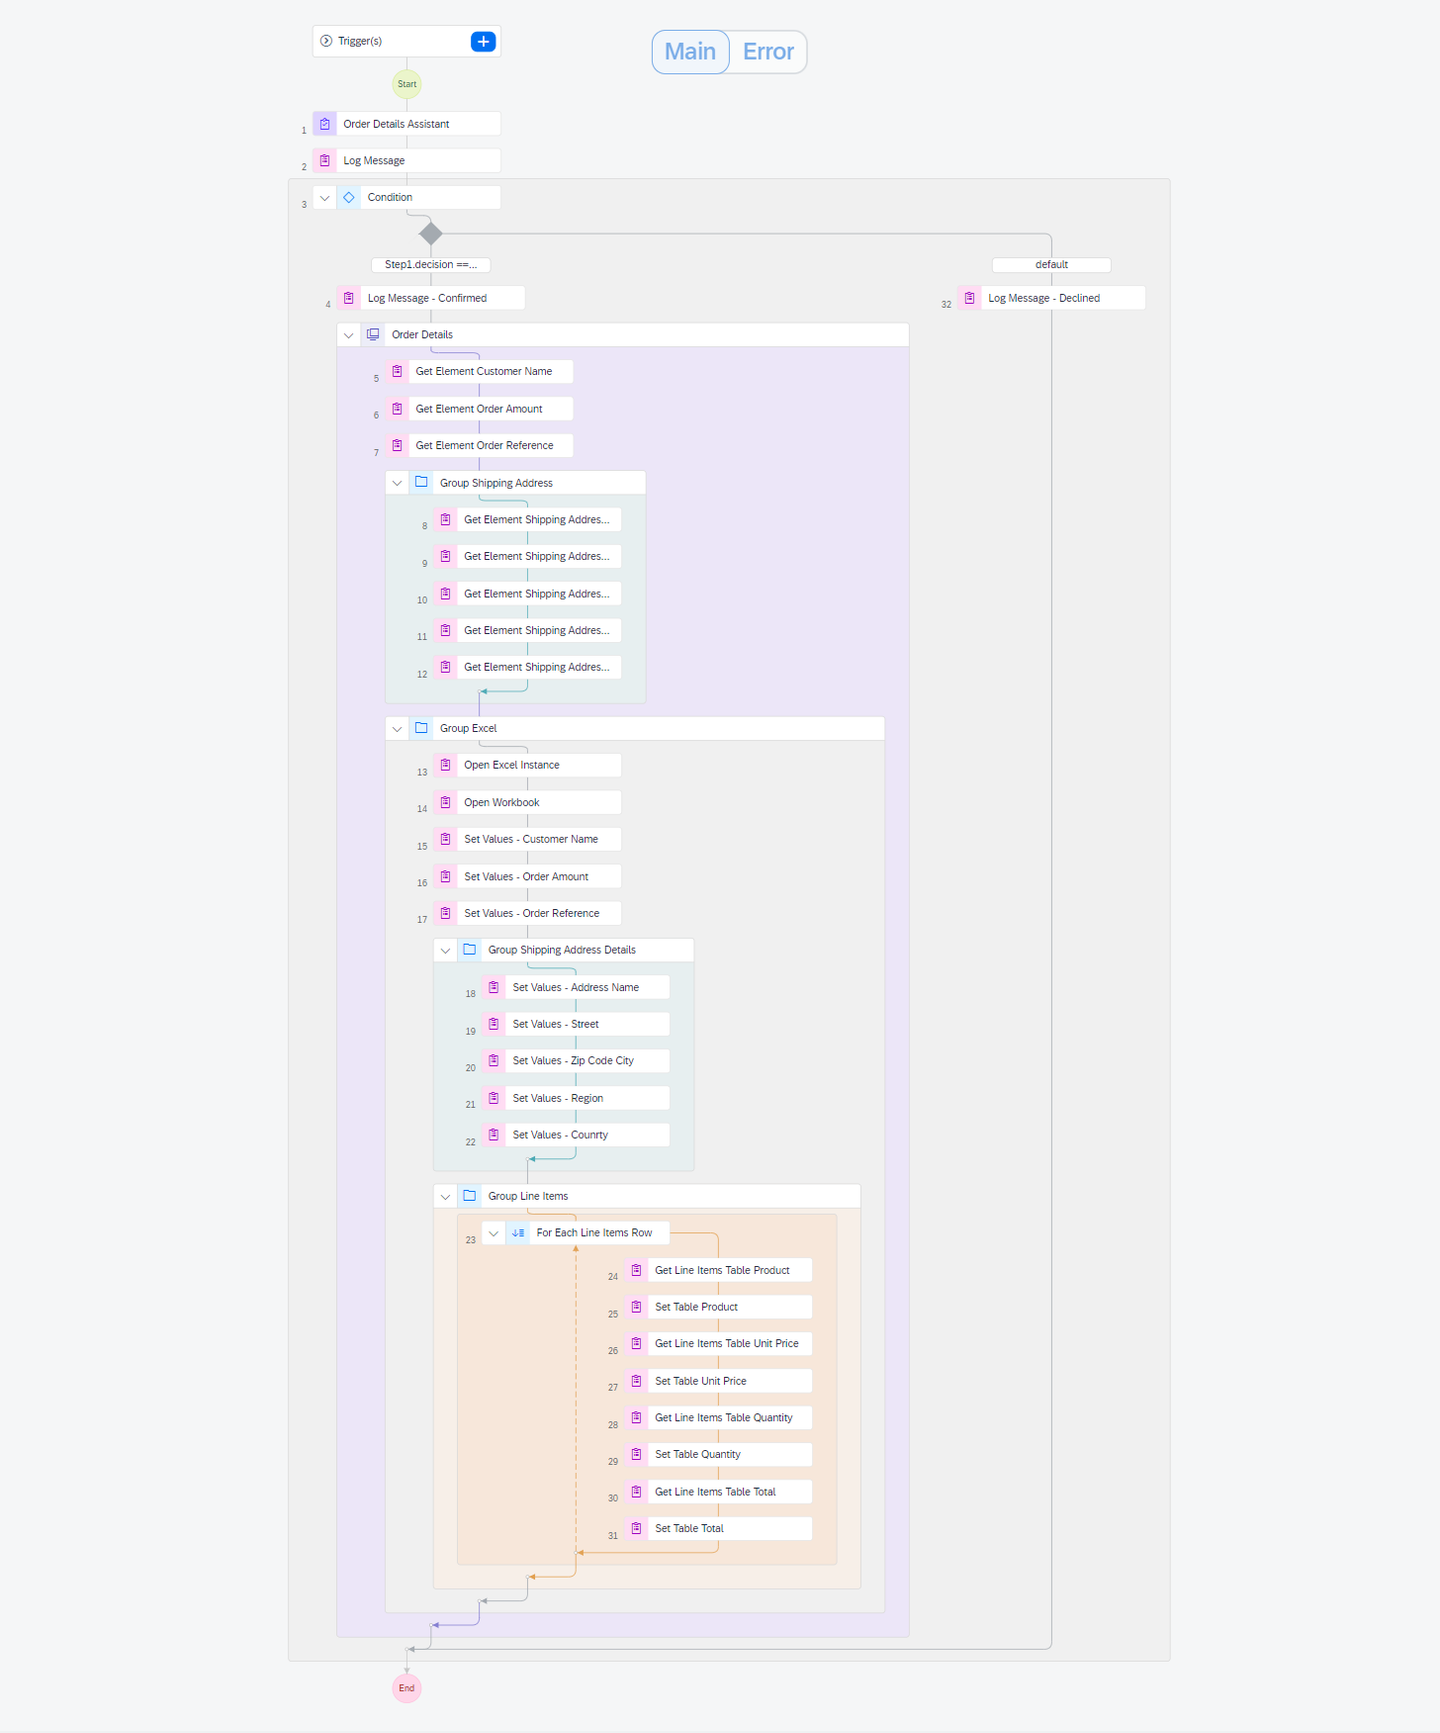
Final automation
The last step consists in saving the workbook you created and releasing the excel instance.
To do so, under Automation Details, search for the Save As Workbook activity.
Drag and drop the activity into the workflow in the Group Excel just below the Group Line Items.

Save Workbook Under Input Parameters, fill in the file Path field with the destination you wish to save your workbook.
Now search for the Release Excel Instance activity.
Drag and drop it into the workflow, just below Save As Workbook activity.
Save your work.
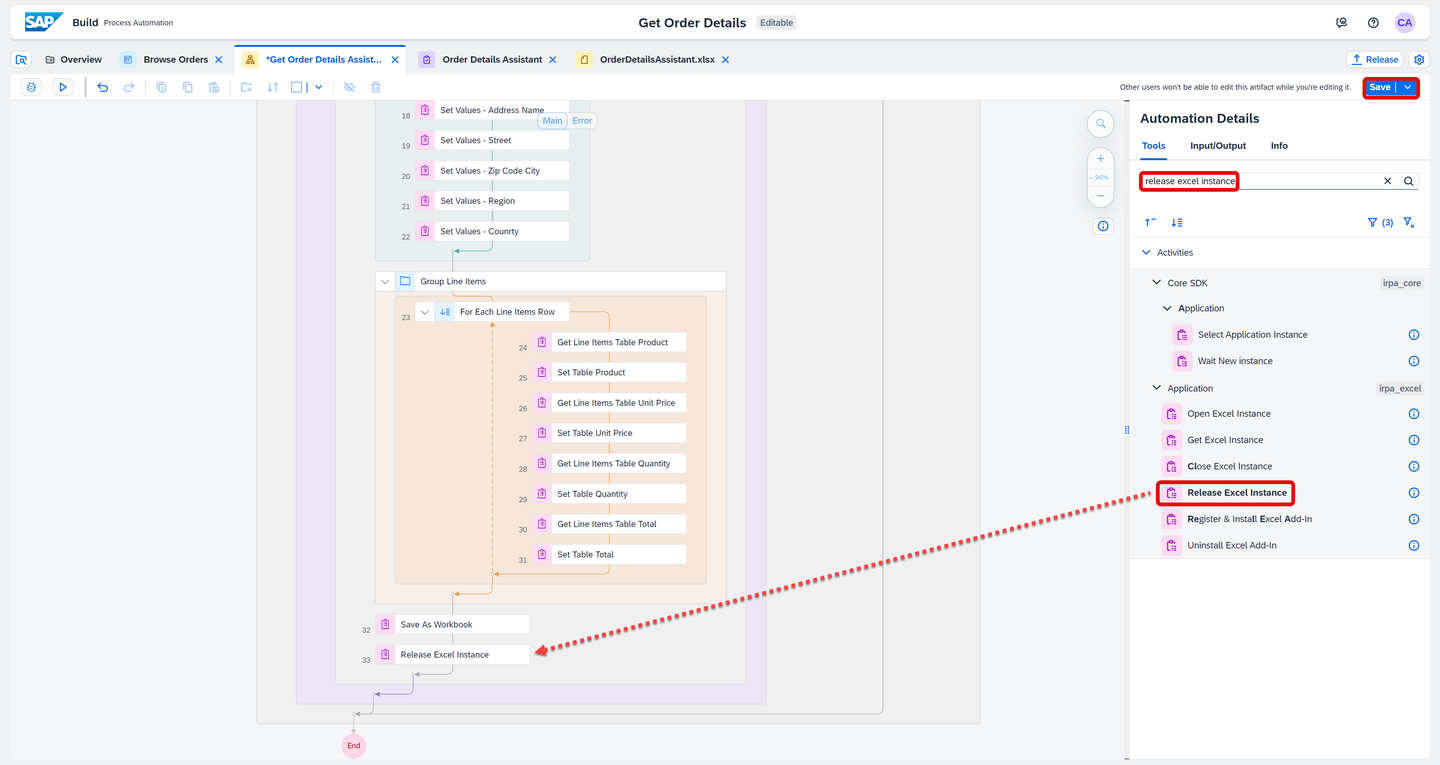
Release Excel Instance This is what your final automation should look like:
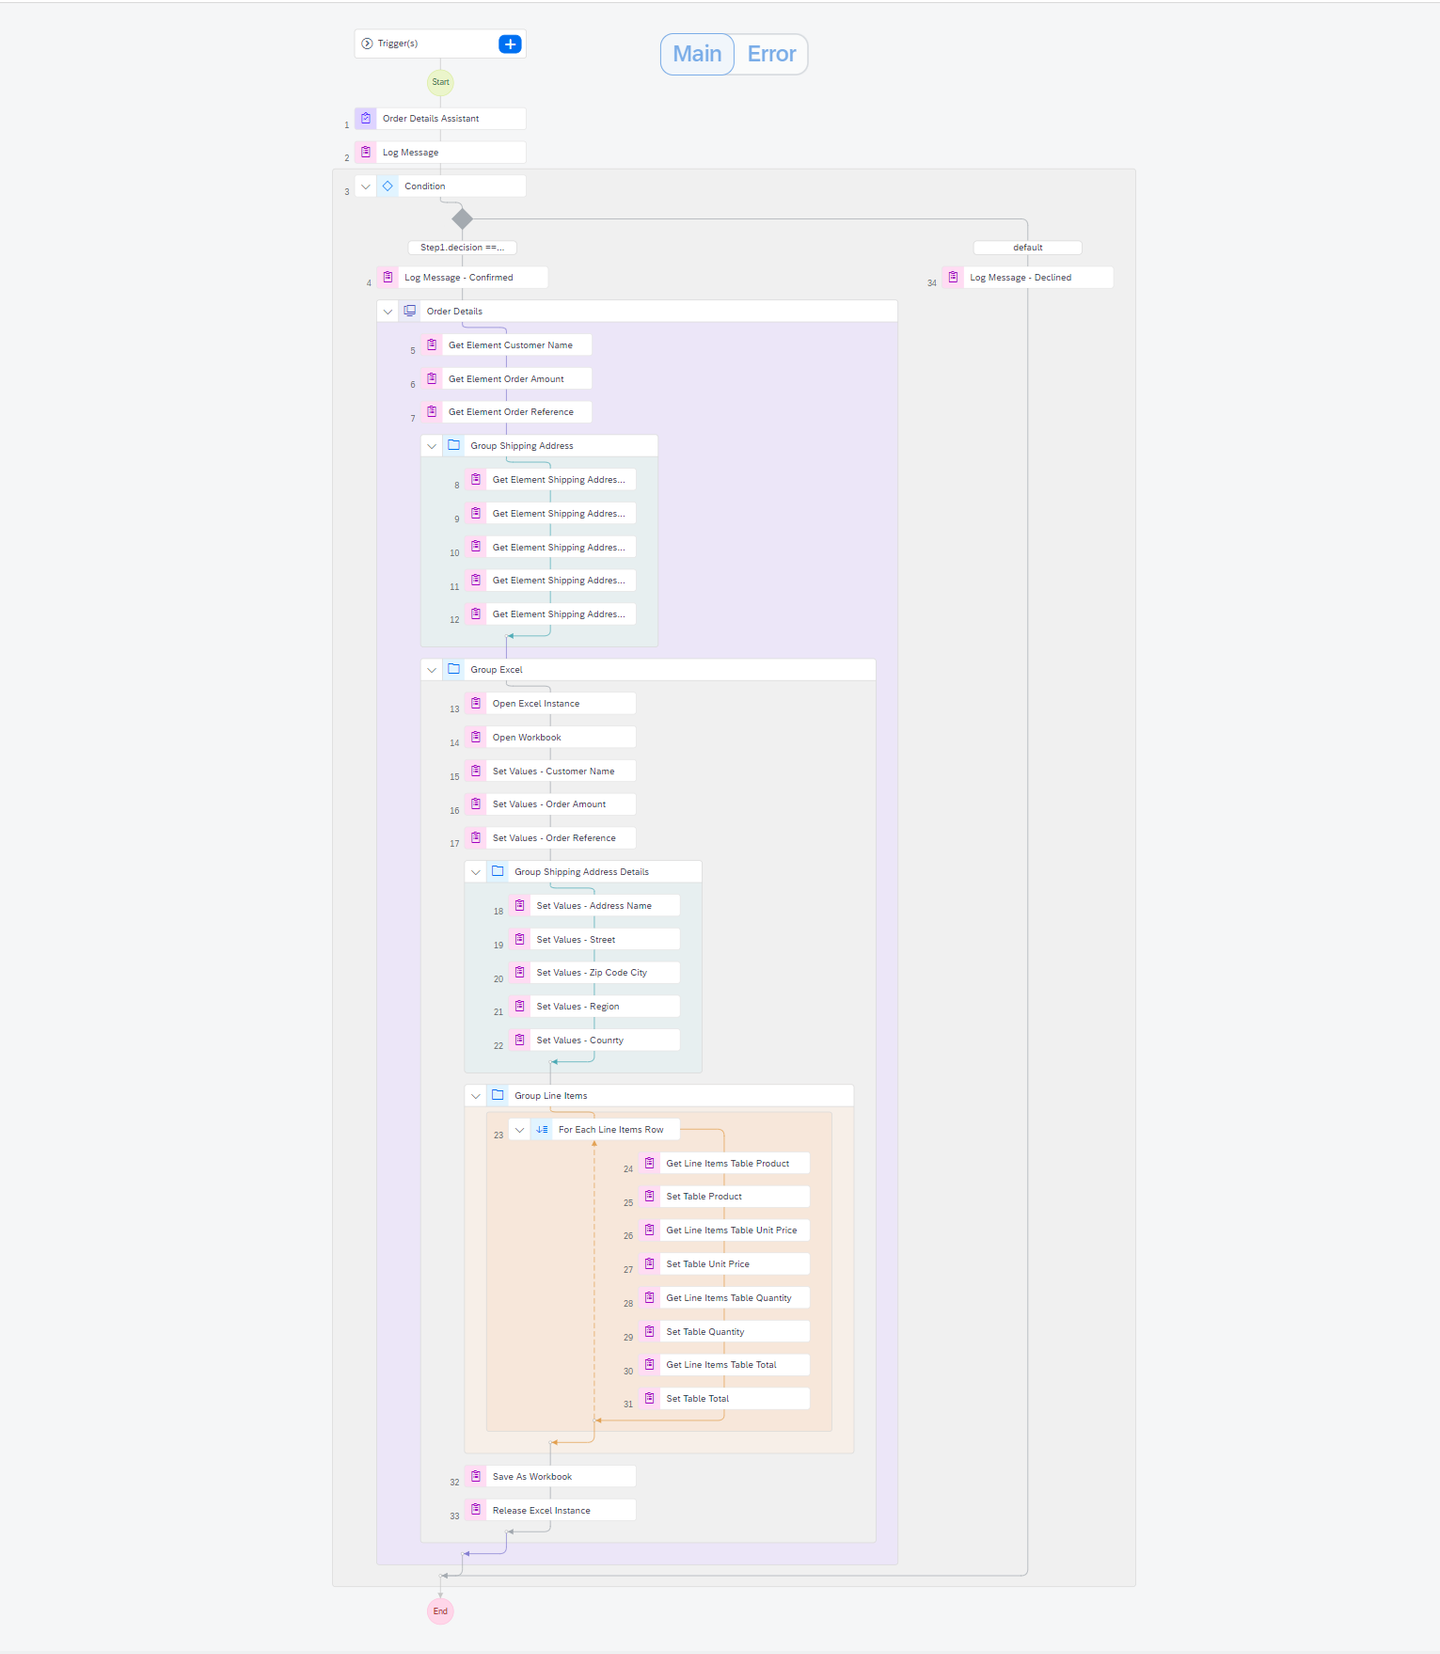
Final Automation
Resources
Discussion
Share feedback on this tutorial or join the conversation in SAP Community.