
Overview
You will learn
- How to use Outlook SDK of SAP Build Process Automation to
- Download attachments from an email
- Reply to an email


Prerequisites
Prerequisites
Steps
Intro
SAP Build Process Automation has native integration to several Microsoft Office products including Outlook, Excel SDK. In this Tutorial, you will extend additional capabilities of Outlook SDK to your automations.
As a first step, since an email search can result in multiple emails, customize your automation project to handle multiple emails in the search context.
SAP Build Process Automaton comes handy with several loop controls. Add a Forever loop activity after Log Message. You can read more about it from the documentation.

Add Forever Loop Activity Forever loop needs to make sure it is executed until there is one email in the search result. In order to know this, use Check Current Email activity which will return if there is any pending emails in the search context. Kindly make sure to test an appropriate output parameter for this activity.

Add Get Email In Context Activity The output of Check Current Email activity step is a boolean.

Review Result of Get Boolean The result of the previous step will return true if an email exists in the search context, stop the loop when there are no more emails to process. You use the Condition Expression Editor and include Is not or ! on the boolean output parameter from previous step. Add the given expression through the expression editor and close it.

Add Loop Condition to Forever Add a Log Message that loop has reached its end. You can provide a custom message if you want.
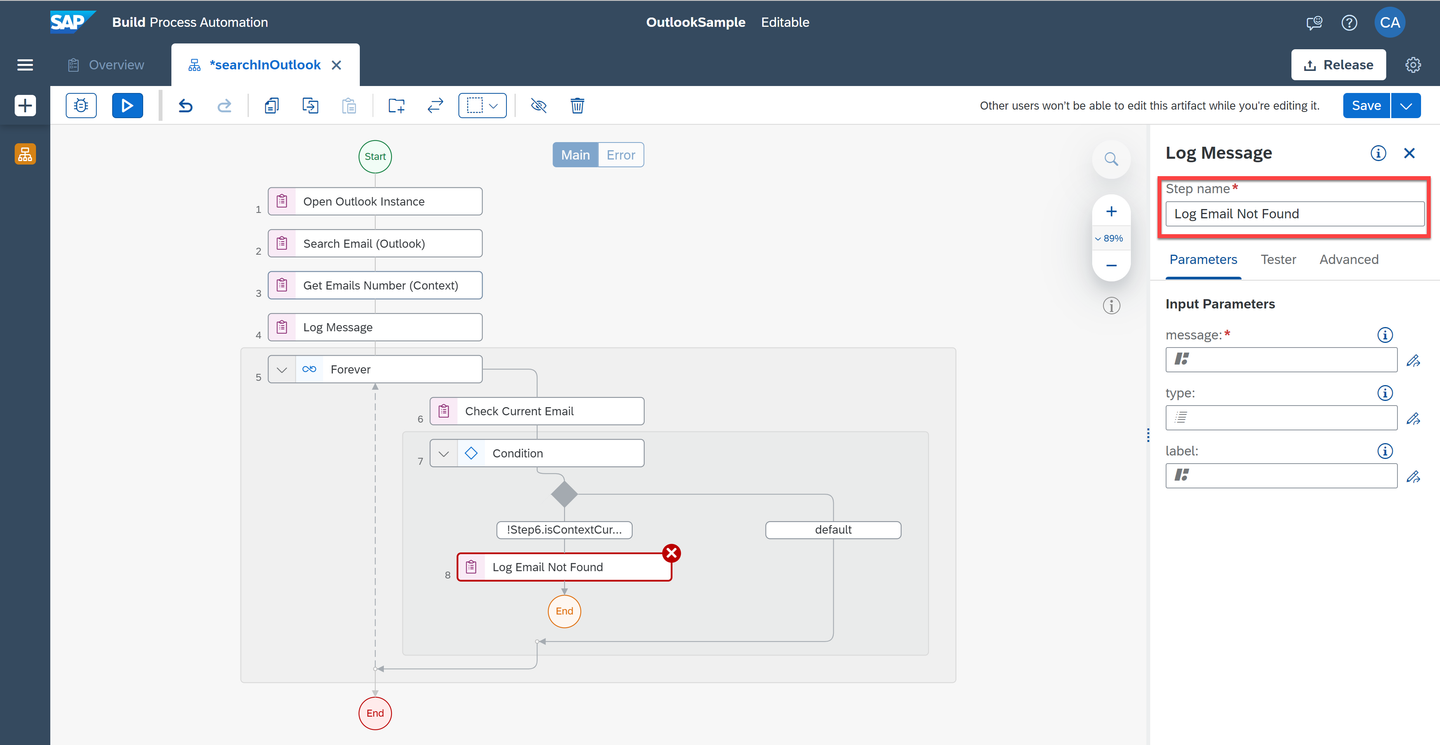
Log End of Loop Add an appropriate log message to this step.

Add Custom Log Message to End of Loop If none of the conditions are met, the workflow of the automation will continue through the default branch. Now to the default branch, you can log the loop index first. Log Message comes handy during debugging. You may remove it, in case you no longer need them.
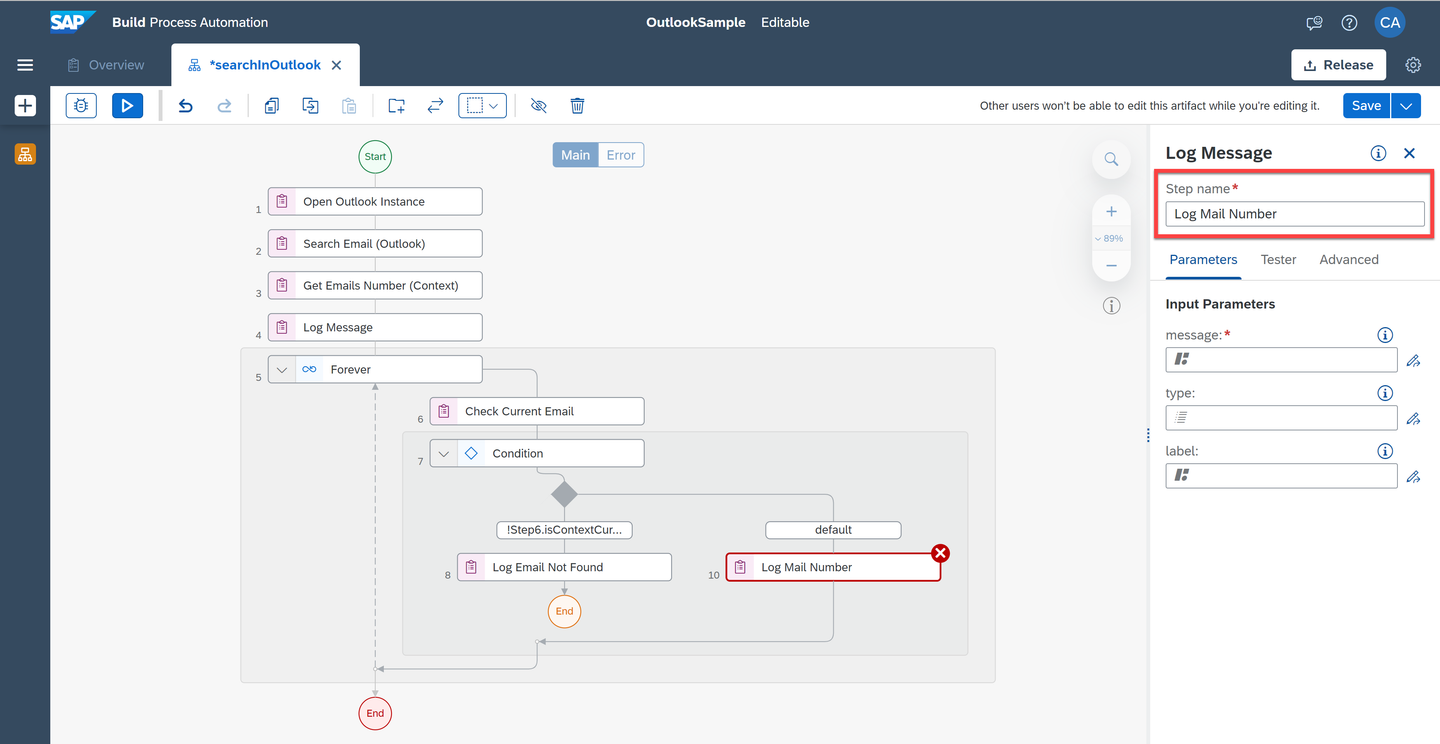
Log Loop Index You can optionally include a custom log message.
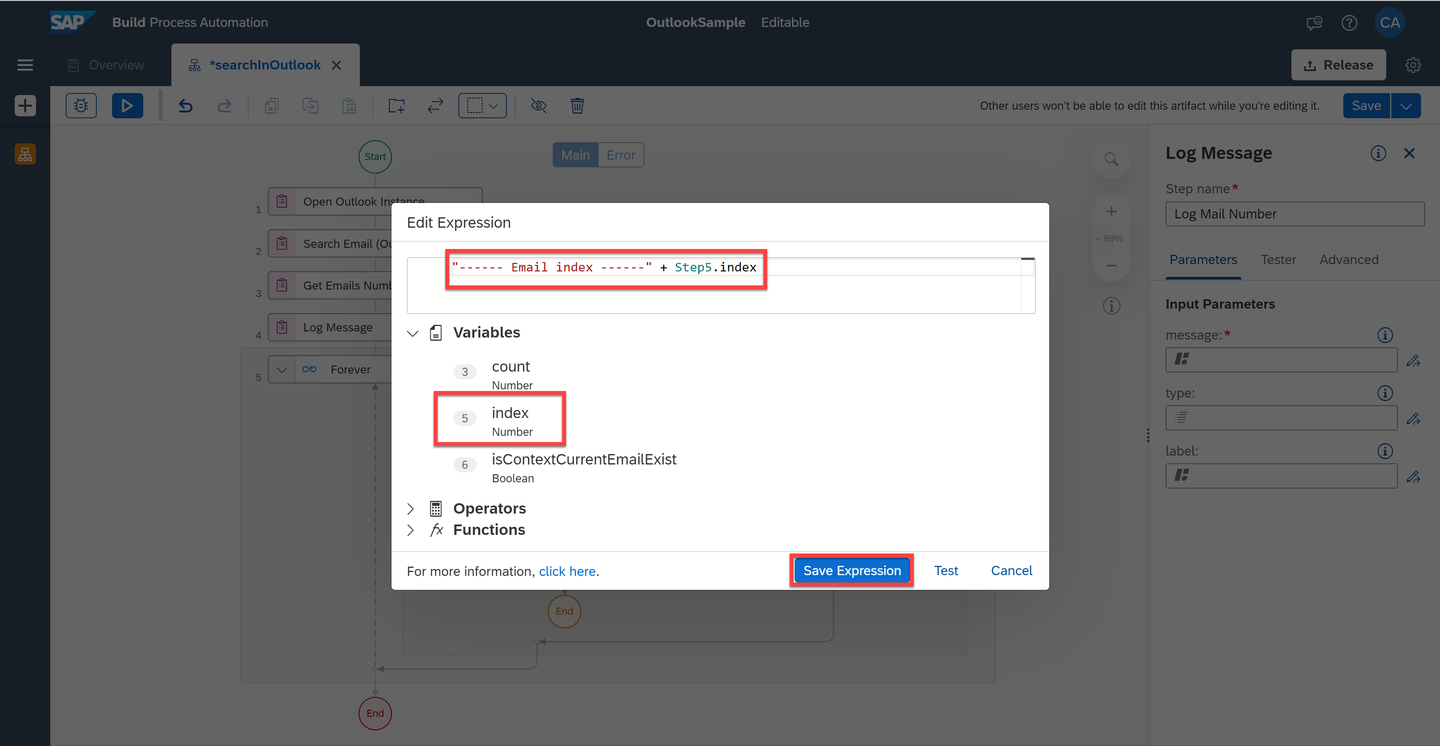
Add Custom Message to Log Loop Index For each email in the loop context, let us retrieve its email Subject through Get Mail Subject activity.

Retrieve Email Subject in the search context Add a log message to print the email subject.

- To the log message event, add your custom message

- Add Get Next Email (Context) activity to advance the loop variable.

- Save and Test the automation, you should see appropriate results.

- You can include additional attributes related to your email in search context result. For example, see the various activities you can use to retrieve additional attributes in your search context.

At this stage, you converted your project to process a series of emails in the search context. An Email may contain one or more file attachments. In the next step, you will download the file attachments.
In this step, you will create a local folder in your windows file system. Then define a folder name dynamically using current timestamp. Finally, save each email attachment to that local folder.
Create a string variable folder name. For this use String datatype and drag and drop into the workflow. You can include it above Get Next Email (Context) activity as shown below.

Add Create a String Variable Activity To the string variable, assign a timestamp value as its value. This is done by using
Date.now().toString()via the expression editor.In the real world, you may want to use your business process specific folder Name.

Assign TimeStamp to Variable Name Just make sure, you set the desired variable name as the output parameter.

Rename Output Variable Using the folder name, create a folder in the file system and include relevant Create Folder activity from the File System collection to the flow.

Add Create Folder Activity In case you wish the new folder to be created in a specific path, you can append that location to the folder name. Make sure you append double slash (\) to the path.
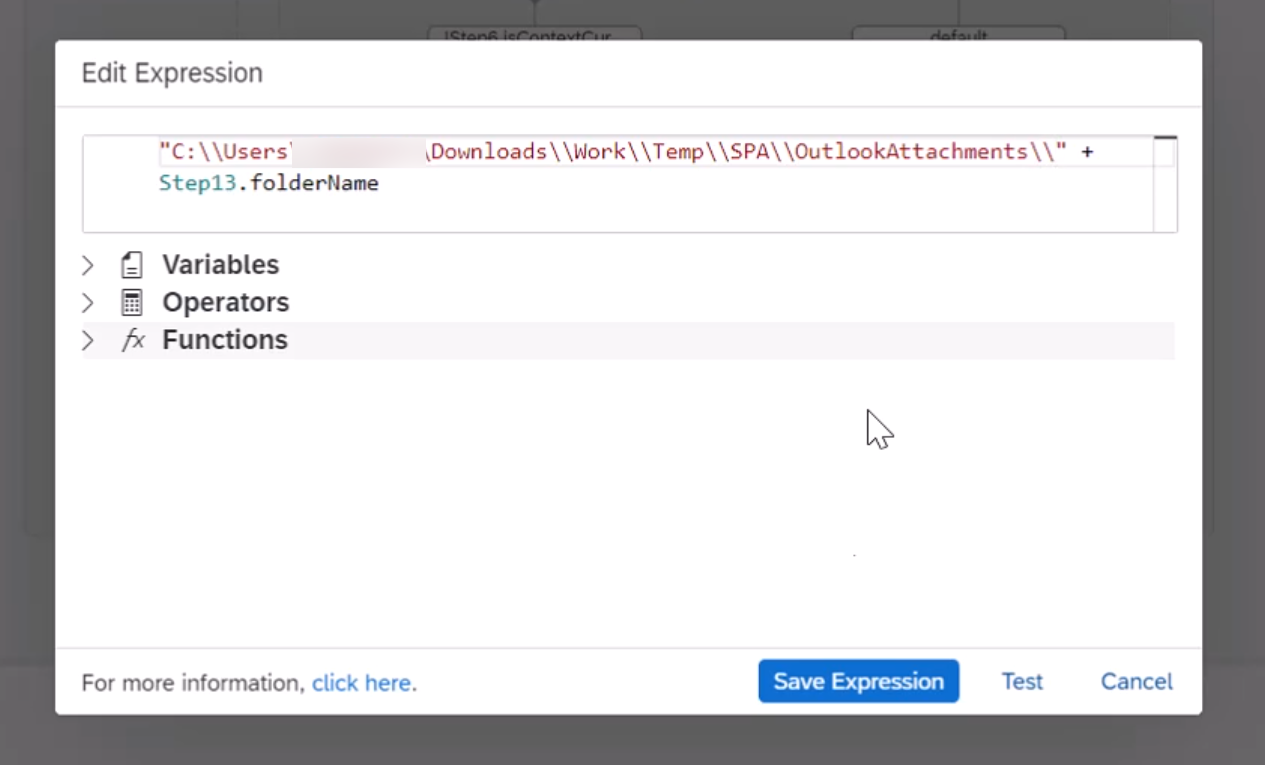
Provide the folder path Here you save all the attachments in an email in one go by adding Save All Mail Attachments activity to your flow. You can also individually save every attachment using Save Mail Attachment. It is a good idea for you to explore the difference between both these options on your own.
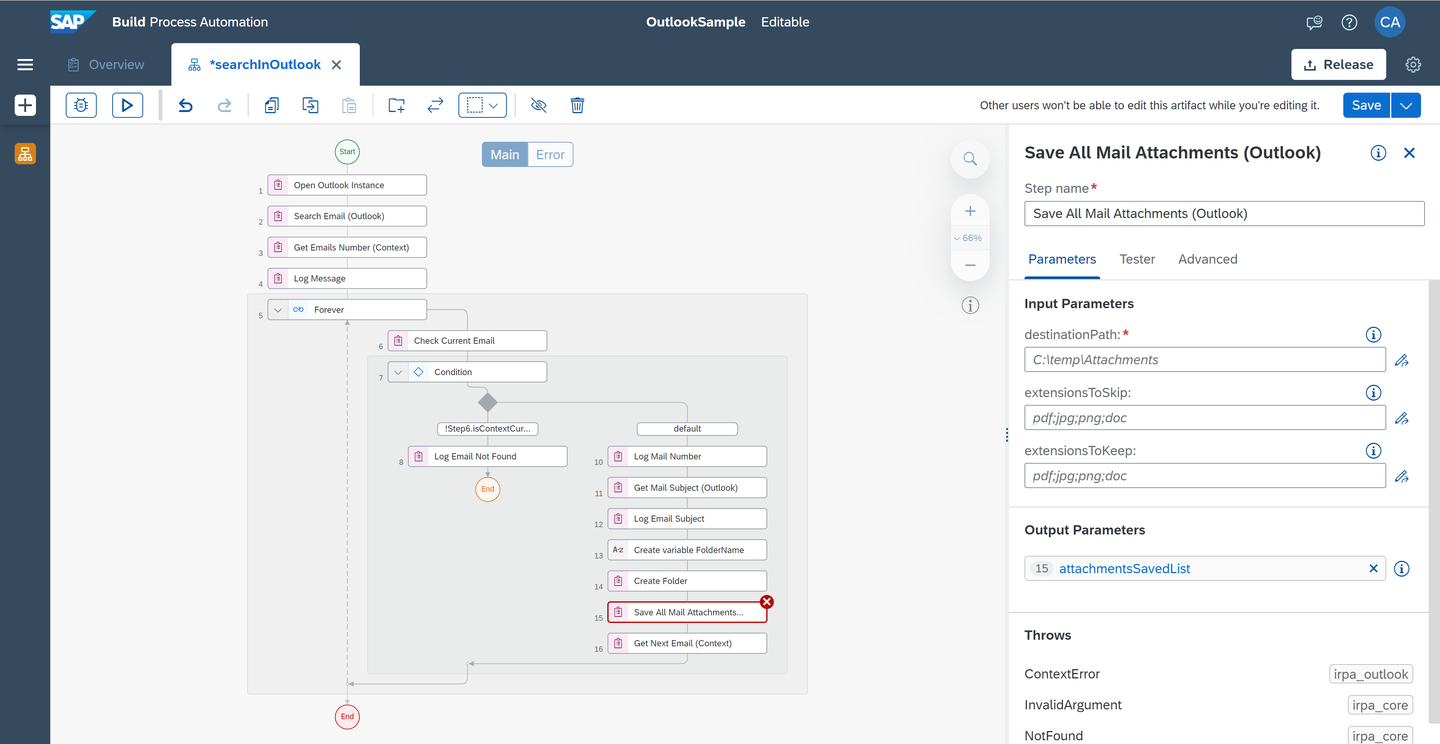
Save All attachments You will refer the folder path from the previous step as the destination location for saving attachments.

Provide the save location Save and test the project.

Test the project If any email in your search context contains an attachment, it is saved in your local folders. Based on the logic of this automation, you can review it based on recently created folder in your local file system.

Validate the result
At times, you may want the automation to handle sending an acknowledgement or an email reply to the email received.
Add Send Reply (Outlook) activity to the flow after Save All Attachments activity.

Add Send Reply (Outlook) activity In the activity properties, Create Custom Data to the email reply activity.
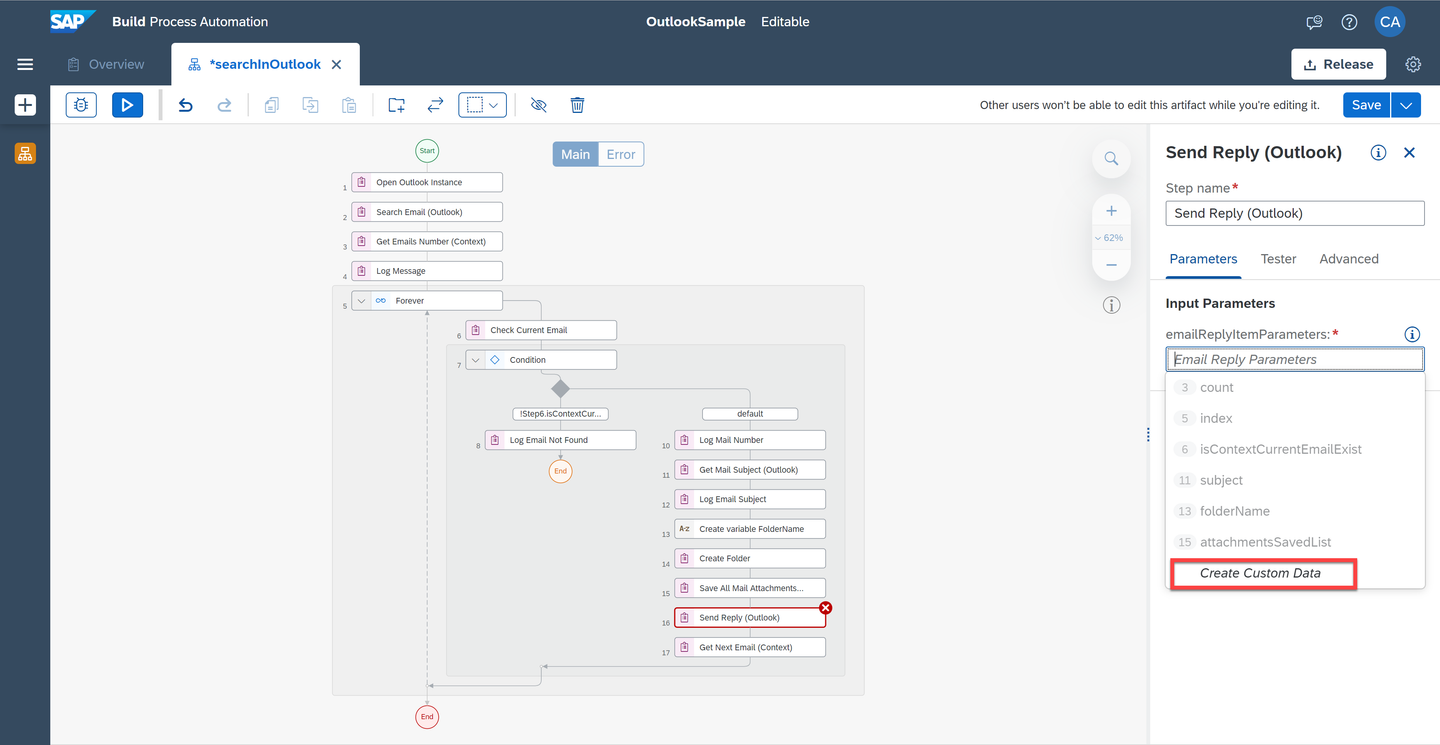
Create Custom reply data You can optionally include additional attributes like an email ID to be kept in cc, bcc in your reply.

Add additional email recipients You can optionally modify reply email’s subject. For example, you can use a custom subject to the email reply as Email reply.

Add a specific subject You can include custom message as email body in your reply.

Add a reply body Once you are done designing your automation, do not forget to add Close Outlook Instance and Release Outlook Instance to your flow.

Add close and release outlook instance Save and Test the project.

Save and test project You can validate the result by checking your email reply.

Validate the result
If you wish to enhance this use case, after you finish processing an email from your search context, say with the file that was saved, you can move the email from current mail box folder to a “Processed folder”. This will be a good enhancement to this tutorial project that you may try.
- Do review the below resources:
- Microsoft Outlook Best Practices from the SAP Build Process Automation [documentation] (https://help.sap.com/docs/IRPA/8e71b41b9ea043c8bccee01a10d6ba72/5a48c81502db40b08e4aac866e04592a.html).
- Outlook Email Best Practices Automation from the SAP Build Process Automation Store.
Resources
Discussion
Share feedback on this tutorial or join the conversation in SAP Community.