
Overview
You will learn
- How to create and deploy an order approval SAP UI5 Task with SAP Business Application Studio.


Prerequisites
Prerequisites
Steps
Intro
IMPORTANT: Please refer to sample Sales Order Management (MI08) in the SAP Build Store if you face any issues while following the tutorials. To retrieve the sample refer to step 6 of Integrate an SAP UI5 Task in a Business Process.
An SAP UI5 Task is a user task that could be integrated in a workflow or in a business process in SAP Build Process Automation. It’s developed with SAP UI5 framework, thus it allows a big flexibility to use custom code.
Let’s start our journey by creating a dedicated Dev Space for our project.
Open your SAP Business Application Studio
- choose the Create Dev Space button

Process Customize your Dev Space
- enter a name for the Dev Space
- select SAP Fiori application type and Workflow Module as additional SAP Extension
- choose the Create Dev Space button

Process Start the Dev Space and wait for it to be on RUNNING status

Process Once the link of the Dev Space is available, click on it to open the SAP Business Application Studio

Process
[OPTION BEGIN[New Project]]
Choose the project template
- open the File Explorer
- choose the Create Project button
- select Basic Multitarget Application tile
- choose the Start button

Process Choose the project template
- provide a Name
- choose the Finish button

Process Create an MTA Module: Approuter Configuration
- in the File Explorer, locate the mta.yaml file and right-click on it
- select Create MTA Module from Template

Process Choose the Module template
- select the Approuter Configuration tile
- choose the Start button

Process - provide a Name for the business solution of the project
- choose the Next button

Process Create a second MTA Module: Workflow UI
- in the File Explorer, locate the mta.yaml file and right-click on it
- select Create MTA Module from Template

Process Select the Module Template
- select the Workflow UI tile
- choose the Start button

Process Choose the Next button to set the default basic properties

Process Select the UI Type
- select the Task UI tile
- choose the Next button

Process Module Customization
- provide the required module information
- choose the Finish button
The application namespace is needed to customize the code.

Process
[OPTION END]
[OPTION BEGIN[Import Project]]
Download project ordersmanagement.tar
Click on the Menu button and navigate to File > Import Project.

Process Choose the downloaded project ordersmanagement.tar. After importing successfully, it can be viewed in the file explorer in the workspace.

Process Please navigate to Step 4: Build and deploy your application.
[OPTION END]
Upgrade the package.json version
- in the File Explorer, locate and open the package.json file under
../workflow-ui-module/ - change the version of the
"@ui5/cli"value underdevDependenciesto ^3.0.0

Process - in the File Explorer, locate and open the package.json file under
Customize your manifest.json file
- in the File Explorer, locate and open the manifest.json
- customize it by adding the code bellow (including the comma in the beginning) after the sap.cloud node in the json file. (line 125 to 198)

Process
    ,
    "sap.bpa.task": {
        "_version": "1.0.0",
        "outcomes": [
            {
                "id": "approve",
                "label": "Approve"
            },
            {
                "id": "reject",
                "label": "Reject"
            }
        ],
        "inputs": {
            "$schema": "http://json-schema.org/draft-07/schema",
            "title": "input",
            "type": "object",
            "required": [
                "customerName",
                "orderNumber",
                "orderAmount",
                "orderDate",
                "expectedDeliveryDate",
                "shippingCountry"
            ],
            "properties": {
                "customerName": {
                    "type": "string",
                    "title": "Customer Name",
                    "description": "Customer Name"
                },
                "orderNumber": {
                    "type": "string",
                    "title": "Order Number",
                    "description": "Order Number"
                },
                "orderAmount": {
                    "type": "number",
                    "title": "Order Amount",
                    "description": "Order Amount"
                },
                "orderDate": {
                    "type": "string",
                    "title": "Order Date",
                    "description": "Order Date"
                },
                "expectedDeliveryDate": {
                    "type": "string",
                    "title": "Expected Delivery Date",
                    "description": "End Date of the Vacation"
                },
                "shippingCountry": {
                    "type": "string",
                    "title": "Shipping Country",
                    "description": "Shipping Country"
                }
            }
        },
        "outputs": {
            "$schema": "http://json-schema.org/draft-07/schema",
            "title": "output",
            "type": "object",
            "required": [
                "comment"
            ],
            "properties": {
                "comment": {
                    "type": "string",
                    "title": "Comment",
                    "description": "Comment to buyer"
                }
            }
        },
        "category": "approval"
}For the sales order approval use case, you need the following sales order details as inputs and a comment from the approver as output of the task.
Customize your xs-app.json file
- in the File Explorer, locate and open the *xs-app.json* in your workflow-ui-module folder
- it must be the *first entry of routes entry*
  {
  "source": "^/api/(.*)$",
  "target": "$1",
  "service": "com.sap.spa.processautomation",
  "endpoint": "api",
  "csrfProtection": true,
  "authenticationType": "xsuaa"
 },
Customize your App.view.xml file
- in the File Explorer, under
../webapp/view/folder, locate and open theApp.view.xmlfile - customize it with your needed page layout

Process In the sales order approval use case, you need the following sales order details in the
App.view.xml. Please, replace the occurrences of<APPLICATION NAMESPACE>with your application namespace.- in the File Explorer, under
<mvc:View controllerName="<APPLICATION NAMESPACE>.workflowuimodule.controller.App"
xmlns:html="http://www.w3.org/1999/xhtml"
xmlns:mvc="sap.ui.core.mvc" displayBlock="true"
xmlns:l="sap.ui.layout"
 xmlns:f="sap.ui.layout.form"
xmlns:core="sap.ui.core"
xmlns:form="sap.ui.layout.form"
xmlns:smartForm="sap.ui.comp.smartform"
 xmlns:smartField="sap.ui.comp.smartfield"
xmlns="sap.m">
<App id="app">
    <Page id = "scroll">
        <content>
        <form:SimpleForm id="request-information-form" editable="false" layout="ResponsiveGridLayout" singleContainerFullSize="false">
            <form:content>
                <core:Title id="vacation-timerange-heading" text="A new order has been received. Please review and confirm whether the requirements can be met or not."/>
                <Label id="customer-name-label" text="Customer Name" labelFor="customer-name-field"/>
                <Input id="customer-name-field" value="{context>/customerName}" editable="false"/>
                <Label id="order-number-label" text="Order Number" labelFor="order-number-field"/>
                <Input id="order-number-field" value="{context>/orderNumber}" editable="false"/>
                <Label id="order-amount-label" text="Order Amount" labelFor="order-amount-field"/>
                <Input id="order-amount-field" value="{context>/orderAmount}" editable="false"/>
                <Label id="order-date-label" text="Order Date" labelFor="order-date-field"/>
                <Input id="order-date-field" value="{context>/orderDate}" editable="false"/>
                <Label id="shipping-country-label" text="Shipping Country" labelFor="shipping-country-field"/>
                <Input id="shipping-country-field" value="{context>/shippingCountry}" editable="false"/>
                <Label id="expected-delivery-date-label" text="Expected Delivery Date" labelFor="expected-delivery-date-field"/>
                <Input id="expected-delivery-date-field" value="{context>/expectedDeliveryDate}" editable="false"/>
            </form:content>
        </form:SimpleForm>

        <html:hr></html:hr>
        <FlexBox id="comment-wrapper" direction="Column" class="sapUiSmallMargin" width="auto">
            <CheckBox id="Ack" text="I acknowledge that we have received your order and will process it based on the availability" />
            <Label id="comment-label" text="Comment" />
            <TextArea id="comment-field" showExceededText="true" maxLength="1000" width="100%" height="120px" value="{context>/comment}"/>
        </FlexBox>
        </content>
    </Page>
</App>
</mvc:View>Customize your Component.js file
- in the File Explorer, under
../webapp/folder, create or modify the Component.js file with the following code

Process Please, replace the occurrences of
<APPLICATION NAMESPACE>with your application namespace.- in the File Explorer, under
sap.ui.define(
    [
        "sap/ui/core/UIComponent",
        "sap/ui/Device",
        "<APPLICATION NAMESPACE>/workflowuimodule/model/models",
    ],
    function (UIComponent, Device, models) {
        "use strict";

        return UIComponent.extend(
        "<APPLICATION NAMESPACE>.workflowuimodule.Component",
        {
            metadata: {
            manifest: "json",
            },

            /**
            * The component is initialized by UI5 automatically during the startup of the app and calls the init method once.
            * @public
            * @override
            */
            init: function () {
            // call the base component's init function
            UIComponent.prototype.init.apply(this, arguments);

            // enable routing
            this.getRouter().initialize();

            // set the device model
            this.setModel(models.createDeviceModel(), "device");

            this.setTaskModels();

            const rejectOutcomeId = "reject";
            this.getInboxAPI().addAction(
                {
                action: rejectOutcomeId,
                label: "Reject",
                type: "reject",
                },
                function () {
                this.completeTask(false, rejectOutcomeId);
                },
                this
            );
            const approveOutcomeId = "approve";
            this.getInboxAPI().addAction(
                {
                action: approveOutcomeId,
                label: "Approve",
                type: "accept",
                },
                function () {
                this.completeTask(true, approveOutcomeId);
                },
                this
            );
            },

            setTaskModels: function () {
            // set the task model
            var startupParameters = this.getComponentData().startupParameters;
            this.setModel(startupParameters.taskModel, "task");

            // set the task context model
            var taskContextModel = new sap.ui.model.json.JSONModel(
                this._getTaskInstancesBaseURL() + "/context"
            );
            this.setModel(taskContextModel, "context");
            },

            _getTaskInstancesBaseURL: function () {
            return (
                this._getWorkflowRuntimeBaseURL() +
                "/task-instances/" +
                this.getTaskInstanceID()
            );
            },

            _getWorkflowRuntimeBaseURL: function () {
              var ui5CloudService = this.getManifestEntry("/sap.cloud/service").replaceAll(".", "");
              var ui5ApplicationName = this.getManifestEntry("/sap.app/id").replaceAll(".", "");
              var appPath = `${ui5CloudService}.${ui5ApplicationName}`;
              return `/${appPath}/api/public/workflow/rest/v1`

            },

            getTaskInstanceID: function () {
            return this.getModel("task").getData().InstanceID;
            },

            getInboxAPI: function () {
            var startupParameters = this.getComponentData().startupParameters;
            return startupParameters.inboxAPI;
            },

            completeTask: function (approvalStatus, outcomeId) {
            this.getModel("context").setProperty("/approved", approvalStatus);
            this._patchTaskInstance(outcomeId);
            },

            _patchTaskInstance: function (outcomeId) {
            const context = this.getModel("context").getData();
            var data = {
                status: "COMPLETED",
                context: {...context, comment: context.comment || ''},
                decision: outcomeId
            };

            jQuery.ajax({
                url: `${this._getTaskInstancesBaseURL()}`,
                method: "PATCH",
                contentType: "application/json",
                async: true,
                data: JSON.stringify(data),
                headers: {
                "X-CSRF-Token": this._fetchToken(),
                },
            }).done(() => {
                this._refreshTaskList();
            })
            },

            _fetchToken: function () {
            var fetchedToken;

            jQuery.ajax({
                url: this._getWorkflowRuntimeBaseURL() + "/xsrf-token",
                method: "GET",
                async: false,
                headers: {
                "X-CSRF-Token": "Fetch",
                },
                success(result, xhr, data) {
                fetchedToken = data.getResponseHeader("X-CSRF-Token");
                },
            });
            return fetchedToken;
            },

            _refreshTaskList: function () {
            this.getInboxAPI().updateTask("NA", this.getTaskInstanceID());
            },
        }
        );
    }
);Last check in the mta.yaml file
In the File Explorer, under your project main folder, check mta.yaml file with the following code and make sure that the node under
modules:parameters:contentis namedsubaccountinstead ofinstance
Process The node under
resources:parameters:config:init_datais namedsubaccountinstead ofinstance
Process
- Open your Subaccount Overview in SAP BTP Cockpit
You will need some information about API Endpoint, Org and Space that are visible in the BTP Cockpit, under Subaccount overview.
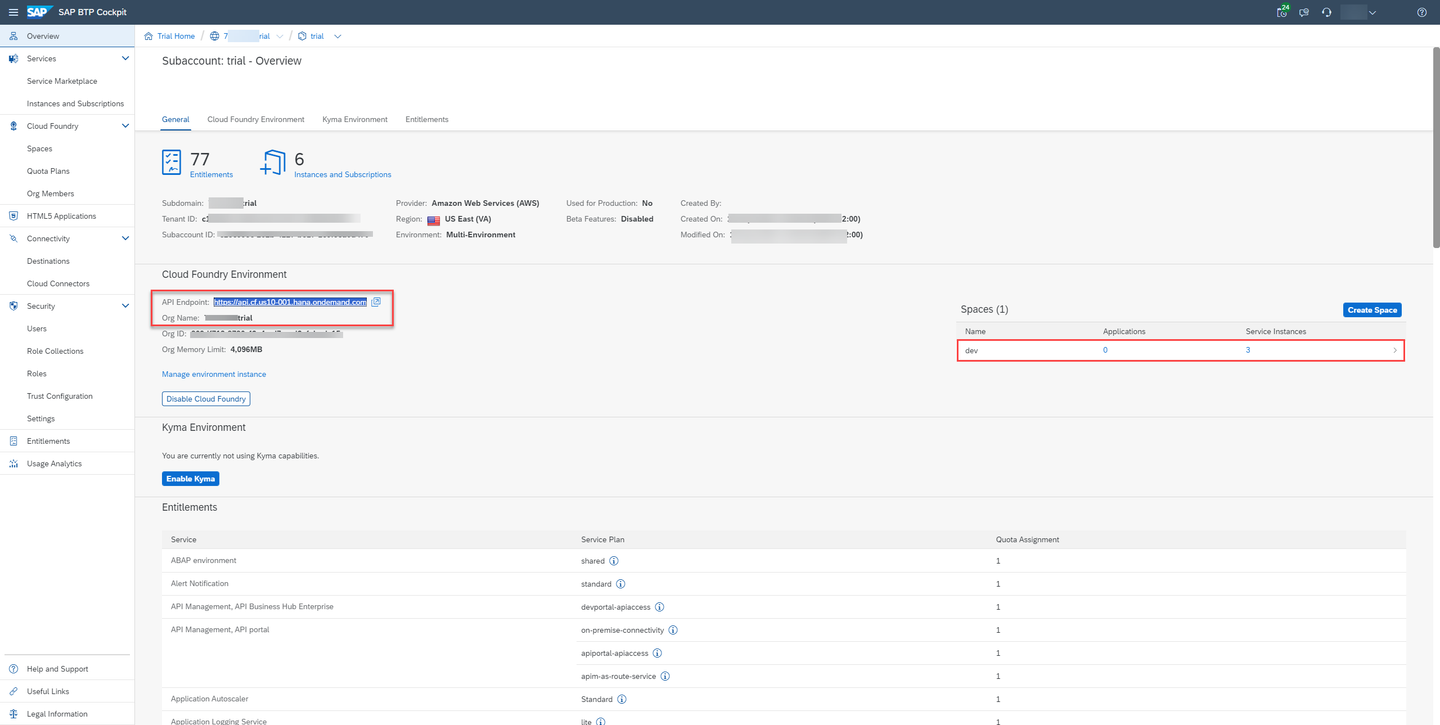
- Start a new Terminal and login to cloud foundry
- from the menu, select Terminal –> New Terminal
- connect to your account using cf login command. (In case of 2FA, you may need to append the One-time password code to your password)
- select the Org if asked
- select the Space if asked
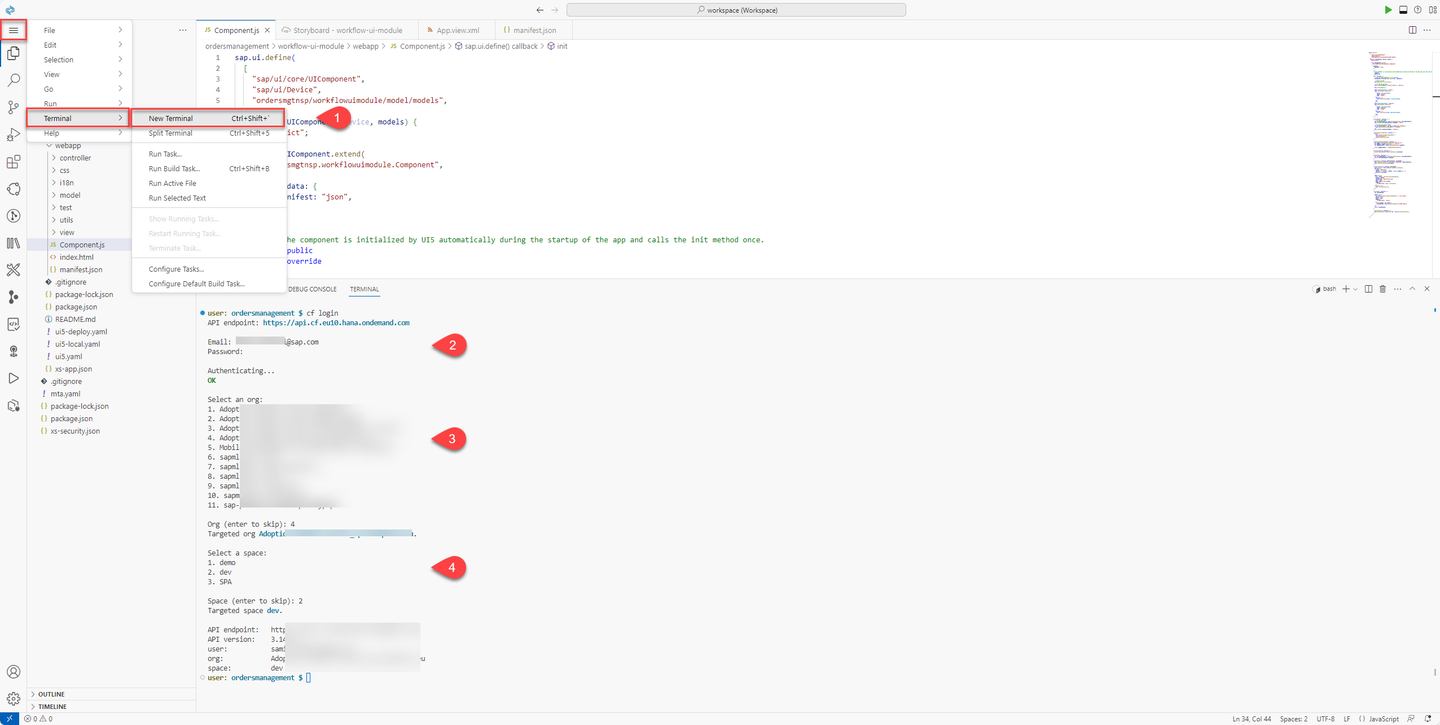
Build MTA Project
- in the File Explorer, locate the mta.yaml file and right-click on it
- select Build MTA Project

Process Build the application
IMPORTANT: Skip this step if you have imported the project. Your project will run into an error as the application is already included in the
mtarfile.Use the
npm run buildcommand to build your application.
Process Deploy the application
Use the
npm run deploycommand to deploy your application.You may use the command
cf deploy mta_archives/ordersmanagement_0.0.1.mtarreplacing themtarfile name with your generated one.
Process Once deployed, your application should be visible in the BTP Cockpit under HTML5 Applications if you’re subscribed to SAP Build Work Zone.

Process You have successfully completed the tutorial, creating and deploying an SAP UI5 application for order approval business processes.
Resources
Discussion
Share feedback on this tutorial or join the conversation in SAP Community.