
Overview
You will learn
- How to create an automation in SAP Build Process Automation
- How to use the Excel SDK
- How to use control blocks: Conditions and Loops


Prerequisites
Prerequisites
- A windows machine
- If you are using a MAC, please install a VDI
- Install and Setup the Desktop Agent
- Complete Build Your First Business Process with SAP Build Process Automation mission
Steps
Intro
IMPORTANT: Please refer to sample Sales Order Management (MI03) in the SAP Build Store if you face any issues while following the tutorials. To retrieve the sample refer to step 6 of Run the Process With an Automation.
An Automation is a succession of steps to orchestrate multiple activities and applications on a local machine.
In this exercise, you will automate the process to read the sales order details from an Excel and select the specific sales order details based on the input from the submitted form. To design the automation, you will need an Excel file filled with the sales order data. You can:
Download Sales Order Data OR
Create the file yourself using the following data:
| Order Number | Order Amount | Order Date | Shipping Country | Expected Delivery Date | Order Status |
|---|---|---|---|---|---|
| PO7991 | 410418.22 | 1/21/2022 | United States of America | 1/29/2022 | In Time |
| PO7918 | 150935.13 | 1/22/2022 | United Kingdom | 1/27/2022 | Urgent |
| PO7375 | 313977.82 | 1/23/2022 | United Kingdom | 2/20/2022 | In Time |
| PO7311 | 755055.4 | 1/24/2022 | United Kingdom | 3/30/2022 | In Time |
| PO6858 | 429358.4 | 1/25/2022 | United Kingdom | 2/20/2022 | In Time |
| PO6368 | 43739.82 | 1/26/2022 | India | 3/25/2022 | In Time |
| PO6189 | 483574.12 | 1/27/2022 | Germany | 2/5/2022 | In Time |
| PO3115 | 273993.56 | 1/28/2022 | Germany | 3/10/2022 | In Time |
| PO2686 | 220887.56 | 1/29/2022 | Germany | 3/5/2022 | In Time |
| PO8282 | 436955.64 | 1/30/2022 | United States of America | 3/30/2022 | In Time |
In the Lobby from the editable version of your project, do the following:
- Select the process Order Processing.
- Choose +.

001 Select Automation.

001 Choose Blank Automation.

001 A pop up will appear to configure the Desktop Agent version. Do the following in the pop up:
- From the dropdown, select the version of the Desktop Agent installed on your machine. It would be displayed with suffix as Registered.
- Under Platforms, choose Windows or Mac depending on the Platforms you are working on.
- Choose the Confirm button.

001 A new pop-up will appear to create the automation. Do the following in the pop-up:
- Under Name enter: Get Order Details.
- Under Description enter: Automation for Order Process.
- Choose the Create button.
Identifier will be auto-filled.

001 An automation Get Order Details will be created successfully.

001
Business projects usually need to use parameters and variables at runtime. These variables are usually saved in their runtime landscapes for example Dev, Test or Production environments. In this case, you will need to maintain an environment variable that will contain the file full path of the Excel file used in the automation.
Environment Variables allow you to reuse certain information for a given environment. You use environment variables to pass parameters to automations.
Select Settings.

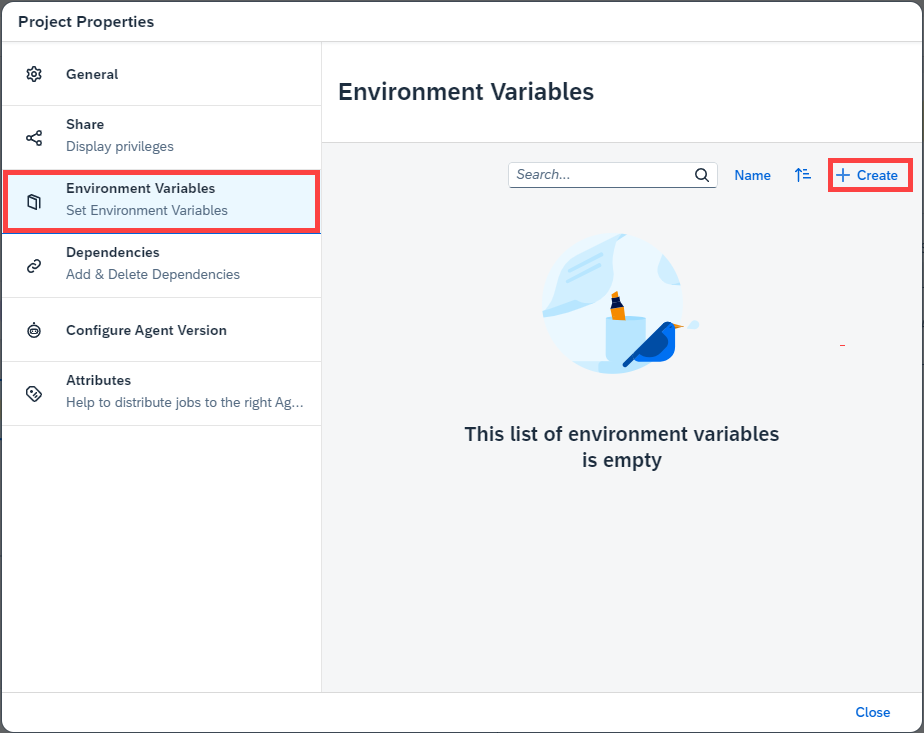
001 In the Project Properties window, select Environment Variables, then + Create.
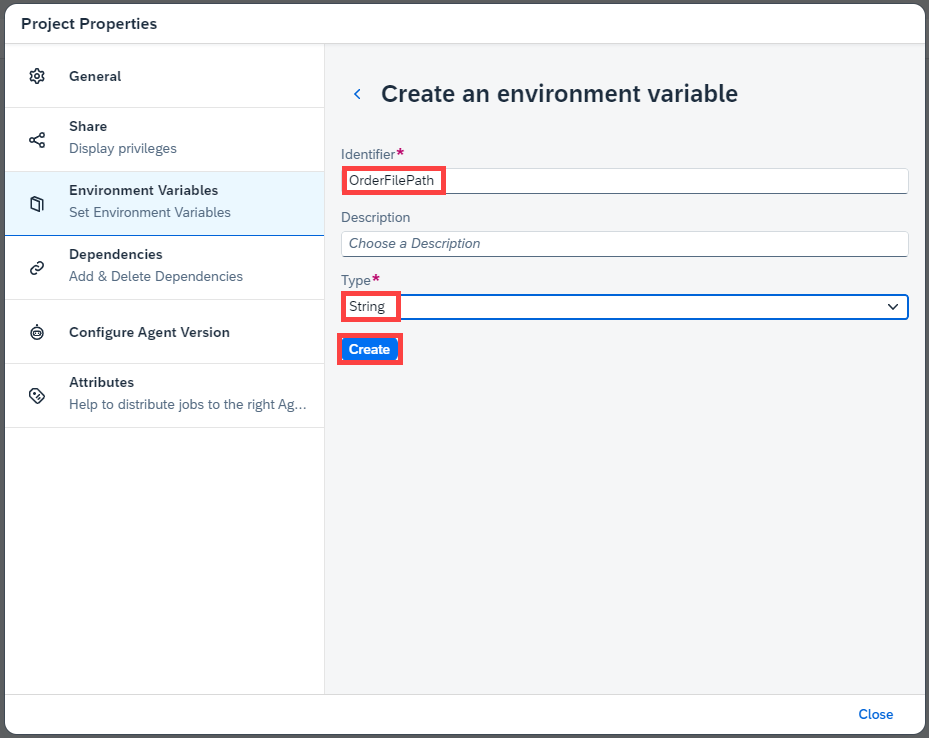
001 In the create an environment variable screen:
- Under Identifier enter:
OrderFilePath. - Under Type select String.
- Choose the Create button.
001 - Under Identifier enter:
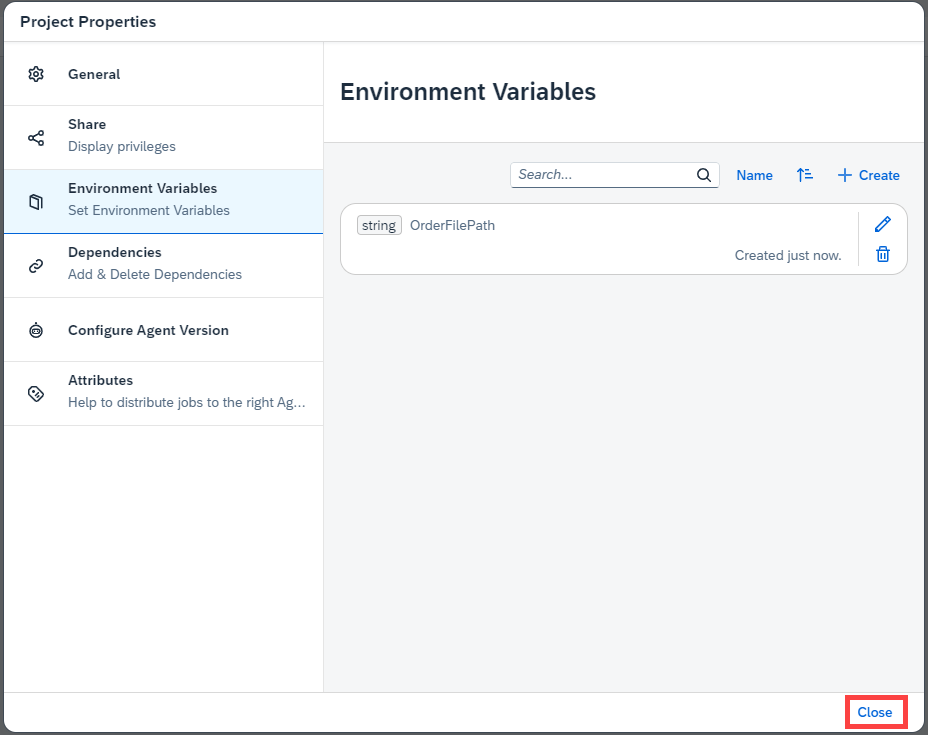
After the Environment Variable is created successfully, close the project properties window.
001
You will now design the automation in the Automation Editor by dragging-and-dropping activities into the workflow of the automation. Later you will configure the inputs and outputs of each activity. You will need activities to interact with the Microsoft Excel application. These activities will open the Excel application, open the workbook that contains the sales orders details, and map them into a data type that will be created during the design. Last, after extracting and mapping the data, the Excel application will be closed.
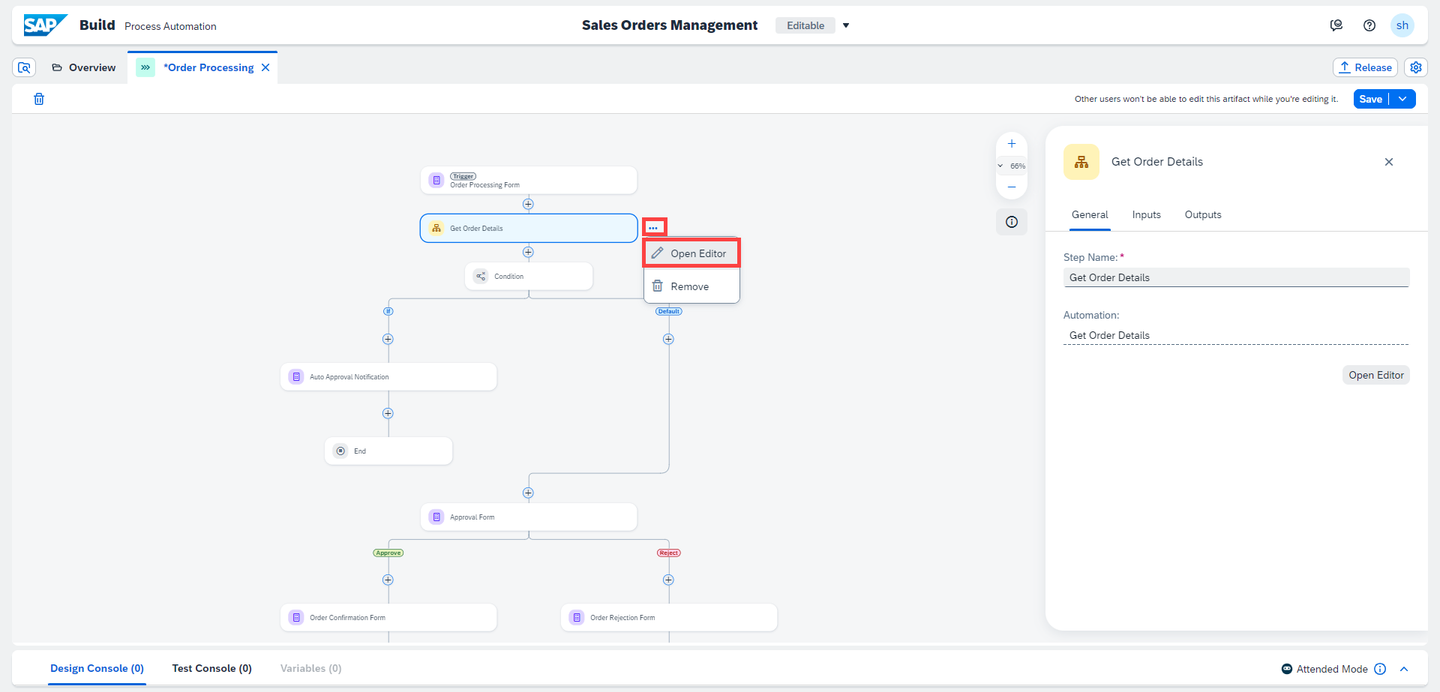
Select three dots next to Get Order Details, choose Open Editor, which navigates to the Design Studio to build the automation.
001 Since Excel is used in this automation, you have to open an Excel instance. Open Excel Instance is a mandatory activity to use when using Excel. Once you open an Excel instance, you can use other Excel activities.
To open the Excel Instance:
- In the Automation Details section on the right, search for the Open Excel Instance activity,
- Drag and drop the activity into the canvas.
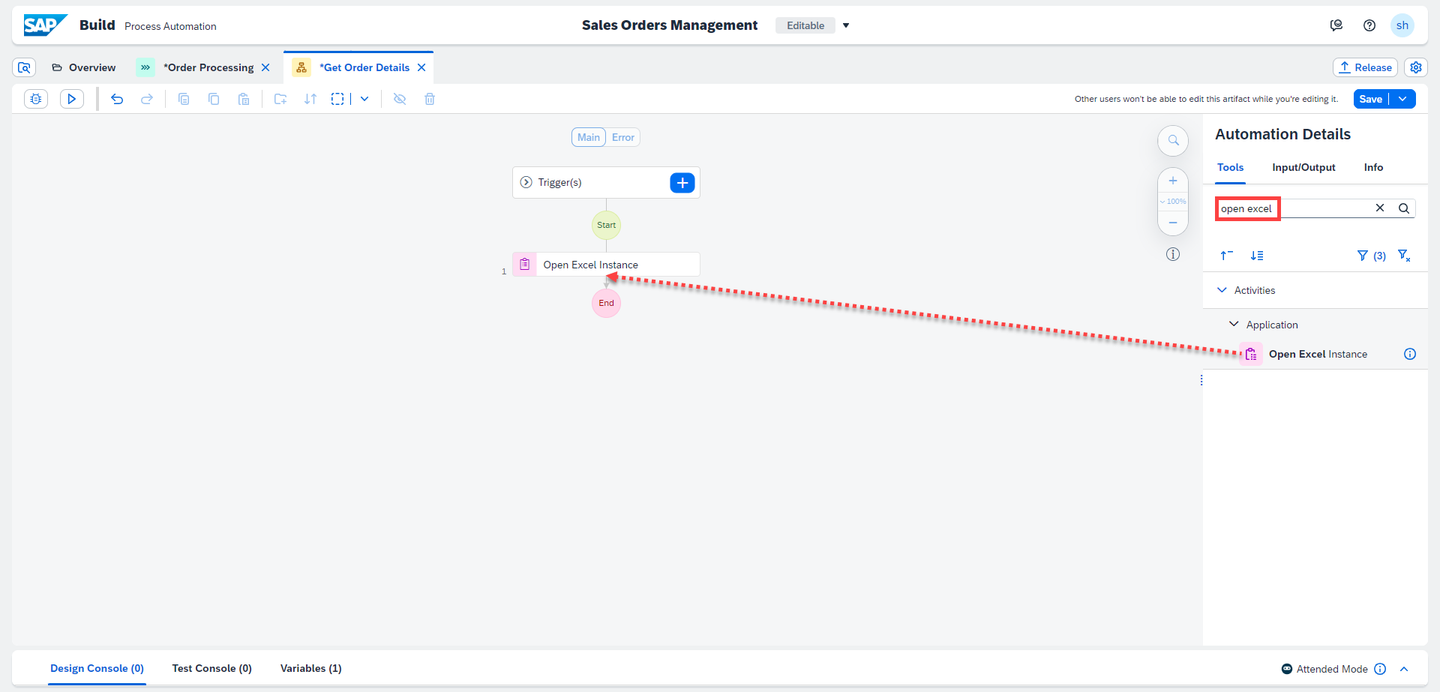
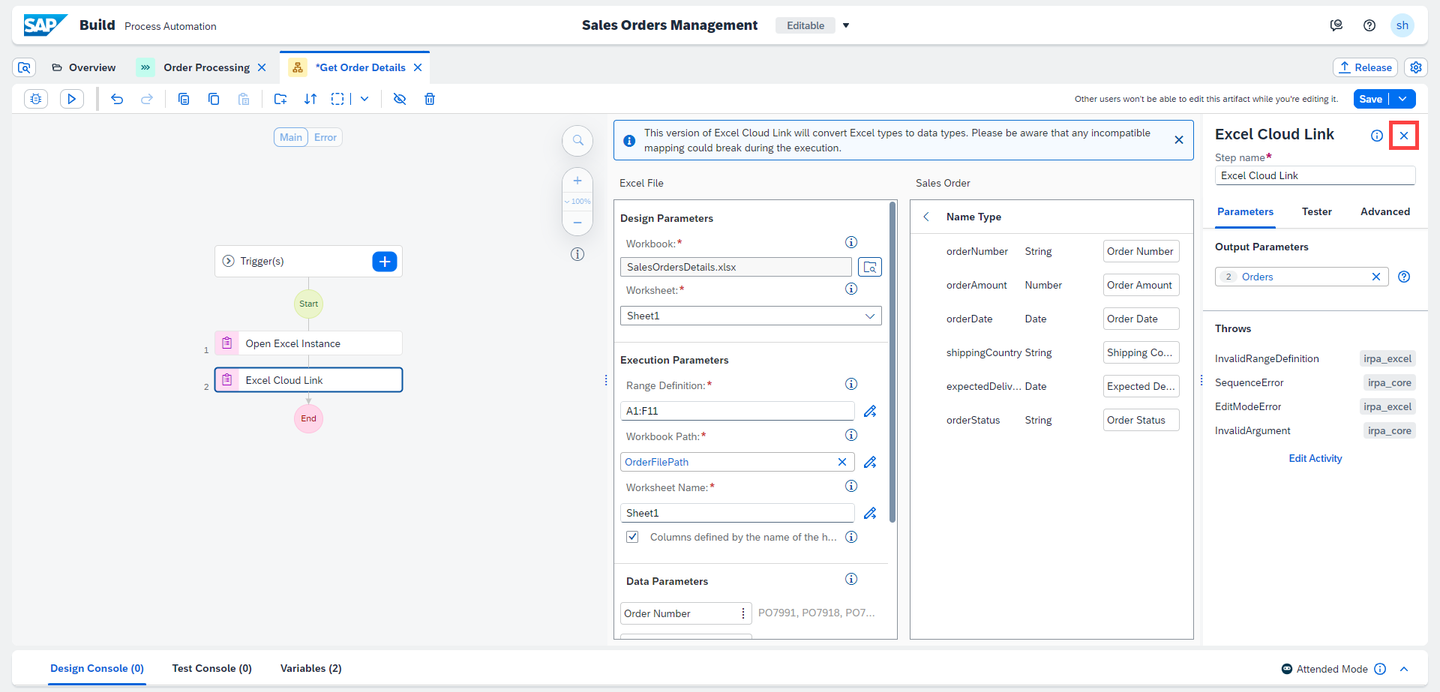
001 Next, Excel Data Mapping is done with the Excel Cloud Link activity. Excel Data Mapping allows you to transform columns-based data from an Excel sheet into data that can be used in the automation. The data from the Excel sheet stays the same but the structure becomes a data type structure, making it possible to use throughout your project.
To get the Excel Cloud Link:
- In the Automation Details search for the activity Excel Cloud Link,
- Drag and drop the activity into the canvas.

001 Select Excel Cloud Link, in the details on the right side, choose the Edit activity button.

001 In the Excel File screen:
- Select Browse.
- Choose the Orders.xlsx file which is saved on your machine.
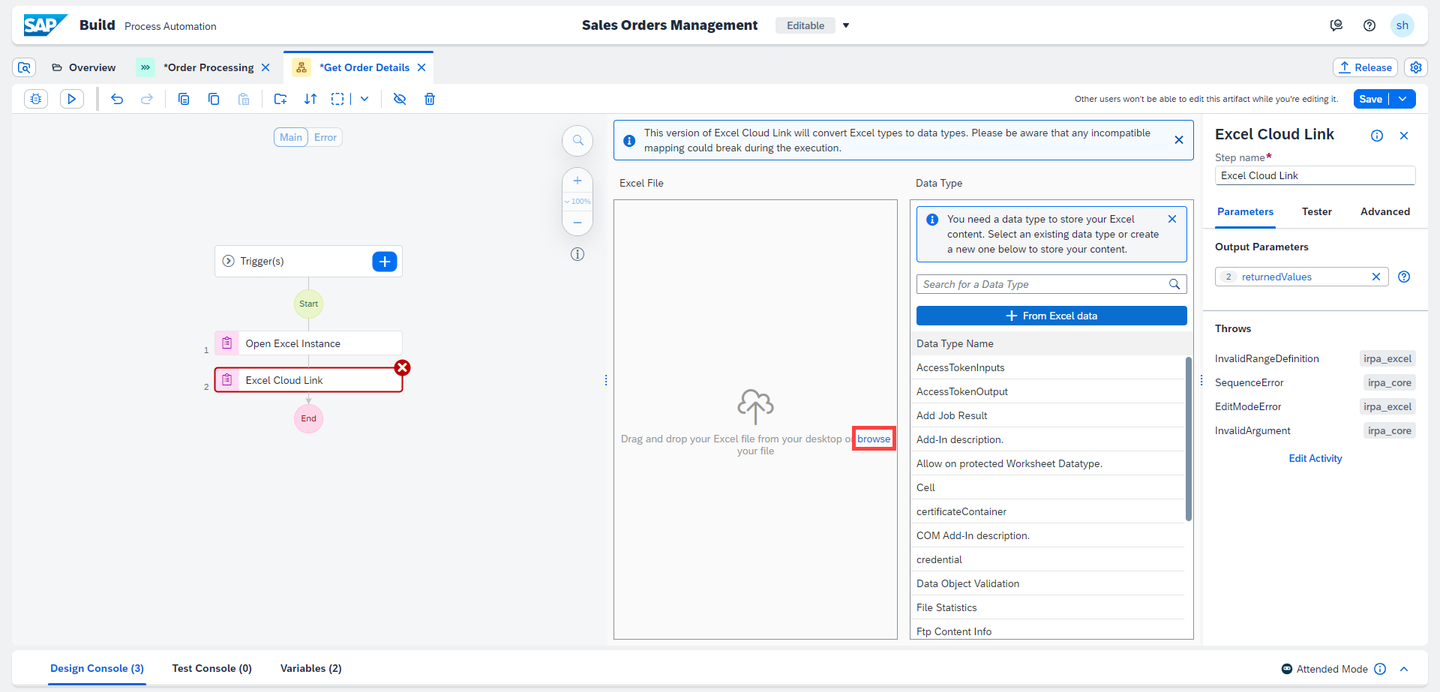
001 The Excel file is mapped automatically.
In the Workbook Path field enter the Environment Variable as
OrderFilePath, which was created above as the parameter value for Workbook path.
001 Select the button + From Excel data.

001 A pop up appears to create a data type. A Sales Order variable is needed to collect the data from the Excel sheet columns. In this step, a variable is automatically created from the Excel file columns.
Under Name of the data type, enter Sales Order and choose the Create button.
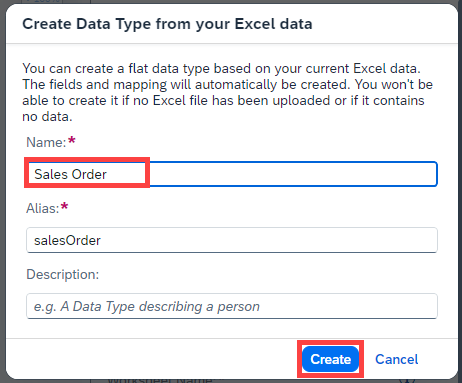
001 Framework creates a data type with the columns of the Excel as the field names. You can see it in the Artifacts section in the Overview tab.
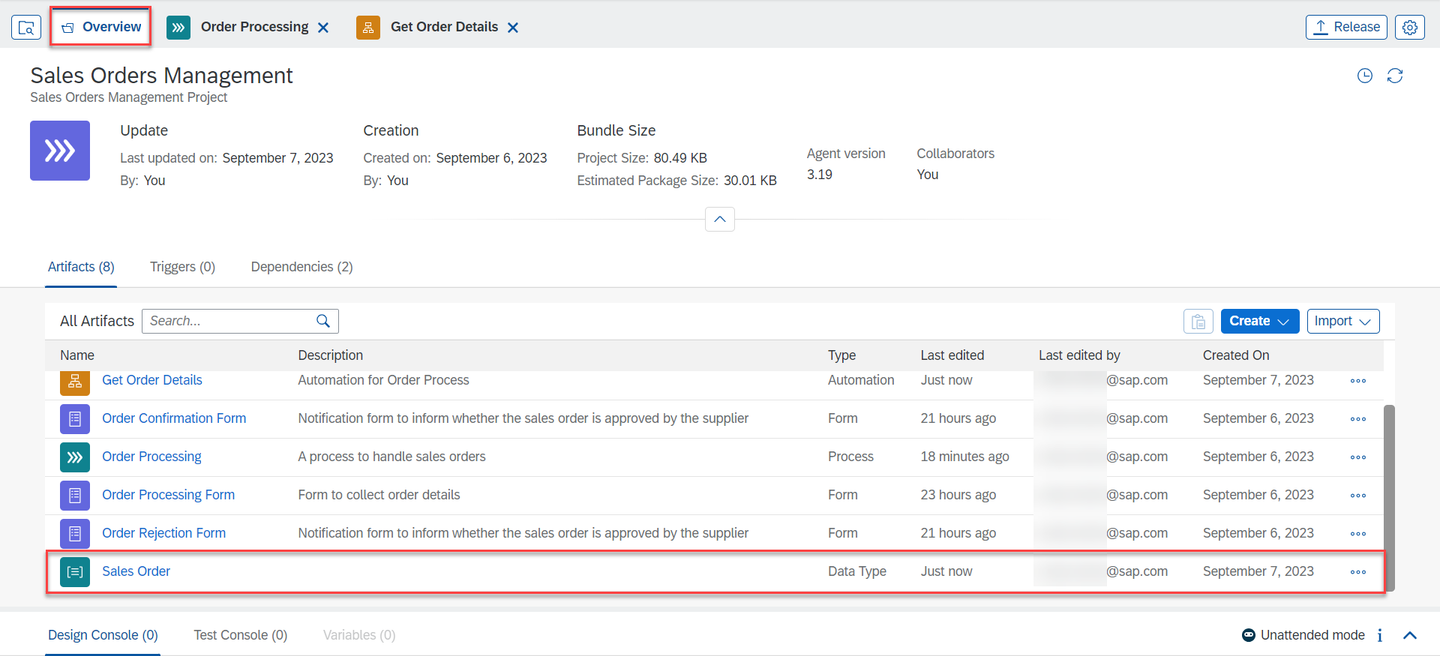
001 Go to Get Order Details automation. In Excel Cloud Link activity on the right side, under Output Parameters, manually change the variable name to Orders.

001 Close the activity.
001 Click on the canvas.

001 Once Excel is no longer required, close the Excel instance. Close Excel Instance activity closes an instance of Excel.
To close the opened instance of the Excel file:
- In the Automation Details search for the activity Close Excel Instance.
- Drag and drop the activity into the canvas and save your automation.

001
Input and output parameters allow you to exchange data in the workflow of your automation between activities, screens, and scripts.
Click on the canvas and select the Input/Output section in Automation Details.

001 Add Input parameters as following:
- In Parameter Name enter:
OrderNumber. - In Description enter: Receives order number from the Order Processing Form.
- In Data type choose: String.

001 - In Parameter Name enter:
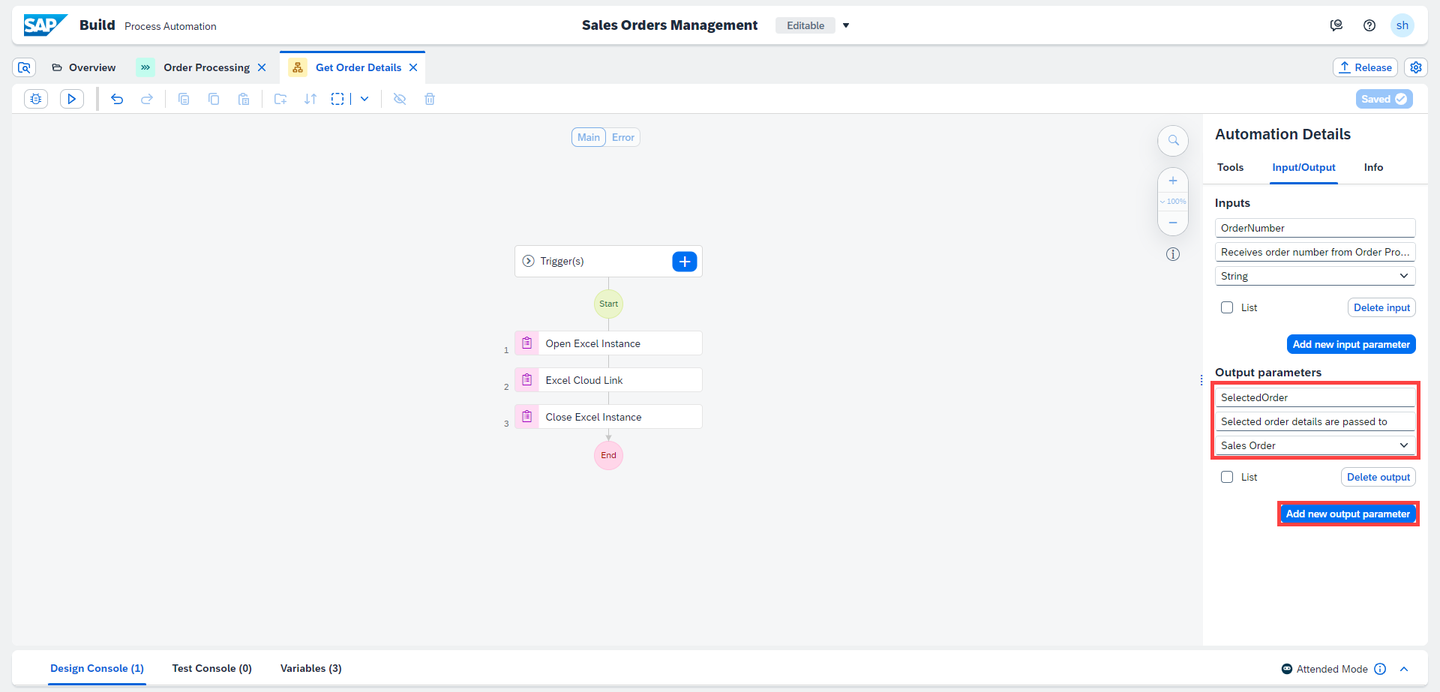
Add Output parameters as following:
- In Parameter Name enter:
SelectedOrder. - In Description enter: Selected order details are passed to the Process.
- In Data type choose: Sales Order.
001 - In Parameter Name enter:
Save your work.
Variables that are used, build your automation, and are data storage that have a name, a type (example: string, list of string or data type), and a value. A variable in the automation is also associated to a step represented by its number.
In the Automation Details under Tools:
- Search for the Sales Order data type (created in the previous step).
- Drag and drop the Sales Order data type into the canvas.
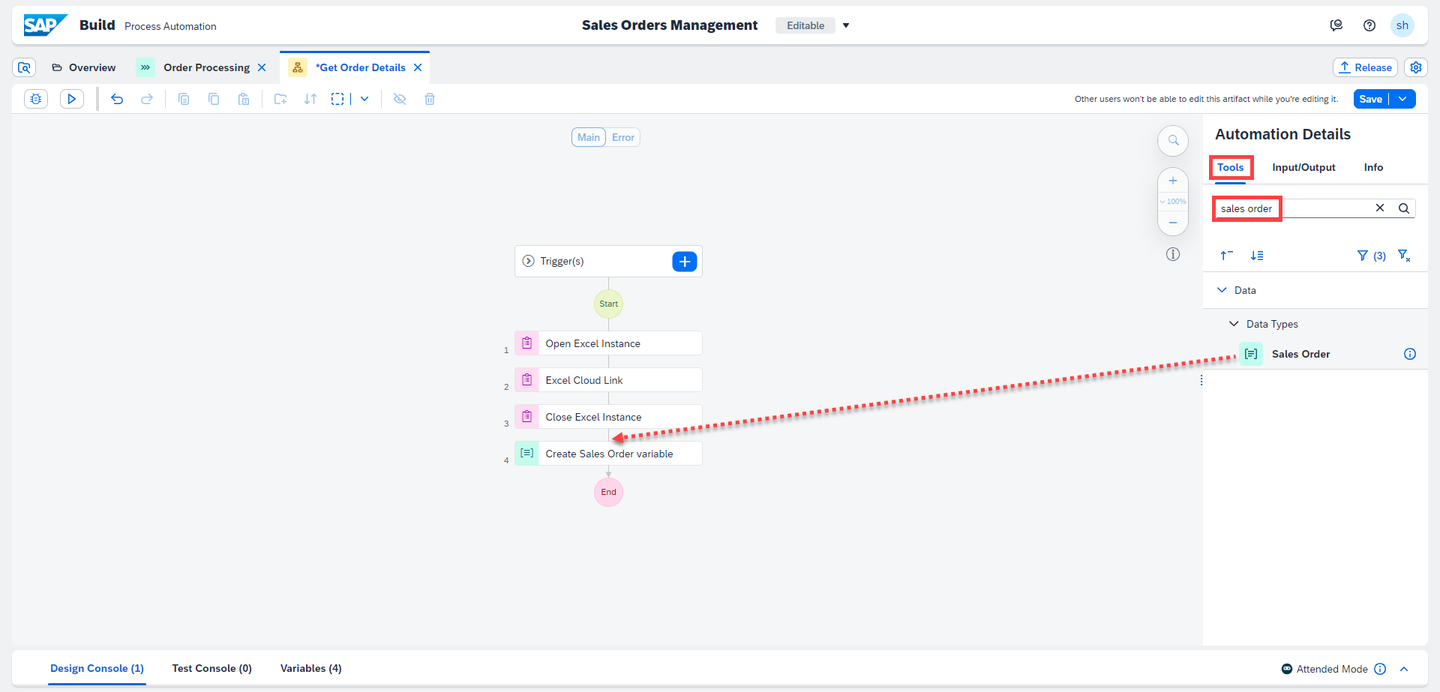
001 A variable of the data type Sales Order is created.
Select Create Sales Order variable. Under Output Parameters enter the value as
selectedOrderDetails.
001 Save your work.
Now you will loop through each Order from the Excel sheet, retrieve the order details for order number submitted in the Order Processing Form. For Each control allows you to go through a list of members provided as input to your automation, and execute an action for each member in that list.
This control has the following loop parameters:
currentMember- The member of the list for the current loop iteration.index- An integer that is the index of the current loop iteration, starts at 0.
To loop through each order:
- Click on the canvas.
- In Automation Details search for the control For Each.
- Drag and Drop the activity into the canvas.

001 Select For Each activity, enter the value of Set looping List as Orders.

001 To match the desired order, a control activity has to be added to search for a match to its order number. The Condition activity is the activity that you will add. In this condition, you will check if the order number entered in the Form is available in data read from Excel in Step 2.
To add the condition:
- Click on the canvas.
- In Automation Details search for the activity Condition.
- Drag and Drop the activity inside the For Each block.

001 Choose Condition, select three dots next to Condition Expression field, select Edit Formula.
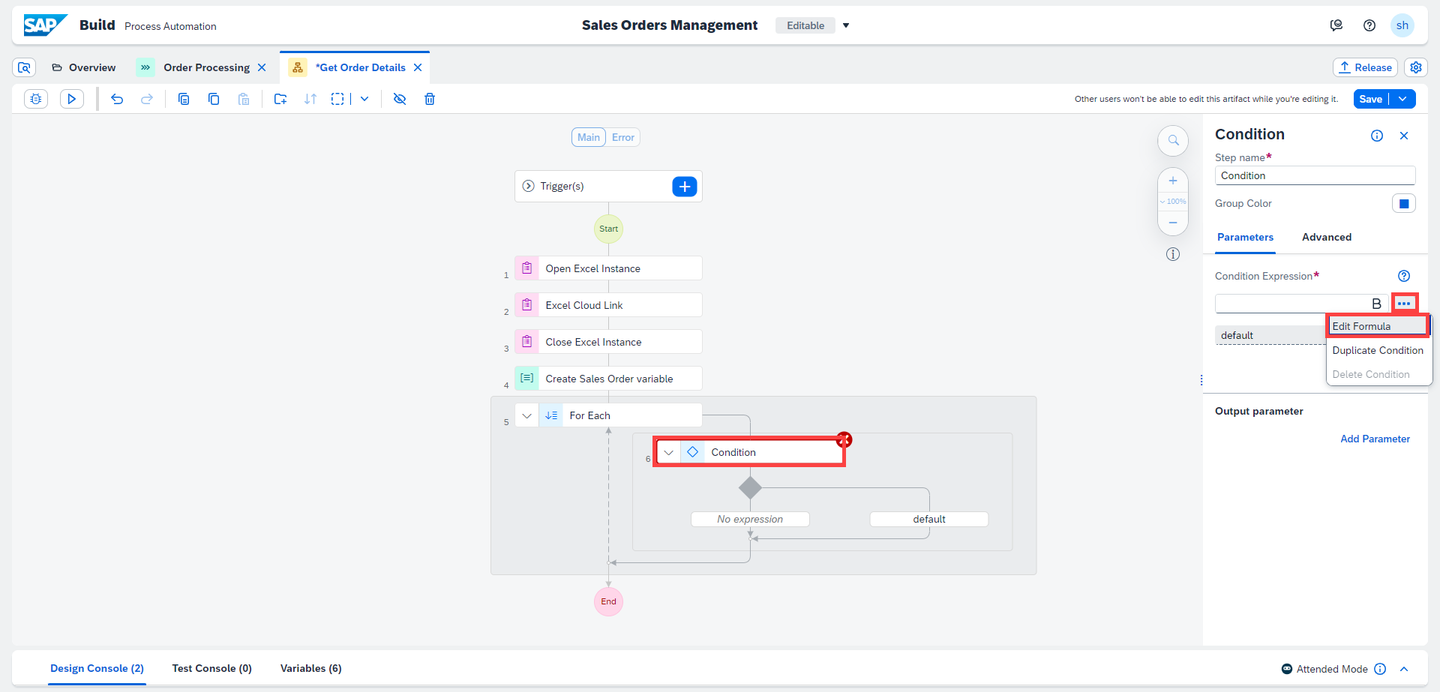
001 A pop up window appears to enter the condition expression:
- You can enter this expression manually or you can expand the Variables list and select the given variables to form the expression:
Step0.OrderNumber === Step5.currentMember.orderNumber. - Select the Save Expression button.

001 If the order number is found in Excel, i.e. the condition is True, set the variable using Set Variable Value activity that is a Data Management activity.
- You can enter this expression manually or you can expand the Variables list and select the given variables to form the expression:
To add Set Variable Value:
- Click on the canvas.
- In Automation Details search for the activity Set Variable Value.
- Drag and Drop the activity into the canvas below the condition you set.

001 Select Set Variable Value. In the configuration screen on the right, do the following:
- In the variable field enter
selectedOrderDetails. - In the value field enter
currentMember.

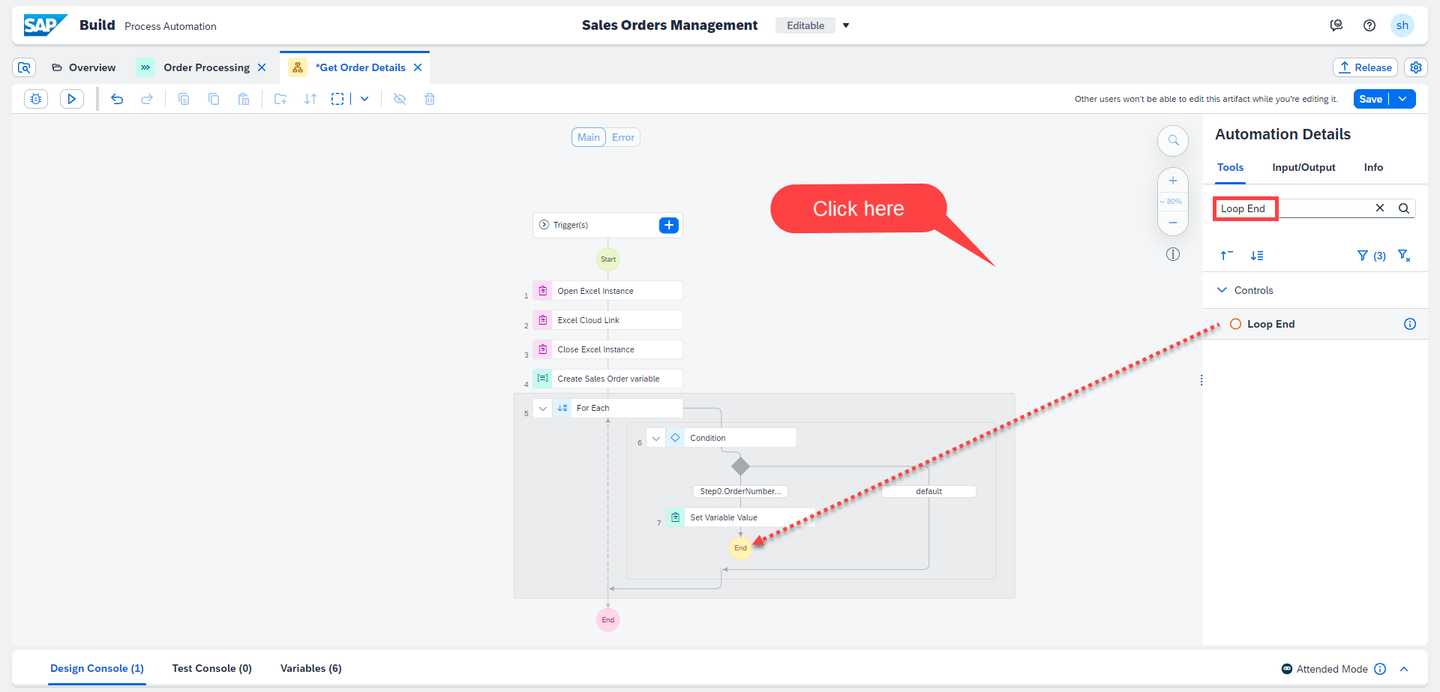
001 Once the order number is found in the Excel, use the control End Loop to stop the loop.
- In the variable field enter
To end loop:
- Click on the canvas,
- In Automation Details search for the activity Loop End,
- Drag and Drop the activity into the canvas just below the Set Variable Value.
001 Use Log Message activity to print your results. To add Log Message:
- In Automation Details search for the activity Log message,
- Drag and Drop the activity into the canvas outside the For Each loop.

001 Use the activity to check
selectedOrderDetailsin testing mode. To do that:- Select Log Message,
- In message field, select
selectedOrderDetails.
Save your work.
Apart from creating an output parameter, it is mandatory to pass the data through the End step to expose the data outside the automation.
To do that:
- Select End.
- In the configuration screen on the right, under the Output Parameter, in the
SelectedOrderfield enterselectedOrderDetails. - Save the Automation.

001 Make sure to add the steps Condition, Set Variable Value, End Loop inside the For Each block.
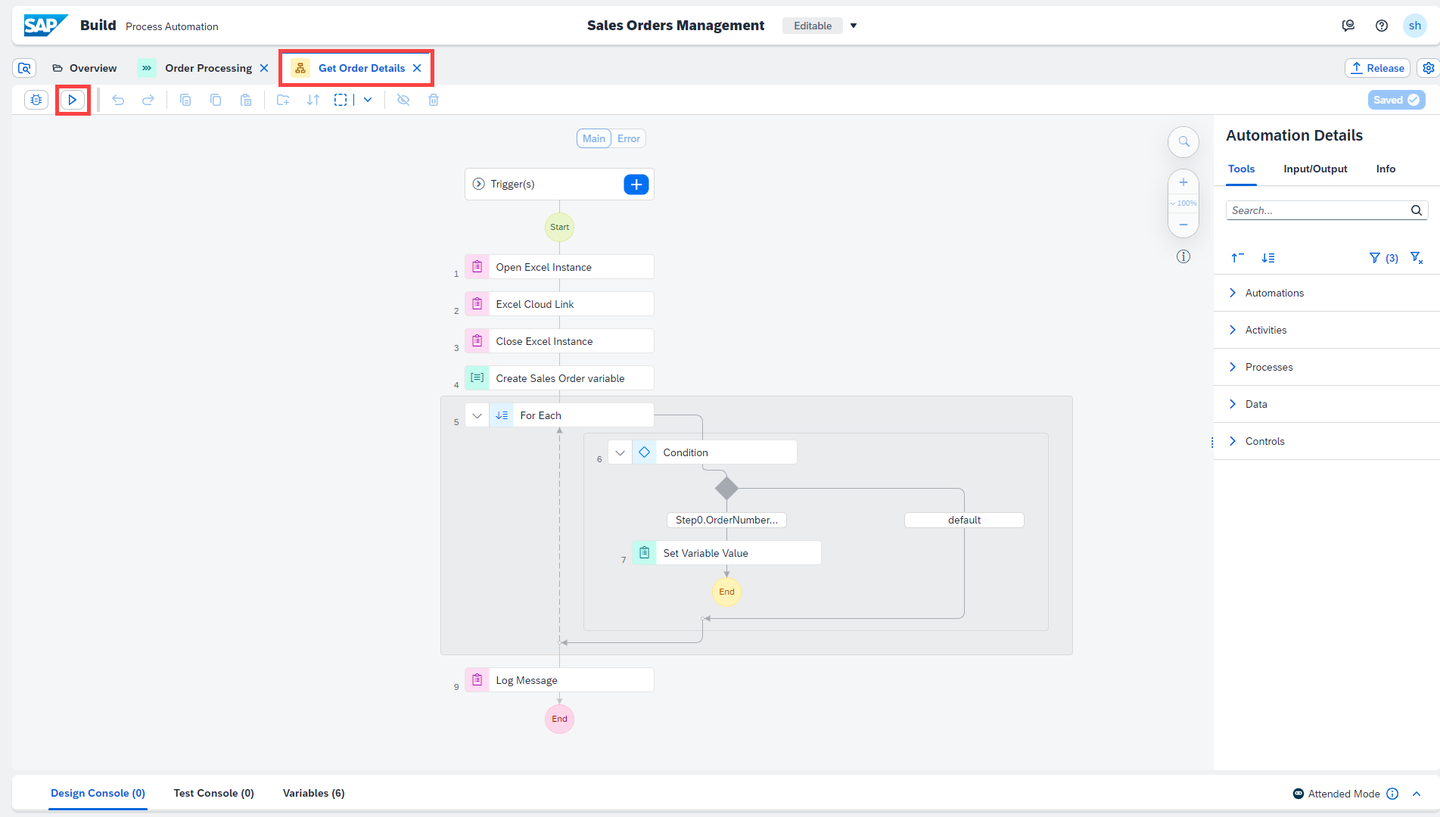
The complete Get Order Details automation looks as below.

001 Now you will map the Automation Parameters with the Form Parameters.
Select Order Processing process. Choose Get Order Details automation in the process.

001 In Get Order Details, map the input parameter
OrderNumberof the automation with the Order Number of Order Processing Form.
001 Choose the Save button.
Navigate back to the automation Get Order Details and choose the Test button.
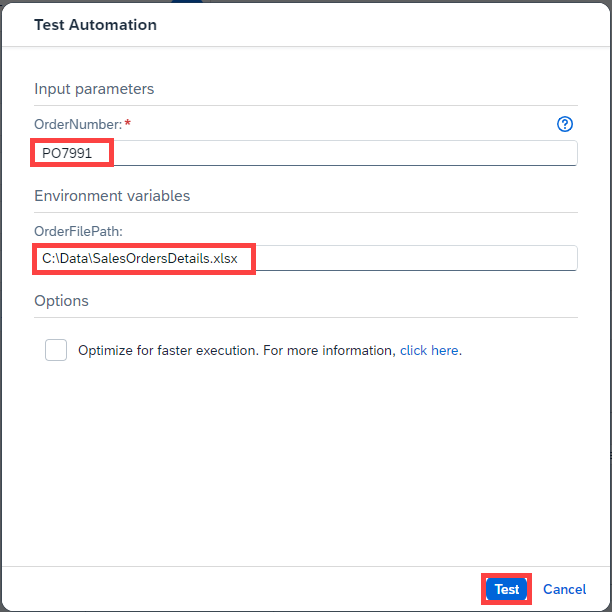
001 In the Test Automation window, enter the parameters to test the Automation:
Parameter Value OrderNumberAny order number which is available in Sales Order Data Excel OrderFilePathPath where the Sales Order Data Excel is stored on your local machine Select Test button.
001 Test Results:
- Automation opens the
SalesOrderDetailsExcel. - Reads the Excel content.
- Closes the Excel.
- Loops through Excel and verifies if entered
OrderNumberis available in the Excel. If theOrderNumberis available in the Excel, it sets the Orders Details. - Ends the looping.
- Prints the selected order details.

001 - Automation opens the
After the design of the automation that retrieves the data form the Excel file, simplify the start form by deleting the not needed fields.
In the Order Processing tab :
- Select three dots next to Order Processing Form.
- Select Open Editor.

001 In the form delete following inputs by selecting the 3 dots next to each input menu and selecting Delete:
- Order Amount.
- Order Date.
- Expected Delivery Date.
- Shipping Country.

001 Save the Form, close the Form Editor and go back to the Order Processing tab.

001
Since you have created an automation Get Order Details to collect Order Amount, Order Date , Expected Delivery Date and Shipping Country directly from the Excel file, you need to update the process condition which previously was dependent of Order Processing Form outputs.
Click on Condition and choose Open Condition Editor.

001 In the Edit Branch Condition, select conditions :
Item Condition Value orderAmountis less than 100000 shippingCountryis equal to India shippingCountryis equal to Germany Choose Apply to add the condition to the business process.

Process Condition
The different Forms of the process will need Inputs mapping from the automation Outputs.
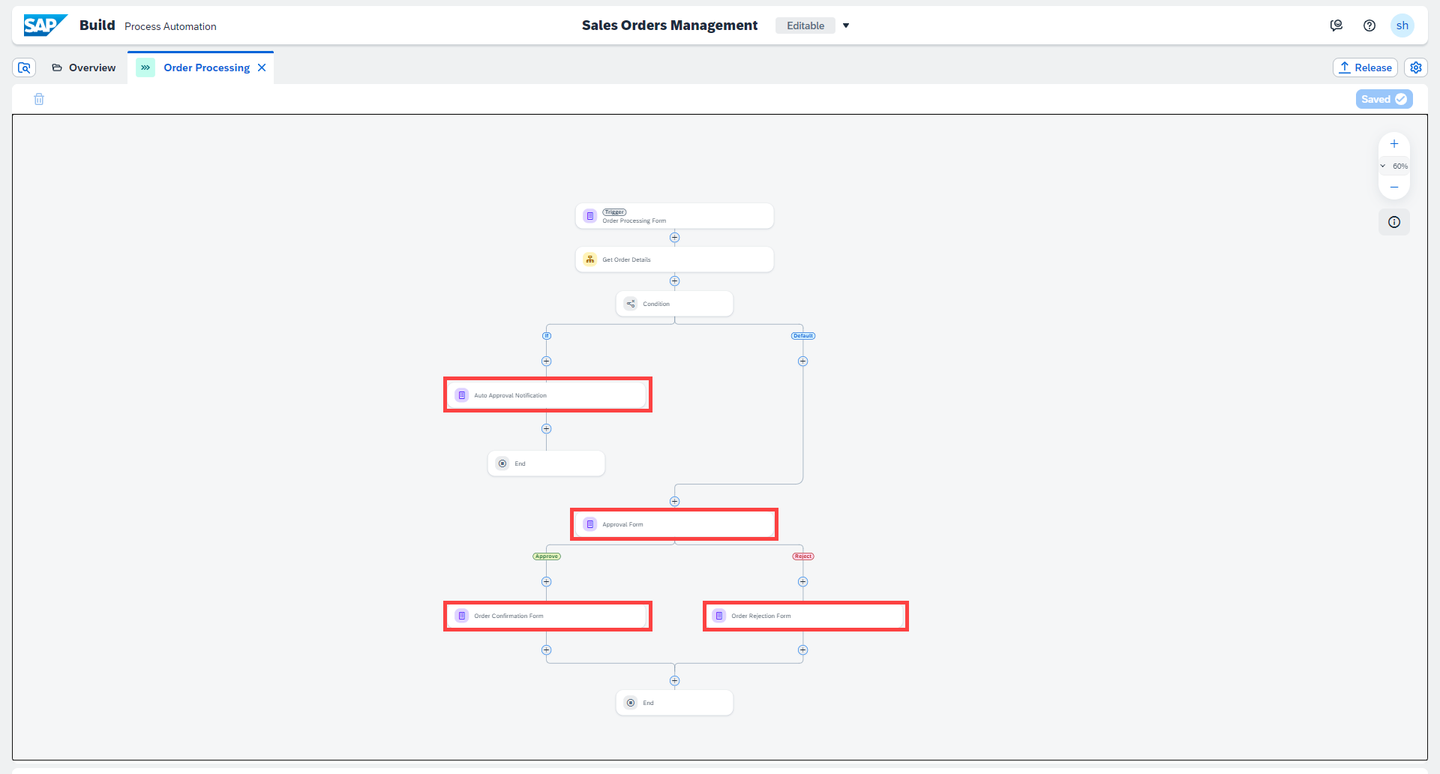
Select the Auto Approval Notification and go to the Inputs :
- In the Order Amount field, choose the
orderAmountfrom the Automation outputs. - In the Expected Delivery Date field, choose
expectedDeliveryDatefrom the Automation outputs.

001 - In the Order Amount field, choose the
Select the Approval Form and go to the Inputs :
- In the Order Amount field, choose the
orderAmountfrom the Automation outputs. - In the Expected Delivery Date field, choose
expectedDeliveryDatefrom the Automation outputs.

001 - In the Order Amount field, choose the
Do the same for the Order Confirmation Notification.

001 Do the same for the Order Rejection Notification.

001 Save the Process.

001
You have successfully completed creating an automation in your process.
Resources
Discussion
Share feedback on this tutorial or join the conversation in SAP Community.