
Overview
You will learn
- How to create an Action Group
- How to add BAPI Action in Action Group
- How to configure the Action Group


Prerequisites
Prerequisites
- Desktop agent version must be equal to or greater than 2.0.30.
- Install Microsoft Visual C++ 2010 Redistributable Package x86, available on the Microsoft website.
- For using SSO connection system, SSO (SAP Single Sign-On) must be configured on your system.
- BAPI with Remote-enabled Module.
Steps
Intro
IMPORTANT: Please refer to sample Connect BAPI using Action Group in the SAP Build Store if you face any issues while following the tutorial. To retrieve the sample, refer to step 7 of this tutorial.
BAPI is a standard interface to the business object model in SAP products. BAPIs are the primary methods through which customer code and third-party applications interact with SAP products. An Action Group is collection of actions that once executed, return some response. BAPI is part of an Action Group whose actions help you to construct the parameters to execute the BAPI module and return the BAPI response.
In this tutorial, you will create an Action Group Artifact and connect to BAPI RFC_GET_TABLE and query the MAKT-Material Master related table.
Login to SAP GUI application. Run the se37 transaction.

Action Project Select the
RFC_READ_TABLEmodule as the Function Module.
Action Project Review the Import options for this module.

Action Project When you execute the module, you get the following output.

Action Project This is the output we expect at the end of our automation. In the next steps you will be building an automation for the same.
In the SAP Build Lobby, select the Create button.

Action Project In the popup, select Build an Automated Process.

Action Project Select Task Automation option.

Action Project Enter your project name and select Create.

Action Project In the Configure Agent Version popup that appears, select your desktop agent version. Select Confirm.

Action Project In the Create Automation popup, enter the name of the automation and select Create.

Action Project
Select the + icon in top-left corner. Select Create option and choose Action Group.

Action Project In the Create Action Group popup, enter the name of your Action Group and set the Connection type to Basic.

Action Project There are three types of connections in BAPI Connection System. SSO: This connection type allows you to set SSO connection.
SNCName,MessageServer,InstanceNumberand Client are commonly used for this connection type. By default,SNCModeis set to true for this connection type. Basic: This connection type allows you to set Basic connection. User, Password,MessageServer,InstanceNumberand Client are commonly used for this connection type. By default,SNCModeis set to false for this connection type. Custom: This connection type allows you to set any other advance connection. You can add connection parameters as per your requirement. By default,SNCModeis set to false for this connection type. However, you can change theSNCModevalue by adding the parameter. In the tutorial, you will use Basic Connection Type .Open SAP Logon Pad. Select the system, right-click the connection and select Properties.

Action Project Copy the details for your connection from the System Entry Properties to Create Action Group popup to let the Action Group connect with your system.

Action Project In the Connection Parameter popup, enter your Username and Password and select Create Connection.

Action Project
Each Action Group artifact can have multiple actions. Each Action corresponds to a single BAPI selection.
In the BAPI Editor, select Create an action option.

Action Project In the Create BAPI Action popup, enter the Action name and select Create.

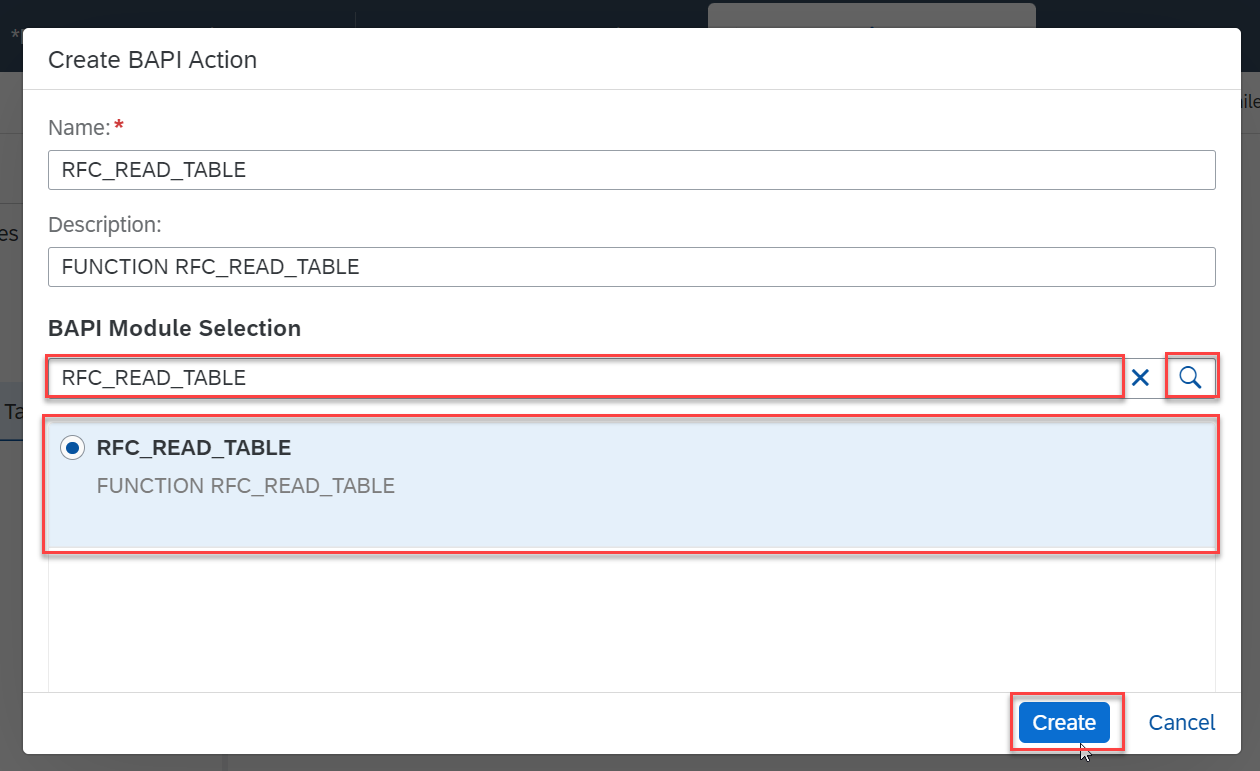
Action Project In the next popup,
- Enter the BAPI module name as
RFC_READ_TABLE. - Select the search icon.
- Select the BAPI module from the search results.
- Select Create.
Action Project - Enter the BAPI module name as
In the Input tab, select the
QUERY_TABLEand ROWCOUNT fields.
Action Project Select the OUTPUT tab. Select the Data field and choose Save.

Action Project To test your BAPI module select the Test tab.
- Enter the
QUERY_TABLEas MAKT. - Enter the ROWCOUNT as 10.
- Select the Test option.

Action Project - Enter the
You can see the data fetched from the given table is shown in Response Preview.

Action Project Select Release.

Action Project In the Release popup, select Release.

Action Project After releasing the Action Group you are redirected to the Overview page. Here you can see the input and output data types are automatically created according to the fields we selected in previous steps.

Action Project
Select the Execute BAPI module automation.

Action Project In the Automation Editor, search for Try control. Drag the control to the canvas.

Action Project Select the Try control and set the Error to catch parameter to Error.

Action Project Now search for your Action Group BAPI Action Group and drag and drop the RFC Read Table Action in the Try block.

Action Project Once you add the RFC Read Table Action, the BAPI SDK will be automatically added which can be seen in project dependencies.

Action Project Select the Action Group and enter your SAP Logon connection Username and Password.

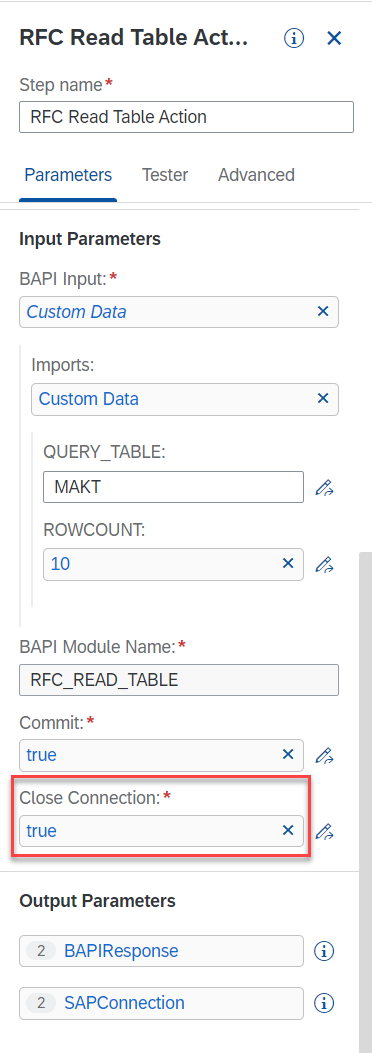
Action Project For the BAPI Input, select Create Custom Data.

Action Project For the Imports option, select Create Custom Data.

Action Project Under the
QUERY_TABLEinput, enter the name of the table you want to read. In this use case, we are reading MAKT table. Enter the number of rows you want to query in ROWCOUNT input parameter.
Action Project The parameter Close Connection closes the connection to your external system automatically. Hence you don’t need to close the connection explicitly.
Action Project Search for the Log Message process and drag it below step 2 - RFC Read Table Action.

Action Project Select the Log Message step and in the message field, select BAPI Response.

Action Project
Select the Test button in top-left corner.

Action Project In the Test Automation popup, select Test.

Action Project In the Test Console you can see the number of rows mentioned in row count have been fetched and displayed.

Action Project
With this, you have successfully created a BAPI Action Group that uses BAPI Action and retrieves the data from the backend in your automation.
The entire project is available in the SAP Build Store as a sample and you can follow the below steps to retrieve the project and use it for reference.
From the SAP Build Lobby, navigate to Store.
Search for the sample project: Connect BAPI using Action Group.
Choose Create from Template to retrieve the sample and save it as a new project in your lobby.

Store Choose Create.

Create Your project gets created in editable version. You may release and deploy it and run the project.
Navigate back to the lobby by clicking on the SAP logo.

Project You can see your project is available in the lobby.

Lobby
Resources
Discussion
Share feedback on this tutorial or join the conversation in SAP Community.