
Overview
You will learn
- How to use a list as an input/output to your decision.
- How to use reusable text rules.
- How to bind list in decision to table in form.


Prerequisites
Prerequisites
- Either complete the tutorial Create Tables in the Form OR
- Retrieve the sample project Sales Order Management (MI05) from the store
- Setup the desktop agent to run automation as explained in this tutorial.
- Download the Orders.xlsx in your local machine.
Steps
Intro
In this tutorial, you will automate the process where the sales executive is notified about the erroneous or error-free orders through a task in the inbox of SAP Build Process Automation.
The process is designed to have the following artifacts:
- A form where the sales executive would provide the path of sales order excel maintained in his system.
- Automation to read the sales order details.
- Decision artifact to process the details of a list of orders extracted from excel. Based on the rules created in the decision, it would determine whether the order details are error-prone or error-free.
- Notification form to the sales executive which displays the erroneous or error-free sales orders in a table format.
The process looks as below:

After completing the prerequisites, you will create a new process.
Navigate to the Overview tab, from the editable version of your project, click the Create dropdown and choose Process.

decision In the Create Process dialog box, do the following:
- Enter a Process Name such as Order Processing Error Table
- Choose Create
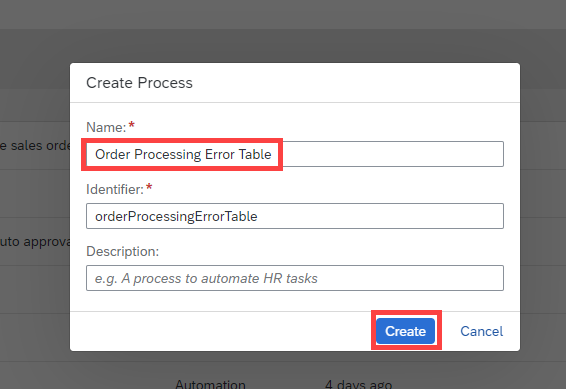
decision Your new process opens in the process builder. You will now create a trigger form that will start the process.
Choose Add a Trigger.

decision Select Submit a Form.

decision Choose Blank Form.

decision In the Create Form dialog box, do the following:
- Enter a Form Name such as Order File Path Form
- Choose Create

decision Choose the three dots and select Open Editor.

decision Now, you will edit the form by using the available layout and input field options. Start by dragging and dropping the form layout fields, then enter the given names and field settings as shown in the example below:
Form Fields Field Settings with Label Headline 1 Order File Path Form Paragraph Please provide the full file path for the Excel file and submit. Text File Path For the input label Text select the Required checkbox, and Save.

decision
Navigate to the Overview tab, from the editable version of your project, search for Get Order Details automation. Choose the three dots and select Duplicate.

decision In the Duplicate Artifact dialog box, enter an Automation Name such as Get Order Details For Error.

decision Your new automation opens in the automation editor.
Now, select all activities from Create Sales Order variable to End as shown in the image below, pressing Ctrl and selecting the requested activities.

decision Right-click and select Delete from the context menu.

decision In the Automation Details section on the right, select Input/Output, and in the inputs section rename
OrderNumbertoFilePath. In the output parameter section renameSelectedOrdertoSalesOrderDetailsand select List.
decision Select Excel Cloud Link, in the details on the right side, choose the Edit Activity button.

decision In the Workbook Path field, select
FilePath.
decision Select End, in the configuration screen on the right, under the Output Parameters, in the
SalesOrderDetailsfield enterOrders.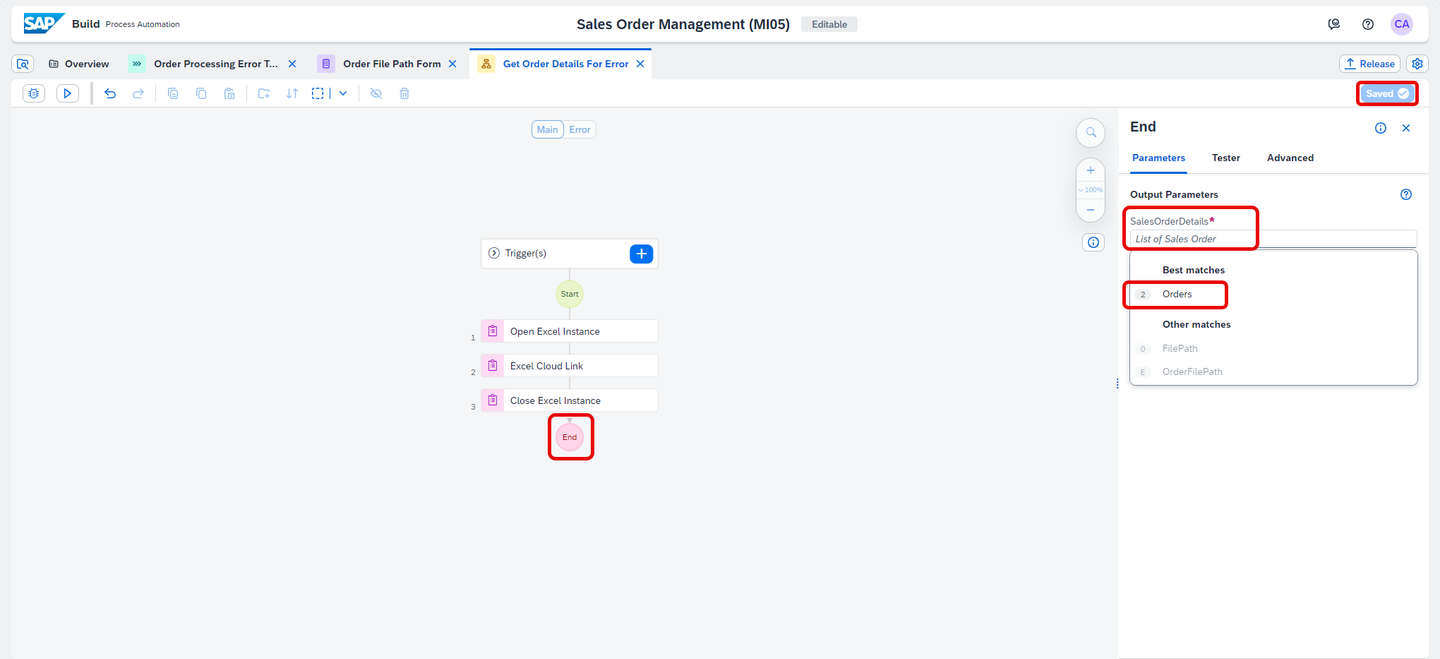
decision Save your automation.
Navigate to Order Processing Error Table process.
Choose + below the Trigger form.

decision Select Automation.
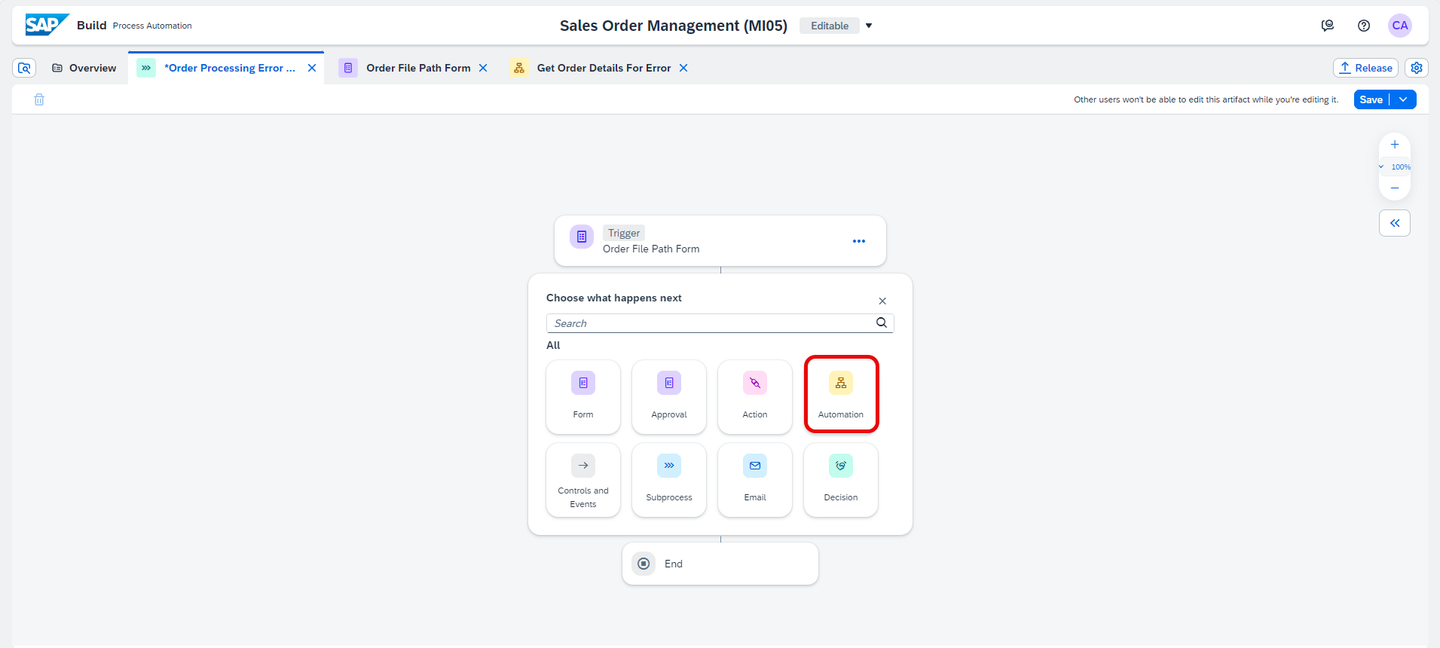
decision Choose Get Order Details For Error automation from Available Automations.

decision Map the input parameter
FilePathof the automation with the File Path of Order File Path Trigger Form.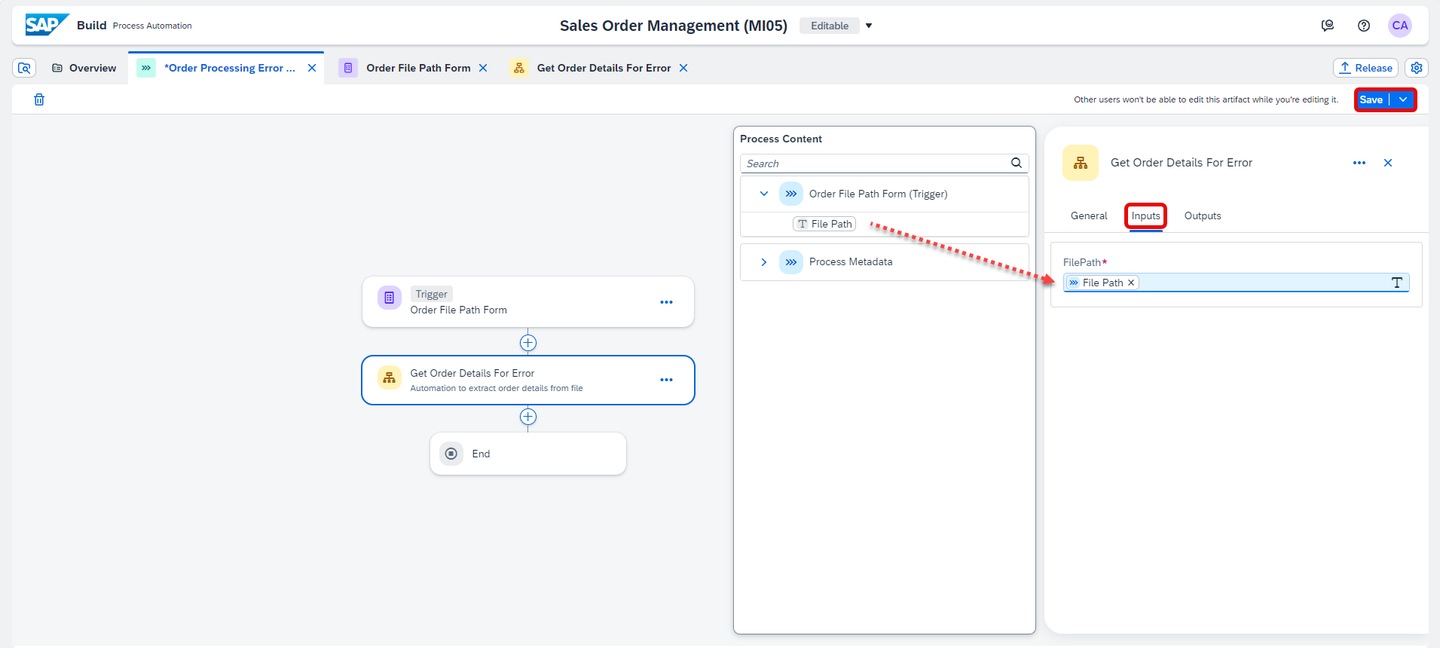
decision Save your process.
Go back to the Overview tab, select Error Output data type.

decision In the Error Output data type screen, choose New Field to add a new attribute to the data object.

decision In the Field Details section on the right, in the Name field enter Order Number. Keep the type as String.

decision Save your work.
Since you have updated the Error Output data type with a new field Order Number, you will have to update the decision table to take into account this change.
Navigate back to the Overview tab.
Choose Order Validity Check decision.

decision Select Rules and choose Error Check.

decision Select the pencil icon on the top right to re-configure the rule.

decision Choose Next Step until Configure Result section.

decision In the Configure Results section, click on Validity Check Output to update the outputs to add
OrderNumber.Choose Next Step.

decision Choose finish to update the decision table.

decision Choose Save and close the window.

decision
Navigate to the Order Processing Error Table process. Choose + below the automation.

decision Select Decision.

decision Choose Blank Decision.
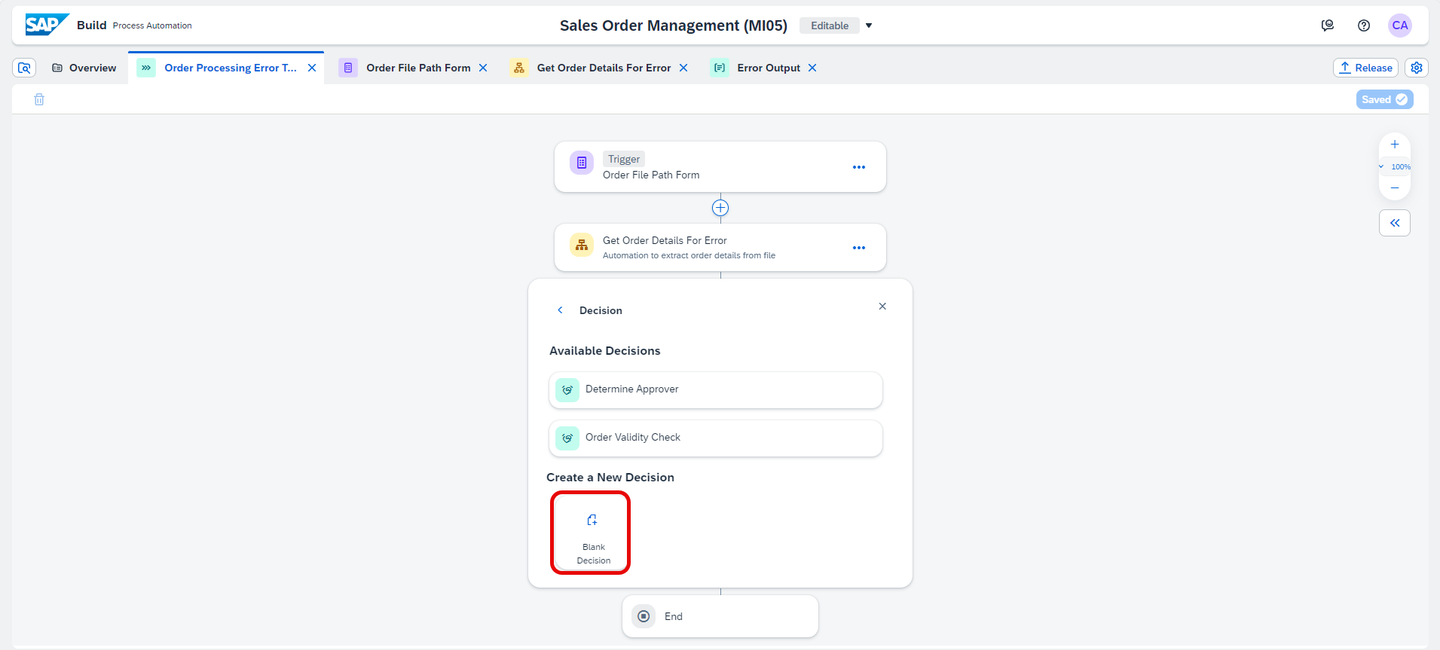
decision In the Create Decision window, enter a Decision Name such as Order Error Checking and choose Create button.

decision The decision editor will open where you can start modeling the decision.

decision
You will select Add Input Parameter button and Add Output Parameter button to configure input and output parameters.

Configure Input Parameter:
- In Name enter: Order List Input
- In Description enter: Order List Input
- In Type choose: Sales Order, and select List
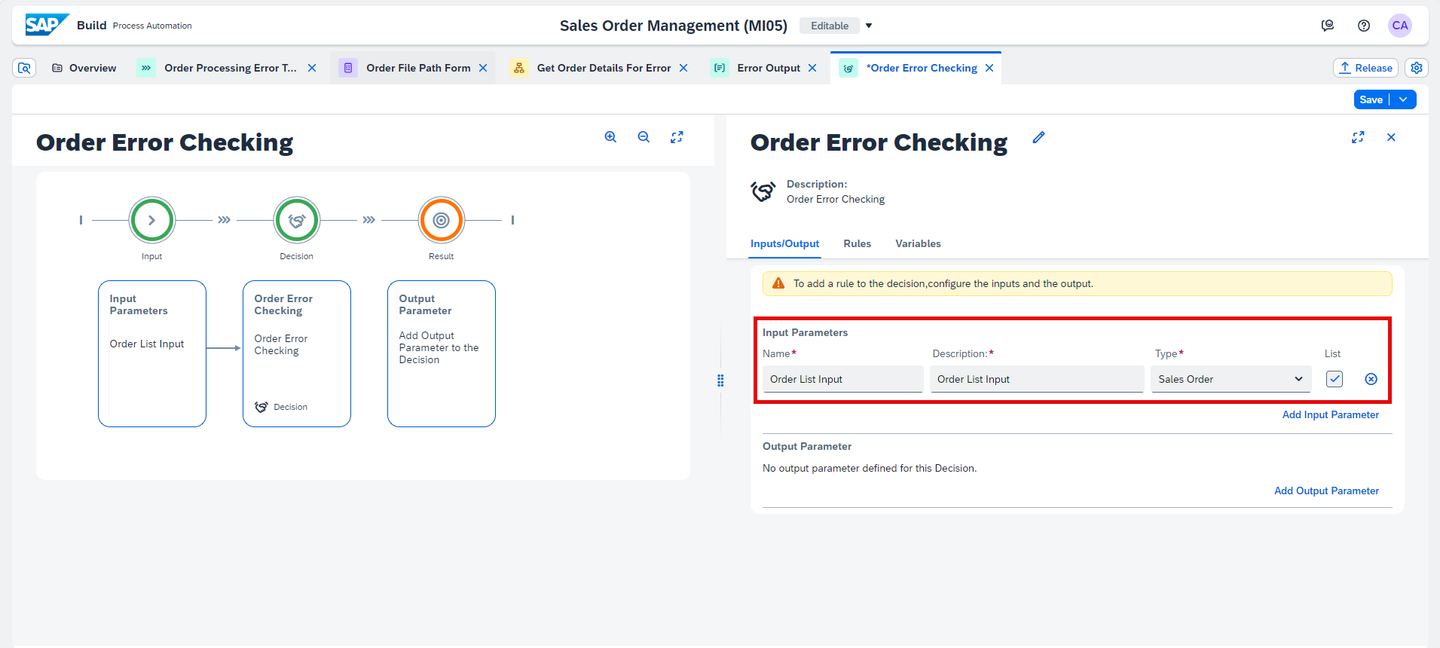
decision Configure Output Parameter:
- In Name enter: Order Error List
- In Description enter: Order Error List
- In Type choose: Error Output and select List

decision Save your decision.
Now, you will add intermediate variables that you will use to store the results of the rules. Select Variables and choose Add Variable.

decision In the Decision Variable window:
- In the Name enter Order Input
- In the Description enter Intermediate variable to store Order Details
- Under Type select Sales Order
- Choose Save

decision Here, you will use an intermediate variable to store the inputs, which can be utilized later in reusable text rules, thus avoiding overwriting the original inputs.
Similarly, for the second variable select Add Variable.

decision In the Decision Variable window:
- In the Name enter Error Output
- In the Description enter Intermediate variable to store the error details of the Orders
- Under Type select Error Output
- Choose Save

decision This intermediate variable will serve to temporarily store the outputs of the text rules for each error test, without overwriting the results of the initial tests. Additionally, it allows appending the result of each test to the variable, preserving the information from previous tests.
Save your decision.

decision
Now, you are going to add reusable text rules, which are validation or error detection rules. Therefore, you will create a reusable rule for each error search in the command. Select Rules and choose Add Rule.

decision The first text rule you will create is a test for the delivery date of the order. In the Create Rule window:
- In the Rule Type select Text Rule
- In the Rule Name enter Date Error test
- In the Rule Description enter check order delivery date
- Active Reusable Rule
- Choose Next Step button

decision Configure the output or result of the decision table. Under Result Vocabulary:
- Select Error Output data type
- In the Vocabulary section choose Error Output to add the Result Attributes
- Choose Next Step button

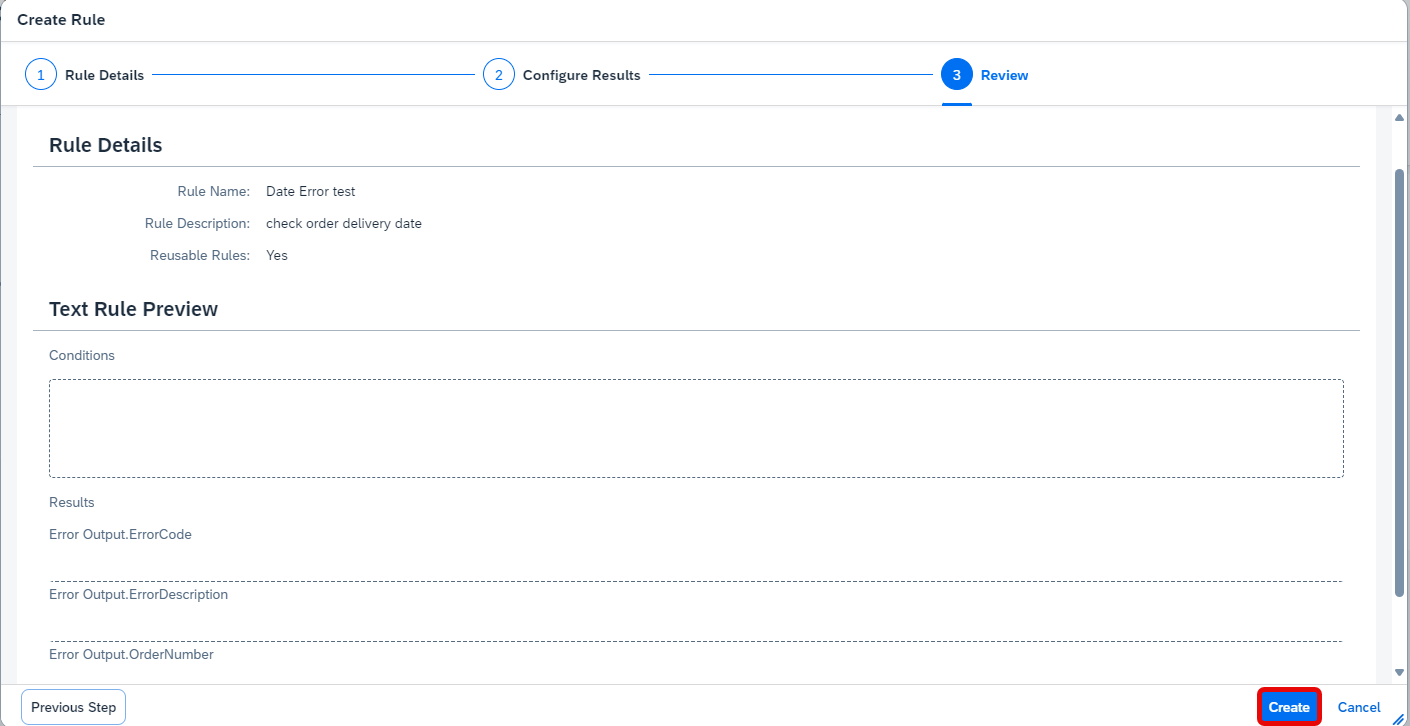
decision Review and choose Create button to create the rule.
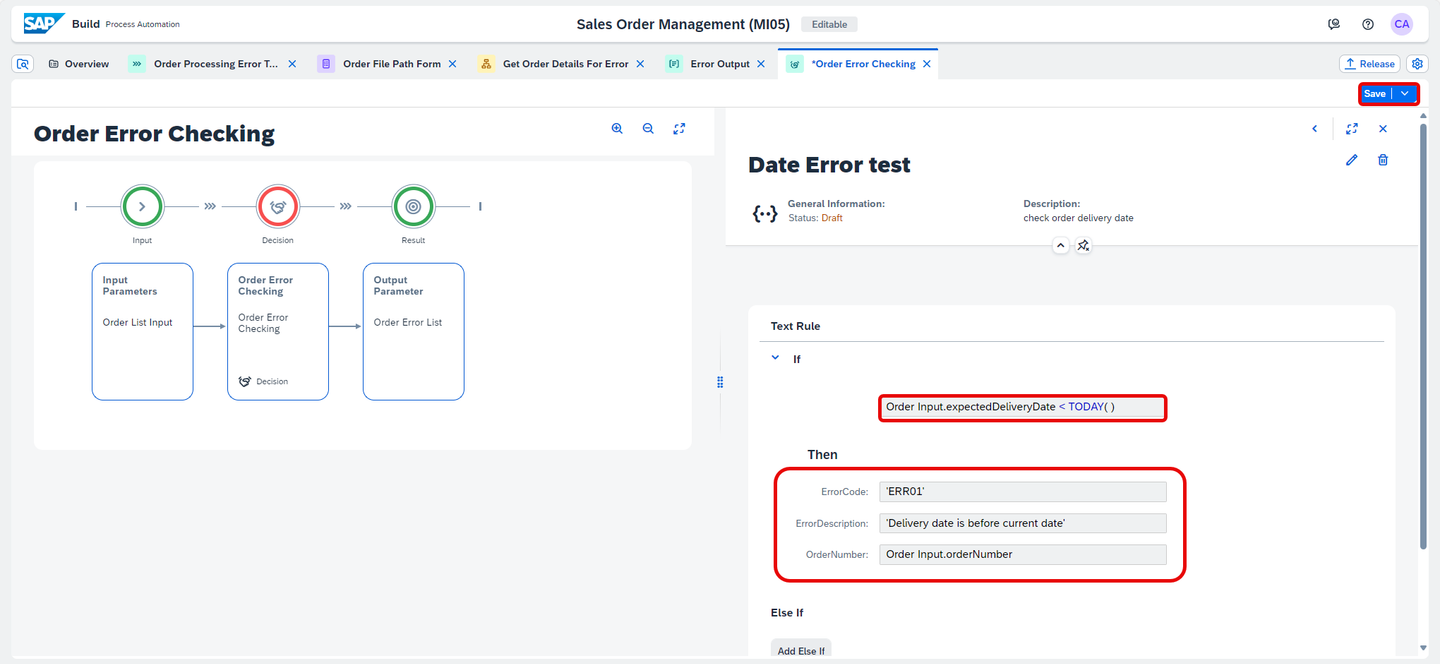
decision In the newly created Text Rule, add values to condition and result columns:
- in the If condition: Order Input.expectedDeliveryDate < TODAY( )
- In
OrderNumberenter : Order Input.orderNumber - In
ErrorDescriptionenter : ‘Delivery date is before current date’ - In
ErrorCodeenter : ‘ERR01’
Do not copy and paste the values, use the suggestions pop up (Ctrl+Space) as shown in the picture below. When entering the error code and its description, please remember to put two singles quotes first and then type the code and description inside them.

decision Once you have successfully entered the values, your rule looks as below.
Save your work.
decision Go back to Rules, click on Back Button.

decision Click on the three dots next to Date Error Test rule and choose Duplicate.
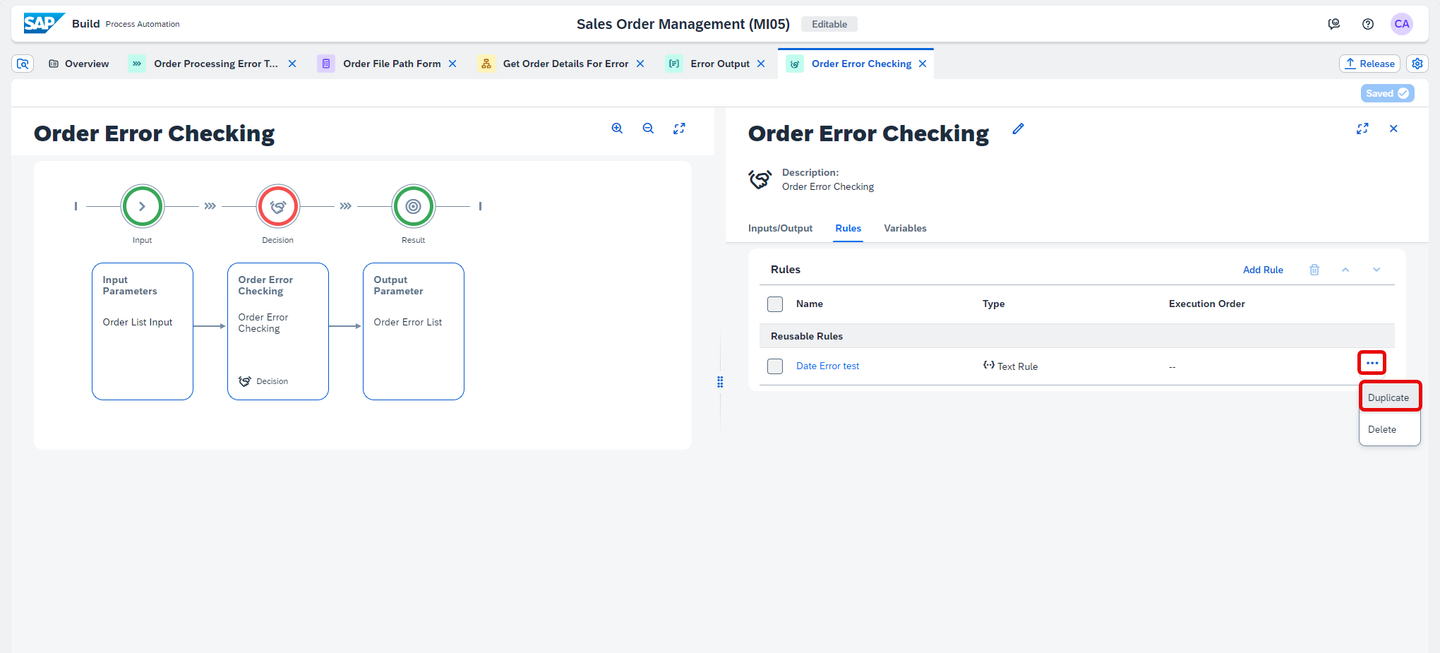
decision The second text rule you will create is a test for the order amount. In the Duplicate Rule window:
- In the Rule Name enter Order Amount Error test
- In the Rule Description enter Test the order amount
- Choose OK button

decision Click on the Order Amount Error test rule.

decision In the newly created Text Rule, change the values to condition and result columns:
- in the If condition: Order Input.orderAmount > 100000
- In
OrderNumberenter : Order Input.orderNumber - In
ErrorDescriptionenter : ‘Fraudulent Request’ - In
ErrorCodeenter : ‘ERR02’

decision Save your rule.
Go back to Rules, click on Back Button.

decision Now, you will create three more text rules to perform three additional tests. To do this, repeat the same steps: click on the three dots next to text rule and select Duplicate to create the three new text rules.

decision The third text rule you will create is a test for shipping country. So similarly Duplicate a new text rule and in the Duplicate Rule window:
- In the Rule Name enter Shipping Country Error Test
- In the Rule Description enter check the Shipping Country
- Choose OK button
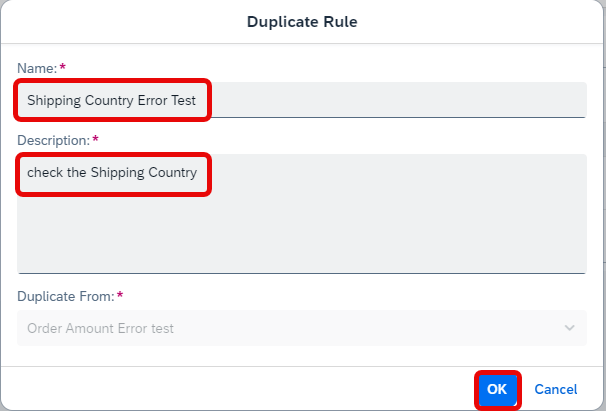
decision Click on the newly created Text Rule and change values to condition and result columns:
- in the If condition: Order Input.shippingCountry NOTEXISTSIN [ ‘India’ , ‘United Kingdom’ ]
- In
OrderNumberenter : Order Input.orderNumber - In
ErrorDescriptionenter : ‘Delivery not supported in this country’ - In
ErrorCodeenter : ‘ERR03’ - Save your rule and click on Back Button.

decision The same goes for the fourth text rule, what you will create is a test for the order status. Duplicate a new text rule and in the Duplicate Rule window:
- In the Rule Name enter Order Status Error Test
- In the Rule Description enter test order status
- Choose OK button

decision Click on the newly created Text Rule, change values to condition and result columns:
- in the If condition: Order Input.orderStatus = '’
- In
OrderNumberenter : Order Input.orderNumber - In
ErrorDescriptionenter : ‘Order status is not set’ - In
ErrorCodeenter : ‘ERR04’ - Save your rule and click on Back Button.

decision Similarly for the final text rule, you will verify if the order has no errors. In the Duplicate Rule window:
- In the Rule Name enter No Error Test
- In the Rule Description enter test if the order has no errors
- Choose OK button

decision Click on the newly created Text Rule, change values to condition and result columns:
- in the If condition: Order Input.expectedDeliveryDate >= TODAY( ) AND Order Input.orderAmount < 1000000 AND Order Input.shippingCountry EXISTSIN [ ‘India’ , ‘United Kingdom’ ] AND Order Input.orderStatus != '’
- In
OrderNumberenter : Order Input.orderNumber - In
ErrorDescriptionenter : ‘No Error’ - Save your rule and click on Back Button.

decision
Now, you will create a rule that will execute and utilize all the reusable text rules you created before in a loop for each order. The results will be sent to an error table stored in the previously created variable.
Go back to Rules and click on Add Rule.

decision In the Create Rule window:
- In the Rule Type select Text Rule
- In the Rule Name enter Main Rule
- In the Rule Description enter A rule that executes all error-testing rules in a loop for each order
- Choose Next Step button

decision In the Configure Results step, under Result Vocabulary choose
No Resultand click on Next Step button.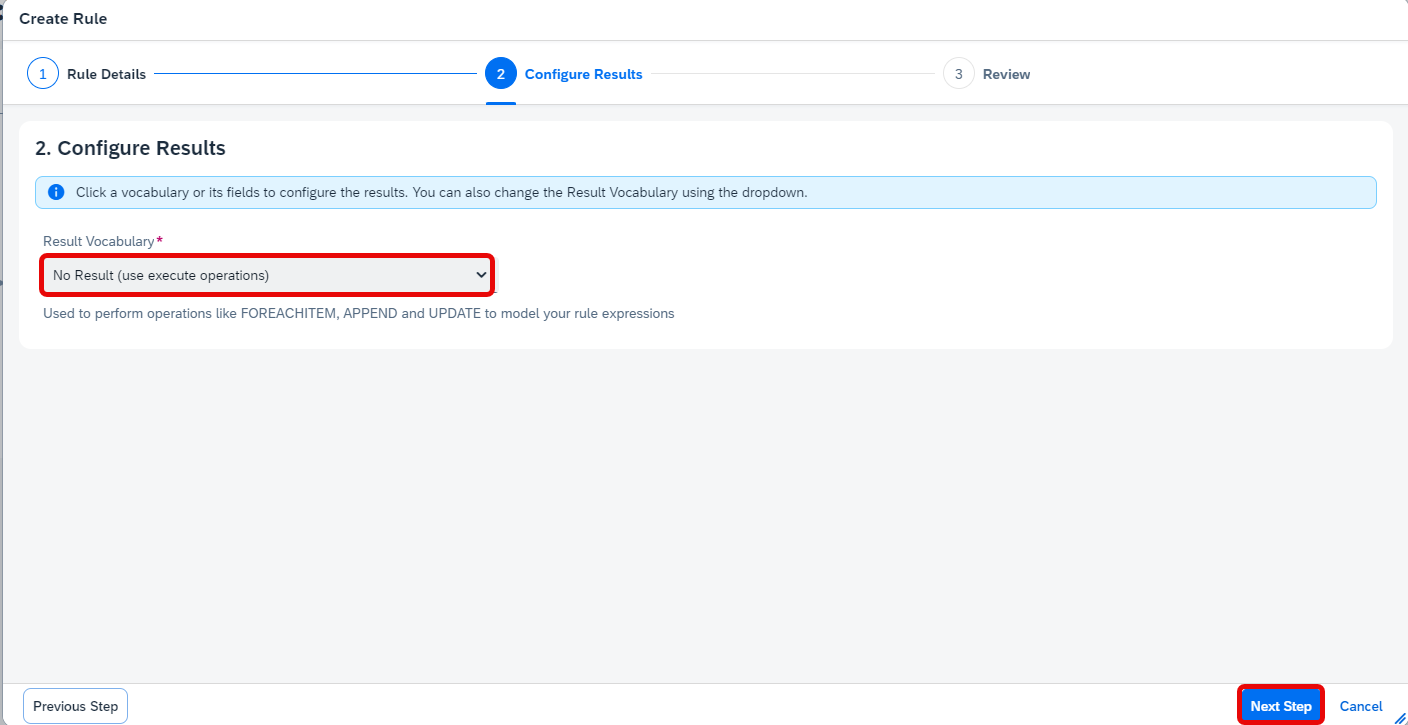
decision Review and choose Create button to create the rule.

decision In the newly created Text Rule, in the If statement, assign
trueto represent the absence of any specific condition.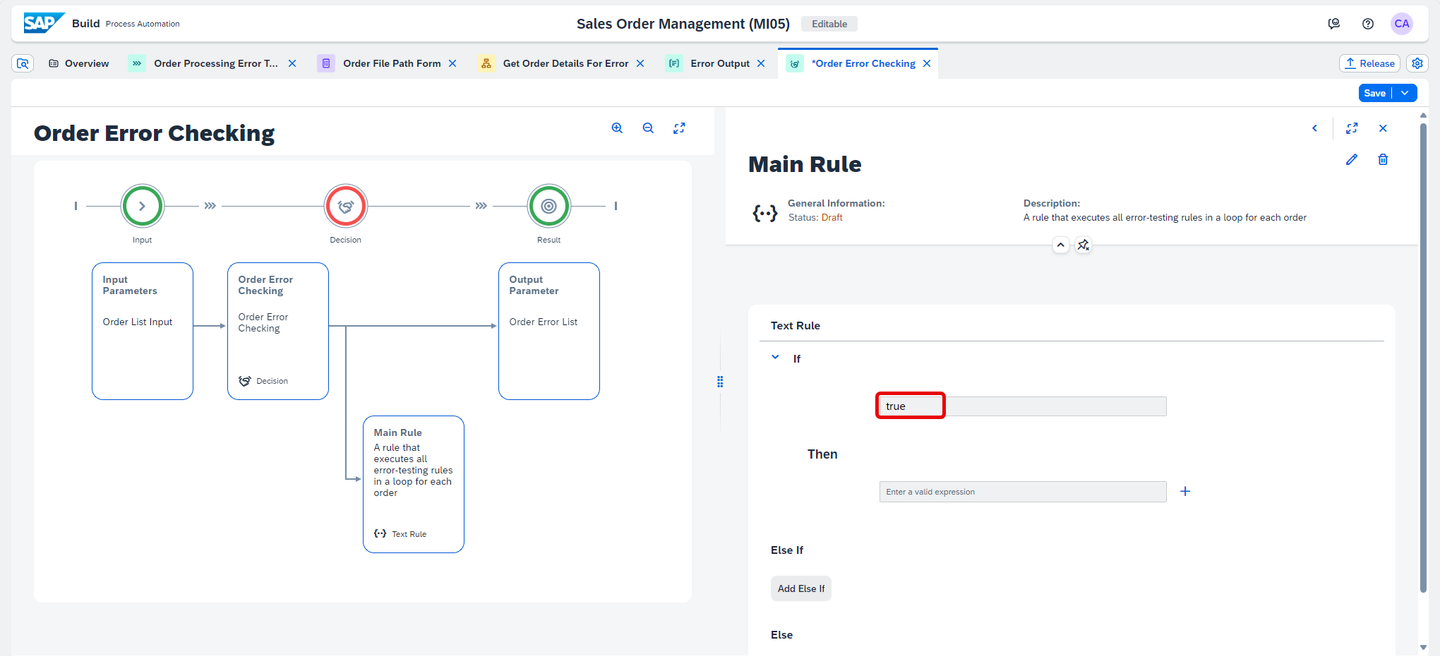
decision In the Then statement, press Ctrl+Space on your keyboard and select Loop Functions.

decision A window for configuring loop functions opens. Configure the function as follows:
- In the Vocabulary select
Order_List_Input. - In the Current Item select Order Input.
- In the Expression statement enter: APPEND (Order Error List, Date Error test)
- In the Vocabulary select
Click on Apply.

decision With this function, you iterate through each element, which represents each order, and perform the delivery date test. Then, it appends the test output to the Order Error List. So, the objective is to repeat the same process for each reusable text error rule that you have previously created and gradually add the collected errors for each order to the Order Error List.
Click on the Then expression.

decision In the Configure Loop Functions window, select + to add a new expression box and enter : APPEND (Order Error List, Order Amount Error Error test)

decision Similarly, add three more expression box and enter the following in each box:
- First box: APPEND (Order Error List, Shipping Country Error Test)
- Second box: APPEND (Order Error List, Order Status Error Test)
- Third box: APPEND (Order Error List, No Error Test)
- Choose Apply button.

decision So, here you will iterate through all the reusable text error rules that you have created earlier, one by one, for each order. The result obtained from each rule, whether there is an error or not, will be added to the Order Error List without overwriting the previous results. That is why you have used an intermediate variable.
Save your work.
Navigate back.

decision
Navigate to the Order Processing Error Table process, select Order Error Checking decision and do the following:
- Choose Inputs tab, under the select list click on the
List - SalesOrderDetailsto bind the properties forSalesOrderDetailslist.

decision - Choose Inputs tab, under the select list click on the
Save the process.
Go back to the Overview tab and under the Artifacts, search for Order Rejection Notification with Errors form. Choose the three dots and select Duplicate.

decision In the Duplicate Artifact dialog box, enter a Form Name such as Order Error Table Form and click on Duplicate.

decision Your new form opens in the form editor.

decision Click on the three buttons next to Customer Name and next to Order Number, then choose Delete to remove them.

decision 
decision Now, change the Headline and the Paragraph following the table below..
Form Fields Field Settings with Label Headline 1 Order Error Summary Table Paragraph The table below represents your processed order list with details of the errors found. 
decision Modify the table to add a cell for the Order Number. Click on the + icon beside Error Output field and select Text and enter Order Number as field name.

decision 
decision Click on the three dots next to Order Number and choose Move Left to shift the cell to the left, and repeat the operation to move the cell all the way to the left of the table.

decision 
decision Finally, change the name of Error Output field to Error Description.
Save your form.

decision Navigate to the Order Processing Error Table process.
Choose + below the decision.

decision Select Form.

decision Choose Order Error Table from Available Forms.

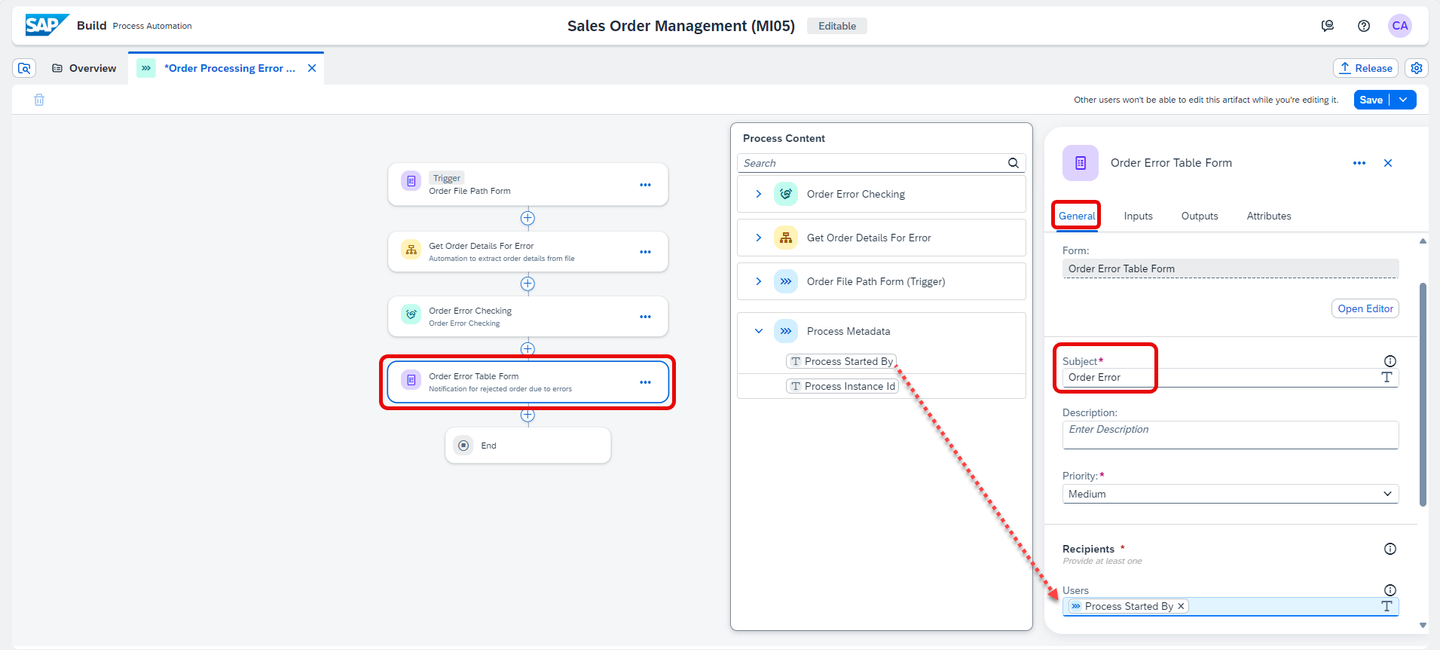
decision Configure the General information section:
- In the Subject section, enter Order Error
- In the Recipients section, under Users, select Process Started By from Process Metadata
decision Now, configure the Inputs information section. In the select list field, choose
List - Order Error List.
decision Save the process.

decision
CAUTION: Please complete the following tutorial, mentioned in Pre-requisites before you release and deploy the process.
In the Order Processing Error Table process, choose the Release button on the top right corner

decision In the Release Project popup, select Release.

decision In the Overview section that appears, choose Deploy.

decision Select an Environment and choose Deploy.

decision In the Define Variables section, choose Deploy. You will enter the
orderFilePathas you would provide the path of excel in the trigger form which is explained in Step 13: Test the process.
decision Your project successfully deployed.

decision CAUTION: Before executing the process, make sure your desktop agent is in unattended mode.

decision
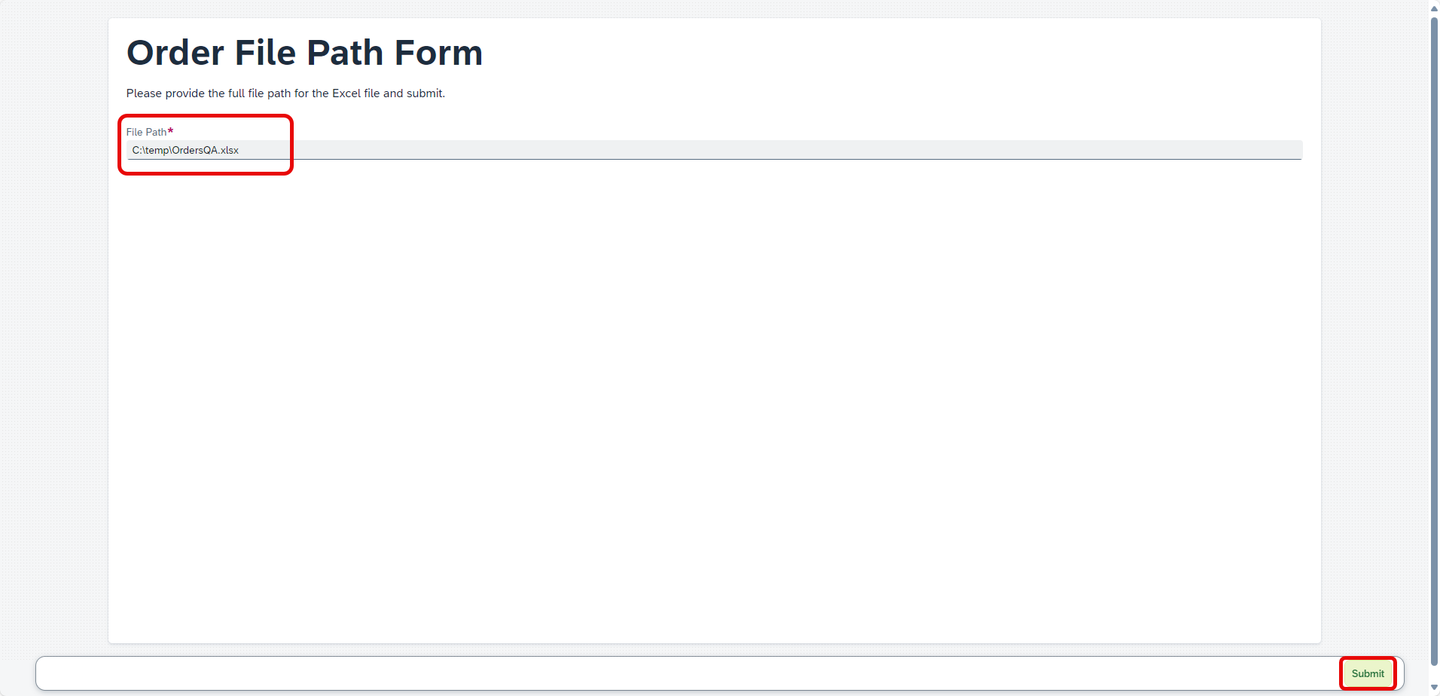
Open the Order Processing Error Table process of the deployed version and choose Order File Path Form, select the Copy Link icon next to the Form Link.

decision In a new tab in your browser, paste the form link and enter your file path and select Submit.
decision Once the form is submitted successfully, the BOT opens the Sales Order Excel file which is stored in your system, reads the data, and passes the data to the decision. The Business Rules are executed and the list of orders with/without errors are displayed in the tables in the form. You can follow the steps of execution in the Monitoring section.
Navigate back to SAP Build Lobby and select Monitoring tab. Then choose Process and Workflow Instances under Monitor.

decision Now, select the Order Processing Error Table process. The process indicates that the Order Error task is available in My Inbox.

decision In the SAP Build lobby, choose My Inbox icon.

decision You will receive a notification with the error details in a table.
Choose Submit to complete the process.

decision You can navigate back to Monitoring > Process and Workflow Instances.
Your process completed successfully.

decision Congratulations! You have successfully completed the tutorial. With this process, sales executive is notified of erroneous and error free orders.
Resources
Discussion
Share feedback on this tutorial or join the conversation in SAP Community.