
Overview
You will learn
- How to use SAP API Business Hub’s productivity tools for developers (like sandbox environment and code snippet generator) to easily test cloud services
- How to use SAP Business Technology Platform’s trial environment and SAP Business Application Studio to build a small SAPUI5 application
- How to orchestrate and use the different APIs of the variant configuration and pricing services


Prerequisites
Prerequisites
Steps
Go to the SAP Business Application Studio. Accept the SAP Business Application Studio Trial Privacy Statement when it pops up. Click on Create Dev Space.

step-1-numeral-1-dev-spaces In the name field, enter
ProductConfigurationUI, choose SAP Fiori, and then choose Create Dev Space.
step-1-numeral-1-create-a-new-dev-space When the status changes to Running, click on the space name created. Accept the SAP Business Application Studio Trial Privacy Statement when it pops up.

step-1-numeral-2-space-name-created In the Create Dev Space, create a new project from the template via menu File > New Project from Template.

step-1-numeral-3-new-project-from-template Choose the template SAP Fiori application and then Start.
Choose Application Type SAPUI5 freestyle and the SAPUI5 Application floor plan, then choose Next.

step-1-numeral-3-sapui5-application-template Choose Data source None, and then Next.

step-1-numeral-3-data-source You may want to rename the initial View name as Main, then choose Next.

step-1-numeral-3-rename-initial-view Provide the following:
Module name: such as
product_configuration_api_tutorialApplication title: such as
Product Configuration API TutorialApplication namespace such as
sap.tutorialDescription such as
Product Configuration API Tutorial
Keep the default for the other parameters, then choose Finish.

step-1-numeral-3-parameters-new-project-from-template Choose the project you created and click Open.
The application is now created. It can be opened via the menu File > Open Workspace….

step-1-numeral-4-open-workspace Choose the project you created and click Open.

step-1-numeral-4-choose-project-created The application will call the Variant Configuration service during the initialization of the form. The controller, can be found at
ProductConfigurationAPITutorial>webapp> controller > Main.controller.js, in which the service APIs will be called.
step-1-numeral-5-main-controller You will call the following cloud service APIs:
POST /api/v2/configurationsto create a new product configuration.GET /api/v2/knowledgebases/{kbId}to read static master data for display (descriptions of a characteristic and its values in our example).PATCH /api/v2/configurations/{configurationId}/items/{itemId}/characteristics/{characteristicId}to change a characteristic value.GET /api/v2/configurations/{configurationId}to read and displayed the changed configuration results.POST /api/v1/statelesspricingto get the price based on the chosen characteristic value.
In the [API Business Hub] (https://api.sap.com/) search for SAP Variant Configuration, find the SAP Variant Configuration and Pricing API Package and choose it.

step-2-numeral-1-SAP-API-business-hub Once on the API package page, choose Variant Configuration service.

step-2-numeral-2-SAP-API-business-hub-CPS In the Test View find the
POST /api/v2/configurationsmethod and click on the Code Snippet link.
step-2-numeral-3-test-view-code-snippet
Click on the JavaScript tab and copy the code.
Back in SAP Business Application Studio, add the copied code from the API Business Hub to your
onInitfunction.Replace in the code the
datavariable by using the example input JSON found for the service on API Hub.
step-3-numeral-2-main-controller Remove
xhr.setRequestHeader("DataServiceVersion", "2.0"; from theonInitfunction because configuration and pricing service does not allow this header field and it is blocked by CORS policy. Make sure to remove it from the copied snippets.
step-3-numeral-3-data-service-version An API Key is used as an authentication method. Each time an API is called, the API Key needs to be sent in the http request header. Make sure you are logged in SAP API Business Hub to get your API Key.
Click on Show API Key.

step-3-numeral-4-show-API-key This will show the API key in pop up view. Click on the button Copy Key and Close.

step-3-numeral-4-copy-close Add the API key as a request header to the copied code in your
onInitfunction asxhr.setRequestHeader("APIKey", "<API-Key>")
step-3-numeral-4-API-key-request-header ESLINT errors caused by console statement or hard-coded URL can be switched off in project settings or by inserting Java /* eslint-disable */ in the first line.
Run your new application to test it.
Open the Run Configurations view.

step-4-numeral-1-run-configurations-view Expand the run configuration and hover over the run configuration and choose the Run Module icon.

step-4-numeral-2-run-module If you are running the app for the first time, the button of the notification will say Expose and Open. Otherwise, it will say Open in New Tab.
You should see a blank application with the title
opened in a new tab. The pre-generated code puts the results of the API in the browser console. To find the result, open your browser’s developer tools and go to the Console tab.
step-4-numeral-3-blank-application Which field in the response body of service endpoint
/api/v2/configurationsreturns the unique identifier of the configuration? This identifier must be provided as input fieldconfigurationIdto the subsequent calls to the other endpoints, e.g. to change a characteristic value.
The result from the API consists of the configuration, characteristics, and characteristic values.
Add a
ComboBoxto display characteristicCPS_OPTION_Mvalue. Open your main view and add aComboBox. TheComboBoxitems and selected item will be set from the result of the API call.
step-5-numeral-1-main-view-combobox JavaScript<mvc:View controllerName="sap.tutorial.ProductConfigurationAPITutorial.controller.Main" xmlns:html="http://www.w3.org/1999/xhtml" xmlns:mvc="sap.ui.core.mvc" xmlns:core="sap.ui.core" displayBlock="true" xmlns="sap.m"> <App id="app"> <pages> <Page title="{i18n>title}"> <content> <ComboBox items="{/possible_values}" selectedKey="{/value}"> <core:Item key="{valueLow}" text="{valueLow}"/> </ComboBox> </content> </Page> </pages> </App> </mvc:View>Ensure that core namespace is declared via
xmlns:core="sap.ui.core"Back in the controller file, you will need to define the model used in the view. You need to add the
JSONModellibrary to your controller. In thedefineat the top of the controller, add theJSONModellibrary by addingsap/ui/model/json/JSONModeland defining theJSONModelin the controller function.
step-5-numeral-2-JSONModel JavaScriptsap.ui.define([ "sap/ui/core/mvc/Controller", "sap/ui/model/json/JSONModel" ], function (Controller, JSONModel) {In the
onInitfunction, you need to save the current version so that you can access the view associated with the controller in the API call response. Create a new variable called self and set it to this.JavaScriptvar self = this;Additionally, you need to create a new
JSONModelto house the results of the API call. Bind a new emptyJSONModelto the view.JavaScriptthis.getView().setModel(new JSONModel({}));To actually bind the result to the model, you need to parse the API response in the
xhr.addEventListenerfunction. The result from the API comes back as text, so you need to parse it to JSON.JavaScriptvar jsonResults = JSON.parse(this.responseText);Then, you can set the relevant properties into the model. The
ComboBoxneedsCPS_OPTION_Mpossible values and its initial value.JavaScriptvar CPS_OPTION_M = jsonResults.rootItem.characteristics.find(function (i) { return i.id === "CPS_OPTION_M"; }); self.getView().getModel().setProperty("/possible_values", CPS_OPTION_M.possibleValues); if (CPS_OPTION_M.values.length > 0) { self.getView().getModel().setProperty("/value", CPS_OPTION_M.values[0].value); } else { self.getView().getModel().setProperty("/value", ""); }The used find() statement is not supported by Internet Explorer 11.

step-5-numeral-6-JSONResults Save the changes. If you execute the application, you will see a
ComboBoxfilled withCPS_OPTION_Mcharacteristic possible values, having the selected value be the default value for this characteristic.
step-5-numeral-7-possible-values
Update the configuration if the user changes the value of the
ComboBox. First, you need to declare a new event on theComboBoxcontrol in the view.
step-6-numeral-1-combobox JavaScript
<mvc:View controllerName=“sap.tutorial.ProductConfigurationAPITutorial.controller.Main” xmlns:html=“http://www.w3.org/1999/xhtml" xmlns:mvc=“sap.ui.core.mvc” xmlns:core=“sap.ui.core” displayBlock=“true” xmlns=“sap.m”>
2. Back to the main controller, create an empty `onChange` function.

   ```JavaScript
onChange: function (oEvent) {
}
As in step 3, head over to SAP API Business Hub, locate the PATCH /api/v2/configurations/{configurationId}/items/{itemId}/characteristics/{characteristicId} API under Test View and copy the JavaScript code.
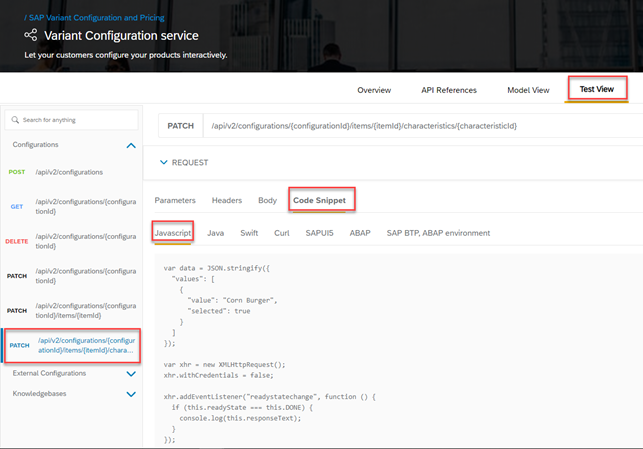
Add the copied
JavaScriptcode from API Business Hub to the newly createdonChangefunction. Make sure to removexhr.setRequestHeader("DataServiceVersion", "2.0");and add API Key.
step-6-numeral-3-java-code Change the data variable declaration to assign the value from the value property of the view model, which is bound to the
ComboBoxvalue.JavaScript
var data = JSON.stringify({ “values”: [{ “value”: this.getView().getModel().getProperty("/value"), “selected”: true }] });
   Since this API PATCH method does not return a response body, in the `xhr.addEventListener` call of the `onChange` function, you may change the console log so that the response code is logged instead of the response text.

   ```JavaScript
console.log(this.status);
To fill out all parameters for this API method, you need to add a few fields in the view model, namely
configuration idanditem id. Add these new properties on the model in thexhr.addEventListenercall of theonInitfunction so that the model is filled when the configuration is loaded.JavaScript
self.getView().getModel().setProperty("/config_id", jsonResults.id); self.getView().getModel().setProperty("/item_id", jsonResults.rootItem.id);
6. Once they are added in the model, replace hard-coded `{configurationID}` and `{itemID}` in the generated `url` in the `onChange` function by the values in the model. Likewise, replace hard-coded `{characteristidID}` by `CPS_OPTION_M`.

   ```JavaScript
xhr.open("PATCH",
   "https://sandbox.api.sap.com/cpservices/prodconf/api/v2/configurations/" +
   this.getView().getModel().getProperty("/config_id") + "/items/" +
   this.getView().getModel().getProperty("/item_id") + "/characteristics/CPS_OPTION_M "
);
Almost done! The variant configuration API uses HTTP header fields etag and If-Match as an optimistic lock. You need to capture the etag header in the model from the HTTP response when loading the configuration and send back that value in the If-Match HTTP header when updating the configuration. In the xhr.addEventListener call of the onInit function, set the etag property of the model with the etag value of the response header.
self.getView().getModel().setProperty("/etag", this.getResponseHeader("etag"));You also you need to capture the etag value of the characteristic change response in case the user wants to update the value multiple times. Add the same line in the xhr.addEventListener call of the onChange function.
Back in the onChange function, fill the If-Match request header value with the etag value of the model.
xhr.setRequestHeader("If-Match", this.getView().getModel().getProperty("/etag"));

>Do not forget variable `self` in this and the coming new functions.
Run your application. You should see a
ComboBoxfilled with the possible values of characteristicCPS_OPTION_M, having the selected value be the default value for this characteristic. If you change the value of theComboBox, the call is made to the API to change the value, and you can see the response code in the JavaScript console, which should be 200.
step-6-numeral-7-response-code-200 By how much is the
eTagvalue in the service response header increased with each change to the characteristicCPS_OPTION_M?Check the development tools of your browser.
Currently, the value keys are displayed in the interface. In a real-world scenario, you might want to provide the value descriptions to the user and add a label to the combo box. This can be achieved by getting the knowledge base details.
Create a new method
readKbin the controller that takes a knowledge base id as parameter.When creating a configuration (Step 3), the knowledge base id is returned from the API. To get the
KBdetails, another API needs to be called. Go to the API Business Hub (as in step 2), locate theGET/api/v2/knowledgebases/{kbId}method, copy the JavaScript code then paste it in thereadKbfunction.
step-7-numeral-1-code-snippet-get Modify the URL of the request to include the knowledge base ID function parameter.
JavaScriptxhr.open("GET", "https://sandbox.api.sap.com/cpservices/prodconf/api/v2/knowledgebases/" + kbId + "?$select=products,classes,characteristics,characteristicSpecifics,bomItems,description");Make sure to remove
xhr.setRequestHeader("DataServiceVersion", "2.0");and add API Key.You need to bind the possible values to the model by parsing the response text to JSON then retrieving the
possible_valuesproperty ofCPS_OPTION_M. Also, add the characteristic name to a new model property/name.JavaScriptvar jsonResults = JSON.parse(this.responseText); var CPS_OPTION_M = jsonResults.characteristics.find(function (i) { return i.id === "CPS_OPTION_M"; }); self.getView().getModel().setProperty("/possible_values", CPS_OPTION_M.possibleValues); self.getView().getModel().setProperty("/name", CPS_OPTION_M.name);
step-7-numeral-2-readkb Remember to remove the assignment of
possible_valuesto the model in theaddEventListenerfunction of theonInitfunction.Now, you need to call the new function
readKbwhen the configuration is created with the knowledge base id, at theaddEventListenerof theonInitfunction.
step-7-numeral-3-self-readkb In the view, add a
SimpleFormwhich contains the previousComboBoxand a new Label. Set the label text to the new model property/name.Finally, adjust the
ComboBoxcontrol in the view so that elementsidandnameofpossible_valuesare used as key and text respectively.
step-7-numeral-4-simple-form XML<sap.ui.layout.form:SimpleForm xmlns:sap.ui.layout.form="sap.ui.layout.form" editable="true" layout="ResponsiveGridLayout" id="form0"> <sap.ui.layout.form:content> <Label text="{/name}" id="label"/> <ComboBox items="{/possible_values}" selectedKey="{/value}" selectionChange="onChange"> <core:Item key="{id}" text="{name}"/> </ComboBox> </sap.ui.layout.form:content> </sap.ui.layout.form:SimpleForm>Run your application. The value descriptions are provided by the
ComboBox, and the label text comes from the knowledge base.
step-7-numeral-5-sample
In addition to the configuration, SAP Variant Configuration and Pricing also provides a way to calculate the pricing.
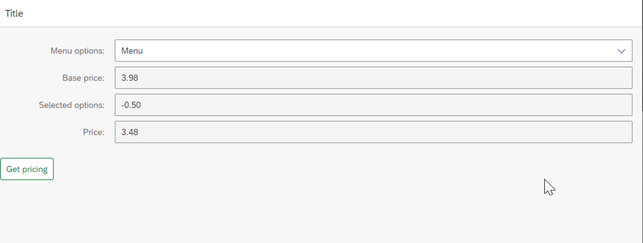
In the Burger model, the price is influenced by the menu option. By changing the menu option values, we should see a difference in the calculated price.
For the pricing API to correctly reflect the status of the configuration, the variant condition characteristic values needs to be provided. Which means that the configuration needs to be read after updating it in the app.
Locate the GET
/api/v2/configurations/{configurationId}in the SAP API Business Hub, copy the JavaScript code and paste it in a new method_getConfig. Modify the URL of the request to include the configuration ID from the model.JavaScriptxhr.open("GET", "https://sandbox.api.sap.com/cpservices/prodconf/api/v2/configurations/" + this.getView().getModel().getProperty("/config_id"));Make sure to remove
xhr.setRequestHeader("DataServiceVersion", "2.0");and add API Key.In the
xhr.addEventListenerfunction, assign the configuration JSON in a new attributeself._config.
step-8-numeral-1-getconfig Call this new method from the
xhr.addEventListenerfunction of theonChangemethod, so that the configuration is read again as soon as it is modified.
step-8-numeral-2-self-getconfig Next, add new read-only fields that will be used to show the base price and selected options as well as a button to calculate the price.

step-8-numeral-3-main-view JavaScript<mvc:View controllerName="sap.tutorial.ProductConfigurationAPITutorial.controller.Main" xmlns:html="http://www.w3.org/1999/xhtml" xmlns:mvc="sap.ui.core.mvc" xmlns:core="sap.ui.core" displayBlock="true" xmlns="sap.m"> <App id="app"> <pages> <Page title="{i18n>title}"> <content> <sap.ui.layout.form:SimpleForm xmlns:sap.ui.layout.form="sap.ui.layout.form" editable="true" layout="ResponsiveGridLayout" id="form0"> <sap.ui.layout.form:content> <Label text="{/name}" id="label"/> <ComboBox items="{/possible_values}" selectedKey="{/value}" selectionChange="onChange"> <core:Item key="{id}" text="{name}"/> </ComboBox> <Label text="{i18n>basePrice}"/> <Input value="{/base_price}" editable="false"/> <Label text="{i18n>selectedOptions}"/> <Input value="{/selected_options}" editable="false"/> <Label text="{i18n>price}"/> <Input value="{/price}" editable="false"/> </sap.ui.layout.form:content> </sap.ui.layout.form:SimpleForm> <Button text="{i18n>getPrice}" type="Accept" press="onPrice"/> </content> </Page> </pages> </App> </mvc:View>Do not forget to update your
i18nfile with the new labels!JavaScript
basePrice=Base price selectedOptions=Selected options price=Price getPrice=Get pricing
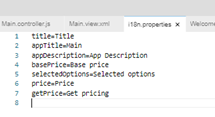
4. Next, go to the SAP API Business Hub, locate the `/api/v1/statelesspricing` method in the Pricing service, copy the JavaScript code and paste it in a new method `onPrice`.
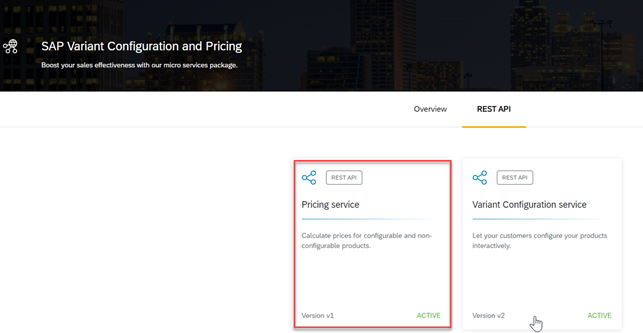
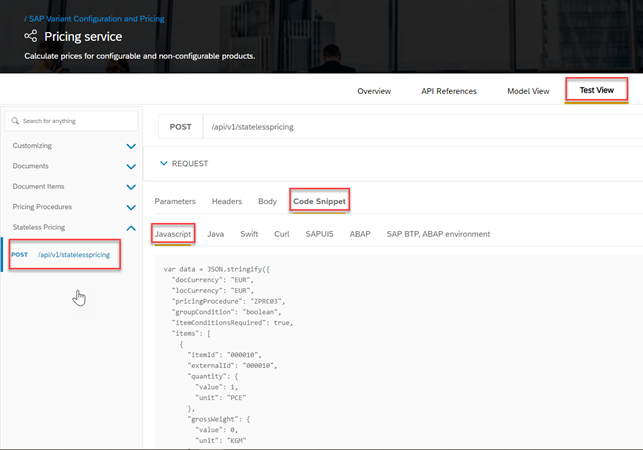
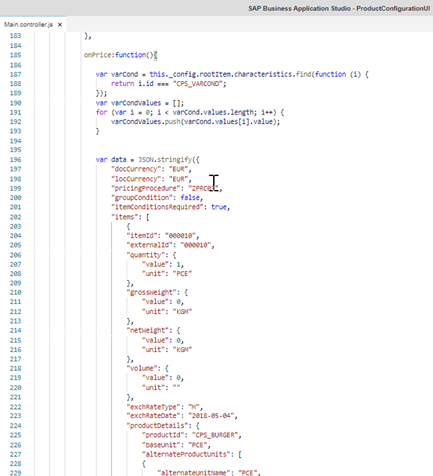
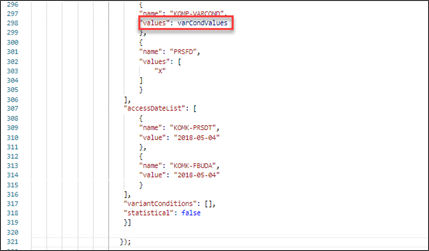
There are a lot of parameters in this API that you would fill out in a real-world application. But for this tutorial, hard code all values except for the `KOMP-VARCOND` attribute of the item 000010.
Get the variant condition values from the configuration and assign them to the `KOMP-VARCOND` attribute in the request data.
```JavaScript
var varCond = this._config.rootItem.characteristics.find(function (i) {
return i.id === "CPS_VARCOND";
});
var varCondValues = [];
for (var i = 0; i < varCond.values.length; i++) {
varCondValues.push(varCond.values[i].value);
}var data = JSON.stringify({
"docCurrency": "EUR",
"locCurrency": "EUR",
"pricingProcedure": "ZPRC03",
"groupCondition": false,
"itemConditionsRequired": true,
"items": [
{
"itemId": "000010",
"externalId": "000010",
"quantity": {
"value": 1,
"unit": "PCE"
},
"grossWeight": {
"value": 0,
"unit": "KGM"
},
"netWeight": {
"value": 0,
"unit": "KGM"
},
"volume": {
"value": 0,
"unit": ""
},
"exchRateType": "M",
"exchRateDate": "2018-05-04",
"productDetails": {
"productId": "CPS_BURGER",
"baseUnit": "PCE",
"alternateProductUnits": [
{
"alternateUnitName": "PCE",
"numerator": 1,
"denominator": 1
}
]
},
"attributes": [
{
"name": "KOMK-HWAER",
"values": [
"EUR"
]
},
{
"name": "KOMK-KONDA",
"values": [
"01"
]
},
{
"name": "KOMK-KUNNR",
"values": [
"0000010052"
]
},
{
"name": "KOMK-PLTYP",
"values": [
""
]
},
{
"name": "KOMK-VKORG",
"values": [
"0001"
]
},
{
"name": "KOMK-VTWEG",
"values": [
"01"
]
},
{
"name": "KOMK-WAERK",
"values": [
"EUR"
]
},
{
"name": "KOMP-KONDM",
"values": [
""
]
},
{
"name": "KOMP-PMATN",
"values": [
"CPS_BURGER"
]
},
{
"name": "KOMP-PRSFD",
"values": [
"X"
]
},
{
"name": "KOMP-VARCOND",
"values": varCondValues
},
{
"name": "PRSFD",
"values": [
"X"
]
}
],
"accessDateList": [
{
"name": "KOMK-PRSDT",
"value": "2018-05-04"
},
{
"name": "KOMK-FBUDA",
"value": "2018-05-04"
}
],
"variantConditions": [],
"statistical": false
}]
});
In the
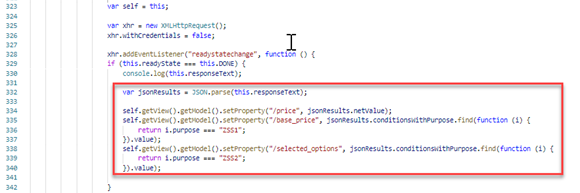
xhr.addEventListenerfunction of theonPricefunction, get the net value as well as the value of the condition purposesZSS1andZSS2, which in this test model means Base Price and Selected Options, and assign them to the JSON model.JavaScript
var jsonResults = JSON.parse(this.responseText); self.getView().getModel().setProperty("/price", jsonResults.netValue); self.getView().getModel().setProperty("/base_price", jsonResults.conditionsWithPurpose.find(function (i) { return i.purpose === “ZSS1”; }).value); self.getView().getModel().setProperty("/selected_options", jsonResults.conditionsWithPurpose.find(function (i) { return i.purpose === “ZSS2”; }).value);
Make sure to remove `xhr.setRequestHeader("DataServiceVersion", "2.0");` and add **API Key**.
6. Run your application. The selected options and price values will change depending on the menu option you choose. The below result is excluding the `External Conditions` in the input for stateless pricing API. If the `External Conditions` are included then the results may vary.
**Congratulations!** You have successfully completed the tutorial. We hope that you find it useful and it helps you to start discovering our services.
>In the example above, possible values of the characteristic are read at the end only from the knowledge base. List of possible values can change during runtime, therefore in a real world example possible values from configuration results must be considered.
>The sandbox environment of the API Hub is used with an API key when calling the services. In the productive environment, OAuth authentication with client credentials would be used.
>Finally, the configuration service is called without providing session context. For optimal performance and resource consumption, please ensure that the cookie retrieved with each configuration creation (implementation in the `onInit` event listener of the function in our example) is used when calling the other configuration service APIs for the same configuration session (functions `onChange`, `readKB`, and `getConfig` in our example).
> ```JavaScript
> self.getView().getModel().setProperty("/cookie", this.getResponseHeader("set-cookie"));
> xhr.setRequestHeader("Cookie", this.getView().getModel().getProperty("/cookie"));
> ```
Please read the development guide (https://help.sap.com/viewer/f2b349b522ff40f0918e1e7ada320799/Cloud/en-US/98b0e7f7ba8d46f4976c884177daebdd.html) for more information about how to use the services.
---
</div><div class="step-validation-mount"
data-step="8"></div>
<div class="step-actions">
<button class="fd-button fd-button--emphasized" data-action="mark-done" data-step="8">Done</button>
</div>
</div>
</div>Resources
Discussion
Share feedback on this tutorial or join the conversation in SAP Community.
Joule
AI Notice
Joule is an AI assistant. Generative AI may produce inaccurate, incomplete, or biased information. Always verify important details before acting on them.
Conversations are sent to SAP-hosted large language models for processing. Do not include personal data, credentials, or confidential information in your messages.
Joule's responses are based on the SAP tutorial catalog and may not reflect the latest product changes. For authoritative guidance, consult the linked tutorials and official SAP documentation.