
Overview
You will learn
- How to set up the Google Cloud Platform project
- Where to get the application code
- How to prepare the required external data


Prerequisites
Prerequisites
Steps
Intro
- A Git client. If you don’t have on installed you can download one at https://git-scm.com/downloads
- Apache Maven, available at http://maven.apache.org/download.cgi, version 3.5 or higher
- A Google Cloud account
- The Google Cloud SDK for deploying to the Google App Engine
- A code editor. For example, Eclipse
- A zip tool capable of creating split zip archives
The application code is available on GitHub.
Clone it to your local machine using a Git client and switch to the branch tutorial.
git clone --branch tutorial https://github.com/SAP/hxe-hibernate-google-app-engine.gitYou can import the project as a Maven project into Eclipse.
Open the Eclipse IDE.
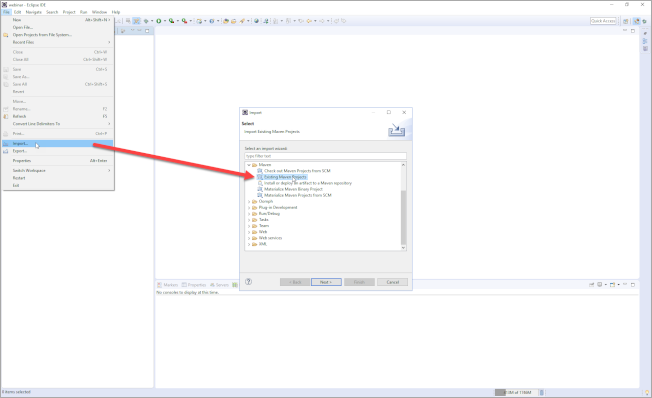
Import the project by selecting File > Import…, then choosing Maven > Existing Maven Projects.
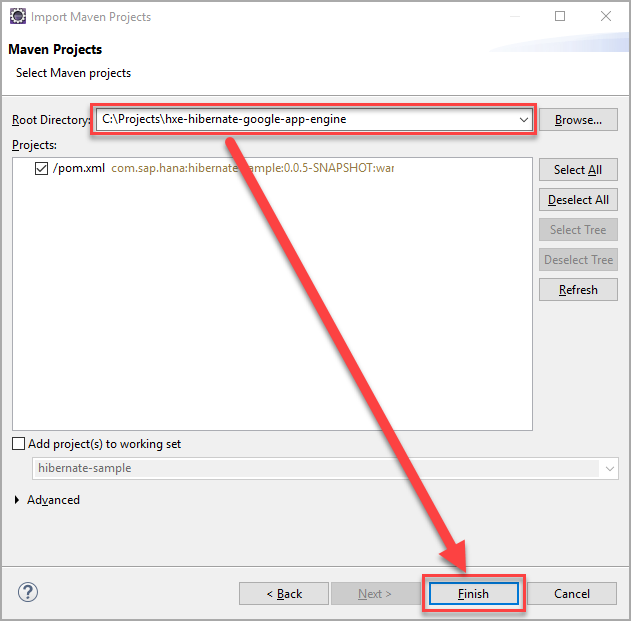
Browse to the location into which you cloned the code and afterwards click on the Finish button.
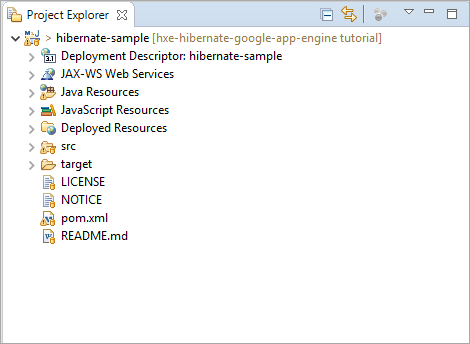
You should now see the project in the Eclipse project explorer.
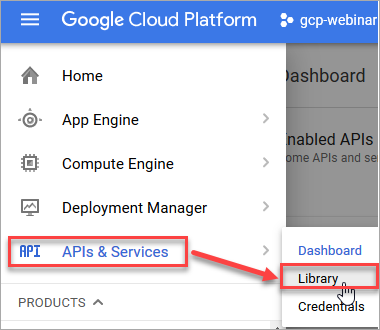
In the Google Cloud Platform Console, browse to APIs & Services > Library.
Search for Maps JavaScript API.

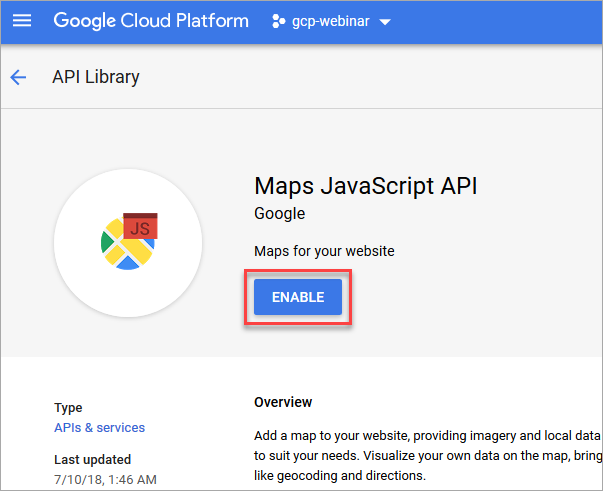
Click on the tile labeled Maps JavaScript API, and click on Enable.
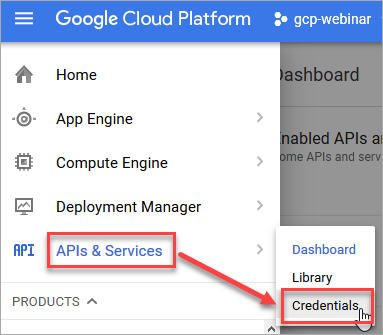
To be able to use the Maps JavaScript API, you also need to create an API key. Navigate to APIs & Services > Credentials*.
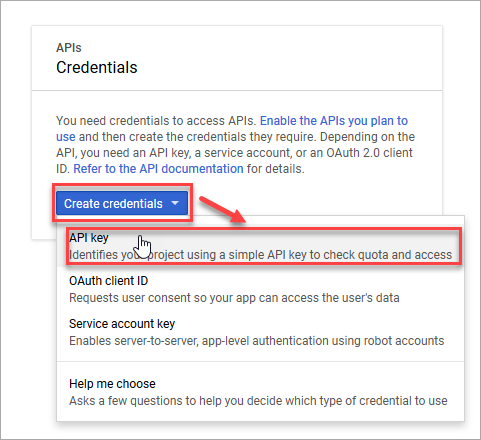
Click on Create credentials > API key to create a new API key.
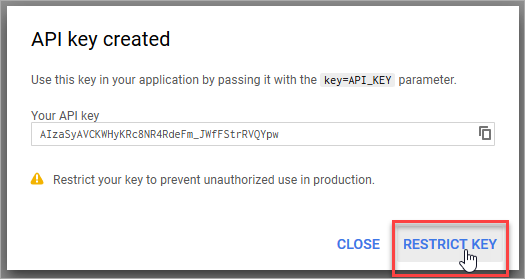
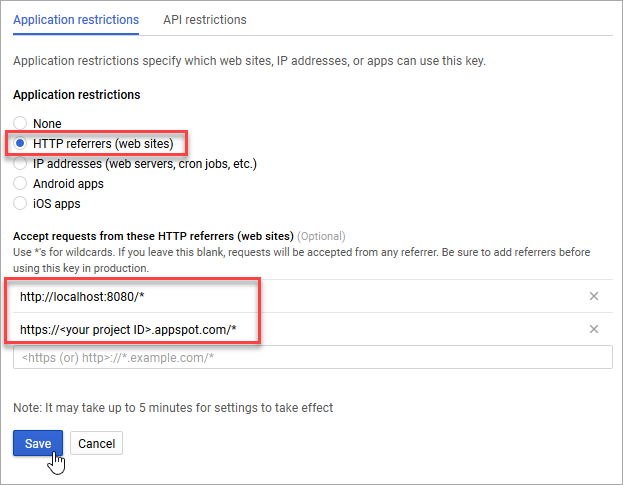
You’ll see a popup window displaying the API key. It is strongly recommended to restrict the API key to your applications to prevent unauthorized use. To restrict the key, click Restrict key.
You can choose any restriction type that fits your use case.
For example, to restrict the key to certain domains you can choose the restriction type HTTP referrers (web sites) and enter the URLs of the sites that are allowed to use the API key. Good choices are http://localhost:8080/* for local testing and https://<your project ID>.appspot.com/* for running the application on the Google App Engine (make sure to replace <your project ID> with your actual Google Cloud project ID).
When you’re finished entering the referrers, click Save.
If you haven’t done so yet, you need to set up the Google App Engine for you project. To do this, navigate to App Engine > Dashboard in the Google Cloud Platform Console.

In the tile labeled Your first app, click Select a language and choose Java.

Choose the same region that you already chose for your SAP HANA, express edition instance to minimize the latency between the App Engine and the Compute Engine.
Then click Next and wait for the setup to complete.

Download the CSV version of the San Francisco Police Department Incidents data set and the CSV version of the San Francisco Addresses data set and place them into the src/main/resources/csv directory as incidents.csv and addresses.csv, respectively.
Create two ZIP archives named incidents.zip and addresses.zip, respectively, each containing the corresponding CSV file and make sure to have the zip tool split the archives into parts no larger than 30 megabytes. Otherwise the resulting files can’t be uploaded to the Google App Engine.
Once the ZIP files have been created, delete the two CSV files.
Your src/main/resources/csv directory should now contain 6 files.
src/main/resources/csv
|- addresses.zip
|- incidents.zip
|- incidents.z01
|- incidents.z02
|- incidents.z03
\- PLACE_CSV_FILES_HEREOpen the file pom.xml in the project’s root directory and update the build properties to match your settings.
<properties>
  <spring.version>5.0.6.RELEASE</spring.version>
  <spring-data.version>Kay-SR7</spring-data.version>
  <apt.version>1.1.3</apt.version>
  <hibernate.version>5.3.1.Final</hibernate.version>
  <jackson.version>2.9.4</jackson.version>
  <flyway.version>5.1.3</flyway.version>

  <jdbc.username>DEMO_USER</jdbc.username>
  <jdbc.password>D3m0-U$eR</jdbc.password>
  <jdbc.host>hxehost</jdbc.host>
  <jdbc.port>39015</jdbc.port>
  <jdbc.url>jdbc:sap://${jdbc.host}:${jdbc.port}/</jdbc.url>

  <google.project.id>REPLACE_WITH_YOUR_PROJECT_ID</google.project.id>
  <google.api.key>REPLACE_WITH_YOUR_API_KEY</google.api.key>
  <maps.api.key.parameter>key=${google.api.key}</maps.api.key.parameter>
</properties>
You’ll have to update the properties jdbc.host, and jdbc.port to match the actual connection data of your database instance.
Note: Check out step 1 of the tutorial Create a User, Tables and Import Data Using SAP HANA HDBSQL for information about which values to use for the database host (
jdbc.host), and the database port (jdbc.port).
You’ll also have to update the properties jdbc.username and jdbc.password with valid user credentials.
Note: The default schema of the database user specified in the
jdbc.usernameproperty must be empty.
Lastly, you’ll have to update the properties google.project.id to match your Google Cloud Platform project ID and google.api.key to match the API key created earlier.
After the adjustment the properties should look something like this:
<properties>
  <spring.version>5.0.6.RELEASE</spring.version>
  <spring-data.version>Kay-SR7</spring-data.version>
  <apt.version>1.1.3</apt.version>
  <hibernate.version>5.3.1.Final</hibernate.version>
  <jackson.version>2.9.4</jackson.version>
  <flyway.version>5.1.3</flyway.version>

  <jdbc.username>WORKSHOP_01</jdbc.username>
  <jdbc.password>P4ssword</jdbc.password>
  <jdbc.host>132.154.10.5</jdbc.host>
  <jdbc.port>39015</jdbc.port>
  <jdbc.url>jdbc:sap://${jdbc.host}:${jdbc.port}/</jdbc.url>

  <google.project.id>hxe-hibernate-tutorial</google.project.id>
  <google.api.key>AIzaSyAVCKWHyKRc8NR4RdeFm_JWfFStrRVQYpw</google.api.key>
  <maps.api.key.parameter>key=${google.api.key}</maps.api.key.parameter>
</properties>
Save the pom.xml file.
Open the file application.properties in the directory src/main/resources.
Update the properties csv.incidents.file.location and csv.addresses.file.location to point to the ZIP archives created earlier.
spring.datasource.url=@jdbc.url@
spring.jpa.database-platform=org.hibernate.spatial.dialect.hana.HANASpatialDialect
spring.datasource.username=@jdbc.username@
spring.datasource.password=@jdbc.password@
spring.datasource.driver-class-name=com.sap.db.jdbc.Driver

spring.jpa.hibernate.ddl-auto=validate
spring.jpa.show-sql=false
spring.jpa.properties.hibernate.format_sql=true

spring.jpa.properties.hibernate.jdbc.batch_size=50

logging.level.org.hibernate.type.descriptor.sql.BasicBinder=warning
logging.level.org.hibernate.type.descriptor.sql.BasicExtractor=warning

translation.enabled=false
translation.api.key=@google.api.key@

csv.incidents.file.location=/csv/incidents.zip
csv.addresses.file.location=/csv/addresses.zip
Save the application.properties file.
Now the application is ready to be deployed to the Google App Engine. To do this, you can use the Google App Engine Maven plugin.
In a console, run the following command from the root directory of the project.
mvn clean appengine:deployThe application will be deployed to the Google App Engine.
The initial deployment will take some time because the data files need to be uploaded and the data needs to be loaded into the database.
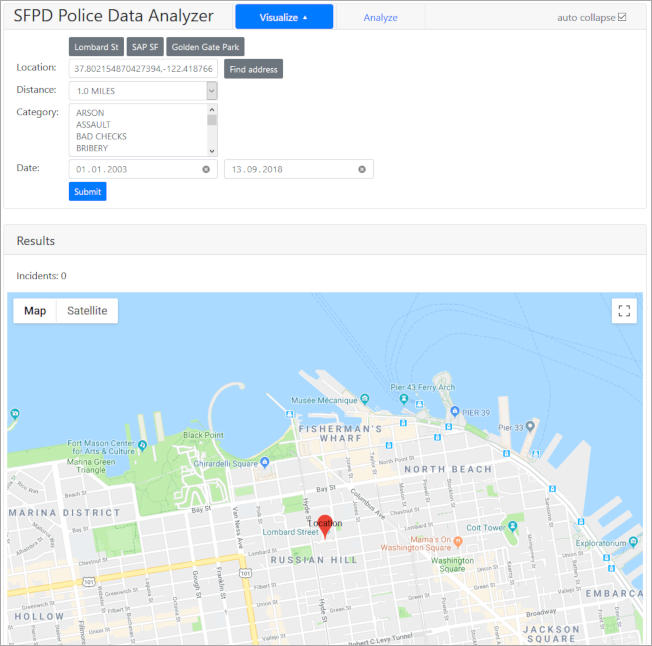
After the deployment has succeeded you can navigate to https://<your project ID>.appspot.com. If the deployment was successful, you should see the web UI.
Resources
Discussion
Share feedback on this tutorial or join the conversation in SAP Community.