
Overview
You will learn
- How to add MTA configuration to the project structure
- How to add
AppRouterconfiguration to the MTA file - How to create the Fiori Elements app and set it up into the MTA file
- How to launch the Fiori Elements app
- How to add additional configuration to the MTA file, which is relevant for Cloud Foundry deployment


Prerequisites
Prerequisites
- Complete the tutorial: Prepare to Develop the SAP SuccessFactors Extension
- Complete the tutorial: Jump start the SAP SuccessFactors Extension CAP Project
- Complete the tutorial: Import SAP SuccessFactors OData Services definitions
- Complete the tutorial: Create the CDS Data Model for the SAP SuccessFactors Extension
- Complete the tutorial: Create the CAP Service for the SAP SuccessFactors Extension
- Complete the tutorial: Add Business Logic to the SAP SuccessFactors Extension
- Complete the tutorial: Prepare the SAP SuccessFactors Extension UI with CDS Annotations
- Complete the tutorial: Add Security to the SAP SuccessFactors Extension
- Complete the tutorial: Deploy the SAP SuccessFactors Extension Database to SAP HANA Cloud
Steps
To deploy your application to Cloud Foundry on SAP BTP, you are going to use the MTA (Multi-Target Application) approach, which facilitates the deployment as it pushes everything at once to the platform: UI application, backend service, database, service instances creation and binding, etc.
As you have already done almost everything that is required to setup your project for deployment following the previous tutorials, you can now add the MTA configuration to it, which will be described using YAML standard in a file named mta.yaml.
Fortunately, once again, CAP can add that file automatically for you, populating it with all that has been configured in the project so far. But, before you do it, just open the package.json file and change the application description as demonstrated below, so it can be reflected in the mta.yaml file:

In the Terminal type cds add mta and press Enter (don’t forget to press CTRL+C to terminate cds watch if it was previously running).

On the left-hand pane, click on the mta.yaml file to open it.

If you explore the file, you’ll notice that it contains the descriptors for the server module, which is the actual CAP service, with a dependency pointing to the service instance of the HDI container (described in the resources section) and a sidecar module (suffixed -db-deployer), which is an auxiliary app that runs only during deployment and takes care of the creation/update of the HANA database artifacts into the HDI container (notice that it also depends on the HDI service instance).
All of that has been extracted from the CAP configuration (cds.requires section) in the package.json file.
The next step is to create an approuter module with a unique route name (in the context of the subaccount region) to take care of the authentication flow when the application is accessed from the UI in SAP BTP as well as other stuff, such as mapping the backend service route to the same domain as the HTML5 application as a destination to avoid problems like CORS (Cross-Origin Resource Sharing) issues.
Before you move forward with the creation of the approuter module, you need to make a copy of your xs-security.json file as the module generator will overwrite it with some specific approuter configuration.
To do that, simply select the file in the left-hand pane then press CTRL+C and CTRL+V in sequence; With that, you should obtain the following result:

Now, you can move on to the approunter configuration.
On the left-hand pane, right-click on the mta.yaml file and select Create MTA Module from Template.

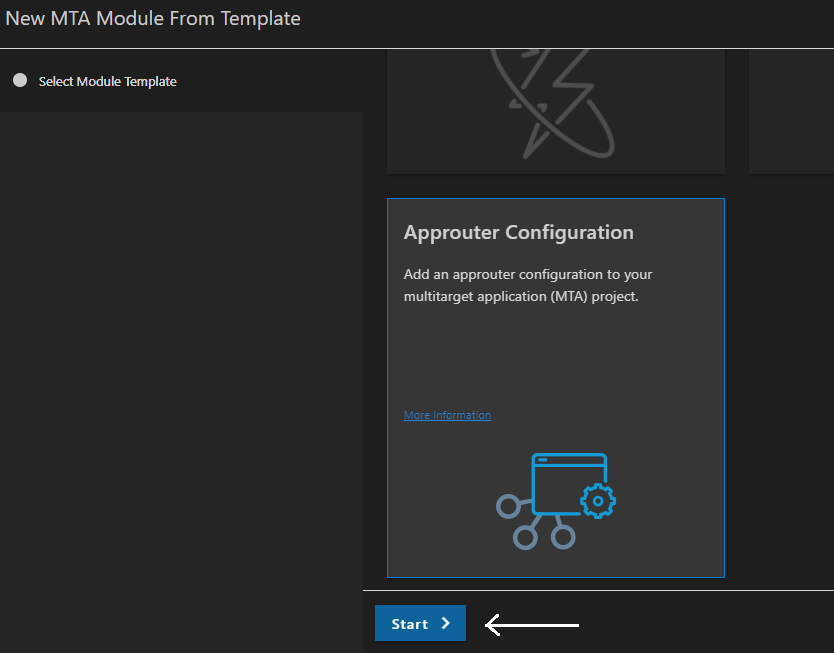
In the Wizard, select Approuter Configuration and click on Start.
In the next Dialog, select Managed Approuter as your HTML5 application runtime. As the unique name for the solution, type sfsf-projman, appending a “-” followed by the subdomain of your SAP BTP subaccount (like demonstrated in the screenshot below – this will make sure the name is really unique in the context of the subaccount region) and select Yes as the answer for the last question. Then, click on Next.

The essential difference between the managed and standalone approuter is that the managed is centrally governed by the launchpad service through an HTLM5 application repository that ties your solution to a URL from the launchpad service, whilst the standalone just creates another application in the Cloud Foundry space in parallel to the CAP service application. So, basically, in the first case you access your solution from a list of applications in the HTML5 repository – and you’re also able to add it to a user-driven launchpad – and in the second you do it directly from the list of applications in the Cloud Foundry space.
You can get the subdomain of your SAP BTP subaccount in the Overview page from the cockpit like demonstrated below:

In the last step, select overwrite (first option) and click on Finish.

Now, merge the generated xs-security.json into the copy you previously created.
On the left-hand pane, click on xs-security.json and then on xs-security_copy.json to open both files. You must transfer (copy & paste) the blocks indicated in the screenshot below from xs-security.json to the corresponding sections in xs-security_copy.json.

Then, after the transfer, the xs-security_copy.json file should look like this:
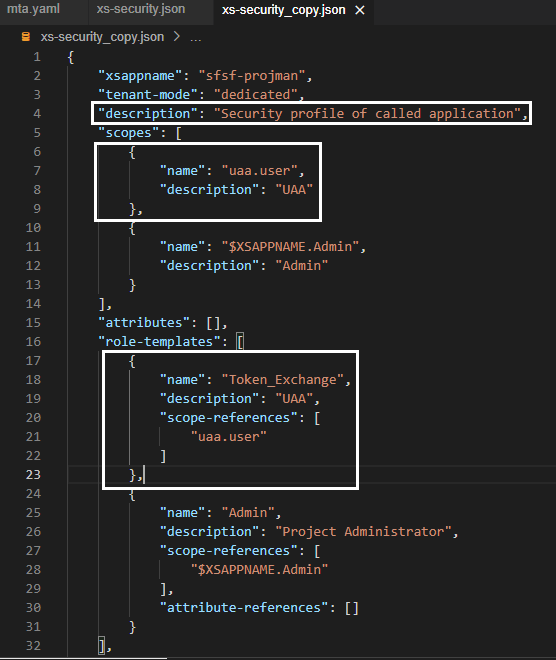
The uaa.user scope associated to the Token_Exchange role template is required to perform the OAuth 2.0 authentication flow executed by the approuter. Basically, before loading the HTML5 application (which you are going to build in a minute) the router authenticates the user logged in to SAP BTP via OAuth 2.0 and gets a JWT (JSON Web Token) which is, then, forwarded to the HTML5 application and, from there, to the CAP service, making sure that only authenticated and authorized (Admin) users have access to the application.
You can now delete the generated xs-security.json and rename the xs-security_copy.json to its original name.
On the left-hand pane, right-click on xs-security.json and select Delete. In the Dialog, click OK.

On the left-hand pane, click on xs-security_copy.json and press F2 to rename it. In the Dialog, remove the _copy and click OK.
Now, open the mta.yaml file and notice how much configuration has been automatically added to it! Among the new content there’s the definition of the destination and UAA services that are required by the router.
You shall remember that the CAP service also depends on those service instances, thus they must be bound to it as well. For that, you just append their definition to the “requires” section of the sfsf-projman-srv definition following the order: first destination and then XSUAA, like demonstrated below:

And that’s it! This completes the approuter configuration.
Now it’s finally come the time to create your SAP Fiori Elements app (the front-end of your project management solution) and, to facilitate and speed-up the project configuration, you will add it to your project directly as an MTA module.
On the left-hand pane, right-click on the mta.yaml file and select Create MTA Module from Template.
In the Wizard, select SAP Fiori Application and click on Start.

In the next Dialog, make sure that the application type is SAP Fiori Elements and select List Report Object Page, then click on Next.

In the Data Source and Service Selection dialog, select Use a Local CAP Project as the Data Source, then click on the browse button in the CAP project path field (small folder) to select the sfsf-projman folder under projects and, finally, select sfsf.projman.service.ProjectManager (Node.js) as the OData service. Then, click on Next.

In the Entity Selection dialog, select Project as the Main entity, None as the Navigation entity and leave Yes as the answer to the last question, then click on Next.

Fill-in the information in the Project Attributes dialog like demonstrated below, then click on Next.

In the Deployment Configuration dialog, select Cloud Foundry as the target and None as the Destination name, then click on Next.

Fill-in the information in the SAP Fiori Launchpad Configuration dialog like demonstrated below, then click on Finish.

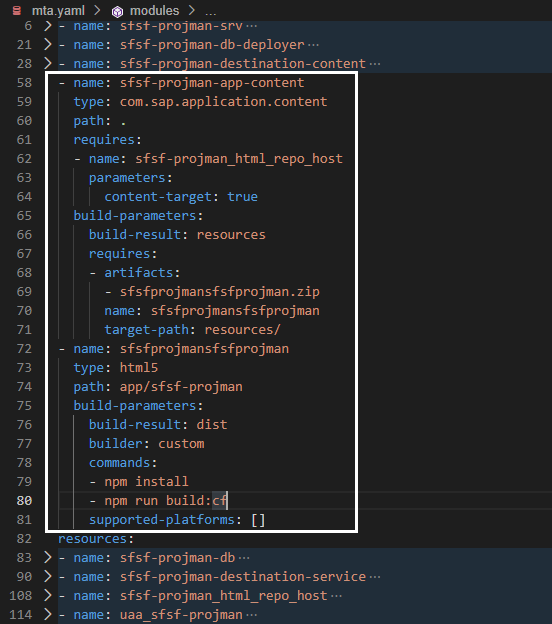
Now, if you open again the mta.yaml file you’ll notice that an additional configuration (two modules) related to the SAP Fiori app has been added to it like demonstrated below:
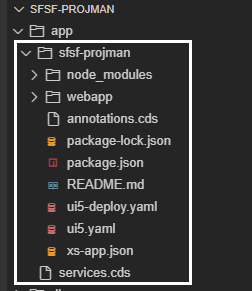
Also, the actual SAP Fiori application has been created under the app folder in a folder named sfsf-projman like you can see in the following screenshot:
You can, now, test the newly created SAP Fiori app. In the Terminal, run cds watch and CTRL+Click the http://localhost:4004 link to open the CAP application home page. Notice that under Web Applications the link to the SAP Fiori app home page is listed:
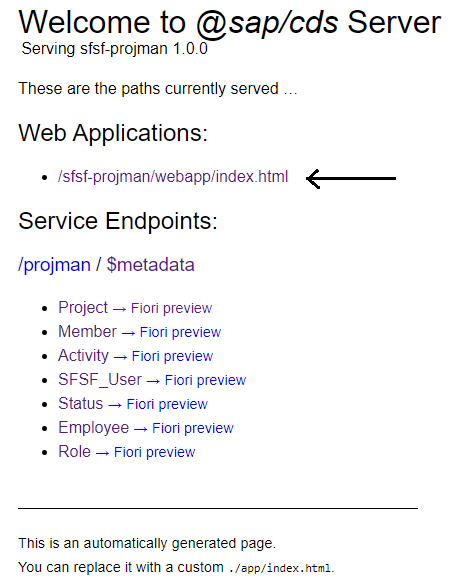
Click on that link and a SAP Fiori Launchpad will open-up with the application tile in it:

NOTE: newer versions of the Fiori Generator might skip this tile and jump direct into the List Report from the next screenshot.
Click on the tile – if the sign-in dialog pops-up just enter john in the username with any password as it’s the mock user with the Admin role you defined in the CAP service for authentication during development – and the List Report page for the Project entity will be loaded:

Now, click on the Go button and the initial test data (loaded from the CSV files) will be displayed:

And that’s it! There you have it: a fully working SAP Fiori Elements application easily created with the help of SAP Business Application Studio standard MTA modules generator, almost ready to deploy!
You can, now, test it at your will, in the same way you did using the Fiori Preview in step 6 of the tutorial: Prepare the SAP SuccessFactors Extension UI with CDS Annotations.
A few more configurations are required to get the solution fully ready for deployment.
Basically, you will define an appname with a very unique name (the same you used in the approuter configuration) and a destination to the CAP service (which is the backend of your application) to be mapped by the approuter in a single entry point – remember, the approuter is responsible for creating a unique entry point for the solution (UI and backend) putting everything under the same domain and taking care of the authentication flow.
After doing that, you will adjust the xs-app.json file (which holds the configuration of the routes to be mapped by the approuter) to point to the destination of the backend service.
On the left-hand pane, click on the mta.yaml file to open it and, under “parameters” add the following line:
NOTE: use the exact same name you provided in the Add
AppRouterConfiguration to the MTA file step (sfsf-projman-<your subdomain>)

Now, under “modules” expand the sfsf-projman-srv module and add the following line to the “parameters” section:

Create a “requires” section to resources > sfsf-projman-destination-service using the following code snippet (right under the type: org.cloudfoundry.managed-service):
  requires:
    - name: srv-api
Append the following code snippet to resources > sfsf-projman-destination-service > parameters > config > inti_data > instance > destinations (right under the URL: https://ui5.sap.com):
          - Name: sfsf-projman-app-api
            Description: Project Manager CAP service
            Authentication: NoAuthentication
            ProxyType: Internet
            Type: HTTP
            URL: ~{srv-api/srv-url}
            HTML5.DynamicDestination: true
            HTML5.ForwardAuthToken: true
Your mta.yaml should now look like this:

Basically, what’s been done here is that you instructed the destination service to create a dynamic destination to the CAP service which will be used by the HTML5 runtime to invoke it forwarding the JWT grabbed by the approuter during the authentication flow, so it can check whether the user has been properly authenticated and has the authorization (Admin role) to access the service. Notice that the service is referencing the CAP service via the name srv-api that has been given to it in its definition at the beginning of the mta.yaml file.
On the left-hand pane, click on the xs-app.json file under app/sfsf-projman folder to open it and add the following code snippet as the very first route in the “routes” collection:
        {
            "source": "^/projman/",
            "destination": "sfsf-projman-app-api",
            "csrfProtection": false,
            "authenticationType": "none"
        },
Your xs-app.json should now look like this:

As you can see, you have mapped the /projman service route to the single entry point managed by the router using the destination defined in the mta.yaml file.
And that concludes the full project configuration required to deploy the application to Cloud Foundry via the MTA approach.
Resources
Discussion
Share feedback on this tutorial or join the conversation in SAP Community.