
Overview
You will learn
- How to define message categories
- How to create recipients
- How to create and maintain a recipient assignment table


Prerequisites
Prerequisites
- You’ve set up SAP Application Interface Framework
- SAP S/4HANA 1709 or later, AIF 4.0
- You’ve completed the tutorial Customize an IDoc Interface with Runtime and Monitoring
Steps
Intro
You use recipients to control which interfaces and messages can be accessed within the message monitor of SAP Application Interface Framework. To assign recipients to users, you can apply the following approaches: either by interface, by key field values, by error categories or via a combination of latter two approaches.
In this tutorial, you will learn how to set up recipients based on message categories. This way, you can dispatch messages to users or groups that are responsible for handling specific errors.
As a prerequisite, you should have gone through the Customize an IDoc Interface with Runtime and Monitoring tutorial where you configured the monitoring for an IDoc flight booking interface. In this case, we simply assigned a recipient to the IDoc interface. You will replace the recipient assignment by interface with a recipient assignment based on message categories. Here, we distinguish between users handling either travel agency related errors, passenger related errors or errors caused by wrong flight details.
This tutorial focuses on customizing an IDoc interface. All the settings are also supported for any other technology that SAP Application Interface Framework supports, such as Proxies or Web Services.
You need to create a recipient assignment table by copying the template table /AIF/RECA_TMPL.
Run transaction code
SE11, enter/AIF/RECA_TMPLin the field Database table, right-click it and select Copy….Enter the name
ZFB_RECIPIENTfor the new table and select Continue. When prompted, enter the package name you created in the previous tutorial.Once created, choose Dsiplay.
Activate your table.
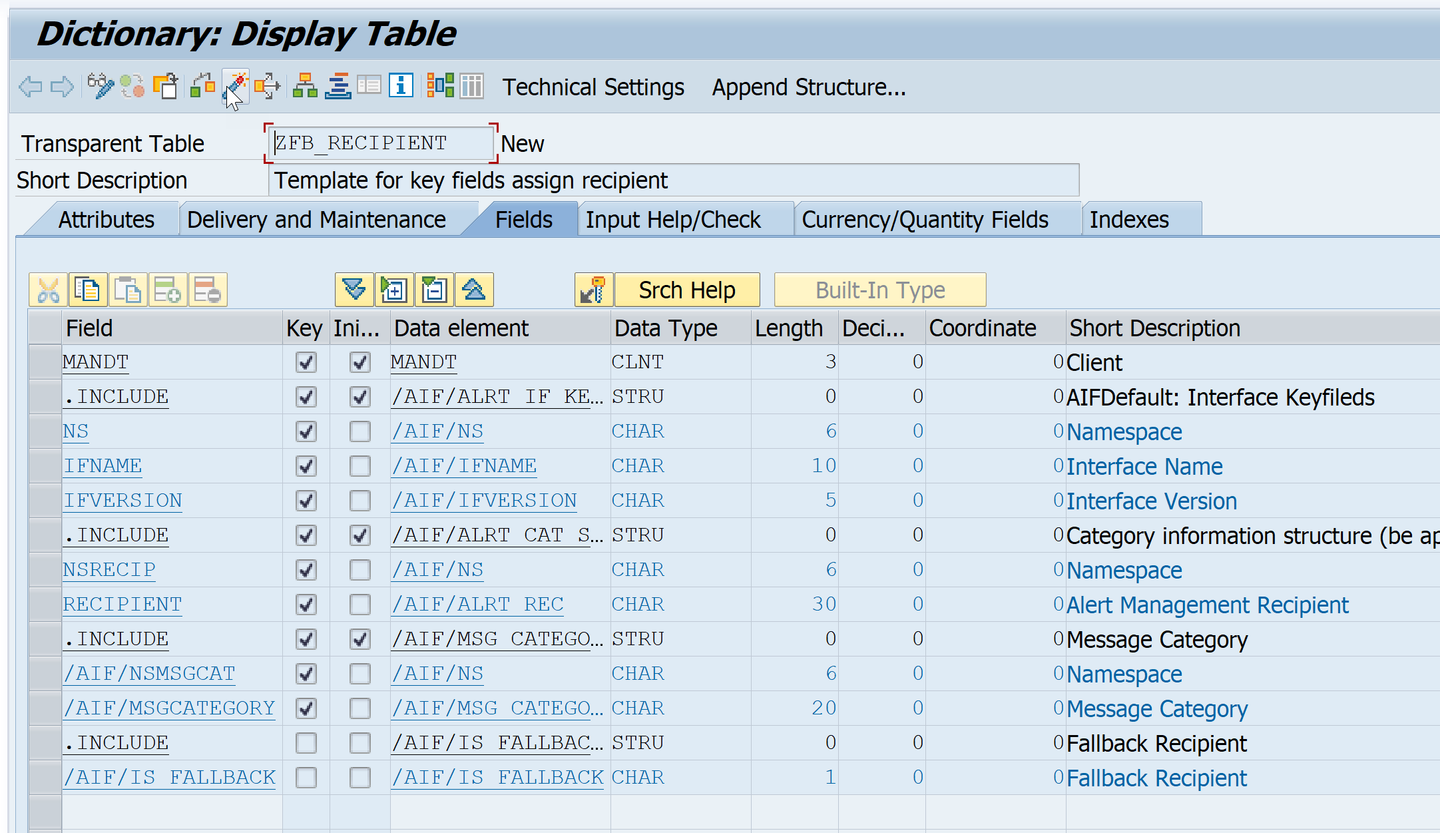
Create Recipient Assignment Table
You need to create different recipients for different error categories.
Go to Customizing (transaction code
/AIF/CUST) and navigate to SAP Application Interface Framework > Error Handling > Define Namespace-Specific Features. Enter or select your namespaceDEMO_1and select Continue.In the menu on the left, navigate to Define Recipients by double-clicking it. Select New Entries, and enter the following recipients:
Recipient for Alert Alert Recipient Description ZFB_RECIPIENT_AGENCYRecipient for Agency related errorsZFB_RECIPIENT_FLIGHTRecipient for Flight related errorsZFB_RECIPIENT_PASSRecipient for Passenger related errorsZFB_RECIPIENT_DEFAULTDefault recipientSave your changes.

Define Recipients
You need to assign the beforehand created recipient assignment table as well as the default recipient to your interface.
You maintain a default recipient to make sure that no message slips through without anybody being notified. If the system cannot find any other recipient that receives a notification, a notification is always sent to the default recipient regardless of the alert settings.
While in Customizing (transaction code
/AIF/CUST), navigate to SAP Application Interface Framework > Error Handling > Define Namespace-Specific Features. Enter your namespaceDEMO_1and select Continue.Double-click the node Configure Alerts, and select New Entries to create a new entry. Enter your interface name
FLBOOKand version1, and maintain the parameters as follows:Field Value Rec Assgn Table ZFB_RECIPIENTNamespace DEMO_1Default Recipient ZFB_RECIPIENT_DEFAULTSave your changes.

Configure Alerts
You need to create message categories corresponding to your recipients.
Run transaction code
/AIF/MSG_CAT_DEF, enter your namespaceDEMO_1and select Apply.Select New Entries, and enter the following message categories:
Message Category Msg. Cat. Desc ERRORS_AGENCYAgency related errorsERRORS_FLIGHTFlight related errorsERRORS_PASSPassenger related errorsSave your changes.

Create message categories
You need to group log messages in the beforehand created message categories.
Run transaction code
/AIF/MSG_CAT_ASGN, enter your namespaceDEMO_1and the first beforehand created message categoryERRORS_AGENCY, then select Apply.Select New Entries, and enter the following message categories:
Message Class Message Number BC_IBF105BC_IBF151Save your changes.
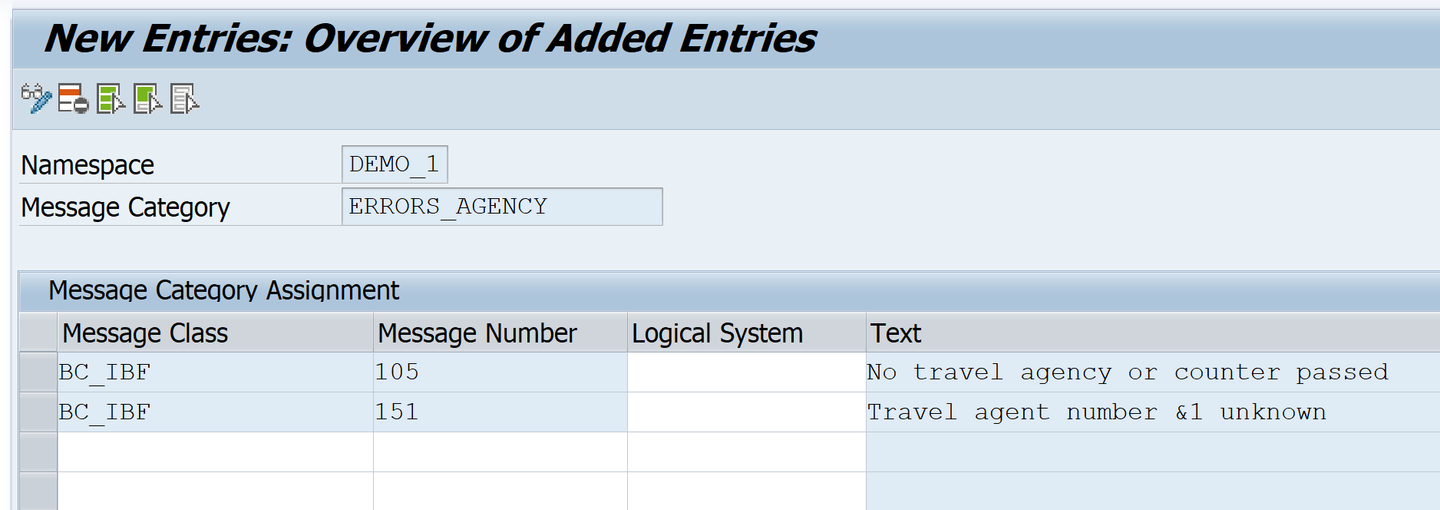
Assign message category agency Rerun transaction code
/AIF/MSG_CAT_ASGN, enter your namespaceDEMO_1and the next message categoryERRORS_FLIGHT, then select Apply.Select New Entries, and enter the following message categories:
Message Class Message Number BC_IBF055BC_IBF057BC_IBF107Save your changes.

Assign message category flight Rerun transaction code
/AIF/MSG_CAT_ASGN, enter your namespaceDEMO_1and the next message categoryERRORS_PASS, then select Apply.Select New Entries, and enter the following message categories:
Message Class Message Number BC_IBF106BC_IBF150Save your changes.

Assign message category passenger
Next, you need to maintain the recipient assignment table to map the message categories to your recipients.
As a prerequisite to add entries to the recipient assignment table, the Data Browser/Table View Editing table setting should be set to
Display/Maintenance Allowed. Since we copied the recipient assignment table from a template table, this should automatically apply. Otherwise, ensure to change the setting accordingly.
Run transaction code
SE16, enterZFB_RECIPIENTin the field Table Name, and select Create Entries.Add the following entries to the table:
NS IFNAME IFVERSION NSRECIP RECIPIENT /AIF/NSMSGCAT /AIF/MSGCATEGORY /AIF/IS_FALLBACK DEMO_1FLBOOK1DEMO_1ZFB_RECIPIENT_AGENCYDEMO_1ERRORS_AGENCYDEMO_1FLBOOK1DEMO_1ZFB_RECIPIENT_FLIGHTDEMO_1ERRORS_FLIGHTDEMO_1FLBOOK1DEMO_1ZFB_RECIPIENT_PASSDEMO_1ERRORS_PASS
Optionally, you can add an entry for a fallback recipient by setting the fallback flag (not covered in this tutorial). The fallback recipient would get all messages for error types other than maintained above.
Save your changes.
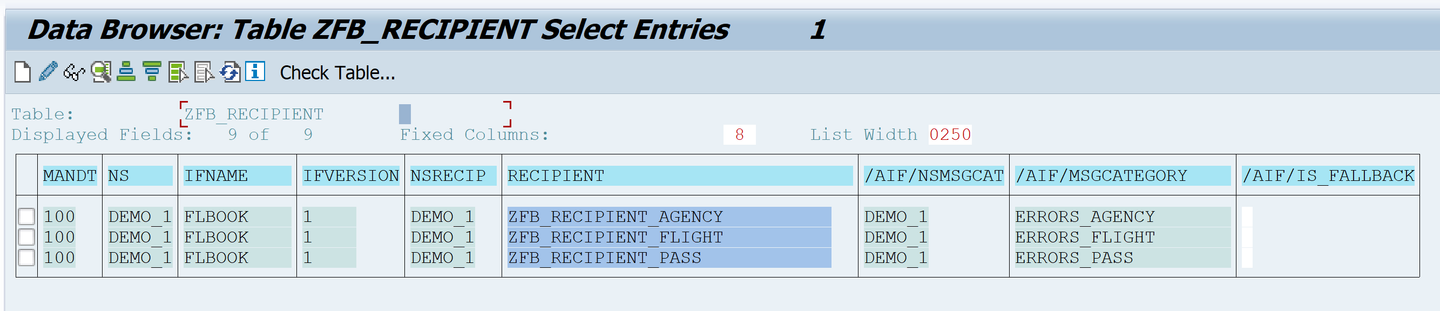
Maintain assignment table
Now the users in charge of monitoring the IDoc must be assigned to the recipients. We assume that you have already created three different users, one for each message category.
Go to Customizing (transaction
/AIF/CUST) and navigate to SAP Application Interface Framework > System Configuration > Recipients > Assign Recipients. Enter or select your namespaceDEMO_1and the beforehand created recipientZFB_RECIPIENT_AGENCY, then select Apply.Select New Entries to create a new entry in Assign Users. Enter your user responsible for agency related errors and check the boxes for Include on Overview and Tech. User.
Save the new entry.

Assign users to recipient Navigate back, and run through the same steps for the recipients
ZFB_RECIPIENT_FLIGHTandZFB_RECIPIENT_PASS.
Let’s create a couple of sample messages to showcase the customizing changes.
As a prerequisite, you need to generate sample test data. If you haven’t done so far, run through step 17 of the Customize an IDoc Interface with Runtime and Monitoring tutorial. Step 18 of the tutorial describes how to send test data.
Open the Test Tool for IDoc Processing (transaction code WE19). Send in new test messages forcing different kind of processing errors:
- Select an existing flight however maintain an agency that does not exist like agency number
00109345. - Select an existing flight however maintain no agency nor a counter.
- Select an existing flight however maintain
00000000as customer number. - Select an existing flight however maintain a wrong flight class such as
X. - Select an existing flight where the flight date is in the past.
- Select a flight that does not exist.

Now, let’s check the results of your tests in the Monitoring and Error Handling.
Log on with one of the users, e.g., the one responsible for agency related errors.
Open the Interface Monitor (transaction code
/AIF/IFMON). You should see at least one new message.
Display summary in interface monitor When you select the summary line for your interface, you’re forwarded to Monitoring and Error Handling where you can see your selected test messages. You should see agency related errors only, like an unknown agency:
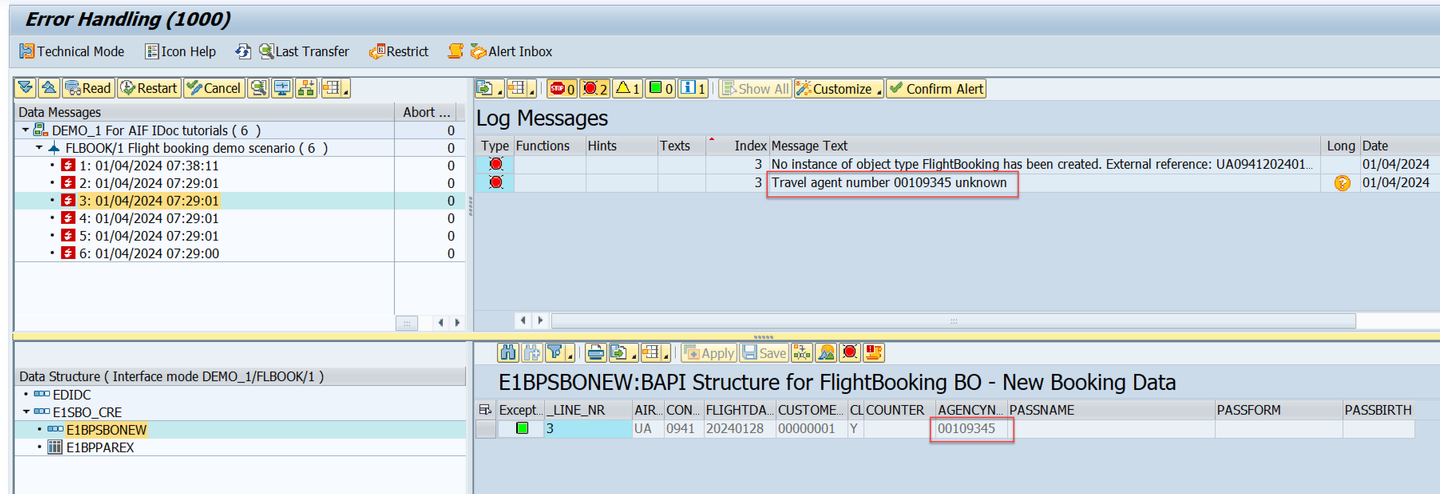
Display message If you select another message you may find a message with no agency maintained:
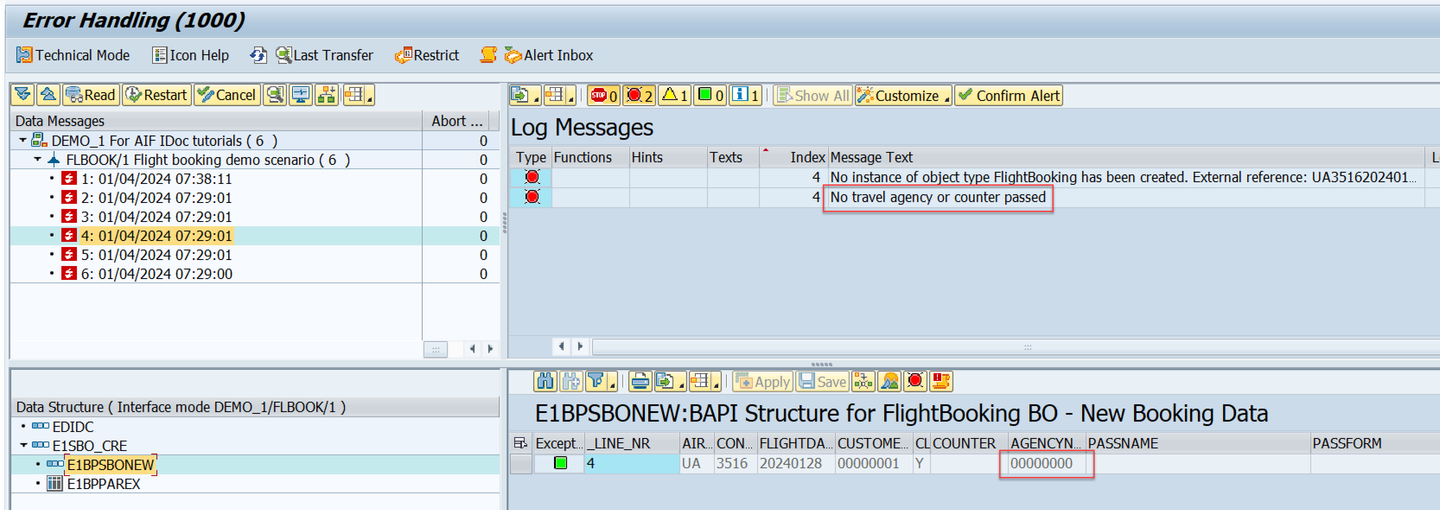
Display message Alternatively, if you’ve set up Message Monitoring for Administrators in the SAP Fiori launchpad, you can check the test results there. Here, you see all messages grouped by recipient. See Message Monitoring for Administrators.

Display messages in Message Monitoring for Administrators
Congratulations! You’ve successfully defined message category based recipients.
Resources
Discussion
Share feedback on this tutorial or join the conversation in SAP Community.