
Overview
You will learn
- How to define a single key field
- How to create recipients
- How to create and maintain a recipient assignment table


Prerequisites
Prerequisites
- You’ve set up SAP Application Interface Framework
- SAP S/4HANA 1709 or later, AIF 4.0
- You’ve completed the tutorial Create a Simple IDoc Interface
Steps
Intro
You use recipients to control which interfaces and messages can be accessed within the message monitor of SAP Application Interface Framework. To assign recipients to users, you can apply the following approaches: either by interface, by key field values, by error categories or via a combination of latter two approaches.
In this tutorial, you will learn how to set up recipients based on key field values. In our example, messages are dispatched to different users depending on a particular country code.
As a prerequisite, you should have gone through the Create a Simple IDoc Interface tutorial where you simply assigned a recipient to the IDoc interface. You will replace the recipient assignment by interface with a recipient assignment based on key field values.
This tutorial focuses on customizing an IDoc interface. All the settings are also supported for any other technology that SAP Application Interface Framework supports, such as Proxies or Web Services.
To be able to determine recipients based on business data, you need to enhance the interface-specific index table.
As a prerequisite, you should have gone through the Create a Simple IDoc Interface tutorial and hence should have already defined an interface-specific single index table with name
ZIDOC_MON_IDX. Otherwise, run through step 7 of the tutorial to create the index table.
Run transaction code
SE11, enter the table nameZIDOC_MON_IDXand choose Change.Add the following new entry:
Field Data element COUNTRYS_COUNTRYSave and activate your changes.

Enhance index table
You need to define the key field for your interface.
In the Customizing for SAP Application Interface Framework (transaction code
/AIF/CUST), navigate to Error Handling > Define Interface-Specific Features.In the upcoming dialog, enter namespace
DEMO_1, interfaceFCUSTOMER, and version1, then press Enter.Double-click Define Key Fields for Multi. Search in the menu on the left. Add a new entry with Field Sequence No.
10and add the following values:Field name Value Key Field Name COUNTRYData element S_COUNTRYField Name E1SCU_CRE-E1BPSCUNEW-COUNTRRaw or SAP Structure Source structureMulti.Selection Type Single selectionHide Tree Node in the View 1 Tree selected Field Name in Alert Recipient Assignment COUNTRYRelevant for Recipient Determination selected Save your changes.

Add key field country
You need to create a recipient assignment table by copying the template table /AIF/T_ALRT_DEF.
Run transaction code
SE11, enter/AIF/T_ALRT_DEFin the field Database table, right-click it and select Copy….Enter the name
ZFCUST_RECIPIENTfor the new table and select Continue. When prompted, enter the package name you created in the previous tutorial.Once created, choose Change.
Add the following new entry:
Field Data element COUNTRYS_COUNTRYSave and Activate your changes.
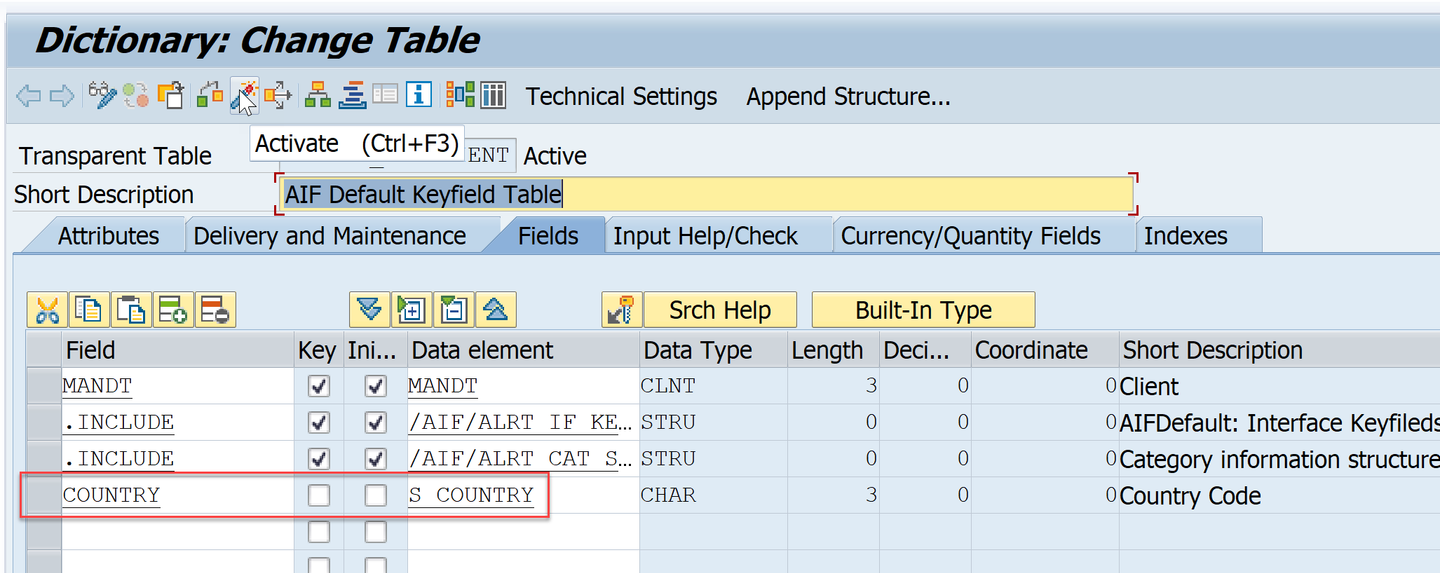
Create Recipient Assignment Table
You need to create different recipients for different key field values.
Go to Customizing (transaction
/AIF/CUST) and navigate to SAP Application Interface Framework > Error Handling > Define Namespace-Specific Features. Enter or select your namespaceDEMO_1and select Continue.In the menu on the left, navigate to Define Recipients by double-clicking it. You should see a recipient that you have defined in the previous tutorial. You need to create three more recipients: two for the key field based recipient determination and one as default. Select New Entries, and enter the following details:
Recipient for Alert Alert Recipient Description ZFCUST_RECIPIENT_DEKey field based recipient for country DEZFCUST_RECIPIENT_USKey field based recipient for country USZFCUST_RECIPIENT_DEFAULTDefault recipientSave your changes.

Define Recipients
You need to assign the beforehand created recipient assignment table as well as the default recipient to your interface.
You maintain a default recipient to make sure that no message slips through without anybody being notified. If the system cannot find any other recipient that receives a notification, a notification is always sent to the default recipient regardless of the alert settings.
While in Customizing (transaction
/AIF/CUST), navigate to SAP Application Interface Framework > Error Handling > Define Namespace-Specific Features. Enter your namespaceDEMO_1and select Continue.Double-click the node Configure Alerts, and select New Entries to create a new entry. Enter your interface name
FCUSTOMERand version1, and maintain the parameters as follows:Field Value Rec Assgn Table ZFCUST_RECIPIENTNamespace DEMO_1Default Recipient ZFCUST_RECIPIENT_DEFAULTSave your changes.

Configure Alerts
You need to maintain the recipient assignment table to map key field values to your recipients.
As a prerequisite to add entries to the recipient assignment table, the Data Browser/Table View Editing table setting should be set to
Display/Maintenance Allowed. Since we copied the recipient assignment table from a template table, this should automatically apply. Otherwise, ensure to change the setting accordingly.
Run transaction code
SE16, enterZFCUST_RECIPIENTin the field Table Name, and select Create Entries.Add the following entries to the table:
NS IFNAME IFVERSION NSRECIP RECIPIENT COUNTRY DEMO_1FCUSTOMER1DEMO_1ZFCUST_RECIPIENT_DEDEDEMO_1FCUSTOMER1DEMO_1ZFCUST_RECIPIENT_USUSSave your changes.

Maintain assignment table
Now the users in charge of monitoring the IDoc must be assigned to the recipients. We assume that you have already created two different users, one will be responsible for the messages related to country DE and the other for country US.
Go to Customizing (transaction
/AIF/CUST) and navigate to SAP Application Interface Framework > System Configuration > Recipients > Assign Recipients. Enter or select your namespaceDEMO_1and the beforehand created recipientZFCUST_RECIPIENT_DE, then select Apply.Select New Entries to create a new entry in Assign Users. Enter your user responsible for
DEand check the boxes for Include on Overview and Tech. User.Save the new entry.

Assign users to recipient Navigate back, and run through the same steps for the recipient
ZFCUST_RECIPIENT_US.
Assign users to recipient
Let’s create a couple of sample messages to showcase the customizing changes.
Open the Test Tool for IDoc Processing (transaction code WE19). Send in two new test messages with different countries, choose either DE or US. Maintain customer names, regions, and cities. Enter an existing customer type, either P or B, to ensure that the message won’t fail. Optionally, enter any other customer type to force a message processing error.

Now, let’s check the results of your tests in the Monitoring and Error Handling.
Log on with one of the users, e.g., the one responsible for
DE.Open the Interface Monitor (transaction code
/AIF/IFMON). You should see one new message.
Display summary in interface monitor When you select the summary line for your interface, you’re forwarded to Monitoring and Error Handling where you can see your selected test message for country
DE. You should not see the messages for any other country.
Display message Alternatively, if you’ve set up Message Monitoring for Administrators in the SAP Fiori launchpad, you can check the test results there. Here, you see all messages grouped by recipient. See Message Monitoring for Administrators.

Display messages in Message Monitoring for Administrators
Congratulations! You’ve successfully defined key field based recipients.
Resources
Discussion
Share feedback on this tutorial or join the conversation in SAP Community.