
Overview
You will learn
- How to create an IDoc interface
- How to use the IDoc Structure Generator
- How to implement a mapping in SAP Application Interface Framework
- How to create an action to call the actual application


Prerequisites
Prerequisites
- You have set up SAP Application Interface Framework
- SAP S/4HANA 1709 or later, SAP Application Interface Framework 4.0
- Optionally: You have a working IDoc communication in place
Steps
Intro
In this tutorial, you’ll learn how to create and customize an IDoc interface. In this process, you’ll use the IDoc Structure Generator to create interfaces to display and process IDocs.
If you don’t have a working IDoc scenario in place, the first five steps show you how to set up the IDoc communication with the IDoc message type
FLIGHTBOOKING_CREATEFROMDAT. The steps show you how to process an IDoc with SAP Application Interface Framework instead of using the IDoc standard processing. Otherwise, if you have an existing IDoc communication set up, you can skip the first two steps and start with step number three in order to change the IDoc processing from the standard processing to the SAP Application Interface Framework processing.
Open your system. Go to Configuration of RFC Connections (transaction code
SM59) and choose Create.Enter a destination name following the naming convention
<SID>CLNT<client>, with<SID>being your system ID and<client>the client number of your system. As Connection Type, choose3 RFC connection to ABAP system. Choose Continue. The settings for your newly created destination open.Switch to the Logon & Security tab. Maintain Language and Client and set the
Current Userflag.
Create RFC destination Save your changes.
Go to Ports in IDoc processing (transaction code
WE21), select the Transactional RFC node and choose Create to create a new port.In the upcoming dialog, choose
Generate port nameand then Continue.Maintain a description and in the field RFC destination, enter the destination you created in the previous step.

Create port Save your changes.
To process an IDoc message via SAP Application Interface Framework, one of the SAP Application Interface Framework function modules need to be assigned to the combination of IDoc message type and IDoc basic type.
Go to IDoc Assignment of FM to Log. Message and IDoc Type (transaction code
WE57). Confirm the upcoming dialog warning you that the table is cross-client.Choose New Entries and enter the following data:
| Field Name | Value |
|---|---|
| Function module | /AIF/IDOC_INB_PROCESS_FUNC_1 |
| Function type | Function module |
| Basic type | FLIGHTBOOKING_CREATEFROMDAT01 |
| Message type | FLIGHTBOOKING_CREATEFROMDAT |
| Direction | Inbound |
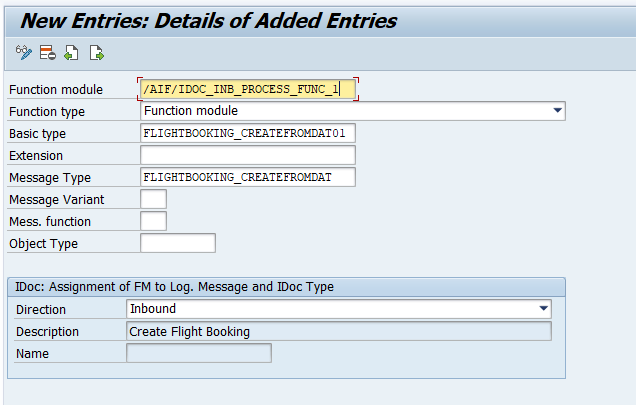
- Save your changes.
Go to Inbound process code (transaction code
WE42).Choose New Entries and enter the following data:
| Field Name | Value |
|---|---|
| Process code | ZDEMO_FLBOOK |
| Identification | /AIF/IDOC_INB_PROCESS_FUNC_1 |
Maintain a description, select the
Process with ALE serviceflag and theProcessing by function moduleflag.
Create port Save your changes.
Go to Partner profiles (transaction
WE20) and choose Create.Enter a Partner no., following the naming convention
<SID>CLNT<client>,<SID>being your system ID and<client>being the client number of your system. As Type, chooseLS(Logical System).In tab Post Processing: Valid Processors, enter Ty. (agent type)
US(User). As Agent, enter your user name.
Create partner profile In the Inbound table, choose Create inbound parameter. In the upcoming screen, choose or enter Message Type
FLIGHTBOOKING_CREATEFROMDATand the beforehand created Process CodeZDEMO_FLBOOK. Lastly, for Processing by Function Module, chooseTrigger immediately.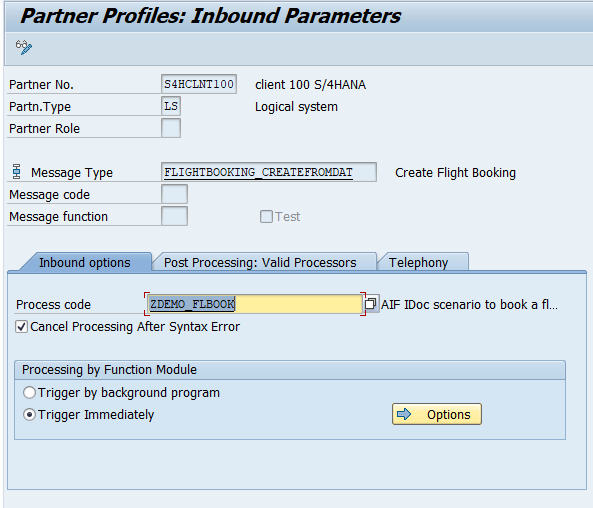
Add inbound processing Navigate back to the partner profile and Save your changes.
Create a package that serves as the destination for your newly created objects.
Go to the Object Navigator (transaction code
SE80).From the drop-down menu, select Package, enter the name
ZDEMO, and press Enter or choose Display or Create Object. If you have run through other SAP Application Interface Framework tutorials before, the package may exist. In this case, it will be displayed. Otherwise create it. Confirm the dialogue window, enter a meaningful short description for your new package, and choose Confirm. If prompted, enter a workbench request and confirm again.
Create Package Additionally, create a new function group by selecting Function Group from the drop-down menu and enter the name
ZDEMO.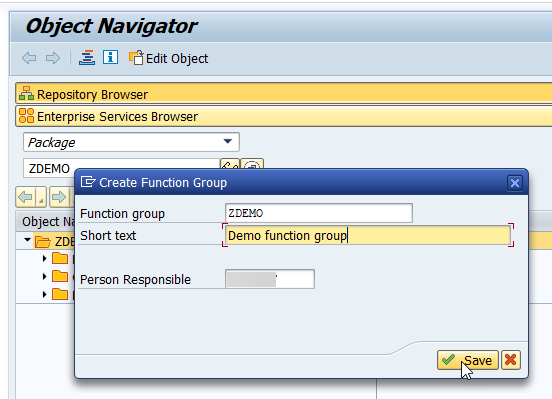
Create Function Group
You have successfully created a new package named ZDEMO and a new function group named ZDEMO.
The IDoc Structure Generator is a report that generates most of the required customizing settings for SAP Application Interface Framework. To be able to use it correctly, you require a namespace.
Open your system. Go to Customizing for SAP Application Interface Framework (transaction code
/AIF/CUST) and navigate to Interface Development > Define Namespace.Choose New Entries and enter the following name and description for your new namespace:
| NS | Namespace description |
|---|---|
DEMO_1 | For AIF IDoc tutorials |
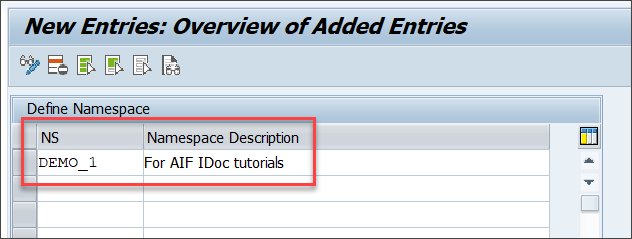
- Press Enter to confirm your entry.
Internally, SAP Application Interface Framework works with ABAP Dictionary structures, but IDoc Basic Types are not available as ABAP Dictionary structures. However, the IDoc Structure Generator can create the required ABAP Dictionary structure for a specific basic type and extension combination.
- Open the IDoc Structure Generator (transaction code
/AIF/IDOC_GEN) and enter the following general information about the IDoc you want to monitor:
| Field name | Description | Value |
|---|---|---|
| Basic Type | The basic type of the IDoc you want to monitor | FLIGHTBOOKING_CREATEFROMDAT01 |
| Message Type | The message type used in the IDoc you want to monitor | FLIGHTBOOKING_CREATEFROMDAT |
| Extension | The extension name if used in the IDoc | leave empty |
| Root Structure Name | The name of the structure you want to create | ZDEMO_1_FLIGHTBOOKING_CREATE |
| Destination for Remote Search | The standard name of an RFC destination | leave empty |
| Create or Update Structure | Indicates if an ABAP Dictionary structure should be created or updated | check the box |
| Create Interface | Indicates if an interface should be created | check the box |
- Once you check the boxes for Create or Update Structure and Create Interface, two additional sections are displayed: Structure Details and Interface Definition. In section Structure Details, leave the boxes unchecked and enter the following details:
| Field name | Description | Value |
|---|---|---|
| Structure Prefix | All ABAP Dictionary objects created by the generator will start with this prefix to ensure correct naming. | ZDEMO_1_ |
| Package | The destination package for the new ABAP Dictionary objects; if the field is left empty, the objects will be created as local objects. | ZDEMO |
| Workbench Request | Enter a workbench request if the structure should be transported. | your workbench request |
- In section Interface Definition, enter the following details:
| Field name | Description | Value |
|---|---|---|
| Namespace | An existing namespace in which the interface should be created | DEMO_1 (the namespace created before) |
| Interface Name | The name of the to be created interface, for example (an abbreviation of) the basic type | FLBOOK |
| Interface Version | The version number of the interface | 1 |
| Interface Description | The short description of the interface | your short description |
| IDoc Processing Scenario | There are several possibilities to monitor and process an IDoc with SAP Application Interface Framework; depending on the scenario the interface is generated with different settings. | AIF runtime; Call IDoc function as action |
| Customizing Request | Enter a customizing request if the interface should be transported. | your customizing request |
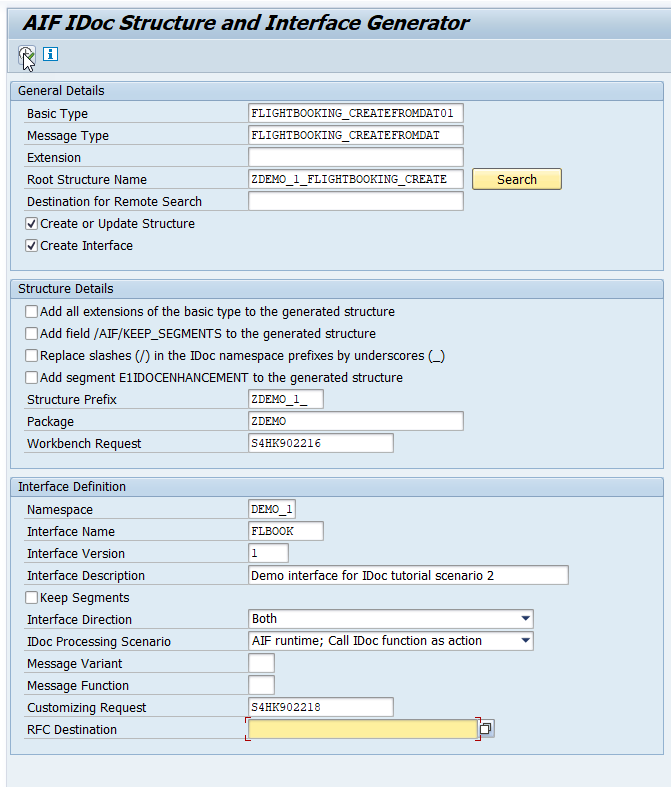
When you’ve entered all the details, press F8 or choose Execute. The IDoc Structure Generator will start to create the required ABAP Dictionary objects and the interface. Once the report is finished, a summary of what was created is displayed.

IDoc Structure Generator - Display Logs Choose Continue.
Go to Customizing for SAP Application Interface Framework (transaction code
/AIF/CUST) and navigate to Interface Development > Define Interfaces. In the upcoming dialog, enter your previously created namespaceDEMO_1, and continue.Enable Change mode. Double-click the newly generated interface
FLBOOKto open it. Because we like to maintain checks and field mappings, deselect the Move Corresponding Structures flag here. We will set it in the structure mapping.
Define Interfaces Save your changes.
While in Customizing (transaction code
/AIF/CUST), navigate to Interface Development > Define Structure Mappings.In the upcoming dialog, enter your previously created namespace
DEMO_1, interface nameFLBOOK, and interface version1. Choose Continue.Choose New Entries and enter the root node of your interface structure, here
ZDEMO_1_FLIGHTBOOKING_CREATE.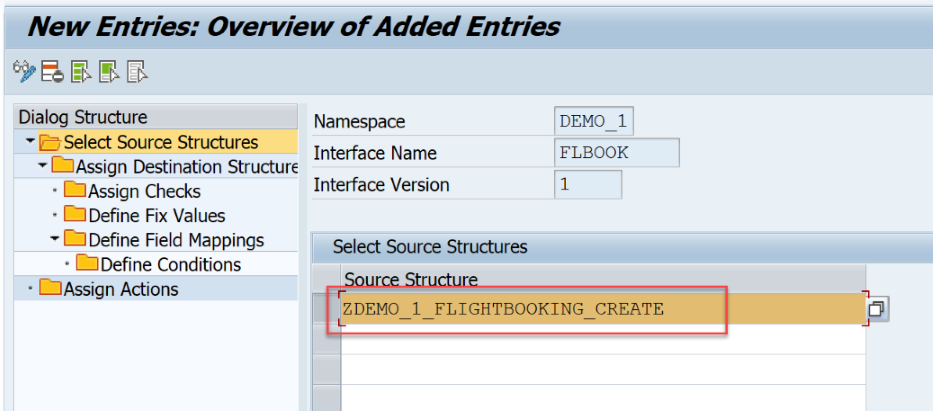
Create New Source Structure Select the new entry and double-click Assign Destination Structure in the menu on the left.
Choose New Entries and enter the Number of Structure Mapping
10. As Destination Structure, enter the same root node of your interface structure,ZDEMO_1_FLIGHTBOOKING_CREATE. Finally, select the Move Corresponding Fields flag. Unless you define a mapping for a particular field, this ensures that the fields are mapped one to one.
Assign Destination Structures Save your changes.
In the following, we like to enrich the incoming flight booking data, that is, the field pass name should be filled based on the customer ID. For this, we implement a table lookup to fetch the pass name.
While in Define Structure Mappings, double-click the node Define Field Mappings. Create a new entry and define the field mapping as follows:
Field Value Field in Destination Structure E1SBO_CRE-E1BPSBONEW-PASSNAMEField Name 1 E1SBO_CRE-E1BPSBONEW-CUSTOMERIDNamespace DEMO_1Value Mapping VM_CUSTOMER
Assign Destination Structures Since the value mapping doesn’t exist yet, you are asked to create it. Confirm the dialog.
Navigate to the reusable value mapping by double-clicking
VM_CUSTOMERand define it with the following information:Field Value Value Mapping Description Fetch customer name from table SCUSTOMTable Name SCUSTOMField Name NAMEWhere Condition for Select Statement ID = '$1'
Assign Destination Structures Save the value mapping and navigate back to Define Field Mappings.
Next, create an action with a function to book the flights in your test scenario.
In Define Structure Mappings, double-click the node Assign Actions.
Create a new entry and enter the following details:
Field Value Action Number 10Namespace DEMO_1Action FLIGHT_CREATE
Assign Destination Structures Since the action doesn’t exist yet, you’re asked to create it. Confirm the upcoming dialog with Yes.
Navigate to the new action by double-clicking
FLIGHT_CREATE.In Define Actions, you can maintain multiple functions for each application. In this tutorial, you only need one function calling the IDoc runtime to create new flight bookings.
Enter an action description and set the Commit Mode to
COMMIT WORKand the Commit Level toAfter Each Function.
Assign Destination Structures Double-click the Define Functions node. Create a new function with Function Number
10and Function Module NameZFLIGHT_CREATE_IDOC.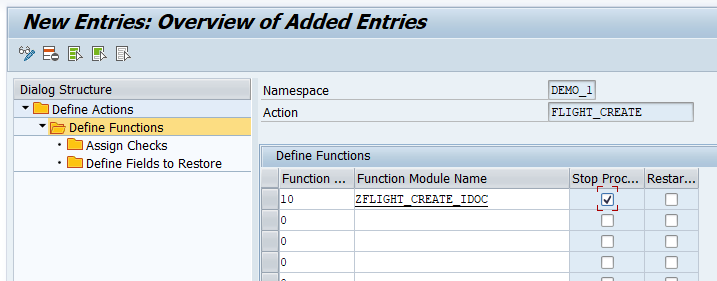
Assign Destination Structures Since the function module doesn’t exist yet, you’re asked to create it. Confirm the upcoming dialog with Yes.
In the next dialog, enter your function group
ZDEMOand choose Copy. A new function module is created as copy of the/AIF/FILE_TEMPL_PROCESStemplate.Open the function module, switch to the Source code tab and enter the following source code:
ABAPFUNCTION ZFLIGHT_CREATE_IDOC . *"---------------------------------------------------------------------- *"*"Local Interface: *" IMPORTING *" REFERENCE(TESTRUN) TYPE C *" REFERENCE(SENDING_SYSTEM) TYPE /AIF/AIF_BUSINESS_SYSTEM_KEY *" OPTIONAL *" TABLES *" RETURN_TAB STRUCTURE BAPIRET2 *" CHANGING *" REFERENCE(DATA) *" REFERENCE(CURR_LINE) *" REFERENCE(SUCCESS) TYPE /AIF/SUCCESSFLAG *" REFERENCE(OLD_MESSAGES) TYPE /AIF/BAL_T_MSG *"---------------------------------------------------------------------- CALL FUNCTION '/AIF/IDOC_ACTION_FUNCTION' EXPORTING iv_idoc_function = 'IDOC_INPUT_FLIGHTBOOKING_CREAT' TABLES return = return_tab CHANGING data = data. ENDFUNCTION.Save and activate your function module.
Navigate back to the action and save your changes.
Navigate back to Define Structure Mappings and save your changes.
It’s recommended to implement an interface-specific single index table to ensure full flexibility, especially if you expect a high load of messages or if you plan to define key fields for your interface (now or later).
You can also switch the single index table later, but when you do, all processed messages stored in the old single index table will no longer be visible in the Interface Monitor. The information for the newly incoming messages is stored in the new single index table of the interface.
Create a table via transaction
SE11. You can use table/AIF/STD_IDX_TBLas a template by entering/AIF/STD_IDX_TBLin the field Database table, right-clicking it and choosing Copy…. Enter the nameZIDOC_RT_IDXfor the new table and choose Continue. When prompted, enter the package name you created earlier.
Create Single Index Table After creating the single index table, activate it by choosing Display and then Activate.

Create Single Index Table Go to Customizing (transaction
/AIF/CUST) and navigate to SAP Application Interface Framework > Error Handling > Define Namespace-Specific Features. Enter your namespaceDEMO_1and choose Continue.Choose New Entries to create a new entry in Define Interface-Specific Features. Enter your interface name
FLBOOKand version1and enter the name of the newly created single index tableZIDOC_RT_IDXin the field Message Index Table.
Details of Added Entries Save your changes.
If you want to monitor the newly created interface in the Interface Monitor of the Message Dashboard app, a recipient for the interface is required.
Go to Customizing (transaction
/AIF/CUST) and navigate to SAP Application Interface Framework > Error Handling > Define Namespace-Specific Features. Enter or select your namespaceDEMO_1and choose Continue.In the menu on the left, navigate to Define Recipients by double-clicking it. Choose New Entries, enter a meaningful name for your new recipient and add a description.

Define Recipients - Details Save your changes.
To be able to see any data in the Interface Monitor or the Message Dashboard, a recipient must be assigned to the interface you want to monitor.
Go to Customizing (transaction
/AIF/CUST) and navigate to SAP Application Interface Framework > Error Handling > Define Interface-Specific Features. Enter or select your namespaceDEMO_1, as well as your interface nameFLBOOKand interface version1. Choose Continue.
Select namespace and interface In the menu on the left, double-click Assign Recipients Without Key Fields and create a new entry. Enter or select the namespace and the recipient you created before.

Assign recipients Save your changes.
Now the users in charge of monitoring the IDoc must be assigned to the recipient.
Go to transaction code
/AIF/RECIPIENTSand select or enter your user name and any additional user names you want to assign to the recipient.
Enter User Name Create a new entry and select the namespace and recipient you created in the steps before. Enter a user number and check the boxes for Include on Overview Screen and Technical User.

Assign users to recipient Save the new entry.
Before you can create flight bookings, you need to generate test data.
To do so, run transaction code
BC_DATA_GEN, select the standard data record, and execute the report.
Create Data for Flight Data Model Open the Data Browser (transaction code
SE16), select the table SFLIGHTS, and choose Execute. The generated flight data entries are displayed.
If you run the requests in step 18, select existing flights from this table. Ensure that the flight date is in the future, otherwise your requests will fail.
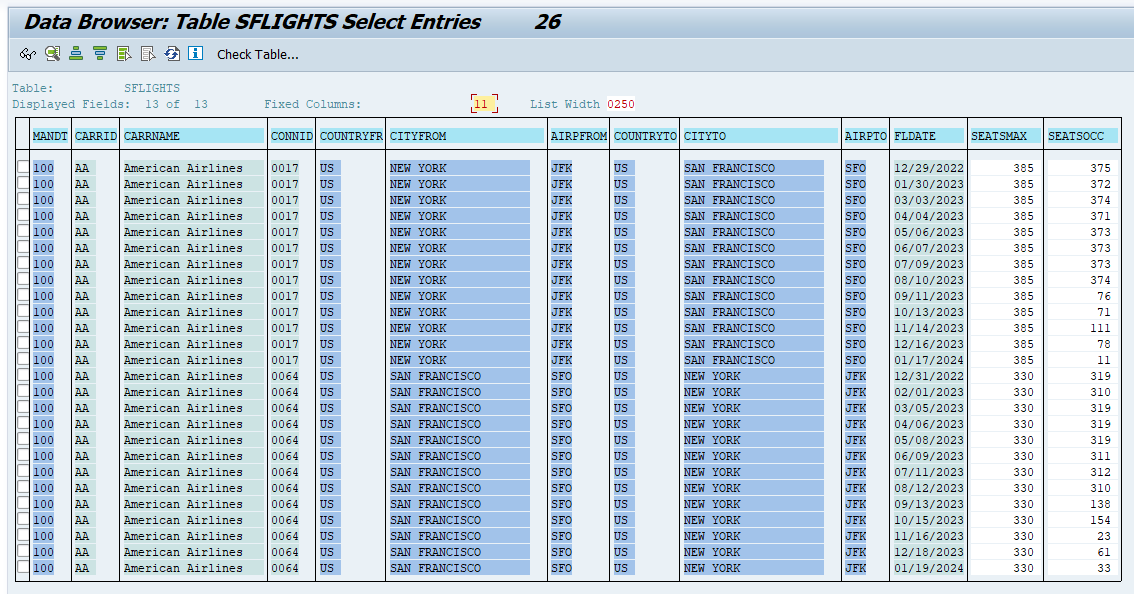
After the setup is complete, test your settings and verify that the IDoc monitoring is working as planned.
Send in new test IDocs, for example using the Test Tool for IDoc Processing (transaction code
WE19).In the test tool, maintain basic type
FLIGHTBOOKING_CREATEFROMDAT01.Maintain the control record fields corresponding to your partner profile and the port created beforehand as follows:
Field name Value Receiver Port SAP<SID>(<SID>being your system ID)Receiver Partner Number The partner number as specified in the partner profile Receiver Type LSSender Port The port as specified before Sender Partner Number The partner number as specified in the partner profile Sender Type LSMessage Type FLIGHTBOOKING_CREATEFROMDAT
Maintain control record Maintain existing flight data from table
SFLIGHTS, see above. Maintain a customer ID, e.g.,42and an agency number, e.g.,109. As flight class, choose eitherY,CorF.
Maintain data record Then, choose Standard Inbound. A dialog pops up informing you that the IDoc was passed to the application.
Check the results of your test in the Interface Monitor (transaction code
/AIF/IFMON). You’ll only be able to see the new interface if you correctly assigned your user to the recipient.
Interface Monitor When you select the summary line for your interface, you’re forwarded to Monitoring and Error Handling, where you can see your selected test message(s).

Error Handling In the log message, the internal reference to the flight booking is displayed. It’s a combination of the airline ID and the booking ID. Note down the ID. You need it for the next step.
Let’s now check if the lookup value mapping functioned properly. Open the Data Browser (transaction
SE16), and enter table nameSBOOK. Then choose icon Table Contents.On the next screen, enter CARRID and BOOKID of the successful created booking. You derive the values from the log message, see above. Then choose Execute.

Error Handling As you can see for the chosen table entry, the pass name has been successfully mapped.

Error Handling
Congratulations! You’ve created, customized and tested an IDoc interface for processing and monitoring in SAP Application Interface Framework.
Resources
Discussion
Share feedback on this tutorial or join the conversation in SAP Community.