
Create a Simple OData Interface
Create a simple AIF interface to enable monitoring of an OData Gateway service.
Overview
You will learn
- How to create a simple OData interface
- How to set up monitoring of an OData service in SAP Application Interface Framework


Prerequisites
Prerequisites
- You’ve set up SAP Application Interface Framework
- SAP S/4HANA 1709 or later
- You have set up SAP Gateway and registered the basic OData sample service for SAP Gateway, see Registering Sample Service - Basic
Steps
Intro
In this tutorial, you will learn how to create a simple SAP Application Interface Framework interface that enables you to monitor an OData service. In our example, we use the basic OData sample service GWSAMPLE_BASIC.
If you’ve completed other tutorials for SAP Application Interface Framework, you might already have created a package. In this case, you can skip this step.
Create a package that serves as the destination for your newly created objects.
Open your system and navigate to the Object Navigator (transaction code
SE80).From the drop-down menu, choose Package and enter the name
ZDEMO. Press Enter or choose Display or Create Object.Confirm the dialogue window, enter a meaningful short description for your new package, and select Confirm. If prompted, enter a workbench request and confirm again.
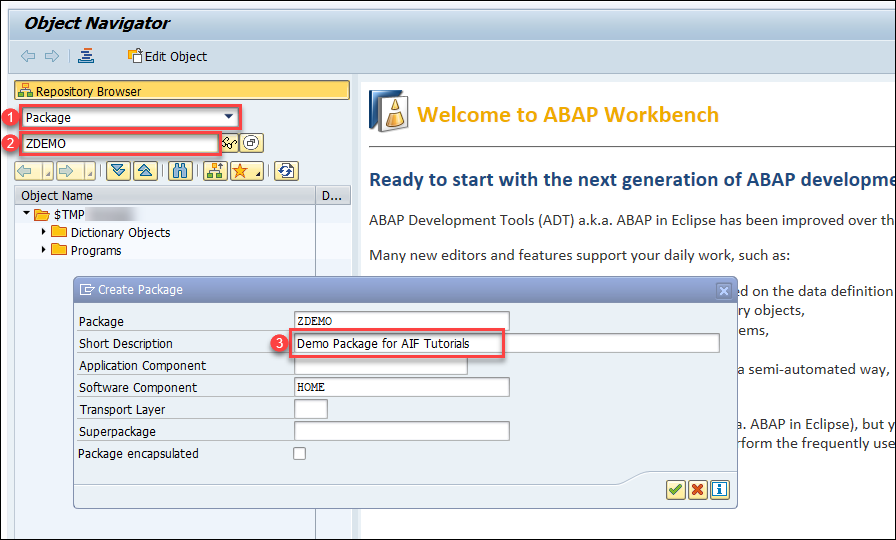
Create Package
You have successfully created a new package named ZDEMO.
Next, create a new structure in ABAP Dictionary to be used in your interface later.
Run the ABAP Dictionary (transaction code
SE11) and create a new structure namedZDEMO_ODATA_SALES_ORDER.Enter the Data type name
ZDEMO_ODATA_SALES_ORDERand choose Create.In the upcoming dialog, select the
Structureradio button. Choose Continue.Enter a short description.
Switch to the Components tab and maintain the following structure:
Component Typing Method Component Type ODATA_STDTypes /AIF/ODATA_STD_RAW_FLDS_SPAYLOADTypes CHAR_132The DDIC structure needs to contain a component of type
/AIF/ODATA_STD_RAW_FLDS_Sand a component of any type that can be used to display the payload.
Create Structure Save and activate your changes.
As interfaces in SAP Application Interface Framework are grouped using namespaces, you must create a namespace.
Go to Customizing for SAP Application Interface Framework (transaction code /n/AIF/CUST) and navigate to Interface Development > Define Namespace.
Select New Entries and enter the following name and description for your new namespace:
| Namespace | Namespace Description |
|---|---|
DEMO_4 | Namespace for AIF OData tutorials |

Now it’s time to create an interface using the structure you created before.
While still in Customizing (transaction code
/n/AIF/CUST), navigate to Interface Development > Define Interfaces.In the upcoming dialog, enter your previously created namespace
DEMO_4and press Enter.Select New Entries and enter the following parameters based on your previously created structure:
Field name Description Value Interface Name Name of the interface to be created SALESORDInterface Version Version number of the interface 1Description Description of the interface Sales Order interface for OData tutorialSAP Data structure Input substructure of the RFC ZDEMO_ODATA_SALES_ORDERRaw Data structure Input structure of the RFC ZDEMO_ODATA_SALES_ORDERInterface Direction Indicates the direction of the interface InboundSave your changes.
Next, select the engines that should be used to handle the messages that are processed.
While still in Customizing (transaction code
/n/AIF/CUST), navigate to Interface Development > Additional Interface Properties > Specify Interface Engines.In the upcoming dialog, enter your previously created namespace
DEMO_4and press Enter.If your namespace contains more than one interface, select interface
SALESORDof version1. If not, your interface is already displayed.Change the values for the following engines:
Parameter Value Application Engine OData application enginePersistence Engine OData persistency engineSelection Engine AIF Index TablesLogging Engine OData logging engineSave your changes.
Next, you need to assign the OData service to the interface.
While still in Customizing (transaction code
/n/AIF/CUST), navigate to Interface Development > Additional Interface Properties > Define OData Services.In the upcoming dialog, enter your previously created namespace
DEMO_4, and press Enter.If your namespace contains more than one interface, select interface
SALESORDof version1. If not, your interface is already displayed.For oData Service Name, enter
GWSAMPLE_BASIC.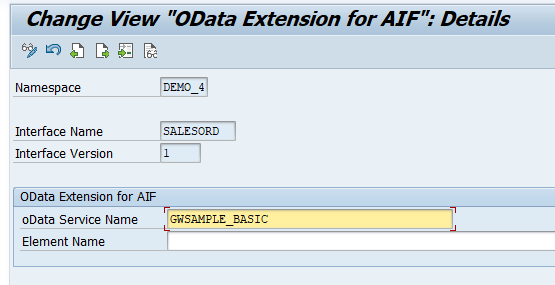
Define OData Settings Save your changes.
It’s recommended to implement an interface-specific single index table to ensure full flexibility, especially if you expect a high load of messages or if you plan to define key fields for your interface (now or later).
You can also switch the single index table later, but when you do, all processed messages stored in the old single index table will no longer be visible in the Interface Monitor. The information for the newly incoming messages is stored in the new single index table of the interface.
Create a table via transaction
SE11. You can use table/AIF/T_ODATA_IDXas a template by entering/AIF/T_ODATA_IDXin the field Database table, right-clicking it and selecting Copy…. Enter the nameZSO_MON_IDXfor the new table and select Continue. When prompted, enter packageZDEMO, which you created earlier.After creating the single index table, activate it by selecting Display and then Activate.
Go to Customizing (transaction code
/n/AIF/CUST) and navigate to SAP Application Interface Framework > Error Handling > Define Namespace-Specific Features. Enter your namespaceDEMO_4and select Continue.Select New Entries to create a new entry in Define Interface-Specific Features. Enter your interface name
SALESORDand version1and enter the name of the newly created single index tableZSO_MON_IDXin the field Message Index Table.
Define Interface-Specific Features Save your changes.
If you want to monitor the newly created interface in the Interface Monitor of the Message Dashboard app, you need a recipient for the interface.
While still in Customizing (transaction code
/n/AIF/CUST), navigate to SAP Application Interface Framework > Error Handling > Define Namespace-Specific Features. Enter or select your namespaceDEMO_4and choose Continue.In the menu on the left, navigate to Define Recipients by double-clicking it. Choose New Entries, enter the name
ZODATA_TEST_RECIPIENTfor your new recipient, and add a meaningful description.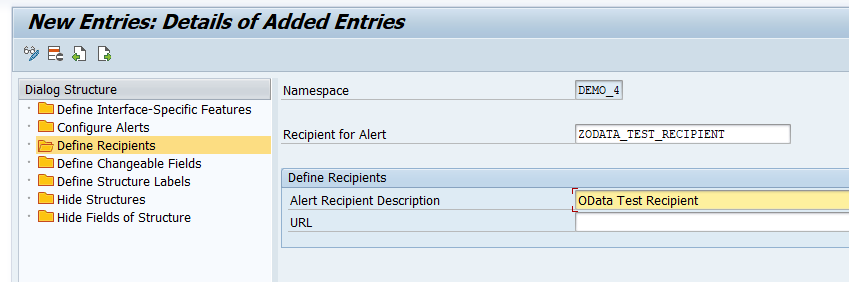
Define Recipients Save your changes.
To be able to see any data in the Interface Monitor or the Message Dashboard, a recipient must be assigned to the interface they want to monitor.
While still in Customizing (transaction code
/n/AIF/CUST), navigate to SAP Application Interface Framework > Error Handling > Define Interface-Specific Features. Enter or select your namespaceDEMO_4, as well as your interface nameSALESORDand interface version1. Choose Continue.In the menu on the left, double-click Assign Recipients Without Key Fields and create a new entry. Enter or select the namespace and the recipient you created before.
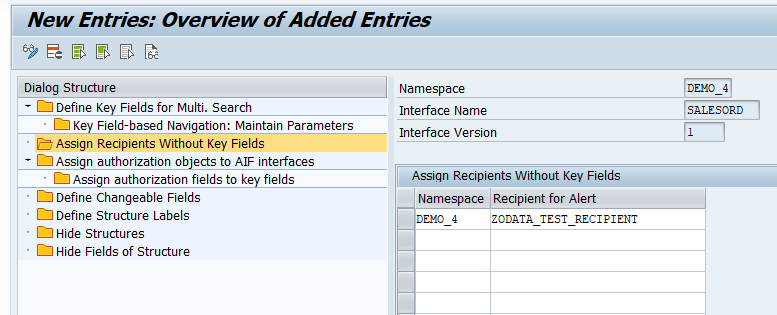
Assign Recipients Without Key Fields Save your changes.
Now the users in charge of monitoring the OData service must be assigned to the recipient.
Run transaction
/AIF/MYRECIPIENTSand create a new entry.Select the namespace
DEMO_4and recipientZODATA_TEST_RECIPIENTyou created in the steps before.Check the boxes for Overview and Technical User.

Assign User to Recipient Save the new entry.
The OData logs are passed to SAP Application Interface Framework via the OData transfer job. First, you need to create a variant of the respective program for the particular OData service.
Run the ABAP Editor (transaction code
SE38) and enter/AIF/ODATA_TRANSFER_JOBin the Program field. Select the Variants radio button, and choose Display.
Display variants On the next screen, enter a name for the variant, here
SALES_ORDER, and choose Create.
Create variant On the next screen, enter the Service Name
GWSAMPLE_BASICand choose Attributes.
oData Service Selection Finally, enter a description.
Save your changes.
After creating a variant of the OData transfer job, you need to schedule the respective program to collect the OData logs and pass them on to SAP Application Interface Framework.
For demo purposes, you may also directly execute the program with variant instead of scheduling a background job once you have sent an erroneous sample message. In this case you can skip this chapter.
Run the Define Background Job (transaction code
SM36). Enter the job nameODATA_TRANSFER_JOBand choose Start condition.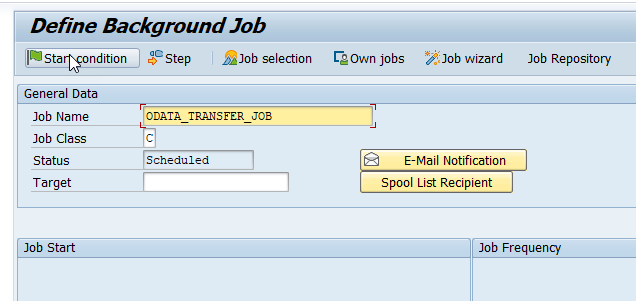
Create background job In the upcoming Start Time dialog, choose Immediate, which selects the Immediate Start flag. At the bottom of the dialog, choose Period values and enter a time value after which the job should be started periodically, for example, every
5 mins. The option Periodic Job is now selected. Save your changes.
Maintain periodic schedule To maintain the program, choose Step from the toolbar.
In the Create Step dialog, enter the program name
/AIF/ODATA_TRANSFER_JOBand the previously created variantSALES_ORDER. Then save.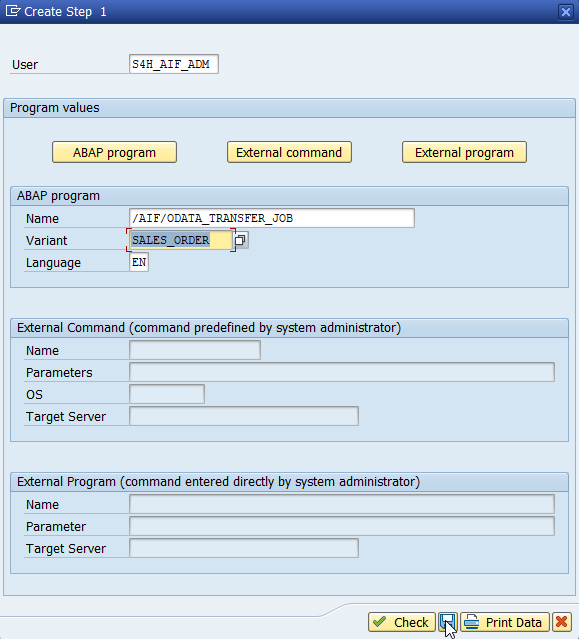
Maintain step Click on Back, and then save. This will schedule the background job to run on a regular basis.
By default, only technical errors are logged in the SAP Gateway error log. To also add business-related errors, you need to change the log level.
Open the SAP Gateway: Error Log (transaction code
/IWFND/ERROR_LOG) and navigate to Error Log > Global Configuration.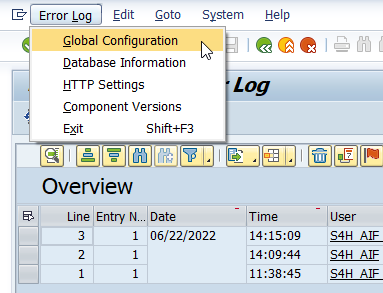
Select Global Configuration In the Global Configuration, change the Error Log level to
Full.
change log level Save your changes.
Before you can send sample requests, you need to determine the service endpoint.
Navigate to Activate and Maintain Services (transaction code
/IWFND/MAINT_SERVICE), select the serviceGWSAMPLE_BASICwith technical service nameZGWSAMPLE_BASIC, and choose Call Browser.
Maintain service A browser window opens, displaying the service entities. From here, the basic endpoint URL can be gathered. In this tutorial, we use the
SalesOrderSetcollection.
Display metadata Since you’ll need the service endpoint in the next step, copy it or leave the window open.
Let’s send in sample requests to test the SAP Application Interface Framework interface. Use a test client of your choice to call the OData service to fetch the details of a particular sales order. If you use Postman, create a new GET request, and enter the end point URL of your OData service into the address field, see previous step Determine service endpoint above.
The URL should have the following format with host and port of your backend system and a particular sales order ID:
https://host:port/sap/opu/odata/IWBEP/GWSAMPLE_BASIC/SalesOrderSet('id')
Enter the user credentials in your test client to log on to your backend system.
Let’s first run a successful request. Select a sales order ID that exists, e.g.
0500000000. In this case, a response with http status code200containing the sales order details should be returned. Since SAP Gateway doesn’t log successful messages, you won’t find a new entry in the message monitoring.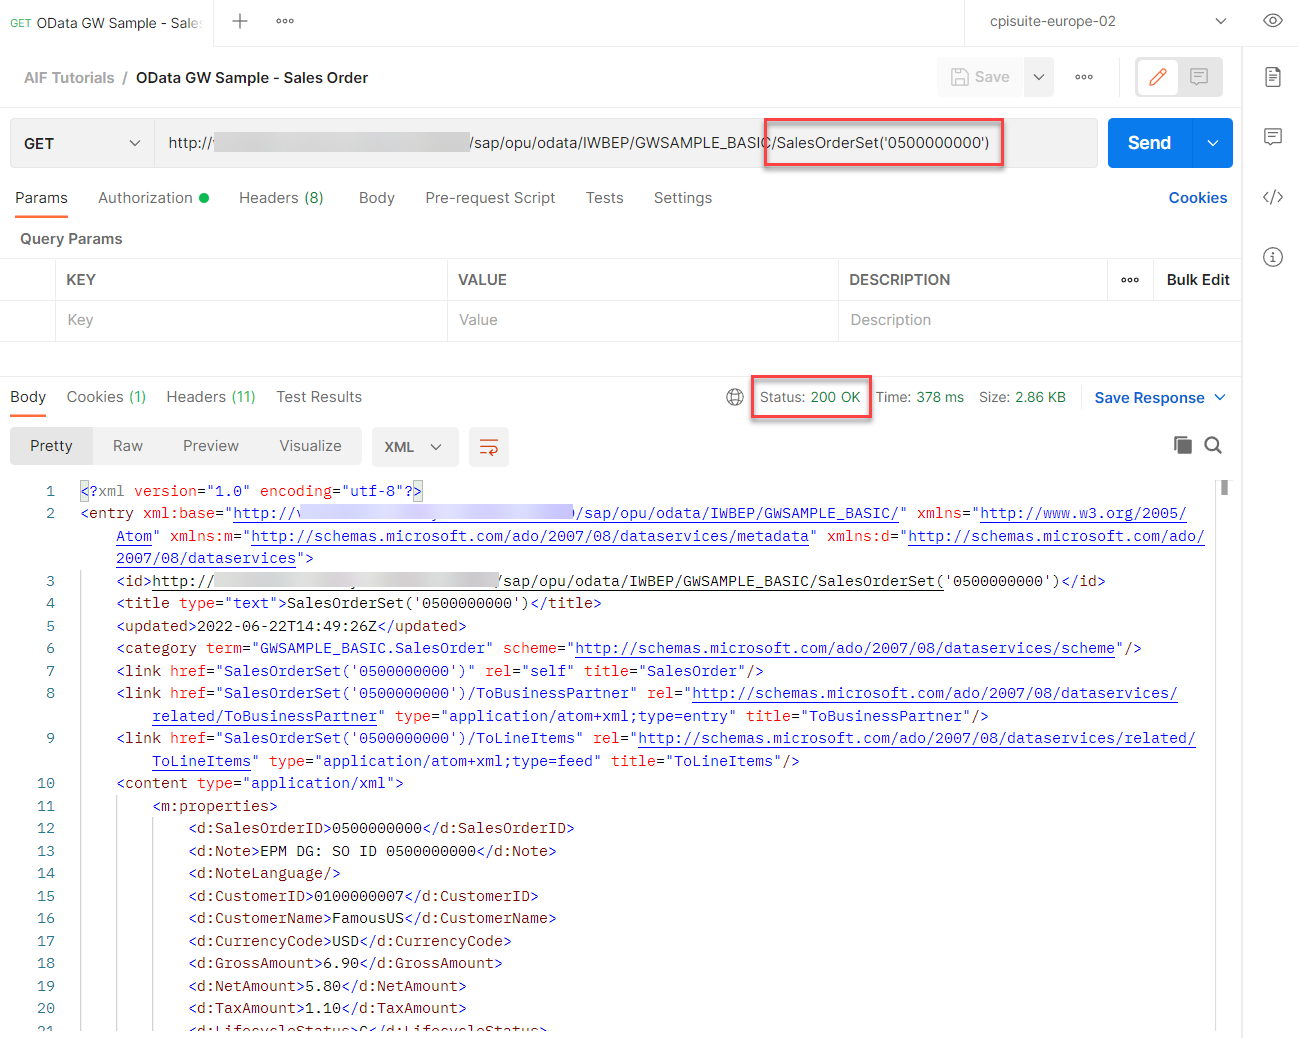
Successful request Now, force an error by selecting a sales order ID that doesn’t exist, for example
1500000000. In this case, you get an http error code400 Bad Request.
Error message
Finally, test your settings and verify that the OData monitoring is working as planned.
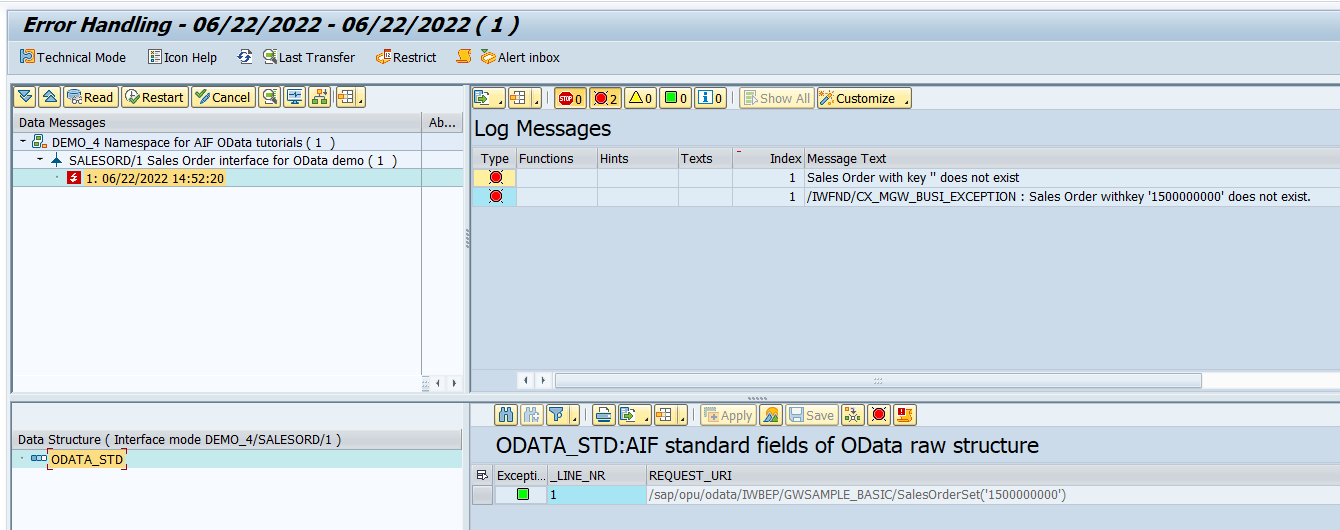
If you’re using SAP GUI, check the results of your test in the Interface Monitor (transaction code /n/AIF/IFMON).
If you don’t see the new interface, check that your user is correctly assigned to the recipient as described in step Assign users to recipient.
Select the summary line for your interface. You’re forwarded to Monitoring and Error Handling, which shows your selected test message(s).
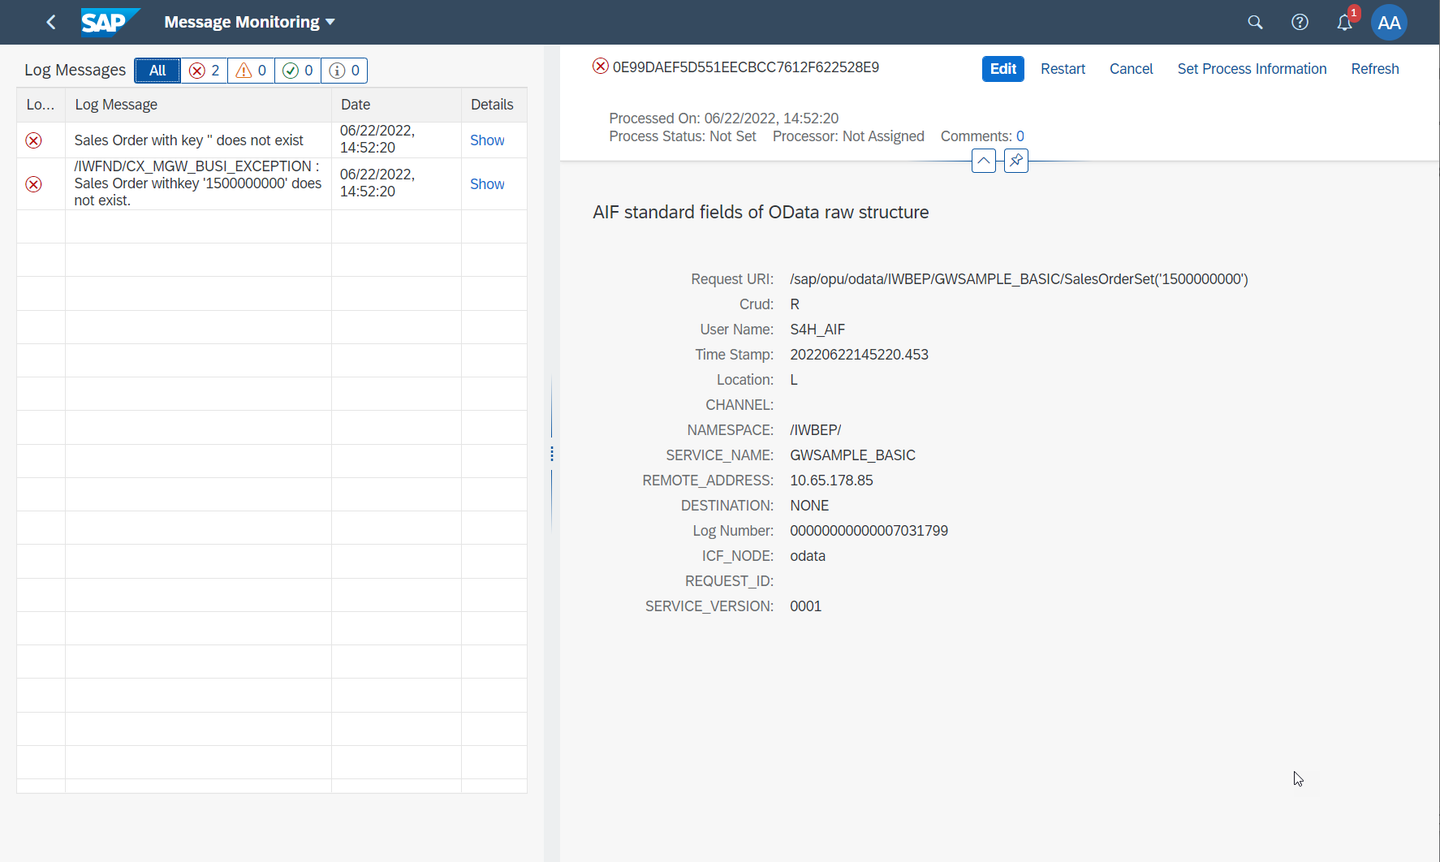
Alternatively, if you’ve set up Message Monitoring in the SAP Fiori launchpad, you can check the test results there. See How to configure the SAP Fiori Apps for SAP Application Interface Framework.
Congratulations! You’ve created a simple OData interface and set up monitoring for it in SAP Application Interface Framework.
Resources
Discussion
Share feedback on this tutorial or join the conversation in SAP Community.