
Overview
You will learn
- How to define single key fields
- How to create a selection screen


Prerequisites
Prerequisites
- You’ve set up SAP Application Interface Framework
- SAP S/4HANA 1709 or later, AIF 4.0
- You’ve completed the tutorial Create a Simple IDoc Interface
Steps
Intro
In this tutorial, you will learn how to define single key fields to simplify the error resolution of an interface in SAP Application Interface Framework.
You can define single key fields and a selection screen to be able to search for messages based on business data.
This tutorial focuses on customizing an IDoc interface. All the settings are also supported for any other technology that SAP Application Interface Framework supports, such as Proxies or Web Services.
To be able to search for messages based on business data, you need to enhance the interface-specific index table.
As a prerequisite, you should have gone through the Create a Simple IDoc Interface tutorial and hence should have already defined an interface-specific single index table with name
ZIDOC_MON_IDX. Otherwise, run through step 7 of the tutorial to create the index table.
Run transaction code
SE11, enter the table nameZIDOC_MON_IDXand choose Change.Add the following new entries:
Field Data element COUNTRYS_COUNTRYREGIONS_REGIONCITYCITYCUSTTYPES_CUSTTYPESave and activate your changes.

Enhance index table
To select the additional fields from the index table, you need to create an interface-specific selection screen.
Run transaction code
SE38, enter the program nameZIDOC_FCUSTOMER_SELSCREENand choose Create.
Create program In the upcoming dialog, maintain a Title, and select the Type
Module pool. Then select Save.
Maintain program attributes In the ABAP editor, maintain the code as follows:
ABAPPROGRAM ZIDOC_FCUSTOMER_SELSCREEN. DATA: lv_country TYPE s_country, lv_region TYPE s_region, lv_city TYPE city, lv_custtype TYPE s_custtype. SELECTION-SCREEN BEGIN OF SCREEN 0001 AS SUBSCREEN. SELECT-OPTIONS: s_cntry FOR lv_country, s_region FOR lv_region, s_city FOR lv_city, s_type FOR lv_custtype. SELECTION-SCREEN END OF SCREEN 0001. AT SELECTION-SCREEN OUTPUT. /aif/cl_global_tools=>get_value_from_mem( ).Navigate to Goto > Text Elements from the main menu, then switch to the Selection Texts tab.
For each of the selection options, select the DDIC Reference flag to copy the text from the ABAP Dictionary.

Maintain program texts Save and activate your changes.
To fill the additional fields of the index table, you need to assign both the index table and the selection screen to your interface.
Go to Customizing for SAP Application Interface Framework (transaction code
/n/AIF/CUST) and navigate to Error Handling > Define Namespace-Specific Features.In the upcoming dialog, enter namespace
DEMO_1, then press Enter.Select Define Interface-Specific Features in the menu on the left.
If you have gone through the Create a Simple IDoc Interface tutorial, the interface-specific single index table
ZIDOC_MON_IDXshould be already maintained for your interfaceFCUSTOMER. Otherwise, enterZIDOC_MON_IDXinto the Message Idx Table field.Enter the previously created selection screen
ZIDOC_FCUSTOMER_SELSCREENinto the Program Name field.Finally, enter Screen Number
0001.
NS-specific settings Save your changes.
Finally, you need to define the key fields for your interface.
In the Customizing for SAP Application Interface Framework (transaction code
/n/AIF/CUST), navigate to Error Handling > Define Interface-Specific Features.In the upcoming dialog, enter namespace
DEMO_1, interfaceFCUSTOMER, and version1, then press Enter.Double-click Define Key Fields for Multi. Search in the menu on the left. Add a new entry with Field Sequence No.
10and add the following values:Field name Value Key Field Name COUNTRYData element S_COUNTRYName Select-Options/Parameter S_CNTRYField is Select-Option selected Field Name E1SCU_CRE-E1BPSCUNEW-COUNTRRaw or SAP Structure Source structureMulti.Selection Type Single selectionHide Tree Node in the View 1 Tree unselected Icon @DV@Tooltip Country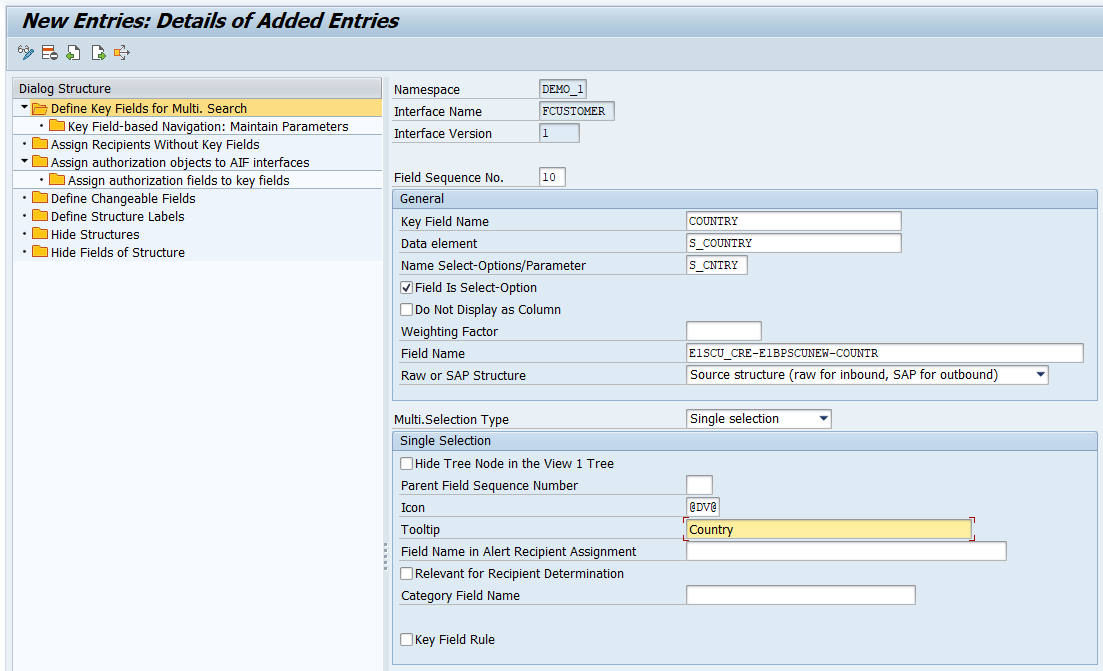
Add key field country Add a second new entry with Field Sequence No.
20and the following values:Field name Value Key Field Name REGIONData element S_REGIONName Select-Options/Parameter S_REGIONField is Select-Option selected Field Name E1SCU_CRE-E1BPSCUNEW-REGIONRaw or SAP Structure Source structureMulti.Selection Type Single selectionHide Tree Node in the View 1 Tree unselected Parent Field Sequence Number 10Icon @AM@Tooltip Region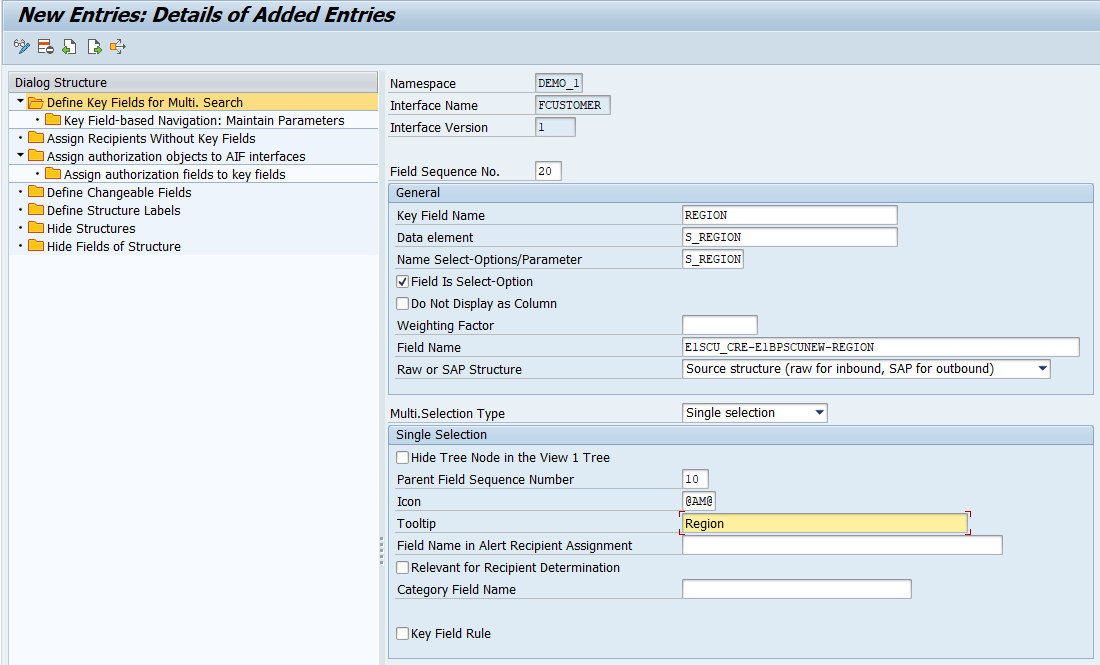
Add key field country Add a third new entry with Field Sequence No.
30as follows:Field name Value Key Field Name CITYData element CITYName Select-Options/Parameter S_CITYField is Select-Option selected Field Name E1SCU_CRE-E1BPSCUNEW-CITYRaw or SAP Structure Source structureMulti.Selection Type Single selectionHide Tree Node in the View 1 Tree selected 
Add key field country Add a fourth new entry with Field Sequence No.
40as follows:Field name Value Key Field Name CUSTTYPEData element S_CUSTTYPEName Select-Options/Parameter S_TYPEField is Select-Option selected Field Name E1SCU_CRE-E1BPSCUNEW-CUSTTYPERaw or SAP Structure Source structureMulti.Selection Type Single selectionHide Tree Node in the View 1 Tree selected 
Add key field country Save your changes.
Let’s create a couple of sample messages to showcase the customizing changes.
Open the Test Tool for IDoc Processing (transaction code WE19). Send in new test messages with different customer names, countries, regions, and cities maintained. Enter an existing customer type, either P or B.
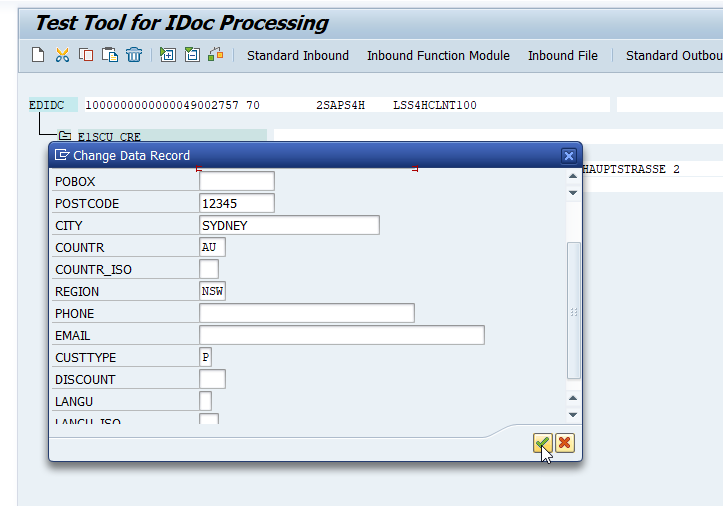
Now, let’s check the results of your tests in the Monitoring and Error Handling.
Open the Monitoring and Error Handling (transaction code
/n/AIF/ERR).In the selection screen, you’ll notice that the additional selection fields have been added. In the Status Selection section, select the Select All button. Apply any filter, for example, filter on selection field B/P customer with value
P. Then choose Execute.
Search message In the message monitor, expand the complete navigation tree. You can see that the messages are grouped by country and region hierarchy. Only the messages suitable to your filter should be displayed.
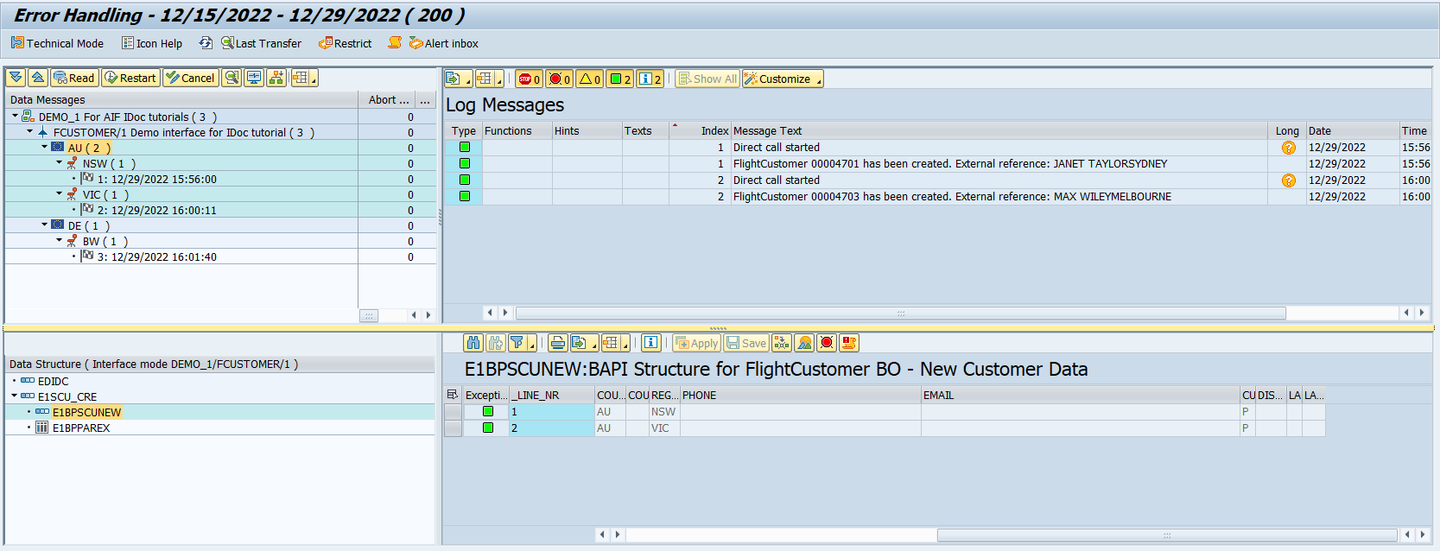
Display messages
Congratulations! You’ve successfully defined single key fields.
Resources
Discussion
Share feedback on this tutorial or join the conversation in SAP Community.