
Overview


Prerequisites
Prerequisites
- BTP Account If you do not already have a commercial SAP Business Technology Platform (BTP) account, you can use BTP Advanced Trial. Create a BTP Account
- For SAP Developers or Employees Internal SAP stakeholders should refer to the following documentation: How to create BTP Account For Internal SAP Employee, SAP AI Core Internal Documentation
- For External Developers, Customers, or Partners Follow this tutorial to set up your environment and entitlements: External Developer Setup Tutorial, SAP AI Core External Documentation
- Create BTP Instance and Service Key for SAP AI Core Follow the steps to create an instance and generate a service key for SAP AI Core. Ensure to use service plan extended: Create Service Key and Instance
- AI Core Setup Guide Step-by-step guide to set up and get started with SAP AI Core: AI Core Setup Tutorial
- An Extended SAP AI Core service plan is required. For more details, refer to SAP AI Core Service Plans
- AI Launchpad Setup Guide Step-by-step guide to set up AI Launchpad: AI Launchpad Tutorial
- Bruno API Client Download Bruno from usebruno.com/downloads
- SAP RPT-1 Sample Collection Clone the official SAP RPT-1 Bruno collection from https://github.com/SAP-samples/aicore-genai-samples/tree/main/genai-sample-apps
- Get Service Key
To obtain your service key:
- Navigate to your BTP subaccount overview page.
- Navigate to your BTP service instance page and Click on the SAP AI Core instance to view the service key details.
- click the service key name to view it, then click Download to save it as creds.json to your local machine.
Steps
You Will Learn
- What SAP RPT-1 is, how it works, and when to use it
- How to deploy SAP RPT-1 using SAP AI Launchpad, Python SDK, and Bruno
- How to prepare your dataset and run regression and classification predictions simultaneously in a single API call
- How to run predictions programmatically using the Python SDK (
sap-ai-sdk-gen) - How to authenticate, build the request payload, and call the RPT-1 predict endpoint using Bruno REST API
Pre-Read
This tutorial provides a complete, practical guide to using SAP RPT-1 — SAP’s first enterprise relational foundation model — for structured business data prediction.
SAP RPT-1 is a Relational Pretrained Transformer model that delivers accurate predictive insights from structured business data using in-context learning, allowing users to provide data records to generate instant, reliable predictions without any model training.
The concept is straightforward: rather than training a new AI model for every business question, you send your existing data rows directly to the model. Rows with known values teach the model the pattern. Rows where you want a prediction are marked with [PREDICT]. The model fills them in — no pipeline, no training job, no waiting.
Unlike large language models that process text sequences, RPT-1 is designed to detect connections and dependencies across rows and columns using a table-native 2D attention scheme, with optimised processing for the unique semantics and data types found in business data.
RPT-1 supports two prediction task types — and both can be run on the same dataset in a single API call:
- Classification — predicts a category label and returns a confidence score (0–1) alongside each prediction. Examples: demand category, payment risk tier, sales group assignment.
- Regression — predicts a continuous numeric value. Examples: days late, forecast units, invoice amount.
SAP RPT-1 is available in three variants:
| Variant | Access | Best For |
|---|---|---|
sap-rpt-1-small | SAP Gen AI Hub | Prototyping, high-volume, cost-sensitive workloads |
sap-rpt-1-large | SAP Gen AI Hub | Production deployments requiring highest accuracy |
Key capabilities at a glance:
| Feature | What It Means |
|---|---|
| No model training | Send data, get predictions — no pipeline, no wait |
| Multi-target prediction | Up to 10 target columns predicted in one API call |
index_column | Maps each prediction back to its source row reliably |
| Missing data resilience | Handles nulls and incomplete rows — no imputation needed |
| Semantic column awareness | Descriptive column names improve prediction accuracy |
| Ephemeral data processing | Data is never stored or used to modify model weights |
When to use RPT-1:
- You have structured tabular data and need predictions without a training cycle
- Your data changes frequently and retraining a traditional model is costly
- You need multiple columns predicted simultaneously
- Audit trail and confidence scores matter for your use case
Limitations to be aware of:
- Exclusively for tabular data — does not process text, images, or audio
- Maximum 128 prediction rows per API call
- Classification supports up to 256 classes (
sap-rpt-1-small) or 1023 classes (sap-rpt-1-large) - Does not produce natural language explanations — pair with an LLM via Orchestration if narrative output is needed
By the end of this tutorial, you will have run your first regression and classification predictions using all four access methods: SAP AI Launchpad, Python SDK, Javascript SDK and Bruno (REST API).
⚠️ Beta notice: The
@sap-ai-sdk/rptpackage is experimental and subject to change. Do not use in production.
Refer to the SAP RPT-1 documentation for complete API reference information.
This tutorial uses a single local CSV file. Two prediction targets are demonstrated simultaneously in one API call.
You can access the DATASET from the GitHub repository.
NOTE: If you download the ZIP file, extract it and navigate to the DATA folder. Place the file in your designated location for further use.
Payment Transaction Dataset — column reference:
| Column | Role |
|---|---|
Transaction ID | Index column — unique row identifier |
Customer ID, Customer Type, Industry, Region | Feature columns |
Currency, Invoice Amount, Due Days, Credit Limit | Feature columns |
Outstanding, Credit Usage, Relationship Years | Feature columns |
Previous Delays, Avg Days Late, Payment Method | Feature columns |
Economic Indicator, Quarter, Contact Attempts | Feature columns |
Has Dispute, Dispute Amount | Feature columns |
Days Late | Regression target — numeric prediction |
Risk Score | Classification target — category label + confidence |
Rows where a target column contains [PREDICT] are the prediction rows. All other rows with known values act as context rows that teach the model the pattern.
Sample rows from the dataset:
Transaction ID    Customer Type    Industry    Region           Currency    Invoice Amount    Days Late    Risk Score
TXN AZT67X0T      Small Business   Education   Middle East      USD         30214.02          [PREDICT]    [PREDICT]
TXN SY4HFYMZ      Individual       Healthcare  Middle East      USD         1045.84           14           Medium
TXN RWO7A9Z2      Small Business   Education   Europe           GBP         17920.85          10           Low
TXN C18O8PW7      Small Business   Education   Europe           GBP         12768.45          [PREDICT]    [PREDICT]
Note: Rows with known
Days LateandRisk Scorevalues are context rows — the model learns from these. Rows marked[PREDICT]are the prediction rows the model will fill in.
This tutorial is accompanied by two Jupyter notebooks that provide a complete, executable version of all prediction steps covered in the Python SDK and JavaScript SDK sections. Download them from the tutorial’s GitHub repository before starting the hands-on sections.
| Notebook | SDK | Runtime | Download |
|---|---|---|---|
rpt1_python_sdk.ipynb | Python (sap-ai-sdk-gen) | Jupyter | Download from GitHub |
rpt1_javascript_sdk.ipynb | JavaScript (@sap-ai-sdk/rpt) | Deno Jupyter Kernel | Download from GitHub |
Note: Replace the
#placeholders above with the actual GitHub repository links once the notebooks are published. Each notebook follows the same step sequence as the corresponding section in this tutorial — credentials setup, dataset loading, context/prediction row split, model call, result parsing, and CSV export.
Step 1: Open SAP AI Launchpad.
Log in to your SAP AI Launchpad instance. In the left navigation panel, go to Generative AI Hub → Model Library.
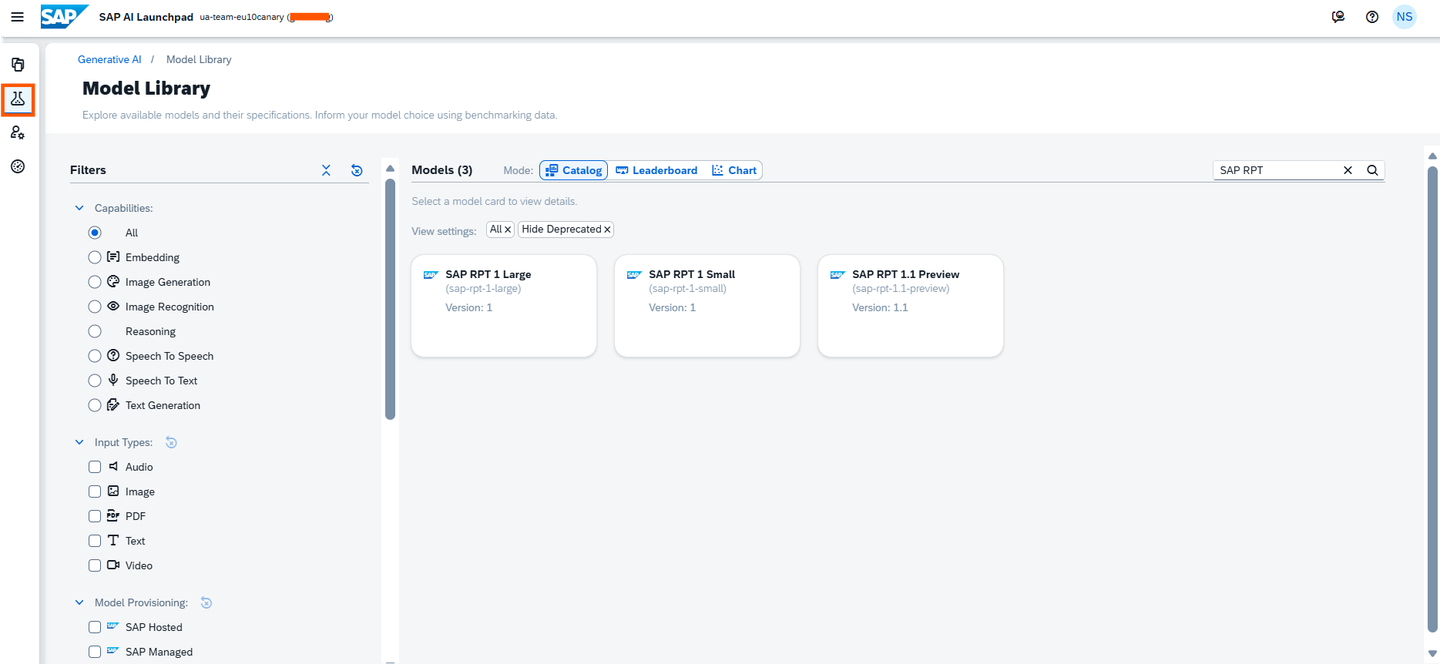
Step 2: Find SAP RPT-1.
Search for sap-rpt-1 in the Model Library. You will see the commercial variants:
sap-rpt-1-small— optimised for speed and high throughputsap-rpt-1-large— optimised for highest accuracy
Select the variant you want to deploy.
Already have a running deployment? Skip Steps 3 and 4. Copy the existing Deployment ID from SAP AI Launchpad (Deployments tab, status must be Running) and use it directly in the Python SDK, JavaScript SDK, and Bruno sections.
Step 3: Deploy the Model.
Select your desired model variant and you should see a Deploy button on the model page. Click Deploy to start a model deployment. Once the deployment is created, you will see that the count increases by 1.
Monitor the Deployment Status page — wait until the status changes to Running.


Step 4: Copy the Deployment ID.
Once the deployment status shows Running, open the deployment details and copy the Deployment ID (a string such as da6094b22ee53449). Keep this value — you will need it in the Python SDK and Bruno sections.

The full predict endpoint URL follows this pattern:
https://<AI_API_BASE_URL>/v2/inference/deployments/<DEPLOYMENT_ID>/predict
You can also create a configuration and deployment programmatically using ai-core-sdk.
Step 1: Install dependencies.
pip install ai-core-sdk sap-ai-sdk-gen pandas tabulateStep 2: Load credentials and create the AI Core client.
import time
import json
import os
from IPython.display import clear_output
from ai_core_sdk.ai_core_v2_client import AICoreV2Client

# Load credentials from creds.json
with open('creds.json') as f:
    credCF = json.load(f)

# Set environment variables from credentials
def set_environment_vars(credCF):
    env_vars = {
        'AICORE_AUTH_URL'      : credCF['url'] + '/oauth/token',
        'AICORE_CLIENT_ID'     : credCF['clientid'],
        'AICORE_CLIENT_SECRET' : credCF['clientsecret'],
        'AICORE_BASE_URL'      : credCF['serviceurls']['AI_API_URL'] + '/v2',
        'AICORE_RESOURCE_GROUP': '<YOUR_RESOURCE_GROUP>'
    }
    for key, value in env_vars.items():
        os.environ[key] = value

# Create AI Core client instance
def create_ai_core_client(credCF):
    set_environment_vars(credCF)
    return AICoreV2Client(
        base_url      = os.environ['AICORE_BASE_URL'],
        auth_url      = os.environ['AICORE_AUTH_URL'],
        client_id     = os.environ['AICORE_CLIENT_ID'],
        client_secret = os.environ['AICORE_CLIENT_SECRET'],
        resource_group= os.environ['AICORE_RESOURCE_GROUP']
    )

ai_core_client = create_ai_core_client(credCF)
print('AI Core client created successfully')Already have a running deployment? Skip Steps 3 and 4. Your
creds.jsonand the Deployment ID from AI Launchpad are all you need. Note the Deployment ID — you will use it in the prediction steps.
Step 3: Create a configuration for RPT-1.
from ai_api_client_sdk.models.parameter_binding import ParameterBinding

# Define configuration parameters
scenario_id    = 'foundation-models'
executable_id  = 'aicore-sap'
config_name    = 'sap-rpt-1-small-config'

config = ai_core_client.configuration.create(
    scenario_id   = scenario_id,
    executable_id = executable_id,
    name          = config_name,
    parameter_bindings = [
        ParameterBinding(key='modelName', value='sap-rpt-1-small')
    ]
)

print(f'Configuration created — ID: {config.id}  Name: {config_name}')
Step 4: Create the deployment and wait until it is Running.
from ai_api_client_sdk.models.status import Status

deployment = ai_core_client.deployment.create(configuration_id=config.id)
print(f'Deployment created — ID: {deployment.id}')

# Poll until the deployment status is Running
def spinner(check_callback, timeout=300, check_every_n_seconds=10):
    start = time.time()
    while time.time() - start < timeout:
        return_value = check_callback()
        if return_value:
            return return_value
        for char in '|/-\\':
            clear_output(wait=True)
            print(f'Waiting for deployment to become ready... {char}')
            time.sleep(0.2)

def check_ready():
    updated = ai_core_client.deployment.get(deployment.id)
    return updated if updated.status == Status.RUNNING else None

ready_deployment = spinner(check_ready)
print(f'Deployment is ready — Status: {ready_deployment.status}')
print(f'Deployment ID: {ready_deployment.id}')
Note: Copy the Deployment ID printed above — it is required in the prediction steps.
You can create a configuration and deployment programmatically using @sap-ai-sdk/ai-api.
Already have a running deployment? Skip Steps 3 and 4. Add the existing Deployment ID directly into the
AICORE_SERVICE_KEYJSON in your.envfile as"deploymentId": "<YOUR_DEPLOYMENT_ID>"and proceed to the Run Predictions section.
Step 1: Install dependencies.
npm install @sap-ai-sdk/rpt @sap-ai-sdk/ai-api dotenv xlsxStep 2: Load credentials from the .env file.
Create a .env file in your project folder with the full creds.json content as AICORE_SERVICE_KEY:
AICORE_SERVICE_KEY={"serviceurls":{"AI_API_URL":<AI_API_URL>},"clientid":<CLIENT_ID>,"clientsecret":<CLIENT_SECRET>,"url":"<AUTH_URL>","resourcegroup":<RESOURCE_GROUP>,"deploymentId":<DEPLOYMENT_ID>}Note: Leave
deploymentIdempty for now — it will be filled in after Step 4. Generate the single-line value in the terminal:
import dotenv from 'npm:dotenv';
dotenv.config();

const serviceKey     = JSON.parse(process.env.AICORE_SERVICE_KEY!);
const RESOURCE_GROUP = serviceKey.resourcegroup;

console.log('Credentials loaded');
console.log('AI API URL     :', serviceKey.serviceurls.AI_API_URL);
console.log('Resource Group :', RESOURCE_GROUP);
⚠️ Beta notice: The
@sap-ai-sdk/rptpackage is experimental and subject to change. Do not use in production.
Step 3: Create a configuration for RPT-1.
import { ConfigurationApi } from 'npm:@sap-ai-sdk/ai-api';

async function createRptConfiguration() {
  try {
    const response = await ConfigurationApi
      .configurationCreate(
        {
          name        : 'sap-rpt-1-small',
          executableId: 'aicore-sap',
          scenarioId  : 'foundation-models'
        },
        { 'AI-Resource-Group': RESOURCE_GROUP }
      ).execute();
    return response;
  } catch (error: any) {
    console.error('Configuration creation failed:', error.stack);
  }
}

const configuration = await createRptConfiguration();
console.log(configuration?.message);
console.log('Configuration ID:', configuration?.id);
Note:
executableId: 'aicore-sap'is the fixed value for SAP-hosted models.scenarioId: 'foundation-models'is the fixed scenario for foundation models on SAP AI Core. To use the large model, change thenametosap-rpt-1-large.
Step 4: Create the deployment and wait until Running.
import { DeploymentApi } from 'npm:@sap-ai-sdk/ai-api';
import type { AiDeploymentCreationResponse } from 'npm:@sap-ai-sdk/ai-api';

async function createRptDeployment() {
  const configurationId = configuration!.id;
  try {
    const response = await DeploymentApi
      .deploymentCreate(
        { configurationId },
        { 'AI-Resource-Group': RESOURCE_GROUP }
      ).execute();
    return response;
  } catch (error: any) {
    console.error('Deployment creation failed:', error.stack);
  }
}

const deployment = await createRptDeployment();
console.log(deployment?.message);
console.log('Deployment ID:', deployment?.id);
Important: A new deployment takes a few minutes to become ready. Monitor the deployment status in SAP AI Launchpad under Deployments and wait until the status shows Running before running prediction steps. Once Running, copy the Deployment ID and update your
.envfile — add"deploymentId": "<COPIED_ID>"inside theAICORE_SERVICE_KEYJSON value.
This tutorial provides a purpose-built Bruno collection scoped entirely to the payment transaction use case — with the correct endpoint, dataset, and prediction configuration pre-filled. Download it and follow the steps below.
Step 1: Download Bruno and the tutorial collection.
- Download and install Bruno from usebruno.com/downloads
- Download the tutorial Bruno collection from github link: ([SAP RPT-1 — Payment Transactions](GITHUB REPOSITORY TO BE PROVIDED ))
- Extract the zip file to a local folder of your choice
- In Bruno, click Open Collection and navigate to the extracted
SAP RPT-1 — Payment Transactions/folder to load the collection
The collection contains four requests at the root level, executed in this sequence:
| Seq | Request | Purpose |
|---|---|---|
| 1 | get_token | Fetch OAuth token — auto-saves to bearerToken |
| 2 | create_configuration | Create RPT-1 model configuration — auto-saves configurationId |
| 3 | create_deployment | Deploy the model — auto-saves deploymentId |
| 4 | predict_parquet | Send parquet file and receive predictions |

The collection contains the following structure:
SAP RPT-1 — Payment Transactions/
├── bruno.json                               ← Collection metadata
├── get_token.bru                            ← Step 1: Fetch OAuth token
├── create_configuration.bru                 ← Step 2: Create RPT-1 configuration
├── create_deployment.bru                    ← Step 3: Create deployment
├── predict_parquet.bru                      ← Step 4: Run predictions
├── environments/
│   └── sap-rpt-1-payment-transactions.json ← Environment variables template
└── data/
    ├── generate_parquet.py                  ← Run once to create the parquet file
    └── payment_transactions.parquet         ← Dataset (generate before first run)
Note: All
.brurequest files are placed at the collection root level. Bruno requires request files to be either at the root or inside a folder that contains afolder.brudescriptor file. Placing them at the root is the simplest approach and ensures all requests are visible immediately when you open the collection.
Step 2: Configure the environment variables.
In Bruno, click No Environment in the top right and select Configure.

Select sap-rpt-1-payment-transactions from the environment list. Fill in the following values — all sourced from your creds.json service key file and SAP AI Launchpad:
| Variable | Source | Example value |
|---|---|---|
baseUrl | serviceurls.AI_API_URL from creds.json | https://api.ai.prod.eu-central-1.aws.ml.hana.ondemand.com |
authUrl | url from creds.json + /oauth/token | https://<subdomain>.authentication.eu10.hana.ondemand.com/oauth/token |
clientId | clientid from creds.json | sb-abc123... |
clientSecret | clientsecret from creds.json | (paste value — stored as secret) |
resourceGroup | Your AI Core resource group | default |
configurationId | Auto-filled after running create_configuration | (auto-filled by post-response script) |
deploymentId | Auto-filled after running create_deployment | (auto-filled by post-response script) |
Important:
baseUrlandauthUrlmust be updated from their placeholder values before running any request.baseUrlis the raw AI API URL — do not append/v2here; the request files handle the path themselves.authUrlmust end with/oauth/token.

Click Save and select the environment from the No Environment dropdown.
Step 3: Generate an OAuth token.
Open the get_token request from the collection root and click Send.

This sends a POST request to your authUrl with grant_type=client_credentials. A post-response script automatically writes the returned access_token into the bearerToken environment variable — no manual copy-paste required.
Note: If you receive a
401 Unauthorizederror at any later step, re-run the get_token request to refresh the token. Tokens expire after a fixed period.
Step 4: Create the RPT-1 configuration.
Open the create_configuration request and click Send.
This sends a POST to {{baseUrl}}/v2/lm/configurations with the following body:
{
  "name": "sap-rpt-1-small",
  "executableId": "aicore-sap",
  "scenarioId": "foundation-models",
  "versionId": "0.0.1",
  "parameterBindings": [
    { "key": "modelName",    "value": "sap-rpt-1-small" },
    { "key": "modelVersion", "value": "latest" }
  ],
  "inputArtifactBindings": []
}
The post-response script automatically saves the returned id into the configurationId.
Note: To use the large model instead, change
modelNamevalue tosap-rpt-1-largebefore sending.executableId: aicore-sapis the fixed value for SAP-hosted models — refer to SAP Note 3437766 for verification.
Step 5: Create the deployment.
Open the create_deployment request and click Send.
This sends a POST to {{baseUrl}}/v2/lm/deployments with the body:
{
  "configurationId": "{{configurationId}}"
}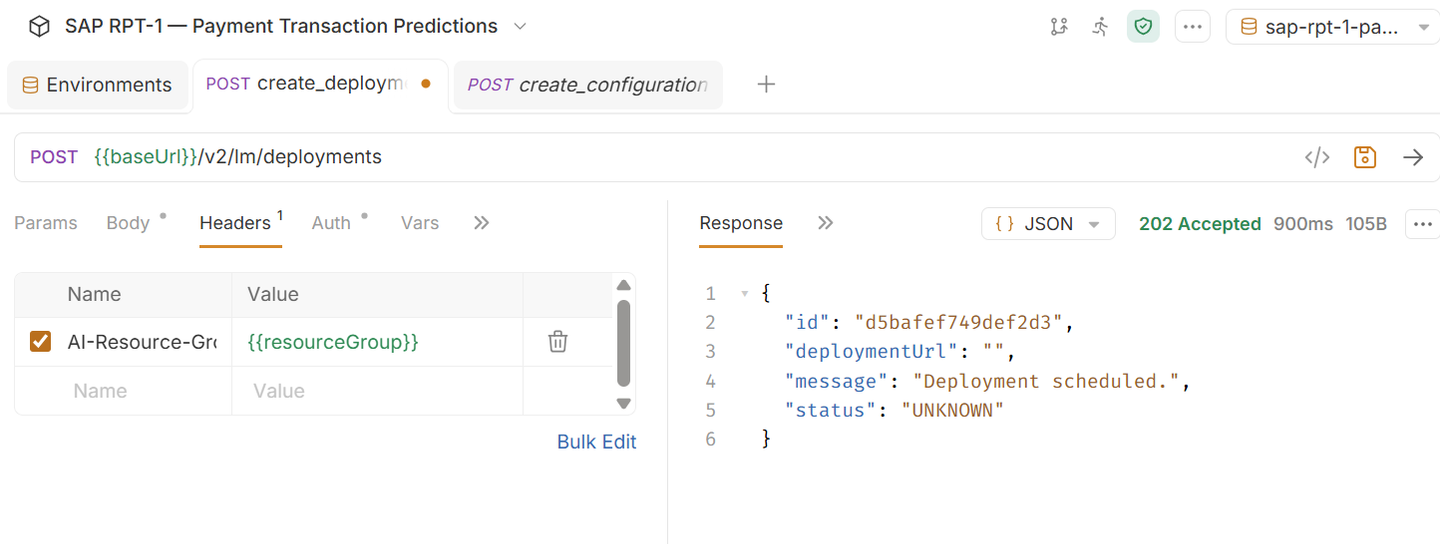
The configurationId from the previous step to be filled here. The post-response script saves the returned deployment id into the deploymentId environment variable.
Important: A new deployment takes a few minutes to become ready. Monitor the status in SAP AI Launchpad under Deployments and wait until the status shows Running before proceeding to the predict step.
This step is run once before using any of the prediction methods. The same payment_transactions.parquet file is shared across Python SDK (advanced), JavaScript SDK, and Bruno — no need to create it separately for each method.
Run the following Python script from your project folder:
import pandas as pd

# Read Excel
df = pd.read_excel("payment-delay-data.xlsx")

# Convert problematic columns to string
df["Days Late"] = df["Days Late"].astype(str)
df["Risk Score"] = df["Risk Score"].astype(str)

# Save as Parquet
df.to_parquet("payment_transactions.parquet", index=False)

print("Parquet file generated successfully!")
Requirements: pip install pandas pyarrow openpyxl
Why Parquet? Parquet preserves column data types natively and is significantly more compact than CSV for large datasets. It is the required format for the
/predict_parquetendpoint used by the JavaScript SDK and Bruno.
Row ordering rule: Context rows must appear before
[PREDICT]rows. The script validates this and warns if the ordering is incorrect.
With the deployment running and credentials configured, you are now ready to send prediction requests.
SAP AI Launchpad does not currently provide a direct UI for sending RPT-1 predict payloads.
For production prediction calls, use the Python SDK, Javascript SDK or Bruno methods described in the tabs below.
Step 5: Load and prepare the dataset.
import pandas as pd

# Load your local CSV file — no joins or merging required
df = pd.read_excel('payment-delay-data.xlsx', dtype=str).fillna('')

# Configuration
INDEX_COLUMN  = 'Transaction ID'
TARGET_REG    = 'Days Late'    # regression target — numeric prediction
TARGET_CLS    = 'Risk Score'   # classification target — category + confidence
PREDICT_TOKEN = '[PREDICT]'
RPT_MODEL     = 'sap-rpt-1-small'  # or 'sap-rpt-1-large' for highest accuracy

print(f'Dataset shape : {df.shape}')
print(f'Columns       : {list(df.columns)}')
df.head(3)
Step 6: Separate context rows from prediction rows.
Context rows have known values in both target columns — the model learns from these. Prediction rows contain [PREDICT] — the model fills these in.
# Context rows — rows where both targets have known (non-PREDICT) values
context_mask = (
    (df[TARGET_REG] != PREDICT_TOKEN) & (df[TARGET_REG] != '') &
    (df[TARGET_CLS] != PREDICT_TOKEN) & (df[TARGET_CLS] != '')
)
context_df = df[context_mask].copy().reset_index(drop=True)

# Prediction rows — rows where either target contains [PREDICT]
predict_mask = (
    (df[TARGET_REG] == PREDICT_TOKEN) |
    (df[TARGET_CLS] == PREDICT_TOKEN)
)
predict_df = df[predict_mask].copy().reset_index(drop=True)

print(f'Context rows (model learns from these) : {len(context_df)}')
print(f'Prediction rows (model fills these in) : {len(predict_df)}')
How many context rows do you need? SAP’s experiments show that 1,000–2,000 randomly sampled rows are sufficient to outperform narrow AI models trained on millions of rows for most enterprise use cases. For many-class classification targets, use stratified sampling to ensure all classes appear in the context rows.
Step 5: Build and send the RPT-1 prediction request.
Both regression and classification targets are predicted in a single API call.
from gen_ai_hub.proxy.native.sap.models import RPTRequest, PredictionConfig, TargetColumn
from gen_ai_hub.proxy.native.sap.client import RPTClient

# Context rows must come first, followed by prediction rows
all_rows = context_df.to_dict(orient='records') + predict_df.to_dict(orient='records')

# Build the prediction request
body = RPTRequest(
    prediction_config=PredictionConfig(
        target_columns=[
            TargetColumn(
                name=TARGET_REG,
                task_type='regression',
                prediction_placeholder=PREDICT_TOKEN
            ),
            TargetColumn(
                name=TARGET_CLS,
                task_type='classification',
                prediction_placeholder=PREDICT_TOKEN
            )
        ]
    ),
    index_column=INDEX_COLUMN,
    rows=all_rows
)

# Call the model
client = RPTClient()
response = client.predict(body=body, model_name=RPT_MODEL)

print(f'Predictions received: {len(response.predictions)}')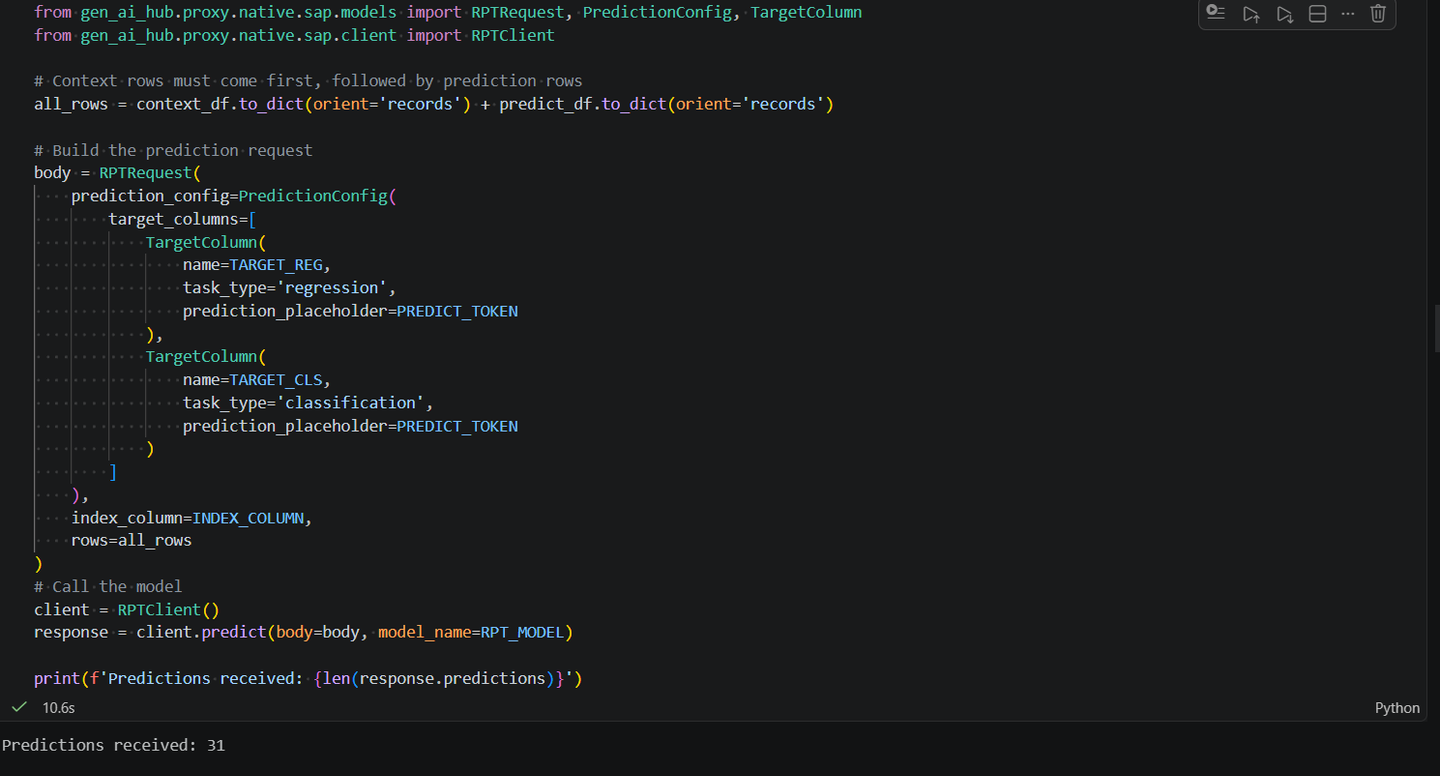
Step 6: Parse and display the results.
from tabulate import tabulate

results = []
for pred in response.predictions:
    results.append({
        INDEX_COLUMN             : pred[INDEX_COLUMN],
        'Predicted Days Late'    : pred[TARGET_REG][0].prediction,
        'Predicted Risk Score'   : pred[TARGET_CLS][0].prediction,
        'Risk Score Confidence'  : round(pred[TARGET_CLS][0].confidence, 4)
    })

print(tabulate(results, headers='keys', tablefmt='grid'))
Sample output:
+------------------+-----------------------+------------------------+-------------------------+
| Transaction ID   |   Predicted Days Late | Predicted Risk Score   |   Risk Score Confidence |
+==================+=======================+========================+=========================+
| TXN AZT67X0T     |              20.2029  | High                   |                    0.72 |
+------------------+-----------------------+------------------------+-------------------------+
| TXN RWO7A9Z2     |              19.9569  | High                   |                    0.69 |
+------------------+-----------------------+------------------------+-------------------------+
| TXN C18O8PW7     |              18.2233  | High                   |                    0.75 |
+------------------+-----------------------+------------------------+-------------------------+
| TXN MQ5R05JP     |              41.6997  | Medium                 |                    0.62 |
+------------------+-----------------------+------------------------+-------------------------+
| TXN RO3WUTF4     |              10.7311  | High                   |                    0.78 |
+------------------+-----------------------+------------------------+-------------------------+
Reading the response:
- Regression —
pred[TARGET_REG][0].predictionreturns the numeric value directly. No confidence score is returned for regression targets.- Classification —
pred[TARGET_CLS][0].predictionreturns the category label.pred[TARGET_CLS][0].confidencereturns a score between 0 and 1 — higher means more certain.
Step 7: Export results to CSV.
results_df = pd.DataFrame(results)
results_df.to_csv('rpt1_predictions.csv', index=False)
print(f'Results exported to rpt1_predictions.csv ({len(results_df)} rows)')
Important Note
Ensure your RPT-1 deployment status is Running in AI Launchpad before executing the prediction steps. Calls to a stopped or pending deployment will return a 404 error.
⚠️ Beta notice: The
@sap-ai-sdk/rptpackage is experimental and subject to change. Do not use in production environments.
Step 1: Load credentials from the .env file.
import dotenv from 'npm:dotenv';
dotenv.config();

const serviceKey     = JSON.parse(process.env.AICORE_SERVICE_KEY!);
const RESOURCE_GROUP = serviceKey.resourcegroup;
const DEPLOYMENT_ID  = serviceKey.deploymentId;

console.log('✅ Credentials loaded');
console.log('Resource Group :', RESOURCE_GROUP);
console.log('Deployment ID  :', DEPLOYMENT_ID);
Step 2: Initialise the RPT client.
import { RptClient } from 'npm:@sap-ai-sdk/rpt';

const client = new RptClient({
  modelName    : 'sap-rpt-1-small',
  resourceGroup: RESOURCE_GROUP
});

console.log('✅ RPT client initialised');
Step 3: Load the dataset from the local Excel file.
import * as XLSX from 'npm:xlsx';

// Configuration — mirrors the Python notebook constants exactly
const INDEX_COLUMN  = 'Transaction ID';
const TARGET_REG    = 'Days Late';
const TARGET_CLS    = 'Risk Score';
const PREDICT_TOKEN = '[PREDICT]';

// Load the Excel file
const fileBuffer = await Deno.readFile('payment-delay-data.xlsx');
const workbook   = XLSX.read(fileBuffer, { type: 'buffer' });

// Read the first sheet as an array of row objects
const sheetName = workbook.SheetNames[0];
const worksheet = workbook.Sheets[sheetName];
const allRows   = XLSX.utils.sheet_to_json<Record<string, string>>(worksheet, {
  raw: false,
  defval: ''
});

console.log(`✅ Dataset loaded from sheet: "${sheetName}"`);
console.log(`   Total rows   : ${allRows.length}`);
console.log(`   Columns      : ${Object.keys(allRows[0]).join(', ')}`);
console.log('\nSample row (first record):');
console.log(JSON.stringify(allRows[0], null, 2));
Step 4: Separate context rows from prediction rows.
// Context rows: both targets have known (non-PREDICT, non-empty) values
const contextRows = allRows.filter(row =>
  row[TARGET_REG] !== PREDICT_TOKEN && row[TARGET_REG] !== '' &&
  row[TARGET_CLS] !== PREDICT_TOKEN && row[TARGET_CLS] !== ''
);

// Prediction rows: either target contains [PREDICT]
const predictRows = allRows.filter(row =>
  row[TARGET_REG] === PREDICT_TOKEN ||
  row[TARGET_CLS] === PREDICT_TOKEN
);

console.log(`✅ Row split complete:`);
console.log(`   Context rows  (model learns from these) : ${contextRows.length}`);
console.log(`   Prediction rows (model fills these in)  : ${predictRows.length}`);

// Preview a prediction row
console.log('\nSample prediction row:');
console.log(JSON.stringify(predictRows[0], null, 2));

// Concatenate Context rows FIRST, prediction rows SECOND — required ordering
const rows = [...contextRows, ...predictRows];

console.log(`✅ Combined rows array built:`);
console.log(`   Total rows  : ${rows.length}`);
console.log(`   First row   : context (${rows[0][INDEX_COLUMN]})`);
console.log(` Last row : prediction (${rows[rows.length - 1][INDEX_COLUMN]})`);Step 5: Call RPT-1 using predictWithoutSchema() — core method.
Both Days Late (regression) and Risk Score (classification) are predicted in a single API call
console.log(`Sending ${predictRows.length} prediction rows with ${contextRows.length} context rows...`);
console.log('Calling RPT-1 model...');

const response = await client.predictWithoutSchema({
  prediction_config: {
    target_columns: [
      {
        name: TARGET_REG,
        task_type: 'regression',
        prediction_placeholder: PREDICT_TOKEN
      },
      {
        name: TARGET_CLS,
        task_type: 'classification',
        prediction_placeholder: PREDICT_TOKEN
      }
    ]
  },
  index_column: INDEX_COLUMN,
  rows
});

console.log(`\n✅ Predictions received: ${response.predictions.length}`);
console.log('Metadata:', JSON.stringify(response.metadata, null, 2));
Step 6: Parse and display the results.
// Parse predictions into a flat results array
const results = response.predictions.map(pred => ({
  [INDEX_COLUMN]           : pred[INDEX_COLUMN],
  'Predicted Days Late'    : pred[TARGET_REG]?.[0]?.prediction ?? null,
  'Predicted Risk Score'   : pred[TARGET_CLS]?.[0]?.prediction ?? null,
  'Risk Score Confidence'  : pred[TARGET_CLS]?.[0]?.confidence != null
    ? Number(pred[TARGET_CLS][0].confidence).toFixed(4)
    : null
}));

// Display as a table in the notebook
console.log('\n=== RPT-1 Prediction Results ===\n');
console.table(results);

// Also print a text table for easy reading
console.log('\nDetailed output:');
results.forEach(r => {
  console.log(
    `${r[INDEX_COLUMN].padEnd(20)} | ` +
    `Days Late: ${String(r['Predicted Days Late']).padEnd(10)} | ` +
    `Risk Score: ${String(r['Predicted Risk Score']).padEnd(10)} | ` +
    `Confidence: ${r['Risk Score Confidence']}`
  );
});
Reading the response:
- Regression (
Days Late) —.predictionreturns the numeric value directly. No confidence score for regression.- Classification (
Risk Score) —.predictionreturns the category label..confidenceis a score between 0 and 1.
Step 7: Export results to CSV.
// Export results to CSV using the xlsx package's CSV utilities
const exportSheet = XLSX.utils.json_to_sheet(results);
const csvOutput   = XLSX.utils.sheet_to_csv(exportSheet);

await Deno.writeTextFile('rpt1_predictions.csv', csvOutput);

console.log(`✅ Results exported to rpt1_predictions.csv (${results.length} rows)`);
console.log('\nCSV preview (first 5 lines):');
console.log(csvOutput.split('\n').slice(0, 6).join('\n'));
Advanced — predictWithSchema(): explicit column schema
Use when column types are known. Declaring schema as const enables TypeScript type inference and IDE autocompletion via PredictionData<typeof schema>.
import type { PredictionData } from 'npm:@sap-ai-sdk/rpt';

// Define the explicit schema for the payment transactions dataset
// Use 'as const' to enable TypeScript type inference for PredictionData<typeof schema>
const schema = [
  { name: 'Transaction ID',      dtype: 'string'  },
  { name: 'Customer ID',         dtype: 'string'  },  // identifier — keep as string
  { name: 'Customer Type',       dtype: 'string'  },
  { name: 'Industry',            dtype: 'string'  },
  { name: 'Region',              dtype: 'string'  },
  { name: 'Currency',            dtype: 'string'  },
  { name: 'Invoice Amount',      dtype: 'numeric' },
  { name: 'Due Days',            dtype: 'numeric' },
  { name: 'Credit Limit',        dtype: 'numeric' },
  { name: 'Outstanding',         dtype: 'numeric' },
  { name: 'Credit Usage',        dtype: 'numeric' },
  { name: 'Relationship Years',  dtype: 'numeric' },
  { name: 'Previous Delays',     dtype: 'numeric' },
  { name: 'Avg Days Late',       dtype: 'numeric' },
  { name: 'Payment Method',      dtype: 'string'  },
  { name: 'Economic Indicator',  dtype: 'numeric' },
  { name: 'Quarter',             dtype: 'string'  },
  { name: 'Contact Attempts',    dtype: 'numeric' },
  { name: 'Has Dispute',         dtype: 'string'  },
  { name: 'Dispute Amount',      dtype: 'numeric' },
  { name: 'Days Late',           dtype: 'string'  },  // target — string to preserve [PREDICT]
  { name: 'Risk Score',          dtype: 'string'  }   // target — string to preserve [PREDICT]
] as const;

// Typed prediction data — TypeScript infers valid column names from schema
const predictionData: PredictionData<typeof schema> = {
  prediction_config: {
    target_columns: [
      {
        name: TARGET_REG,
        task_type: 'regression',
        prediction_placeholder: PREDICT_TOKEN
      },
      {
        name: TARGET_CLS,
        task_type: 'classification',
        prediction_placeholder: PREDICT_TOKEN
      }
    ]
  },
  index_column: INDEX_COLUMN,
  rows   // same combined rows array from Step 5
};

console.log('Calling RPT-1 with explicit schema...');

const schemaResponse = await client.predictWithSchema(schema, predictionData);

console.log(`\n✅ Predictions received (with schema): ${schemaResponse.predictions.length}`);

// Parse and display results
const schemaResults = schemaResponse.predictions.map(pred => ({
  [INDEX_COLUMN]           : pred[INDEX_COLUMN],
  'Predicted Days Late'    : pred[TARGET_REG]?.[0]?.prediction ?? null,
  'Predicted Risk Score'   : pred[TARGET_CLS]?.[0]?.prediction ?? null,
  'Risk Score Confidence'  : pred[TARGET_CLS]?.[0]?.confidence != null
    ? Number(pred[TARGET_CLS][0].confidence).toFixed(4)
    : null
}));

console.log('\n=== Results (predictWithSchema) ===\n');
console.table(schemaResults);Advanced — predictParquet(): file-based prediction
Uses the shared payment_transactions.parquet from the Prepare the Parquet File step — no re-creation needed.
// Read payment_transactions.parquet — created once by the Python SDK notebook.
const parquetPath = 'payment_transactions.parquet';

// Verify the file exists before sending
try {
  const fileStat = await Deno.stat(parquetPath);
  console.log(`Found ${parquetPath} (${fileStat.size} bytes) — ready to send.`);
} catch {
  throw new Error(
    `${parquetPath} not found. Run the Python SDK notebook parquet export cell first.`
  );
}

const parquetBuffer = await Deno.readFile(parquetPath);
const parquetBlob   = new Blob([parquetBuffer], {
  type: 'application/vnd.apache.parquet'
});

console.log(`Sending ${parquetPath} (${parquetBuffer.byteLength} bytes) to RPT-1...`);

const parquetResponse = await client.predictParquet({
  file: parquetBlob,
  prediction_config: {
    target_columns: [
      { name: TARGET_REG, task_type: 'regression',     prediction_placeholder: PREDICT_TOKEN },
      { name: TARGET_CLS, task_type: 'classification', prediction_placeholder: PREDICT_TOKEN }
    ]
  },
  index_column: INDEX_COLUMN
  // parse_data_types defaults to true — RPT-1 infers numeric/date types from string values
});

console.log(`\n✅ Parquet predictions received: ${parquetResponse.predictions.length}`);
console.log('Metadata:', JSON.stringify(parquetResponse.metadata, null, 2));

const parquetResults = parquetResponse.predictions.map(pred => ({
  [INDEX_COLUMN]          : pred[INDEX_COLUMN],
  'Predicted Days Late'   : pred[TARGET_REG]?.[0]?.prediction ?? null,
  'Predicted Risk Score'  : pred[TARGET_CLS]?.[0]?.prediction ?? null,
  'Risk Score Confidence' : pred[TARGET_CLS]?.[0]?.confidence != null
    ? Number(pred[TARGET_CLS][0].confidence).toFixed(4)
    : null
}));

console.log('\n=== Results (predictParquet) ===\n');
console.table(parquetResults);Important Note
Ensure your RPT-1 deployment status is Running in AI Launchpad before running any prediction steps.
The SAP RPT-1 Bruno collection supports two predict request types. This tutorial uses the predict-parquet approach — the recommended method for file-based datasets — which sends your data as a Parquet file via multipart/form-data alongside a JSON prediction configuration.
Why Parquet? Parquet is a columnar file format optimised for structured data workloads. It preserves column data types natively, is significantly smaller than CSV for large datasets, and is the format expected by the
/predict-parquetendpoint in the SAP RPT-1 Bruno collection.
Step 1: Open the predict-parquet request in the Bruno collection.
In Bruno, navigate to the sap-rpt-1 folder inside the imported collection. Open the request named predict parquet.
This is a POST request to:
{{ai_api_url}}/v2/inference/deployments/{{deployment_id}}/predict-parquetHeaders (pre-configured in the collection):
| Header | Value |
|---|---|
Authorization | Bearer {{bearerToken}} |
AI-Resource-Group | {{resource_group}} |
Note: Do not set
Content-Typemanually for this request. Bruno sets it automatically tomultipart/form-datawith the correct boundary when a file is attached.
Step 2: Configure the multipart/form-data body.
The /predict-parquet endpoint expects a multipart/form-data body with exactly two parts:
| Part name | Type | Value |
|---|---|---|
file | File | Your payment_transactions.parquet file |
body | Text (JSON) | The prediction configuration JSON |
In Bruno, expand the Body tab and select Multipart Form.
Part 1 — attach the Parquet file:
- Field name:
file - Type:
File - Click Select File and choose your
payment_transactions.parquet
Part 2 — add the prediction configuration:
- Field name:
body - Type:
Text - Paste the following JSON:
meta {
  name: predict_parquet
  type: http
  seq: 2
}

post {
  url: {{baseUrl}}/v2/inference/deployments/{{deploymentId}}/predict_parquet
  body: multipartForm
  auth: none
}

headers {
  Authorization: Bearer {{bearerToken}}
  AI-Resource-Group: {{resourceGroup}}
}

body:multipart-form {
  prediction_config: {"target_columns": [{"name": "Days Late","prediction_placeholder": "[PREDICT]","task_type": "regression"},{"name": "Risk Score","prediction_placeholder": "[PREDICT]","task_type": "classification"}]}
  index_column: Transaction ID
  parse_data_types: false
  file: @file(./data/payment_transactions.parquet)
}
Payload rules:
- Context rows (rows with known values) must appear before prediction rows (rows with
[PREDICT]) in the Parquet file — the same row ordering rule as the JSON predict endpointtask_typeaccepts only"regression"or"classification"- The
index_columnvalue (Transaction ID) must exist as a column in your Parquet file
Step 3: Run the request and read the response.
Click Send in Bruno. A successful 200 OK response returns predictions in this format:
{
  "id": "199297b3-373f-4af7-8b8a-47b3b8f38108",
  "metadata": {
    "num_columns": 22,
    "num_predictions": 62,
    "num_query_rows": 31,
    "num_rows": 500
  },
  "predictions": [
    {
      "Days Late": [
        {
          "confidence": null,
          "confidence_interval": [
            2.04,
            39.0
          ],
          "prediction": 20.202856063842773
        }
      ],
      "Risk Score": [
        {
          "confidence": 0.72,
          "confidence_interval": null,
          "prediction": "High"
        }
      ],
      "Transaction ID": "TXN AZT67X0T"
    }
  "status": {
    "code": 0,
    "message": "ok"
  }
}Follow the screenshot attached for reference.

Reading the response:
- Only rows that had
[PREDICT]in at least one target column appear inpredictions- Regression (
Days Late) —predictions[i]["Days Late"][0].predictionreturns the numeric value directly. No confidence score is returned for regression targets.- Classification (
Risk Score) —predictions[i]["Risk Score"][0].predictionreturns the category label.predictions[i]["Risk Score"][0].confidencereturns a score between 0 and 1 — higher means more certain.
Important Note
Ensure your RPT-1 deployment status is Running in AI Launchpad before sending the predict request. If you receive a 401 Unauthorized error, re-run the get_token request to refresh your token before retrying.
Regardless of which access method you use, the quality of your context rows directly affects prediction accuracy.
| Practice | Why It Matters |
|---|---|
| Use the recommended context size for your model variant | sap-rpt-1-small accepts up to 2048 context rows and 100 columns — SAP recommends 500–2,000 rows for a balanced trade-off between prediction quality, inference speed, and cost. sap-rpt-1-large accepts up to 65536 context rows and 256 columns — SAP recommends 4,000–8,000 rows for complex enterprise use cases requiring highest accuracy. Both variants support up to 128 simultaneous prediction rows and 10 simultaneous target columns per API call. For further details on model specifications, refer to SAP Help Portal — SAP RPT-1 |
| Sample randomly for balanced datasets | For most cases, random sampling from your labeled data works well |
| Use stratified sampling for many-class targets | If your classification target has many distinct categories, ensure all classes appear in the context rows |
| Use recency-biased sampling for drifting data | If your data changes over time, weight sampling toward recent records |
| Use descriptive column names | The model reads column names as semantic signals — PAYMENT_RISK_LABEL gives more signal than COL_7 |
| Error | Likely Cause | Fix |
|---|---|---|
401 Unauthorized | Token expired or wrong credentials | Re-run the OAuth token request; verify clientId and clientSecret |
404 Not Found on predict endpoint | Wrong deployment ID or deployment not running | Verify deployment status is Running in AI Launchpad; confirm deployment ID |
| Low confidence scores (below 0.5) | Insufficient or unrepresentative context rows | Increase context rows; use stratified sampling for many-class targets |
| All rows returning the same prediction | All context rows belong to one class | Ensure context rows contain examples of all possible target categories |
Regression predictions returning None | Unparseable value from model | Wrap parsing in try/except; check that context rows contain numeric values in the regression target column |
You have now covered all four ways to work with SAP RPT-1, from the point-and-click AI Launchpad for deployment management, to the Python SDK,JavaScript SDK and Bruno REST API for full programmatic control.
| What You Did | Method |
|---|---|
| Deployed the model and obtained a Deployment ID | SAP AI Launchpad |
| Created configuration and deployment programmatically | Python SDK / JavaScript SDK / Bruno |
| Prepared shared Parquet file from Excel — used by all methods | Python (pandas + pyarrow) |
| Loaded Excel and ran regression + classification in one API call | Python SDK (sap-ai-sdk-gen) |
Ran predictWithoutSchema(), predictWithSchema(), and predictParquet() | JavaScript SDK (@sap-ai-sdk/rpt, Deno) |
| Fetched an OAuth token, built the multipart payload, and called the predict endpoint | Bruno REST API |
Useful references:
Resources
Discussion
Share feedback on this tutorial or join the conversation in SAP Community.