
Overview
You will learn
- How to prepare and organize datasets for evaluation.
- How to configure and run evaluations in SAP AI Core.
- How to analyze and interpret aggregated evaluation results.


Prerequisites
Prerequisites
- BTP Account
Set up your SAP Business Technology Platform (BTP) account.
Create a BTP Account - For SAP Developers or Employees
Internal SAP stakeholders should refer to the following documentation: How to create BTP Account For Internal SAP Employee, SAP AI Core Internal Documentation - For External Developers, Customers, or Partners
Follow this tutorial to set up your environment and entitlements: External Developer Setup Tutorial, SAP AI Core External Documentation - Create BTP Instance and Service Key for SAP AI Core
Follow the steps to create an instance and generate a service key for SAP AI Core:
Create Service Key and Instance - AI Core Setup Guide
Step-by-step guide to set up and get started with SAP AI Core:
AI Core Setup Tutorial - An Extended SAP AI Core service plan is required, as the Generative AI Hub is not available in the Free or Standard tiers. For more details, refer to SAP AI Core Service Plans
- Orchestration Deployment Ensure at least one orchestration deployment is ready to be consumed during this process. Refer to this tutorial understand the basic consumption of GenAI models using orchestration.
- Basic Knowledge Familiarity with the orchestration workflow is recommended
- Install Dependencies Install the required Python packages using the requirements.txt file provided. Download requirements.txt
💡 Right-click the link above and choose “Save link as…” to download it directly.
Steps
Pre-Read
This tutorial is designed for users who are unfamiliar with AI Core services and do not require flexibility in their use case. This tutorial is setup in a way that provides automatic setup for your evaluation where only the dataset is minimally required. It demonstrates a quick start simplified workflow for using AI Core’s custom evaluation capabilities to benchmark Large Language Models (LLMs), and evaluate different prompts for a specific use case. It utilizes the public MedicationQA dataset to showcase how to compute industry-standard metrics and assess the reliability of LLM-generated responses.
Navigate to your SAP AI Core Launchpad.
In the Workspaces section, click on “Add” to create a new workspace.
- A workspace in SAP AI Core is a logical container that holds your resources (like models and pipelines) and provides the isolation needed for your projects.
When prompted, enter your AI Core credentials (such as Client ID, Client Secret, and Base URL).
- Note: If you’re unsure about where to find these credentials, refer to this guide.
Once the workspace is successfully created, select your desired Resource Group to begin the evaluation process.
Refer to the screenshot below for guidance:
- Open Visual Studio Code or Jupyter Notebook. Create a new file with the .ipynb extension (e.g., custom_evaluation.ipynb).
- Create a .env file in the root directory of your project.
- Add your AI Core and AWS credentials as shown below.
# AICORE CREDENTIALS
AICORE_CLIENT_ID=<AICORE CLIENT ID>
AICORE_CLIENT_SECRET=<AICORE CLIENT SECRET>
AICORE_AUTH_URL=<AICORE AUTH URL>
AICORE_BASE_URL=<AICORE BASE URL>
AICORE_RESOURCE_GROUP=<AICORE RESOURCE GROUP>

# AWS CREDENTIALS
AWS_ACCESS_KEY=<AWS ACCESS KEY>
AWS_BUCKET_ID=<AWS BUCKET ID>
AWS_REGION=<AWS REGION>
AWS_SECRET_ACCESS_KEY=<AWS SECRET ACCESS KEY>

# ORCHESTRATION DEPLOYMENT URL
DEPLOYMENT_URL=<DEPLOYMENT URL>
Note: Replace placeholders (e.g., CLIENT_ID, CLIENT_SECRET, etc) with your actual environment credentials.
Refer to the below screenshot for clarity:
Install Dependencies
Install the required packages using the requirements.txt↓ file you downloaded in the Prerequisites section.
pip install -r requirements.txtConnect to AI Core Instance
Once the environment variables are set and dependencies are installed, run the following code to connect to your instance:
# Loading the credentials from the env file
from gen_ai_hub.proxy.gen_ai_hub_proxy import GenAIHubProxyClient
from dotenv import load_dotenv
import os

load_dotenv(override=True)

# Fetching environment variables
AICORE_BASE_URL = os.getenv("AICORE_BASE_URL")
AICORE_RESOURCE_GROUP = os.getenv("AICORE_RESOURCE_GROUP")
AICORE_AUTH_URL = os.getenv("AICORE_AUTH_URL")
AICORE_CLIENT_ID = os.getenv("AICORE_CLIENT_ID")
AICORE_CLIENT_SECRET = os.getenv("AICORE_CLIENT_SECRET")

AWS_ACCESS_KEY = os.getenv("AWS_ACCESS_KEY")
AWS_BUCKET_ID = os.getenv("AWS_BUCKET_ID")
AWS_REGION = os.getenv("AWS_REGION")
AWS_SECRET_ACCESS_KEY = os.getenv("AWS_SECRET_ACCESS_KEY")
DEPLOYMENT_URL = os.getenv("DEPLOYMENT_URL")

# Initializing the GenAIHubProxyClient
client = GenAIHubProxyClient(
    base_url=AICORE_BASE_URL,
    auth_url=AICORE_AUTH_URL,
    client_id=AICORE_CLIENT_ID,
    client_secret=AICORE_CLIENT_SECRET,
    resource_group=AICORE_RESOURCE_GROUP
)NOTE:
- Ensure the requirements.txt installation completes successfully before running the code.
- If you face any issues, recheck your .env values and installed packages.
Download the Bruno_collections↓ file
please follow the steps in the Tutorial to set up your environment, refer step - Set Up Your Environment and Configure Access and proceed till generating the token
Note: This step involves local setup using Python and does not require any action on the SAP AI Launchpad.
In this step, the evaluation notebook dynamically detects the dataset file from a predefined folder structure. You are not required to hardcode the dataset filename.
import os
import json

def get_dataset_file_name(folder_path):
    """
    Retrieves the name of the first file in the specified folder.
    """
    if not os.path.isdir(folder_path):
        print(f"The folder path '{folder_path}' does not exist.")
        return None

    items_in_folder = os.listdir(folder_path)

    for item in items_in_folder:
        item_path = os.path.join(folder_path, item)
        if os.path.isfile(item_path):
            return item

    print(f"No files were found in the folder '{folder_path}'.")
    return None


# --- MAIN EXECUTION ---
DATASET_FOLDER = "./DATASET"

DATASET_NAME = get_dataset_file_name(DATASET_FOLDER)

if  DATASET_NAME:
    print(f"Dataset name: {DATASET_NAME}")
else:
    print("Missing run or dataset file.")
    raise SystemExit("Exiting due to missing run/dataset file.")
Note: This step involves local setup using Python and does not require any action on Bruno.
- Open the SAP AI Core Launchpad and navigate to the Administration tab.
- Select the Object Store section from the left-hand menu.
- Click on “Add” to register a new object store secret.
- Fill in the required bucket details as shown in the screenshot below.

In the Secret field, use the following structure to provide your AWS credentials:
{
    "AWS_ACCESS_KEY_ID": "Enter Your value",
    "AWS_SECRET_ACCESS_KEY": "Enter Your value"
}
To make your evaluation files available for AI Core orchestration, you need to:
- Upload them to an object store (e.g., AWS S3).
- Register the object store secret in AI Core.
Setup Authentication and Headers
First, define the authentication headers for AI Core REST API calls.
def _get_headers():
    headers = {
        "Authorization": client.get_ai_core_token(),
        "AI-Resource-Group": AICORE_RESOURCE_GROUP,
        "Content-Type": "application/json",
    }
    return headers
Register Object Store Secret in AI Core
Register your S3 bucket and credentials as a secret.
# Register S3 secret with AI Core which will be used an input source
import requests
import json
import logging

def delete_oss_secret(oss_name=""):
    headers = _get_headers()

    DELETE_SECRETS_ENDPOINT = f'/v2/admin/objectStoreSecrets/{oss_name}'
    request_url = f"{AICORE_BASE_URL}{DELETE_SECRETS_ENDPOINT}"

    try:
        response = requests.delete(request_url, headers=headers, timeout=120)
        if response.status_code == 202:
            print(f"Successfully deleted object store secret: {oss_name}")
        elif response.status_code == 404:
            print(f"Object store secret not found: {oss_name}. It may not exist.")
        else:
            logging.error(f"Failed to delete object store secret: {oss_name}, Status Code: {response.status_code}")
    except Exception as e:
        logging.error(f"Error occurred while attempting to delete object store secret: {e}")
        raise

def register_oss_secret(oss_name="", path_prefix=""):
    headers = _get_headers()

    POST_SECRETS_ENDPOINT = '/v2/admin/objectStoreSecrets'
    request_url = f"{AICORE_BASE_URL}{POST_SECRETS_ENDPOINT}"

    request_body = {
        "name": oss_name,
        "data": {
            "AWS_ACCESS_KEY_ID": AWS_ACCESS_KEY,
            "AWS_SECRET_ACCESS_KEY": AWS_SECRET_ACCESS_KEY
        },
        "type": "S3",
        "bucket": AWS_BUCKET_ID,
        "endpoint": "s3-eu-central-1.amazonaws.com",
        "region": AWS_REGION,
        "pathPrefix": path_prefix,
        "verifyssl": "0",
        "usehttps": "1",
    }
    try:
        response = requests.post(
            request_url, headers=headers, data=json.dumps(request_body), timeout=120
        )
        result = response.json()
        return result
    except:
        logging.error("Error occurred while attempting to create object store secret")
        raise

delete_oss_secret(oss_name="default")
delete_oss_secret(oss_name="genai-quick-data-notebook")

register_oss_secret(oss_name="default", path_prefix="")
register_oss_secret(oss_name="genai-quick-data-notebook", path_prefix="")
Generic secrets securely store AWS S3 credentials required for document access
• Expand objectStoreSecrets under admin and select create a secret request
Use the below payload to create a secret for AWS S3 with NoAuthentication as authentication type.
{
    "name": "genai-data",
    "data": {
        "AWS_ACCESS_KEY_ID": "<access key id>",
        "AWS_SECRET_ACCESS_KEY": "<secret access key>",
    },
    "type": "S3",
    "bucket": "<bucket>",
    "endpoint": "<url>",
    "region": "<region>",
    "pathPrefix": ""
    }
• Ensure that all values in the data dictionary are Base64-encoded as per AWS S3 credential requirements

⚠️ Important Note (Must Read)
- You must create an object store secret with a user defined name (for eg: default) to store output artifacts from orchestration runs. This is mandatory.
- For input artifacts, you may create additional object store secrets with different names if needed.
- If a user defined name (for eg: default) is not configured, orchestration runs will fail due to missing output target setup.
After creating the secret, upload your evaluation files to the S3 bucket and register them as an artifact in AI Core.
Register Uploaded Files as Artifact in AI Core
To register your evaluation dataset with SAP AI Core, you need to upload it as an artifact. Follow the instructions below using the SAP AI Launchpad UI.
- Open the SAP AI Core Launchpad.
- Navigate to the Generative AI/Optimization/Artifacts section to create dataset artifact.

- On the Artifacts section, click add.
On the General Information screen, enter the following:
- Select Scenario:
genai-evaluations - Name:
genai-eval-test-data - Description:
Demo artifacts for evaluation flow. - Select Object Store:
genai-data - Sub-folder path:
genaiEvaluation/<your-user-id>
💡 Replace
<your-user-id>with your SAP BTP user ID or the folder path in your object store where the evaluation files are uploaded.- Select Scenario:
On the Labels screen, click “Add Label” and provide the following:
- Key:
prompt-evaluation - Value:
true
(Note: The prefixext.ai.sap.com/is automatically pre-filled in the UI.)

img - Key:
Review all entered details carefully.
Click “Add” to complete the artifact registration.
After creating the secret, organize your evaluation files into the eval/ folder testdata. Upload them to S3 and register as artifacts in AI Core.
Upload Files to S3 Bucket
# uploading these files to Object store to register as an artifact inside ai core

import boto3
import os
import uuid

def upload_folder_to_s3(folder_path, bucket_name, s3_prefix=""):
    """
    Upload a folder to an S3 bucket recursively.

    :param folder_path: The local folder path to upload.
    :param bucket_name: The name of the S3 bucket.
    :param s3_prefix: Optional prefix to use for the S3 keys (e.g., subfolder in the bucket).
    """
    s3_client = boto3.client(
            's3',
            aws_access_key_id=AWS_ACCESS_KEY,
            aws_secret_access_key=AWS_SECRET_ACCESS_KEY,
            region_name=AWS_REGION
            )

    for root, dirs, files in os.walk(folder_path):
        for file_name in files:
            print("val of root is ", file_name)
            local_path = os.path.join(root, file_name)
            # Compute the relative path for the S3 key
            relative_path = os.path.relpath(local_path, folder_path)
            s3_key = os.path.join(s3_prefix, relative_path).replace("\\", "/")  # Ensure S3-compatible paths
            print("val of s3 key is ", s3_key)
            print(f"Uploading {local_path} to s3://{bucket_name}/{s3_key}")

            # Upload the file
            s3_client.upload_file(local_path, bucket_name, s3_key)

# Example usage
folder_to_upload_testdata = "../DATASET"
user_directory_prefix = "" # replace with your i-number as string here
prefix_guid = user_directory_prefix if user_directory_prefix is not None else str(uuid.uuid4().hex)
s3_testdata_prefix = f"genaiEvaluation/{prefix_guid}/testdata" # Leave empty for root of the bucket


upload_folder_to_s3(folder_to_upload_testdata, AWS_BUCKET_ID, s3_testdata_prefix)
input_artifact_path = f"ai://genai-quick-data-notebook/genaiEvaluation/{prefix_guid}"
Register Uploaded Files as Artifact in AI Core
import requests
import logging
# Registering the uploaded files from AWS as artifacts to use inside configuration.

def register_artifact():
    headers = _get_headers()

    GET_ARTIFACTS_ENDPOINT = '/v2/lm/artifacts'
    request_url = f"{AICORE_BASE_URL}{GET_ARTIFACTS_ENDPOINT}"

    request_body = {
        "labels": [
            {
            "key": "ext.ai.sap.com/prompt-evaluation",
            "value": "true"
            }
        ],
        "name": "genai-eval-simplified-test-data",
        "kind": "other",
        "url": input_artifact_path, # input artifact path
        "description": "demo artifacts for evaluation flow.",
        "scenarioId": "genai-evaluations"
    }
    try:
        response = requests.post(
            request_url, headers=headers, data=json.dumps(request_body), timeout=120
        )
        result = response.json()
        print(result)
        return result['id']
    except:
        print("Error occurred while attempting to register artifact")
        raise

artifact_id = register_artifact()
Before registering a dataset artifact in Bruno, you must upload your CSV file to the SAP AI Core object store using the Dataset API.
Bruno cannot upload files directly to S3. therefore, this step is required.
Prerequisites
An object store secret must already exist in your resource group.Typically, this is the default secret named default
The Dataset API currently supports:
S3 object stores only
CSV file uploads
Upload Your Dataset
Use the Dataset API – Upload File request in Bruno:
PUT:{{ai_api_url}}/v2/lm/dataset/files/{{secretName}}/{{datasetPath}}Headers
Authorization: Bearer {{token}}
AI-Resource-Group: {{resourceGroup}}
Content-Type: text/csv
Body
Upload your .csv file directly as binary in Bruno’s Body
Example Path Values:
- secretName: default
- datasetPath: testdata/medicalqna_dataset.csv

Note:
Save the ai://… URL — you will use this when creating the dataset artifact.
Register the Dataset Artifact
- Click on Register artifact under lm -> artifacts in bruno collection to register the artifact
{
    "name": "aiconfig",
    "kind": "dataset",
    "url": "ai://default/testdata/medicalqna_dataset.csv",
    "scenarioId": "genai-evaluations"
}
A Prompt Template defines:
- The message roles (system, user, etc.)
-
Variables that get substituted from your dataset (e.g., questions)
-
Optional model configuration (temperature, max tokens, etc.)
We’ll create a prompt template to guide the model to answer the questions
create the Prompt Template
In SAP AI Launchpad, go to the left-hand menu and select Generative AI Hub → Prompt Management.
click on Templates → create
This is where you can define reusable templates with variables for evaluations.

Define the Prompt
In the Message Blocks section:
- Add a System role message:
{
  "template": [
    {
      "role": "user",
      "content": "List the benefits and side effects of the drug in the following consumer health question: {{?question}}."
    }
  ]
}
Configure Variables
Scroll down to Variable Definitions and add entries for each variable:
question
- Default Value: leave empty or set to en for fallback
This ensures the placeholders are dynamically substituted during evaluation.

Save the Template
Click Save Template (top right):
Scenario → genai-evaluations
Name → prompt-registry-eval-acc-test
Version → 1.0.0
Click Save to persist the template.
Verify the Template
Go to Generative AI Hub → Prompt Management → Templates and confirm:
The template appears with the correct name, scenario, and version.
Managed By → shows how the template is stored.
Versioning is tracked automatically

The following code defines a function create_prompt_template() that creates a new Prompt Template in the SAP AI Core Prompt Registry.
def create_prompt_template():
    headers = _get_headers()
    GET_PROMPT_TEMPLATES_ENDPOINT = '/v2/lm/promptTemplates'
    request_url = f"{AICORE_BASE_URL}{GET_PROMPT_TEMPLATES_ENDPOINT}"


    prompt_template = {
    "template": [
        {
        "role": "user",
        "content": "List the benefits and side effects of the drug in the following consumer health question: {{?question}}."
        }
    ]
    }

    request_body = {
    "name": "prompt-registry-eval-demo",
    "version": "1.0.0",
    "scenario": "genai-evaluations",
    "spec": prompt_template
    }
    try:
        response = requests.post(
            request_url, headers=headers, data=json.dumps(request_body), timeout=120
        )
        if(response.status_code != 200):
            raise
        result = response.json()
        print(result)
        return result['id']
    except:
        logging.error("Error occurred while attempting to create a prompt template")
        raise

prompt_template_id = create_prompt_template()
Note
If you wish to use a prompt template that already exists in prompt registry, you can manually set prompt_template_id in the next cell and skip executing this cell
If you already have an existing template set the ID manually:
prompt_template_id = "<your_template_id>"In Bruno, you can create a prompt template by sending a POST request to the AI Core API:
Request: Create Prompt Template
URL:
POST {{api_url}}/v2/lm/promptTemplatesHeaders:
Authorization: Bearer {{access_token}}
Content-Type: application/json
Body (JSON):
{
  "name": "prompt-registry-eval-acc-test",
  "version": "1.0.0",
  "scenario": "genai-evaluations",
  "spec": {
    "template": [
      {
      "role": "user",
      "content": "List the benefits and side effects of the drug in the following consumer health question: {{?question}}."
    }
    ],
    "defaults": {},
    "additional_fields": {
      "modelParams": {
        "temperature": 0.3,
        "max_tokens": 100
      },
      "modelGroup": "chat"
    }
  }
}
🔑 Tip: Always increment the version (e.g., 1.0.1, 1.0.2) when updating a template. This ensures reproducibility across evaluations.
Metrics determine how your model outputs are evaluated during an evaluation run. They define the scoring logic that SAP AI Core uses to compare models, measure quality, and validate improvements over time.
Metrics must be supplied before creating an Evaluation Configuration.
In SAP AI Launchpad, metrics are selected visually during the Evaluation Configuration creation flow, the UI provides a selectable list of available metrics.
Go to Generative AI Hub → Optimization.
Click Create to start a new evaluation configuration.

Select Test Input, then:
Select the prompt and select more than one model
Select your registered dataset artifact
Enter the dataset path (example): testdata/medicalqna_dataset.csv
Set the number of test samples (e.g., 20)
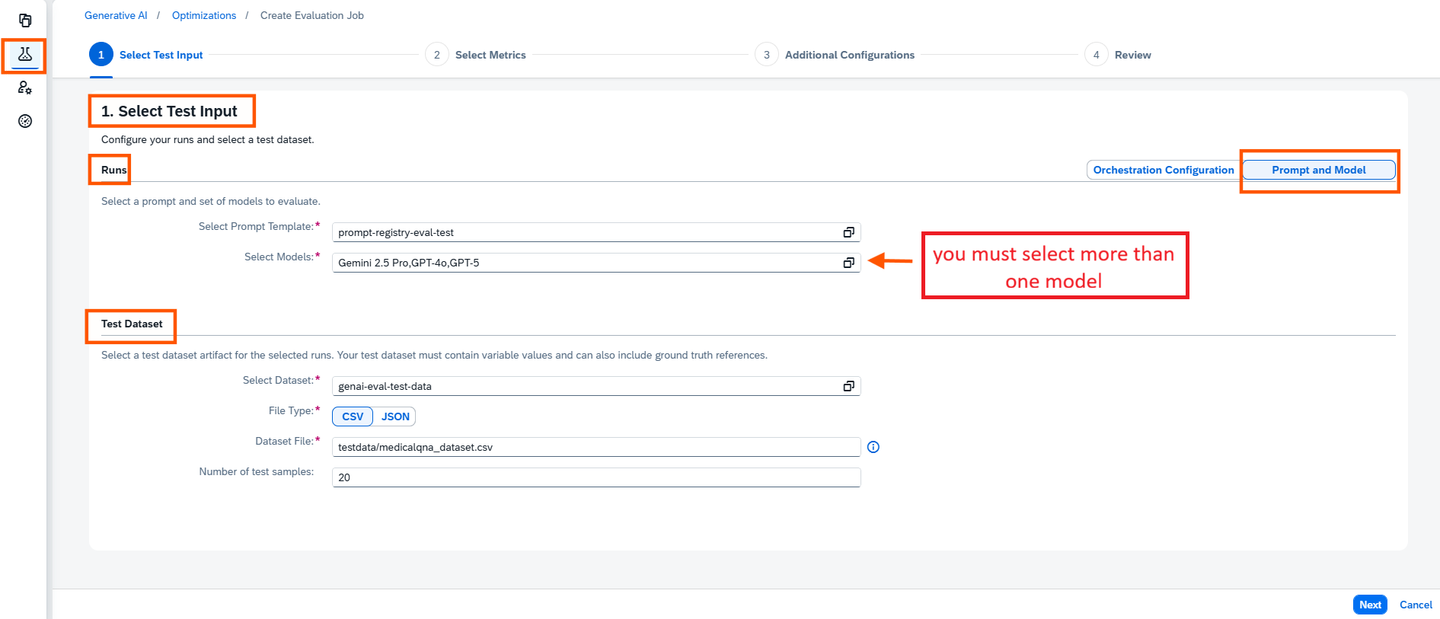
img Click Next to go to Metrics selection.
Select Evaluation Metrics
Choose the metrics you want to evaluate.
You may choose one or multiple system-defined metrics—examples:
- BERT Score
-
Pointwise Answer Relevance
-
Pointwise Correctness
-
Pointwise Instruction Following

📘 Helpful Resources:
Note: You may select additional metrics based on your use case.
Select your Models
Add the models you wish to use in the string selected_models_str
# Manual selection of models
selected_models_str="gemini-2.5-pro:001,gpt-4o:2024-08-06,gpt-5:2025-08-07"
print("Selected models string:", selected_models_str)
Metrics Handling in Python Notebook (Automatic Detection & Creation)
When running the evaluation through the Python notebook, metric setup is partially automated. Before the evaluation configuration is created, the script performs the following:
- Users can manually specify metric IDs
-
It checks if each metric already exists in AI Core
-
If not found → creates it automatically
-
Prints final list of metric IDs used for evaluation
This ensures all metrics exist before the evaluation configuration is created.
# Manual Selection of Metrics
selected_metrics_str = "Pointwise Conciseness,Pointwise Instruction Following,Pointwise Correctness,Pointwise Answer Relevance,Exact Match,BLEU,ROUGE,Content Filter on Input,Content Filter on Output"
print(selected_metrics_str)
This ensures all required metrics are available before launching the evaluation.
You can directly pass models and system metrics in your configuration:
Example Models:
"models":"gemini-2.5-pro:001,gpt-4o:2024-08-06,gpt-5:2025-08-07"Example metrics:
"metrics": "Pointwise Conciseness,Pointwise Instruction Following,Pointwise Correctness,Pointwise Answer Relevance,Exact Match,BLEU,ROUGE,Content Filter on Input,Content Filter on Output"Note:
To compare different models and generate a leaderboard, you must select more than one model. When multiple models are provided, the evaluation system automatically creates separate evaluation runs for each model within the same execution. This enables the evaluation workflow to compare the runs and compute head-to-head win rates across the selected models.
Once your dataset artifact is registered, the next step is to create an Evaluation Configuration.
An Evaluation Configuration tells SAP AI Core:
- which dataset to evaluate
-
which prompt/model or orchestration config to use
-
which metrics to compute
-
which orchestration deployment endpoint to call
-
how many repetitions to run
-
which test dataset file to load
This configuration becomes the blueprint for your evaluation execution.
Steps to Create Evaluation Configuration
In Additional Configuration
Set Number of Repetitions to
1.Choose an existing deployment for Orchestration Endpoint.

img
Final Review & Start
- Review all the details on the summary page.
- Once confirmed, click Create to start the evaluation job.

✅ You have now successfully configured and triggered a Generative AI Evaluation.
When using the Python notebook, the evaluation configuration is created automatically based on your selections. Before creating the configuration, the notebook will:
- Load the dataset artifact ID
-
Resolve metric IDs
-
Load prompt template IDs
-
Validate all required parameters
Sample parameter setup:
import json
test_data_path = f"testdata/{DATASET_NAME}" # specify the test data path here. For the full folder just specifying testdata will work
test_datasets = json.dumps({'path': test_data_path, 'type': 'csv'})
metrics_list = selected_metrics_str
models_list = selected_models_str
print(f"Selected metrics: {metrics_list}")
print(f"Selected models: {models_list}")
orchestration_deployment_url = deployment_url # needs to specify this to use a specific deployment id
repetitions = "1"
Create Configuration Body
The notebook builds the configuration using the required SAP AI Core fields:
- scenarioId
-
executableId
-
dataset artifact binding
-
selected metrics
-
test dataset details
-
repetitions
-
orchestration deployment URL
-
promptTemplate
-
models.
The following function dynamically creates the configuration body for AI Core.
#  creating an AICORE Configuration.
import requests

request_body = {
    "name": "genai-eval-conf",
    "scenarioId": "genai-evaluations",
    "executableId": "genai-evaluations-simplified",
    "inputArtifactBindings": [
        {
            "key": "datasetFolder",
            "artifactId": artifact_id
        }
    ],
    "parameterBindings": [
        {
            "key": "repetitions",
            "value": repetitions
        },
        {
            "key": "orchestrationDeploymentURL",
            "value": orchestration_deployment_url
        },
        {
            "key": "metrics",
            "value": metrics_list
        },
        {
            "key": "testDataset",
            "value": test_datasets
        },
        {
            "key": "promptTemplate",
            "value": prompt_template_id
        },
        {
            "key": "models",
            "value": models_list
        }
    ]
}

def create_aicore_configuration():
    headers = _get_headers()
    GET_CONFIGURATIONS_ENDPOINT = '/v2/lm/configurations'
    request_url = f"{AICORE_BASE_URL}{GET_CONFIGURATIONS_ENDPOINT}"
    try:
        print(request_body)
        response = requests.post(
            request_url, headers=headers, data=json.dumps(request_body), timeout=120
        )
        print(response)
        if(response.status_code != 201):
            raise Exception(f"Failed to create configuration: {response.status_code} - {response.text}")
        result = response.json()
        print(result)
        print(request_body)
        return result['id']
    except:
        logging.error("Error occurred while attempting to create a Configuration")
        raise

configuration_id = create_aicore_configuration()You will receive a configuration ID, which is required for the next step (Execution).

SAP AI Core returns a configuration ID, which is used to trigger the evaluation execution.
When creating an Evaluation Configuration through Bruno, you call:
POST {{api_url}}/v2/lm/configurationsBelow is the sample request body to create configuration.
{
  "name": "genai-eval-conf",
  "scenarioId": "genai-evaluations",
  "executableId": "genai-evaluations-simplified",
  "inputArtifactBindings": [
    {
      "key": "datasetFolder",
      "artifactId": "{{artifactId}}"
    }
  ],
  "parameterBindings": [
    {
      "key": "repetitions",
      "value": "1"
    },
    {
      "key": "orchestrationDeploymentURL",
      "value": "{{deployment_url}}"
    },
    {
      "key": "metrics",
      "value": "language_match"
    },
    {
      "key": "testDataset",
      "value": "{\"path\": \"testdata/{{dataset_file}}\", \"type\": \"csv\"}"
    },
    {
      "key": "promptTemplate",
      "value": "{{prompt_template_id}}"
    },
    {
      "key": "models",
      "value": "{{model_name}}:{{model_version}}"
    }
  ]
}
After creating the Evaluation Configuration, the next step is to execute it.
Execution triggers the evaluation workflow, which:
- Reads the test dataset

- Generates submissions to the orchestration service

- Collects model outputs

- Computes all selected metrics

- Produces aggregate and raw evaluation results
The process is identical for SAP AI Launchpad, Python, and Bruno, with only the invocation method differing.
Once the evaluation configuration is created, the system automatically triggers an evaluation execution.
Follow these steps to monitor its progress and verify completion:
Navigate to ML Operations in the SAP AI Core Launchpad.
In the sidebar, click Executions.

img Locate the most recent execution triggered by your evaluation configuration. You can use the timestamp or configuration name to identify it.
Click on the execution entry to open its details. The Current Status will update as the process runs.

img Once the Target Status reaches COMPLETED , your evaluation has successfully finished.
Track Execution Status
The execution page will show:
- Unknown
-
Pending
-
Running
-
Completed
Once completed, you can navigate to:
- Outputs → Tracking Metrics (aggregate results)
- Output Artifacts (raw results stored in the SQLite DB)
Once the configuration is ready, the next step is to trigger an execution. An execution is a single evaluation run based on the configuration you defined.
Create Execution
The following function starts the evaluation in SAP AI Core using the configuration ID:
# create an execution with the created configuration.

import requests
def create_execution():
    headers = _get_headers()
    GET_EXECUTIONS_ENDPOINT = '/v2/lm/executions'
    request_url = f"{AICORE_BASE_URL}{GET_EXECUTIONS_ENDPOINT}"
    request_body = {"configurationId" : configuration_id}
    try:
        response = requests.post(
            request_url, headers=headers, data=json.dumps(request_body), timeout=120
        )
        print("response received is ", response)
        result = response.json()
        print(result)
        return result['id']
    except:
        logging.error("Error occurred while attempting to create an execution")
        raise


execution_id = create_execution()
Monitor Execution Status
The execution progresses through states:
UNKNOWN → PENDING → RUNNING → COMPLETED
# get execution status
import requests
def get_execution_status(execution_id):
    headers = _get_headers()
    LOG_EXECUTIONS_ENDPOINT = f'/v2/lm/executions/{execution_id}'
    request_url = f"{AICORE_BASE_URL}{LOG_EXECUTIONS_ENDPOINT}"
    try:
        response = requests.get(
            request_url, headers=headers, timeout=120
        )
        print("response received is ", response)
        result = response.json()
        return result
    except:
        logging.error("Error occurred while attempting to get execution status")
        raise


get_execution_status(execution_id)
Automatic Polling
To continuously monitor until the evaluation finishes:
# Polling the execution status until it is COMPLETED or DEAD or timeout occurs
def poll_execution_status(execution_id, timeout_minutes=1800, poll_interval=30):
    start_time = time.time()
    while True:
        result = get_execution_status(execution_id)
        print(f"Execution Status: {result.get('status')}")
        if result.get("status") == "COMPLETED":
            print(f"Execution completed successfully in {time.time() - start_time} seconds, proceed to fetch results.")
            break
        if result.get("status") == "DEAD":
            print(f"Execution failed with status DEAD in {time.time() - start_time} seconds. Check the logs for more details.")
            break
        if time.time() - start_time > timeout_minutes * 60:
            raise TimeoutError(f"Execution status polling timed out after {timeout_minutes} minutes.")
        time.sleep(poll_interval)
✅ Once the execution status shows COMPLETED, the evaluation results are available and can be analyzed in the next step.
After creating the configuration, the next step is to trigger the evaluation workload by creating an AI Core execution.
Create an Execution with the Created Configuration
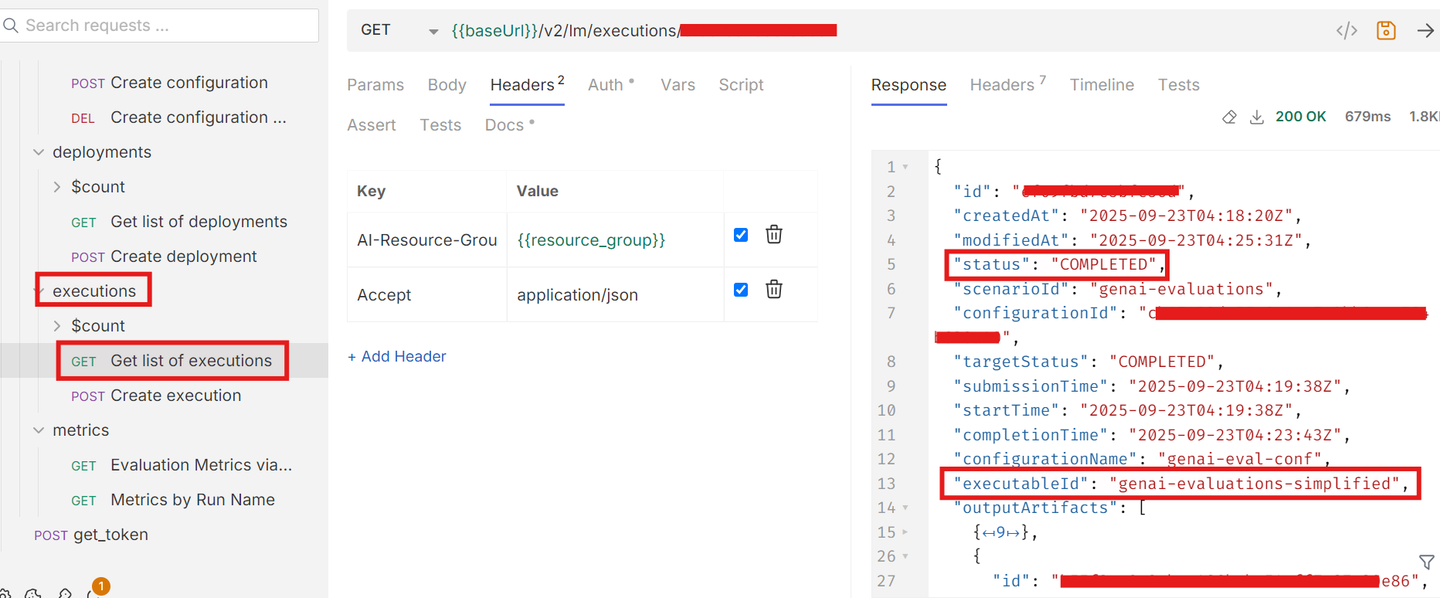
- Click on create execution under executions, pass the configuration id created in previous step

- The status field progresses through different states over time: UNKNOWN → PENDING → RUNNING → COMPLETED.
Get Execution Status
check the status of created execution by passing the execution ID, The Current Status will update as the process runs. please refer the below image
Once the evaluation execution is complete, SAP AI Core generates both aggregated metrics and detailed instance-level results. These results help compare model performance, understand quality metrics, and debug issues.
Once the evaluation workflow execution is completed, this step retrieves the aggregated evaluation metrics from the SAP AI Core service by specifying the run name.
Go to Optimizations
In the runs section , select the runs you created
you can View detailed results of a runs across your selected metrics and models
This is the easiest way to visually inspect evaluation outcomes and compare multiple model runs.

- Compare run performance across your selected metrics. Metrics are aggregated at run level.


The notebook includes utility scripts to retrieve aggregated metrics, download detailed artifacts, and inspect SQLite results.This returns all metric values per evaluated run, which your notebook then:
- Aggregated evaluation metrics
-
Raw instance-level results
-
Prepares for ranking and scoring
Retrieve Aggregate Metrics (Tracking API)
Aggregated metrics summarize performance across all test samples. To fetch them using execution ID:
# Get aggregate metrics using execution id
import requests
def retrieve_aggregate_metrics(execution_id):
    headers = _get_headers()
    GET_METRICS_ENDPOINT = f'/v2/lm/metrics?tagFilters=evaluation.ai.sap.com/child-of={execution_id}'
    request_url = f"{AICORE_BASE_URL}{GET_METRICS_ENDPOINT}"
    try:
        response = requests.get(request_url, headers=headers, timeout=120)
        print("response received is ", response)
        result = response.json()
        return result
    except:
        logging.error("Error occurred while attempting to retreive aggeregate metrics for the run")
        raise

runs_data = retrieve_aggregate_metrics(execution_id)
Transform Metrics by Model
Each run contains tags that identify the evaluated model.
import pandas as pd

def get_model_from_run(run):
    for tag in run.get("tags", []):
        if tag.get("name") == "evaluation.ai.sap.com/model":
            return tag.get("value")

def aggregate_metrics_by_model(runs_list):
    transformed_data = []
    for run in runs_list:
        model = get_model_from_run(run)
        for metric in run["metrics"]:
            metric_value = metric.get("value")

            # Override only for /mode
            if metric.get("name").endswith("/mode"):
                for label in metric.get("labels", []):
                    if label.get("name") == "evaluation.ai.sap.com/mode_category":
                        metric_value = label.get("value")
                        break
            output_json = {
                "model": model,
                "metrics_name": metric.get("name"),
                "metric_value": metric_value
            }
            transformed_data.append(output_json)
    return transformed_data


def create_metrics_pivot_table(transformed_data):
    """
    Creates a pivot table where rows are models and columns are metrics.

    Args:
        transformed_data: List of dictionaries with 'model', 'metrics_name', 'metric_value'

    Returns:
        DataFrame with models as rows and metrics as columns
    """
    # Convert list of dictionaries to DataFrame
    df = pd.DataFrame(transformed_data)

    # Create pivot table
    pivot_table = df.pivot_table(
        index='model',
        columns='metrics_name',
        values='metric_value',
        aggfunc='first'  # Use 'first' to get the single value, or 'mean' if there are duplicates
    )

    return pivot_table

transformed_data = aggregate_metrics_by_model(runs_data['resources'])
metrics_pivot = create_metrics_pivot_table(transformed_data)

HTML(metrics_pivot.to_html())
Download Raw Results (Output Artifact)
All detailed evaluation outputs are stored as an output artifact in your object store. To download all output files programmatically:
# download the result artifacts from Object store.
import boto3

def download_all_objects(prefix, destination_folder):
    """
    Recursively download all objects from an S3 bucket starting with a specific prefix.

    :param bucket_name: Name of the S3 bucket.
    :param prefix: Prefix to filter objects in the bucket.
    :param destination_folder: Local folder to save the downloaded files.
    """
    s3_client = boto3.client(
            's3',
            aws_access_key_id=AWS_ACCESS_KEY,
            aws_secret_access_key=AWS_SECRET_ACCESS_KEY,
            region_name=AWS_REGION
            )

    # Ensure the destination folder exists
    if not os.path.exists(destination_folder):
        os.makedirs(destination_folder)

    # Paginate through objects
    paginator = s3_client.get_paginator('list_objects_v2')
    pages = paginator.paginate(Bucket=AWS_BUCKET_ID, Prefix=prefix)

    for page in pages:
        if 'Contents' in page:
            for obj in page['Contents']:
                key = obj['Key']
                local_file_path = os.path.join(destination_folder, os.path.relpath(key, prefix))

                # Ensure the local directory structure exists
                local_directory = os.path.dirname(local_file_path)
                if not os.path.exists(local_directory):
                    os.makedirs(local_directory)

                # Download the object
                print(f"Downloading {key} to {local_file_path}")
                s3_client.download_file(AWS_BUCKET_ID, key, local_file_path)


# Download the evaluation results from the object store. Look at execution status under "outputArtifacts" key to see the 'url'
# which shows the data path of where your output results are stored
EXECUTION_ID = execution_id
sqlite_db_prefix = f'{EXECUTION_ID}/tmp/'  # change the prefix based on where your output artifact is stored in the bucket.
destination_folder = 'results-new'

download_all_objects(sqlite_db_prefix, destination_folder)
View Detailed Results (SQLite DB)
The evaluation stores detailed instance-level results in results.db.
Example: Reading SQLite tables:
# viewing the results from sqlite db in tabular format..
import sqlite3
import pandas as pd
from IPython.display import display, HTML

# Path to your SQLite database file
db_file = 'results-new/results.db'

connection = sqlite3.connect(db_file)

# Specify the table names you want to display
table_names = ['run','configuration', 'submission', 'submission_result', 'evaluation_result']

# Create the CSS and HTML container
html_content = """
<style>
/* Container to hold all tables */
.fixed-container {
    max-height: 600px;  /* Total container height */
    overflow-y: auto;   /* Vertical scroll for container */
    border: 2px solid #ddd;
    padding: 10px;
}

/* Table styling */
.table-container table {
    border-collapse: collapse; /* Merge table borders */
    width: 100%; /* Full width for tables */
    margin-bottom: 20px; /* Space between tables */
}

.table-container th, .table-container td {
    border: 1px solid #ddd; /* Add gridlines */
    text-align: left;       /* Align text to the left */
    padding: 8px;           /* Cell padding */
    white-space: nowrap;    /* Prevent text wrapping */
}

.table-container th {
    font-weight: bold;         /* Bold header text */
}

/* Allow dynamic column widths */
.table-container td {
    white-space: nowrap;   /* Prevent wrapping for long text */
}

</style>
<div class="fixed-container">
"""

for table_name in table_names:
    query = f"SELECT * FROM {table_name};"
    df = pd.read_sql_query(query, connection)
    # If you want to see all the rows across all tables, remove/comment the next line
    df = df.head(5)  # Limiting the number of rows displayed
    table_html = df.to_html(classes='table-container', index=False)
    html_content += f"""
    <div class="table-container">
        <h3>Table: {table_name}</h3>
        {table_html}
    </div>
    """

html_content += "</div>"

display(HTML(html_content))

# Close the connection
connection.close()
Process and Rank Results
This step generates a leaderboard ranking models by their Win Rate (percentage of pairwise victories), providing a robust, comparative measure of the best-performing model and prompt configuration.
import pandas as pd
import numpy as np
import sqlite3
import json
import os
from IPython.display import display, HTML

# ==========================================
# 1. CONFIGURATION (Separated Groups)
# ==========================================
METRIC_GROUPS = {
    "Categorical": {
        "type": "categorical",
        "description": "Weighted Average (1-5 scale)",
        "metrics": [
            "Pointwise Conciseness",
            "Pointwise Instruction Following",
            "Pointwise Correctness",
            "Pointwise Answer Relevance"
        ]
    },
    "Boolean": {
        "type": "categorical", # Uses same weighted avg logic (0 or 1)
        "description": "Pass Rate (0-1 scale)",
        "metrics": [
            "Exact Match",
            "Content Filter on Input",
            "Content Filter on Output",
            "Language Match",
            "JSON Schema Match"
        ]
    },
    "Numerical": {
        "type": "numerical",
        "description": "Mean Value",
        "metrics": [
            "BLEU",
            "ROUGE",
            "BERT Score",
            "test-metric"
        ]
    }
}

# ==========================================
# 2. DATA EXTRACTION
# ==========================================
def extract_db_metadata(db_path):
    if not os.path.exists(db_path): return pd.DataFrame()
    conn = sqlite3.connect(db_path)
    df_runs = pd.read_sql_query("SELECT id, name, tags, config FROM run", conn)
    conn.close()

    meta_data = []
    for _, row in df_runs.iterrows():
        run_id = str(row["id"])
        run_name = str(row["name"])
        tags = {}
        config = {}
        try: tags = json.loads(row["tags"]) if isinstance(row["tags"], str) else row["tags"]
        except: pass
        try: config = json.loads(row["config"]) if isinstance(row["config"], str) else row["config"]
        except: pass

        model = "Unknown"
        try: model = config["modules"]["prompt_templating"]["model"]["name"]
        except:
            if isinstance(tags, dict): model = tags.get("evaluation.ai.sap.com/model", "Unknown")
            elif isinstance(tags, list):
                for t in tags:
                    if t.get("key") == "evaluation.ai.sap.com/model": model = t.get("value")

        meta_data.append({"run_id": run_id, "run_name": run_name, "model": model})
    return pd.DataFrame(meta_data)

def extract_api_metrics(runs_data_resource):
    flat_data = []
    for run in runs_data_resource:
        model = "Unknown"
        for t in run.get("tags", []):
            if t.get("name") == "evaluation.ai.sap.com/model":
                model = t.get("value")
                break
        for m in run.get("metrics", []):
            clean_name = m.get("name", "").replace('"', '').strip()
            flat_data.append({
                "model": model,
                "metrics_name_clean": clean_name,
                "metric_value": m.get("value")
            })
    df = pd.DataFrame(flat_data)
    df['metric_value'] = pd.to_numeric(df['metric_value'], errors='coerce')
    return df

# ==========================================
# 3. SCORING & HELM LOGIC
# ==========================================
def calculate_weighted_avg_score(row, cols):
    """ Returns a score based on counts.
        Categorical: 1-5 scale.
        Boolean: 0-1 scale (Pass Rate).
    """
    total_score = 0
    total_count = 0
    # Check counts 0-5 (covers Boolean 0/1 and Categorical 1-5)
    for rating in range(0, 6):
        col_name = next((c for c in cols if f"/{rating}/count" in c), None)
        if col_name and not pd.isna(row[col_name]):
            count = row[col_name]
            total_score += count * rating
            total_count += count
    return total_score / total_count if total_count > 0 else 0.0

def get_metric_score_series(df_metrics, metric_name, group_type):
    """ Returns a Series of SCORES (Scalar) for each model for a specific metric """
    subset = df_metrics[df_metrics['metrics_name_clean'].str.startswith(metric_name)]
    if subset.empty: return None

    # Pivot to get columns for this metric
    pivot = subset.pivot_table(index='model', columns='metrics_name_clean', values='metric_value', aggfunc='first')
    cols = pivot.columns.tolist()

    if group_type == "categorical":
        # Calculate Weighted Average (or Pass Rate for Boolean)
        return pivot.apply(lambda row: calculate_weighted_avg_score(row, cols), axis=1)
    else:
        # Calculate Mean (Numerical)
        c_mean = next((c for c in cols if "mean" in c), None)
        if c_mean: return pivot[c_mean]
        return None

def calculate_group_win_rate(score_table):
    """
    Calculates HELM Win Rate: % of times a model beats another model across all metrics in this group.
    """
    models = score_table.index.tolist()
    metrics = score_table.columns.tolist()
    win_rates = {}

    for model_a in models:
        wins = 0
        comparisons = 0

        for model_b in models:
            if model_a == model_b: continue

            # Compare across ALL metrics in this table
            for metric in metrics:
                score_a = score_table.at[model_a, metric]
                score_b = score_table.at[model_b, metric]

                # Only compare valid scores
                if pd.isna(score_a) or pd.isna(score_b): continue

                comparisons += 1
                if score_a > score_b:
                    wins += 1

        win_rates[model_a] = wins / comparisons if comparisons > 0 else 0.0

    return pd.Series(win_rates)

# ==========================================
# 4. EXECUTION
# ==========================================
db_file = 'results-new/results.db'

# A. Metadata
df_db_meta = extract_db_metadata(db_file)
df_db_unique = df_db_meta.drop_duplicates(subset=['model'], keep='last')

# B. CSS
html_content = """
<style>
.fixed-container {
    max-height: 600px;
    overflow-y: auto;
    border: 2px solid #ddd;
    padding: 10px;
}
.table-container table {
    border-collapse: collapse;
    width: 100%;
    margin-bottom: 20px;
}
.table-container th, .table-container td {
    border: 1px solid #ddd;
    text-align: left;
    padding: 8px;
    white-space: nowrap;
}
.table-container th {
    font-weight: bold;
}
.table-container td {
    white-space: nowrap;
}
</style>
<div class="fixed-container">
"""
if 'runs_data' in locals() and runs_data:
    df_metrics_all = extract_api_metrics(runs_data['resources'])

    for group_name, config in METRIC_GROUPS.items():

        # 1. Build Score Table
        score_table = pd.DataFrame(index=df_db_unique['model'].unique())
        score_table.index.name = 'model'

        valid_metrics = []

        # 2. Calculate Scores
        for metric in config["metrics"]:
            scores = get_metric_score_series(df_metrics_all, metric, config["type"])
            if scores is not None:
                score_table[metric] = scores
                valid_metrics.append(metric)

        if not valid_metrics:
            continue

        # 3. Calculate HELM Win Rate (Specific to this group)
        score_table['Win Rate'] = calculate_group_win_rate(score_table[valid_metrics])

        # 4. Calculate Final Rank
        score_table['Final Rank'] = score_table['Win Rate'].rank(ascending=False, method='min')

        # 5. Merge & Format
        df_final = pd.merge(df_db_unique, score_table, on='model', how='inner')
        df_final = df_final.sort_values('Final Rank')

        # Rounding
        for c in valid_metrics: df_final[c] = df_final[c].fillna(0.0).astype(float).round(4)
        df_final['Win Rate'] = df_final['Win Rate'].fillna(0.0).astype(float).round(4)
        df_final['Final Rank'] = df_final['Final Rank'].fillna(0).astype(int)

        # Columns
        meta_cols = ['run_id', 'run_name', 'model']
        final_cols = meta_cols + ['Win Rate', 'Final Rank'] + valid_metrics

        # 6. Generate HTML
        table_html = df_final[final_cols].to_html(classes='table-container', index=False)

        html_content += f"""
        <div class="table-container">
            <h3>{group_name} Comparison</h3>
            <p><i>Values: {config['description']}. Win Rate based on head-to-head performance.</i></p>
            {table_html}
        </div>
        """

    html_content += "</div>"
    display(HTML(html_content))

else:
    print("'runs_data' missing.")
Retrieve Aggregate Metrics by execution_id
Send a GET request:
GET
{{apiurl}}/v2/lm/metrics?tagFilters=evaluation.ai.sap.com/child-of={{execution_id}}Retrieve Aggregate Metrics Using Run Name
Send a GET request:
GET
{{apiurl}}/v2/lm/metrics?tagFilters=evaluation.ai.sap.com/run-name={{run_name}}This returns aggregated values for:
- latency
-
token usage
-
metric scores
-
completion count
Download Raw Results
Open the execution details
Copy the output artifact URL
Download the folder to obtain
step-wise results
sqlite_combined/results.db
Inspect Detailed Results
Open the SQLite DB in any client to inspect:
- submissions
-
completion responses
-
evaluation_results (raw metric scores)
-
aggregation_results
-
custom_logs


Over time, your workspace may accumulate old configurations, executions, and metrics. SAP AI Core allows you to safely delete these resources once they are no longer needed.
This section explains how to delete:
- Evaluation Executions

- Evaluation Configurations
⚠️ Important:
Deletions are permanent and cannot be undone.
Delete Executions
Go to ML Operations → Executions
Select the execution
Click Delete
Confirm the deletion
Delete Evaluation Configurations
Go to ML Operations → Configurations
Select the configuration you created
Click Delete
1. Delete an Evaluation Execution
#Delete Execution Id
def delete_execution():
    headers = _get_headers()
    EXEC_ID = execution_id
    GET_EXECUTIONS_ENDPOINT = '/v2/lm/executions/'
    request_url = f"{AICORE_BASE_URL}{GET_EXECUTIONS_ENDPOINT}{EXEC_ID}"
    try:
        response = requests.delete(
                request_url, headers=headers, params={"AI-Resource-Group":AICORE_RESOURCE_GROUP}, timeout=120
            )
        print(response)
        if(response.status_code != 202):
            raise
        result = response.json()
        print(result)
    except:
        logging.error("Error occurred while attempting to delete a Configuration")
        raise

delete_execution()
2. Delete an Evaluation Configuration
def delete_configuration(configuration_id):
    headers = _get_headers()
    endpoint = f"/v2/lm/configurations/{configuration_id}"
    url = f"{AICORE_BASE_URL}{endpoint}"

    response = requests.delete(url, headers=headers)
    print("Status:", response.status_code)
    print(response.text)

# Example:
delete_configuration(configuration_id)
1. Delete Execution
DELETE Request
{{apiurl}}/v2/lm/executions/{{execution_id}}Headers:
Authorization: Bearer {{access_token}}
AI-Resource-Group: {{resource_group}}
2. Delete Configuration
DELETE {{apiurl}}/v2/lm/configurations/{{configuration_id}}Resources
Discussion
Share feedback on this tutorial or join the conversation in SAP Community.