
Overview
You will learn
- How to create an OData Service to expose user-related information using the ABAP Developer Tool in Eclipse.
- How to add the OData Service to your SAPUI5 project in Business Application Studio.
- How to adjust your SAPUI5 project so that the user-related data is displayed when accessing the application.


Prerequisites
Prerequisites
- You have successfully completed the tutorial Implement Custom Shell Plug-in in the SAP BTP ABAP Environment
This tutorial was written for SAP BTP ABAP Environment. However, you should be able to use it in SAP S/4HANA Cloud Environment in the same way.
Throughout this tutorial, you will create various development objects and UI components. Wherever the suffix
###or000is used, please replace it with your initials or group number.
Steps
In this tutorial you will continue working on the shell plug-in you created in the pervious tutorial in this series. You will learn how to enrich it using OData Services to expose user-related information. To do this, you will first need to create a Data Definition to expose the User ID of the current user and the corresponding Business Role information.
Access ABAP Developer Tool in Eclipse, connect to your SAP BTP ABAP Environment, and open the package you created as part of the previous tutorial.
Right click on the package and select New > Other ABAP Repository Object:

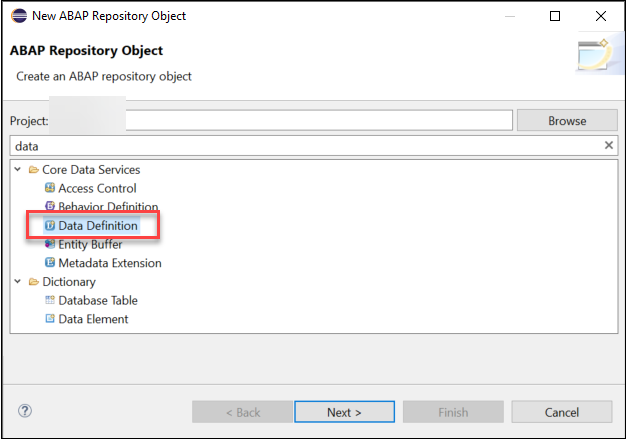
Create data definition In the search bar, search for Data Definition and click on it.
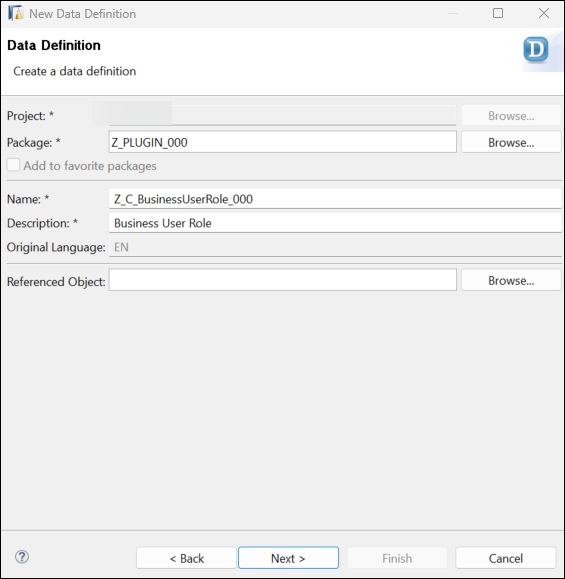
Create data definition - create Enter a Name and a Description. Click on Next.
Create data definition - create 2 Click on Next, then on Finish.
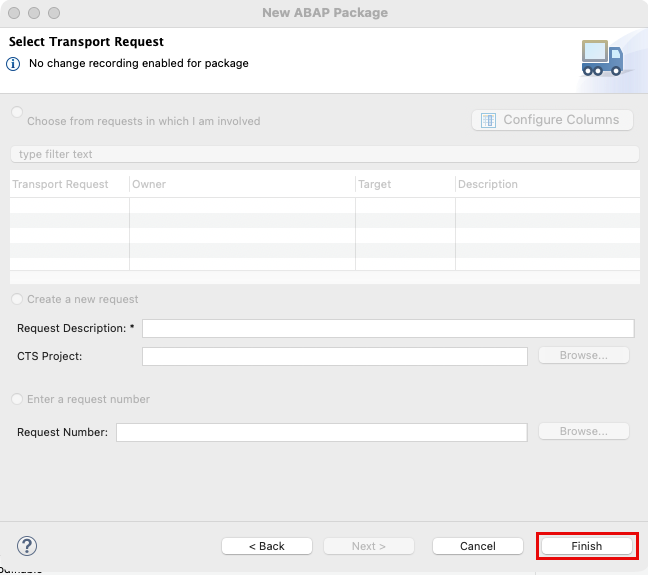
Create data definition - no tr needed The Data Definition is initialized with a pre-filled code based on your chosen template. Adjust it as follows:
ABAP@AccessControl.authorizationCheck: #NOT_REQUIRED @EndUserText.label: 'Business User Role' define root view entity Z_C_BusinessUserRole_### as select from I_IAMBusinessUserBusinessRole as _BusinessUserRole association [0..*] to I_IAMBusinessRoleText as _BusinessRoleText on $projection.BusinessRoleUUID = _BusinessRoleText.BusinessRoleUUID { key abap.char'Me' as ID, key _BusinessUserRole.BusinessRoleUUID as BusinessRoleUUID, _BusinessUserRole.BusinessRole as BusinessRole, _BusinessRoleText.Name as Name, /* Associations */ _BusinessRoleText } where _BusinessUserRole.UserID = $session.userSave your Data Definition and activate it using the Activate icon.

Activate
Now you need to create a second Data Definition, which will take the User ID exposed by the Data Definition you created in the previous step, and will expose the data related to that User ID, such as name and email address.
As in the previous step, right click on the package and select New > Other ABAP Repository Object. In the search bar, search for Data Definition and click on it. Enter a Name and a Description.

Create data definition - Business User Click on Finish, then on Finish.
The Data Definition is initialized with a pre-filled code based on your chosen template. Adjust it as follows:
ABAP@AccessControl.authorizationCheck: #NOT_REQUIRED @EndUserText.label: 'Business User' define root view entity Z_C_BusinessUser_### as select from I_BusinessUserBasic association [0..*] to Z_C_BusinessUserRole_### as _BusinessUserRole on $projection.ID = _BusinessUserRole.ID { key abap.char'Me' as ID, BusinessPartner, BusinessPartnerUUID, PersonFullName, UserID, _WorkplaceAddress.PhoneNumber, _WorkplaceAddress.DefaultEmailAddress, _WorkplaceAddress.Building, _WorkplaceAddress.RoomNumber, /* Associations */ _BusinessUserRole } where UserID = $session.userSave your Data Definition and activate it using the Activate icon.
Activate -2
In order to expose the data from the two previous Data Definitions you need to create a Service Definition.
Right click on the package and select New > Other ABAP Repository Object. In the search bar, search for Service Definition and click on it. Enter a Name and a Description. Click on Next, then on Finish.
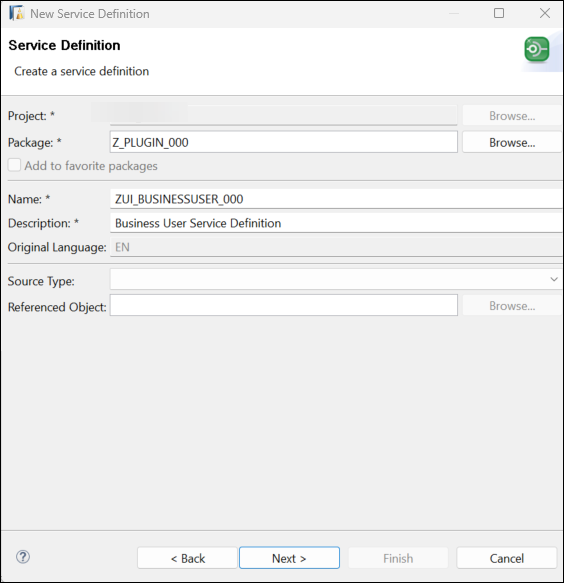
Create service definition Add your Projection Views to your Service Definition as follows:
ABAP@EndUserText.label: 'Business User Service Definition' define service ZUI_BUSINESSUSER_### { expose Z_C_BusinessUser_### as BusinessUser; expose Z_C_BusinessUserRole_### as BusinessUserRole; }Save your Service Definition and activate it using the Activate icon.
Activate - 2
Your Service Definition will be consumed by your SAP Fiori Application via the use of a Service Binding.
In your project explorer, right click on your Service Definition and select New Service Binding.
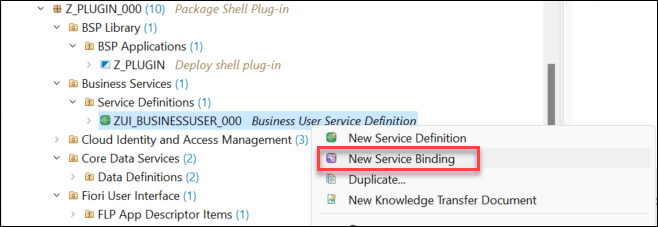
Create service binding Enter a Name and a Description. In the Binding Type dropdown menu, select the option OData V4 - UI.

Create service binding - name and description It is good practice to include the type of Service Binding in the Service Binding name, e.g.: adding the suffix
V_O4to the name of Service Bindings of type OData Service V4.Click on Next, then on Finish.
Save your Service Binding and activate it using the Activate icon.
Activate - 3 In the newly created Service Binding, click on the Publish button.

Create service binding - publish Publishing a Service Binding can take up to a few minutes. Once the Service Binding is successfully published, the Local Service Endpoint parameter will change to Published.
You can now preview your Service Binding: click on the Service URL link.

Create service binding - preview A new window will open up in your browser. In the URL of the browser window, Replace the last part
?sap-client=100withBusinessUser('Me')and press Enter. Your personal user information will be displayed.
Create service binding - URL
Now that you have created an OData Service which exposes user-related information, you need to add it to your SAPUI5 project in Business Application Studio, to enhance your shell plug-in.
In Business Application Studio, open the folder of your project and navigate to the
webappfolder. Right click on themanifest.jsonfile and select Open Service Manager.
Open Service manager This will open an overview of the services used in your project. If there are any previous services, click on the bin icon to delete them.

Service overview To add a new OData Service, click on Add Service.

Add new service Select the Destination option. In the Destination dropdown menu, select the destination pointing to your SAP BTP ABAP Environment. In the Provide Service section, select Fetch and from the Select a service dropdown menu, select your Service Binding. Click on Add.
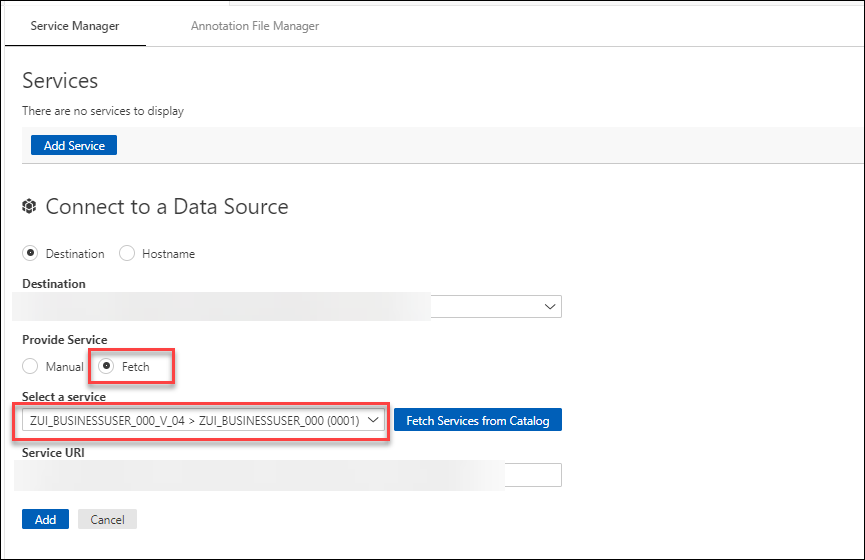
Add new service - parameters
In ADT, navigate to your Service Binding. On the right side you will find the Service URL.
Optional: in the
manifest.jsonfile you can see that the OData Service has been added automatically under"dataSources"and"models"configurations.
Add new service - manifest.json Optional: in the
ui5.yamlfile on project top level you can see that the system connection has been added automatically asbackendconfiguration.
Add new service - ui5.yaml Open the
manifest.jsonfile. In the configurationsap.ui5>dependencies>libs, remove the following parameters:"sap.f": {},"sap.suite.ui.generic.template": {},"sap.ui.comp": {},"sap.ui.generic.app": {}and"sap.ui.table": {}. Add the parameter"sap.ui.layout": {}after"sap.ushell": {}. The configuration should look like this: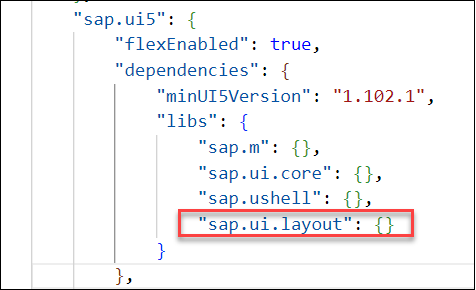
Modify manifest.json file In your workspace, go to your project folder and make a right click. Select Open in Integrated Terminal. This will open a new terminal window. Input the command
npx @sap-ux/create add mockserver-configand press enter.
Create mockserver A new dependency will be added in the
package.jsonfile, in the configuration"main">"devDependencies":
Modify package.json file - 2
Your SAPUI5 Application can now consume user-related information via the OData Service you created. You now need to specify how you want this information to be consumed and displayed in your application. You will first modify the i18n.properties file, which defines which text is displayed for each of your user-related data. You will then create a View of type Fragment in your project, to define the layout with which the user-related information will be displayed. And finally, you will add this Fragment View to the content of your application.
In the
webapp>i18nfolder, open thei18n.propertiesfile. Substitute the file content with the following code:HTML#Texts for manifest.json #XTIT: Application name appTitle=Shell Plug-in #YDES: Application description appDescription=Shell Plug-in #XTIT: Main view title title=Shell Plug-in flpTitle=Shell Plug-in flpSubtitle= #Title and Subtitle of the Plug-in titleTab=Personalized shell plug-in subtitleTab=Plug-in example #Fragment Labels labelUserID=System User ID tooltipUserID=Steampunk System User ID labelMail=E-Mail Address tooltipMail=User-Specific E-Mail Address labelPhone=Phone Number tooltipPhone=User-Specific Phone Number labelLocation=Location tooltipLocation=User-Specific Location titleTable=Assigned Business Roles noContentTable=No Assigned Business Roles labelBusinessRole=Business Role labelBusinessRoleName=NameVia the OData Service you created in a previous step, you can consume Business User details associated with the current Business User. You now need to define how these data will be displayed. To do this, you need to create a form, and specify its layout and contents. In your project, go to the empty folder
webapp>view. Right click on the folder and select New File.
Create new view file Input a Name e.g.
BusinessUserFragmentfor your new View file, and make sure it ends with.fragment.xmlto create a View of type Fragment . Click on OK.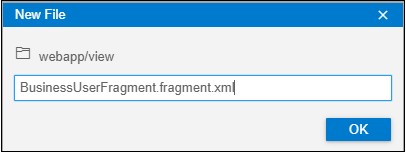
Create new view file - name Open the newly created Fragment View file, and input the following code:
XML<core:FragmentDefinition xmlns="sap.m" xmlns:core="sap.ui.core" xmlns:form="sap.ui.layout.form" xmlns:layout="sap.ui.layout" xmlns:grid="sap.ui.layout.cssgrid" id="businessUserFragment"> <Page id="PersonInfoPage" title="{PersonFullName}" binding="{path:'/BusinessUser(%27Me%27)'}"> <content> <VBox id="_IDGenVBox1" class="sapUiSmallMargin"> <form:Form editable="false" id="form0"> <form:layout> <form:ResponsiveGridLayout id="_IDGenResponsiveGridLayout1" labelSpanXL="5" labelSpanL="5" labelSpanM="5" labelSpanS="5" adjustLabelSpan="false" emptySpanXL="0" emptySpanL="0" emptySpanM="0" emptySpanS="0" columnsXL="5" columnsL="5" columnsM="5" singleContainerFullSize="false"/> </form:layout> <form:formContainers> <form:FormContainer title="" id="PersonInfoContainer"> <form:formElements><form:FormElement label="{i18n>labelUserID}" id="LabelUserID" tooltip="{i18n>tooltipUserID}"> <form:fields><Text id="UserID" text="{UserID}" wrappingType="Normal" textAlign="Begin" tooltip="{i18n>tooltipUserID}"/> </form:fields> </form:FormElement> <form:FormElement label="{i18n>labelMail}" id="LabelEMail"> <form:fields> <Text id="EMail" text="{DefaultEmailAddress}" wrappingType="Normal" textAlign="Begin" tooltip="{i18n>tooltipMail}"/> </form:fields> </form:FormElement> <form:FormElement label="{i18n>labelPhone}" id="LabelPhone"> <form:fields> <Text id="Phone" text="{PhoneNumber}" wrappingType="Normal" textAlign="Begin" tooltip="{i18n>tooltipPhone}"/> </form:fields> </form:FormElement> <form:FormElement label="{i18n>labelLocation}" id="LabelLocation"> <form:fields> <Text id="Location" text="{Building} / {RoomNumber}" wrappingType="Normal" textAlign="Begin" tooltip="{i18n>tooltipLocation}"/> </form:fields> </form:FormElement> </form:formElements> </form:FormContainer> </form:formContainers> </form:Form> </VBox> <Title id="TableTitleID" text="{i18n>titleTable}" textAlign="Center" titleStyle="H4"/> <Table noDataText="{i18n>noContentTable}" id="TableBusinessRoles" items="{path:'_BusinessUserRole'}"> <items> <ColumnListItem type="Active" id="ColumnItem"> <cells> <Text text="{BusinessRole}" id="BusinessRole"/> <Text text="{Name}" id="BusinessRoleName"/> </cells> </ColumnListItem> </items> <columns> <Column id="ColumnBusinessRole"> <header> <Label text="{i18n>labelBusinessRole}" id="LabelBusinessRole"/> </header> </Column> <Column id="ColumnBusinessRoleName"> <header> <Label text="{i18n>labelBusinessRoleName}" id="LabelBusinessRoleName"/> </header> </Column> </columns> </Table> </content> </Page> </core:FragmentDefinition>Your Fragment View defines how you want the data to be displayed. You now need to load the Fragment View into the content of your SAPUI5 Application, so that the form containing the user-related information will actually be displayed in your application. In the
webappfolder, open theComponent.jsfile. Replace the content of the file with the following code:JavaScriptsap.ui.define([ "sap/ui/core/UIComponent", "sap/ui/model/resource/ResourceModel", "sap/ui/core/Fragment" ], function (UIComponent, ResourceModel, Fragment) { "use strict"; return UIComponent.extend("zplugin###.Component", { metadata: { manifest: "json" }, /** * The component is initialized by UI5 automatically during the startup of the app and calls the init method once. * @public * @override */ init: function () { // call the base component's init function UIComponent.prototype.init.apply(this, arguments); var businessUserModel = this.getModel(); var vtitleTab = new ResourceModel({ bundleName: "zplugin###.i18n.i18n" }).getResourceBundle().getText("titleTab"); var vsubtitleTab = new ResourceModel({ bundleName: "zplugin###.i18n.i18n" }).getResourceBundle().getText("subtitleTab"); var oRenderer = sap.ushell.Container.getRenderer(); var oEntry = { title: vtitleTab, icon: "sap-icon://role", value: function () { return jQuery.Deferred().resolve(vsubtitleTab); }, content: function () { if (!this.oFragment) { this.oFragment = Fragment.load({ type: "XML", id: "BusinessUserFragment", name: "zplugin###.view.BusinessUserFragment" }).then(function (fragment) { var i18nModel = new ResourceModel({ bundleName: "zplugin###.i18n.i18n" }); fragment.setModel(i18nModel, "i18n"); fragment.setModel(businessUserModel); return fragment; }); } return this.oFragment; }, onSave: function () { return jQuery.Deferred().resolve(); } }; var i18nModel = new ResourceModel({ bundleName: "zplugin###.i18n.i18n" }); oRenderer.setModel(i18nModel, "i18n"); oRenderer.addUserPreferencesEntry(oEntry); } }); } );If you have chosen different names for your project and for your Fragment View in the previous steps, you will need to adjust the code above: replace any instance of
###with your initials or group number, and replaceBusinessUserFragmentwith the name of your View.
Your enhanced SAPUI5 Application can be previewed before it is deployed. Using the preview functionality is good practice before deploying an application, to make sure that the UI looks as intended and the application’s functionalities work as desired.
In Business Application Studio, In the Storyboard tab right click on your UI Application and click on Open Application Info.
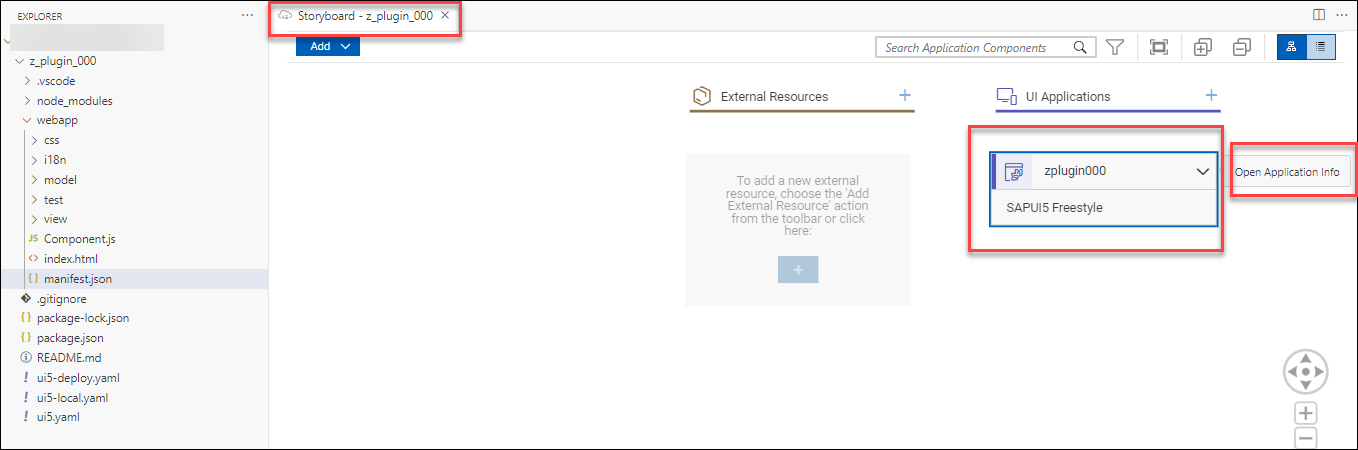
Preview application The Storyboard tab can always be open from the Search bar by typing the command
> Open Storyboard.In the Application Info view, select the Preview Application tile.

Preview application 2 Select start fiori-run. This will prompt a new terminal window which will run the start fiori-run command. This can take up to a few seconds. Once it is done, a preview of your application will open up in a new browser window.

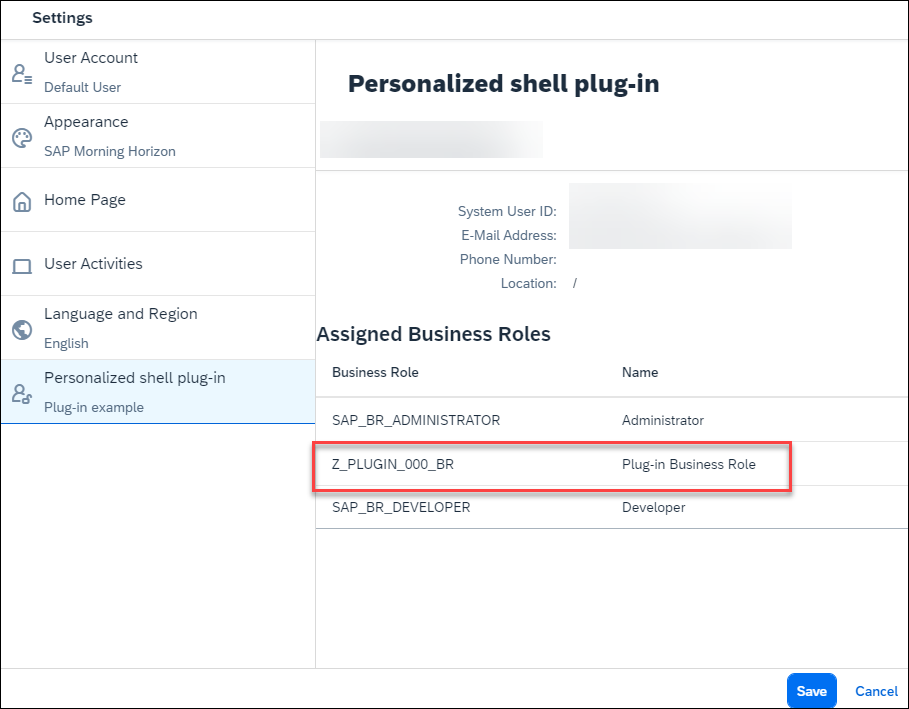
Preview application - start fiori run In the preview of your application, click on the user icon in the top-right corner and open the Settings. Your shell plug-in is listed in the user’s settings dialog. User-related information is displayed according to the layout you defined using the Fragment View.

Application preview - settings 
Application preview - shell plug-in
You can now re-deploy your SAPUI5 Application with an enhanced shell plug-in to your SAP BTP ABAP Environment.
In Business Application Studio, in the Application Info view, click on the Deploy tile:

Deploy application
In case the Deploy tile is not visible in the Application Info, right-click the ui5-deploy.yaml file, select Open in Integrated Terminal, and execute the command npm run deploy.
- The deployment process will begin. You will be prompted to confirm the deployment by typing
Y. Once the SAPUI5 Application is successfully deployed to your SAP BTP ABAP Environment, the terminal will return the status:Deployment Successful.
The deployment process can take up to a few minutes.
After a successful deployment, your shell plug-in will be updated in the system. Login to your SAP BTP ABAP Environment with a Business User with the necessary Business Role (see previous tutorial in this series). Open your application by clicking on the application tile. The plug-in can be accessed via the user settings dialog. The plug-in returns data related to your Business User and a list of Business Roles that are assigned to your Business User.
Resources
Discussion
Share feedback on this tutorial or join the conversation in SAP Community.