
Overview
You will learn
- How to add value help using a filter
- How to add textual information using associations
- How to concatenate two elements, using a built-in function for CDS
- How to convert currencies using a built-in function for CDS
- How to create an object page
- How to create a parent-child hierarchy in your business object
- How to add a CASE statement


Prerequisites
Prerequisites
Steps
Intro
You can then use some of these features in productive development to make your applications more powerful and more user-friendly. By the end of this tutorial, your application should include a list page and an object page, which should look like this:
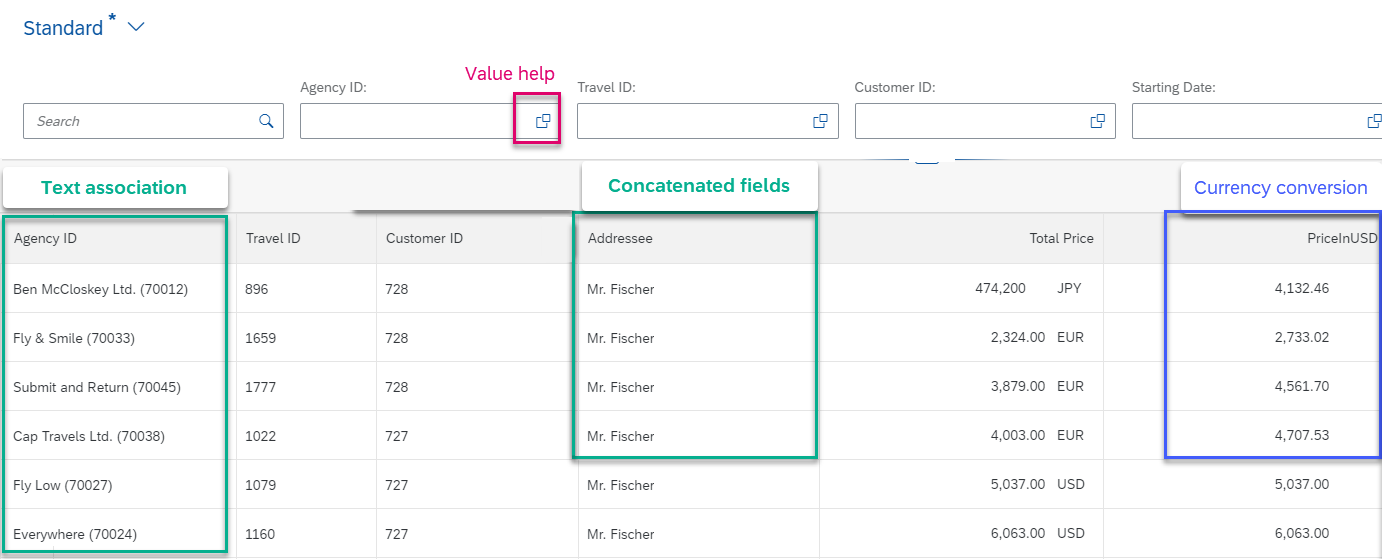
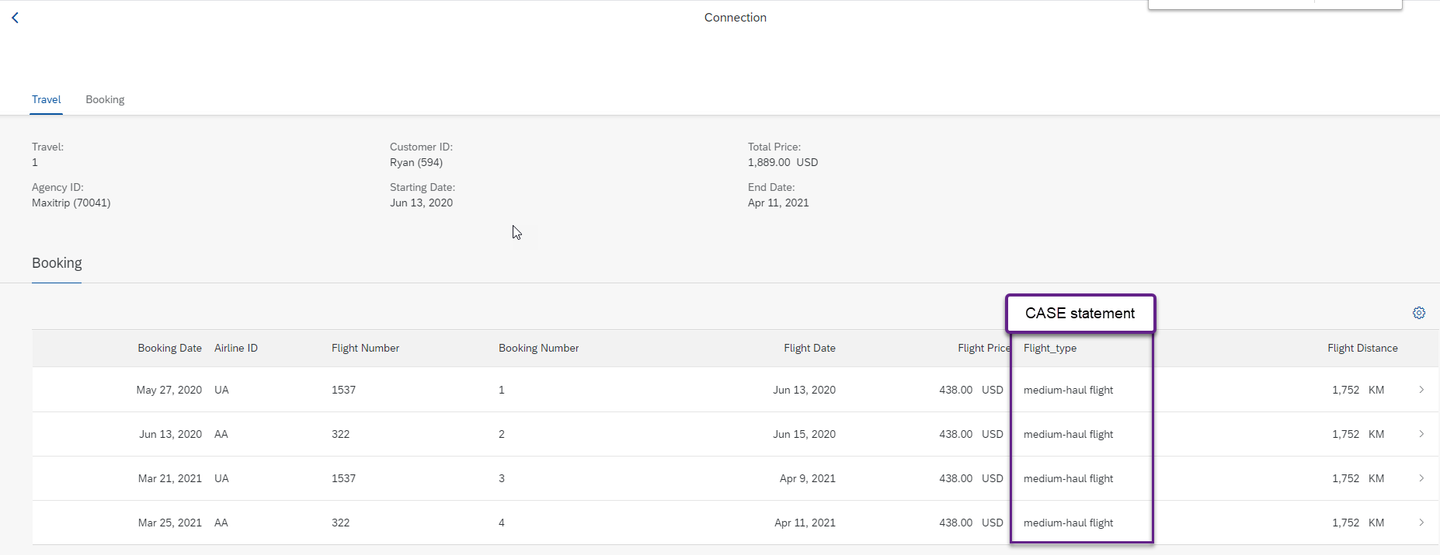
You can see the code at the end of this tutorial. Throughout the tutorial, objects name include a suffix, such as 000. Always replace this with your group number or initials.
To make the input fields more useful, you will now add input value help to the field AgencyID.
Specify the source of the value help. This works a bit like a join: You need to point to an entity, and field common to both the value help entity and your CDS entity. In this case, you will point to
AgencyIDin the CDS entity/DMO/I_Agency. Add the following annotation to your fieldAgencyID.CDS@Consumption.valueHelpDefinition: [{ entity: {name: '/DMO/I_Agency', element: 'AgencyID'} }]You also need to expose this second entity in the OData service. To do this, add the entity
/DMO/I_Agencyto your service definition, so the complete definition looks like this:CDS@EndUserText.label: 'Service exposes Travel Data 000' define service Z_EXPOSE_TRAVEL_R_000 { expose Z_I_TRAVEL_R_000 as Travel; expose /DMO/I_Agency as Agency; }Format, save, and activate both CDS entity and service definition (
Shift+F1, Ctrl+S, Ctrl+3).Refresh your Fiori Elements preview and choose value help for the input field
AgencyID.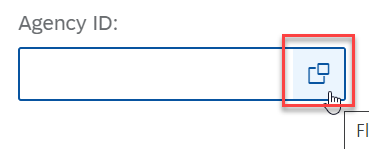
step13a-choose-value-help Now the value help appears. Enter the country key DE and choose Go. Only German agencies appear on the list.
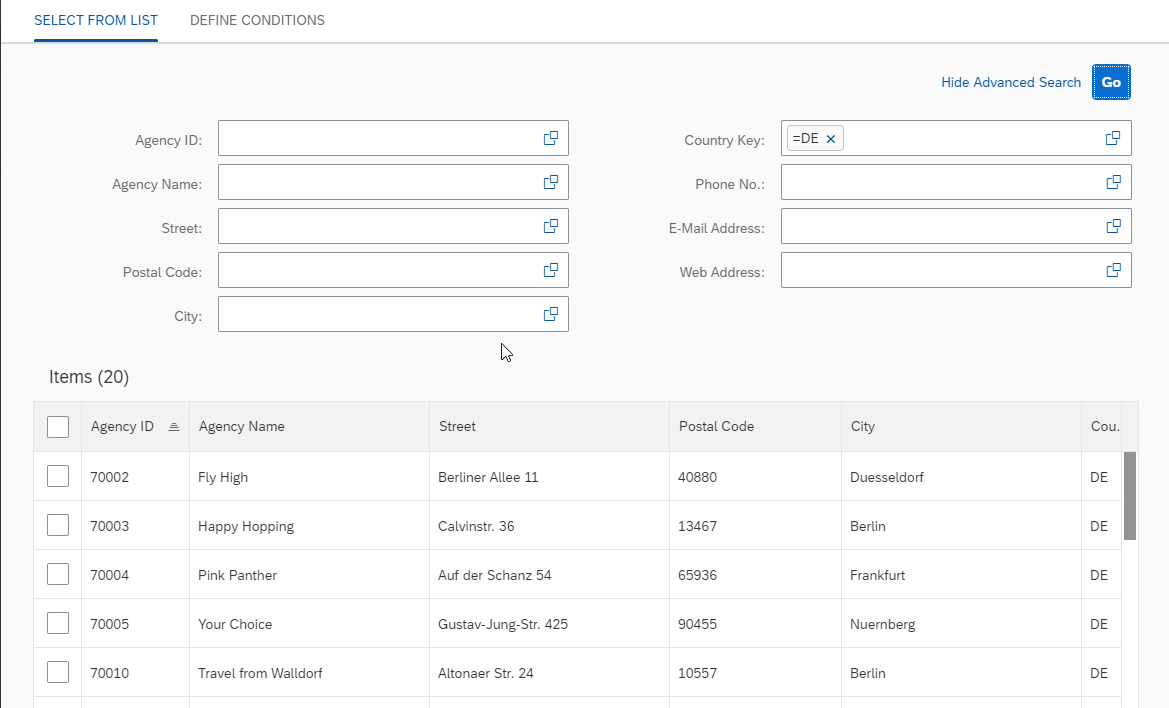
step13b-german-agencies Repeat this step for
CustomerID:CDS@Consumption.valueHelpDefinition: [{entity: {name: '/DMO/I_Customer', element: 'CustomerID' }}]Also, expose this entity in the service definition:
CDSexpose /DMO/I_Customer as Customer;
Next, you will make the Agency field more readable by adding the agency name to the ID, using a text association. CDS associations are simply specifications of joins, always in the same place in the syntax. The main advantage of an association is reuse: Once you have specified an association once, you can conveniently string several associations together in a path. In this case, however, you will use a simple association.
For more information, see:
- ABAP Keyword Documentation: CDS - Associations
Add the following statement to your CDS entity,
Z_I_TRAVEL_R_000, just before the list of fields. The first statement creates an association from the source CDS entityZ_I_TRAVEL_R_000to the target CDS entity/DMO/I_Agency, joined on the fieldAgencyID. The source entity is represented by the alias$projection, because you cannot use the original name in a path statement. The target entity is represented by its alias name_Agency.CDSassociation [1..1] to /DMO/I_Agency as _Agency on $projection.AgencyID = _Agency.AgencyID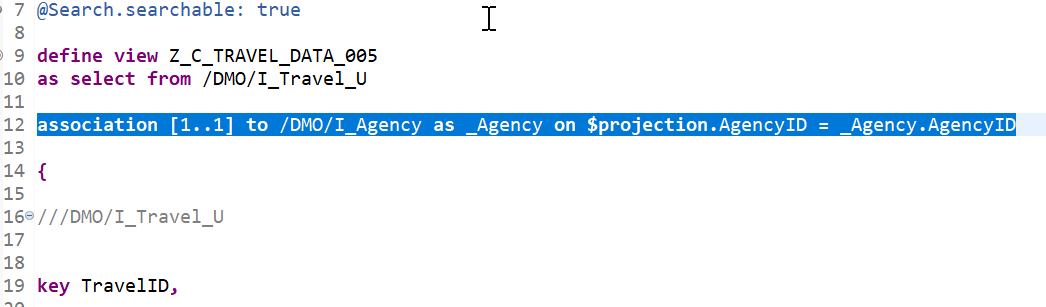
step14a-add-association Now add the following annotation to the field
AgencyID:CDS@ObjectModel.text.association: '_Agency'Check that the association has been added to the field list. (This should have been done automatically when you inserted the signature of
/DMO/I_TRAVEL_U.)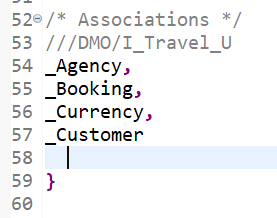
step14b-association-added Format, save, and activate (
Shift+F1, Ctrl+S, Ctrl+F3).Make sure that the entity
/DMO/I_Agencyhas been added to your service definition. (You should have done this in step 1.)
step2a-sd-added Refresh your Fiori Elements preview. The agency name should now be shown, with the ID number in parentheses.
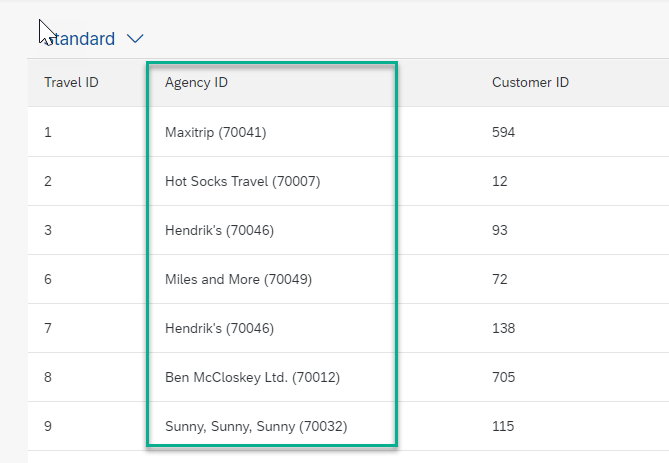
step14c-fep-agency-by-name Repeat for the field
CustomerID:CDSassociation [1..1] to /DMO/I_Customer as _Customer on $projection.CustomerID = _Customer.CustomerIDCDS@ObjectModel.text.association: '_Customer'Also make sure this association are added to the list of fields:
CDS//Associations _Customer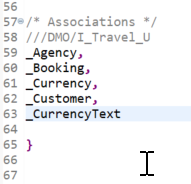
step2b-associations-added
ABAP has many built-in SQL functions for both numeric and string fields.
For more information on these functions, see : ABAP Keyword Documentation: SQL Functions.
You will use a simple one to easily merge two fields. The two fields are provided by the association _Customer.
Add an association.
CDSassociation [1..1] to /DMO/I_Customer as _Customer on $projection.CustomerID = _Customer.CustomerIDAfter
CustomerID, add a comma, then add the functionconcat_with_spaceusing auto-complete (Ctrl+Space); then add the aliasas Addressee.CDSconcat_with_space(_Customer.Title, _Customer.LastName, 1) as Addressee,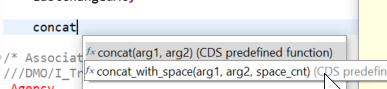
step15a-concat Also make sure this association is added to the list of fields:
CDS//Associations _CustomerFormat, save, and activate these objects using
Shift+F1, Ctrl+S, Ctrl+F3.Check the result in the data preview, by clicking in the editor and choosing Open With > Data Preview from the context menu. The result should look like this.
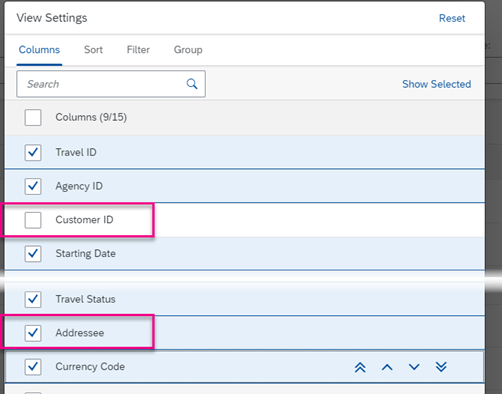
step3-settings-addressee 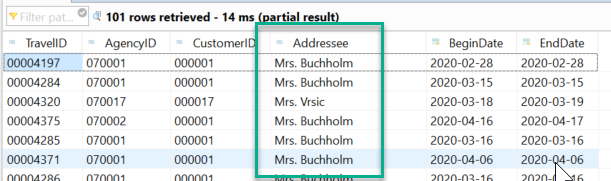
step15b-concat-result Now you have the addressee, you may want to comment out the text association for
CustomerID.
It would be nice to find out how much money each Agency has received in total. To do this, you first need to convert all the sums paid to one currency. To do this, you will again use a built-in function. For more information, see the ABAP Keyword Documentation: ABAP CDS - Conversion Functions for Units and Currencies
Convert the price (
TotalPrice) of each line item to US Dollars. Again, you do this using a built-in conversion function. You simply have to define the variables you are using for amount, source currency, etc, and the built-in function does the rest.You need to cast the character value
'USD'to the correct type and length,abap.cuky( 5 ).You may get a warning: “Reference information missing…”. Ignore this for now.
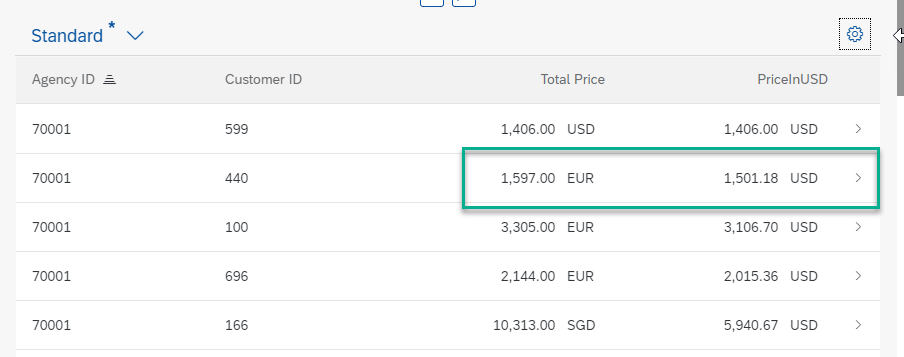
CDS@Semantics.amount.currencyCode: 'CurrencyCode' currency_conversion( amount => TotalPrice, source_currency => CurrencyCode, round => 'X', target_currency => cast('USD' as abap.cuky( 5 )), exchange_rate_date => cast('20200429' as abap.dats), error_handling => 'SET_TO_NULL' ) as PriceInUSD,Format, save, and activate (
Shift+F1, Ctrl+S, Ctrl+3)If you check the result in the data preview, it should look like this.
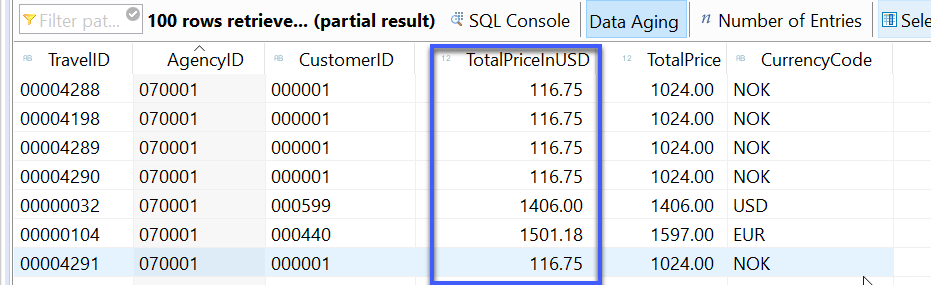
step16a-currency-conversion Now you will remove the warning. If you select the warning, then choose Problem Description from the context menu, you will see that you need to add an annotation,
•Semantics.amount.currencyCode. However, this will simply add the original currency code (e.g.NOK) to thePriceInUSDcolumn. Also, you can only add an element name to the annotation, not a literal such as'NOK'. So you need to:- Create a column,
TargetCurrency - Give it the value of the literal
- Cast the string literal to a currency type,
abap.cuky - Add the semantic annotation to
PriceInUSD
Your code should now look like this:
CDS//Conversion to USD @Semantics.currencyCode: true cast( 'USD' as abap.cuky ) as TargetCurrency,- Create a column,
Optional: Test in the Fiori Elements preview. Your app should look like this:
step16b-convert-to-dollars
The code for your CDS entity should look like this:
@AbapCatalog.viewEnhancementCategory: [#NONE]
@AccessControl.authorizationCheck: #NOT_REQUIRED
@EndUserText.label: 'Travel Model View Entity - Read Only'
@Metadata.ignorePropagatedAnnotations: true
@Metadata.allowExtensions: true
@Search.searchable: true
@ObjectModel.usageType:{
serviceQuality: #X,
sizeCategory: #S,
dataClass: #MIXED
}
define view entity Z_I_TRAVEL_R_ENHANCED as select from /DMO/I_Travel_U
association [1..1] to /DMO/I_Agency as _Agency on $projection.AgencyID = _Agency.AgencyID
association [1..1] to /DMO/I_Customer as _Customer on $projection.CustomerID = _Customer.CustomerID
{
///DMO/I_Travel_U
key TravelID,
@Consumption.valueHelpDefinition: [{entity: {name: '/DMO/I_Agency', element: 'AgencyID'}}]
@ObjectModel.text.association: '_Agency'
AgencyID,
@Consumption.valueHelpDefinition: [{entity: {name: '/DMO/I_Customer', element: 'CustomerID' }}]
@ObjectModel.text.association: '_Customer'
CustomerID,
concat_with_space(_Customer.Title, _Customer.LastName, 1) as Addressee,
BeginDate,
EndDate,
@Semantics.amount.currencyCode: 'CurrencyCode'
BookingFee,
@Semantics.amount.currencyCode: 'CurrencyCode'
TotalPrice,
//Currency Conversion
@Semantics.amount.currencyCode: 'CurrencyCode'
currency_conversion(
amount => TotalPrice,
source_currency => CurrencyCode,
round => 'X',
target_currency => cast('USD' as abap.cuky( 5 )),
exchange_rate_date => cast('20200429' as abap.dats),
error_handling => 'SET_TO_NULL' )
as PriceInUSD,
CurrencyCode,
@Search.defaultSearchElement: true
@Search.fuzzinessThreshold: 0.90
Memo,
Status,
LastChangedAt,
/* Associations */
//DMO/I_Travel_U
_Agency,
_Booking,
_Currency,
_Customer,
_TravelStatus
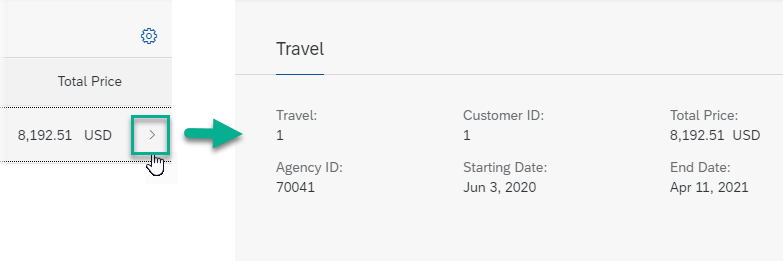
}At the moment, your application is a simple list. It would be nice to click on a row, i.e. a travel, and get more details in a separate page, known as an object page. Later you can add details from other CDS entities using associations. For more information on object pages, see SAP Help Portal: Defining UI Annotations
First add the page itself. Add the following annotation to your metadata extension, just after the opening curly bracket:
CDS@UI.facet: [ { id: 'Travel', purpose: #STANDARD, type: #IDENTIFICATION_REFERENCE, label: 'Travel', position: 10 } ]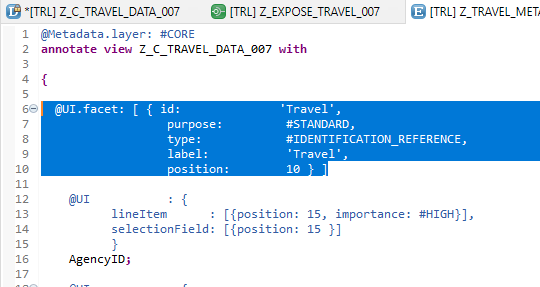
step6a-add-ui-facet You then specify which elements you want to include in the object page. Since the facet type is
#IDENTIFICATION_REFERENCE, you use the identification annotation, so that the complete annotation plus element now looks like this:CDS@UI: { lineItem: [ { position: 20, label: 'Agency', importance: #HIGH } ], identification:[ { position: 10, label: 'Travel' } ], selectionField: [{position: 20 }] } TravelID;Add a similar annotation for each of the other elements; see step 7.5 below for complete code:
Finally, add a header to your object page, just after the layer annotation (before the
annotate view...statement):CDS@UI: { headerInfo: { typeName: 'Travel', typeNamePlural: 'Travels', title: { type: #STANDARD, label: 'Travel', value: 'TravelID' } } }Your complete code should look like this:
CDS@Metadata.layer: #CORE @UI: { headerInfo: { typeName: 'Travel', typeNamePlural: 'Travels', title: { type: #STANDARD, label: 'Travel', value: 'TravelID' } } } annotate view Z_I_TRAVEL_R_000 with { @UI.facet: [ { id: 'Travel', purpose: #STANDARD, type: #IDENTIFICATION_REFERENCE, label: 'Travel', position: 10 } ] @UI : { lineItem : [{position: 15, label: 'Agency', importance: #HIGH}], identification: [{position: 15 }], selectionField: [{position: 15 }] } AgencyID; @UI : { lineItem : [{position: 20, importance: #HIGH}], identification: [{position: 20 }], selectionField: [{position: 20 }] } CustomerID; @UI : { lineItem : [{position: 10, importance: #HIGH}], identification: [{position: 10, label: 'Travel' }], selectionField: [{position: 10 }] } TravelID; @UI : { lineItem : [{position: 30, importance: #HIGH}], identification: [{position: 30 }], selectionField: [{position: 30 }] } BeginDate; @UI : { lineItem : [{position: 40, importance: #HIGH}], identification: [{position: 40 }], selectionField: [{position: 40 }] } EndDate; @UI : { lineItem : [{position: 50, importance: #HIGH}], identification: [{position: 50 }] } TotalPrice; @UI : { lineItem : [{position: 50, importance: #HIGH}] } Memo; @UI : { lineItem : [{position: 60, importance: #HIGH}], selectionField: [{position: 60 }] } Status; }Test your object page in the Fiori Elements preview. It should look roughly like this:
step6b-fep-preview-object-page
You will now add more information to the object page by creating:
- A CDS entity for bookings
- Adding a second UI facet to the travel metadata extension
You will also create a parent-child hierarchy for these two entities. Your business object will then consist of a tree of nodes linked by a special associations known as a composition.
For more information on this relationship, see Defining the Data Model in CDS Views, particularly the first two sections, Travel Root View /DMO/I_Travel_U and Booking View /DMO/I_Booking_U.
In the Package Explorer, select Data Definition, then choose New Data Definition from the context menu.
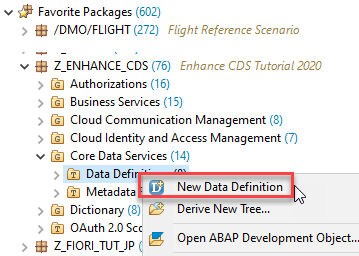
step7a-new-cds Enter the following:
- Name =
Z_I_BOOKING_R_000 - Description =
Consumption view from /DMO/I_BOOKING_U - Referenced Object =
/DMO/I_BOOKING_U
- Name =
Choose the same transport request, then choose Next. Do not choose Finish.
Finally, choose Use template then choose Define view. Then choose Finish.
Your CDS entity appears in a new editor. We will fix the errors now.
- Change the
@AccessControl.authorizationCheck:to#NOT_REQUIRED.
Add the following to
Z_I_BOOKING_000, using Auto-complete (Ctrl+Space). Then Save, but DO NOT yet activate your entity.CDSassociation to parent Z_I_TRAVEL_R_000 as _Travel on $projection.TravelID = _Travel.TravelIDChange
Z_I_TRAVEL_R_000to a root view entity and add the composition association as follows. Again, Save, but DO NOT yet activate your entity.CDSdefine root view entity Z_I_TRAVEL_R_000 as select from /DMO/I_Travel_U as Travel composition [0..*] of Z_I_BOOKING_000 as _BookingNow, choose Activate All
(Shift+Ctrl+F3).
step10a-activate-all-toolbar Choose Deselect All, then choose your two entities
Z_I_TRAVEL_R_000andZ_I_BOOKING_000, then choose Activate.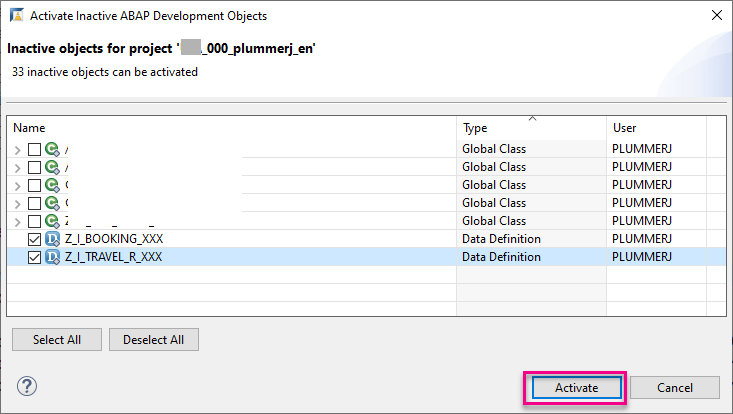
step10-activate-all Change the
@AccessControl.authorizationCheck:to#NOT_REQUIRED.Add an alias to the
define viewstatement, so that your code looks like this:CDS@AccessControl.authorizationCheck: #CHECK @EndUserText.label: 'Read-only view from /DMO/I_BOOKING_U' define view entity Z_I_BOOKING_000 as select from /DMO/I_Booking_U as BookingFormat, save, and activate the CDS entity (
Shift+F1, Ctrl+S, Ctrl+F3)Z_I_BOOKING_000.
Add semantic annotations as follows:
CDS@Semantics.amount.currencyCode: 'Currency_Code' FlightPrice as Flight_Price, @Semantics.currencyCode: true CurrencyCode as Currency_Code,Format, save, and activate the CDS entity (
Shift+F1, Ctrl+S, Ctrl+F3).
First, allow metadata extensions to your CDS entity by adding the following annotation just after the
@EndUserText.label: 'Consumption view from /DMO/I_BOOKING_U'annotation:CDS@Metadata.allowExtensions: trueIn the Package Explorer, select the CDS entity
Z_I_BOOKING_R_000, then choose New Metadata Extension from the context menu.Enter a name
ZMDE_BOOKING_R_000and description Metadata forZ_I_BOOKING_R_000; select the transport request and choose Finish.,In the editor, enter the following code:
CDS@Metadata.layer: #CORE @UI: { headerInfo: { typeName: 'Travel', typeNamePlural: 'Travels', title: { type: #STANDARD, label: 'Travel', value: 'TravelID' } } } annotate view Z_I_BOOKING_R_000 with { @UI: { lineItem: [ { position: 10, importance: #HIGH } ], identification: [ { position: 10 } ] } TravelID; @UI: { lineItem: [ { position: 10, importance: #HIGH } ], identification: [ { position: 10 } ] } BookingID; @UI: { lineItem: [ { position: 20, importance: #HIGH } ], identification: [ { position: 20 } ] } BookingDate; @UI: { lineItem: [ { position: 30, importance: #HIGH } ], identification: [ { position: 30 } ] } AirlineID; @UI: { lineItem: [ { position: 40, importance: #HIGH } ], identification: [ { position: 40 } ] } ConnectionID; @UI: { lineItem: [ { position: 50, importance: #HIGH } ], identification: [ { position: 50 } ] } FlightDate; @UI: { lineItem: [ { position: 60, importance: #MEDIUM } ], identification: [ { position: 60 } ] } Flight_Price; }Format, save, and activate the metadata extension (
Shift+F1, Ctrl+S, Ctrl+F3).
Also, add the entity
Z_I_BOOKING_R_000to the service definitionZ_EXPOSE_TRAVEL_R_000:CDS@EndUserText.label: 'Expose travel Service 000' define service Z_EXPOSE_TRAVEL_R_000 { expose Z_I_TRAVEL_R_000 as Travel; expose Z_I_BOOKING_R_000 as Booking; }Format, save, and activate (
Shift+F1, Ctrl+S, Ctrl+F3).Check the service binding. It should now include a
to_Bookingassociation, like this. If not, try choosing Unpublish, then Publish again.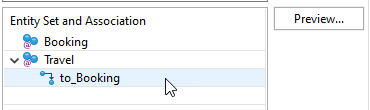
step10a-sb-w-booking-association
In metadata extension
Z_MDE_TRAVEL_000, before the square bracket, insert a comma after the Travel facet, then insert the Booking facet to the Travel metadata extension, so that your code looks like this:CDS@UI.facet: [ { id: 'Travel', purpose: #STANDARD, type: #IDENTIFICATION_REFERENCE, label: 'Travel', position: 10 } , { id: 'Booking', purpose: #STANDARD, type: #LINEITEM_REFERENCE, label: 'Booking', position: 20, targetElement: '_Booking'} ]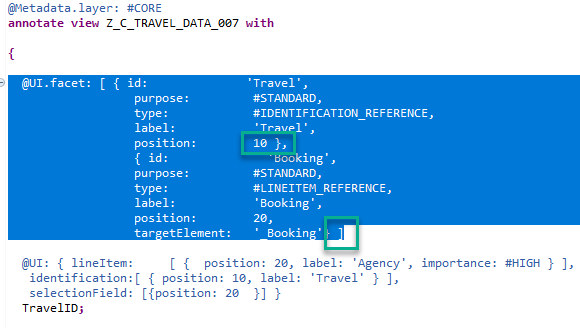
step9a-add-facet-booking Now, in the metadata extension
ZMDE_BOOKING_R_000, specify which fields from Booking you want to include in the object page, again using anidentificationannotation as follows:CDS@UI: { lineItem: [ { position: 10, importance: #HIGH } ], identification: [ { position: 10 } ] } BookingID; @UI: { lineItem: [ { position: 20, importance: #HIGH } ], identification: [ { position: 20 } ] } BookingDate; @UI: { lineItem: [ { position: 30, importance: #HIGH } ], identification: [ { position: 30 } ] } AirlineID; @UI: { lineItem: [ { position: 40, importance: #HIGH } ], identification: [ { position: 40 } ] } ConnectionID; @UI: { lineItem: [ { position: 50, importance: #HIGH } ], identification: [ { position: 50 } ] } FlightDate; @UI: { lineItem: [ { position: 60, importance: #MEDIUM } ], identification: [ { position: 60 } ] } Flight_Price;Test your new facet in the Fiori Elements preview. It should look like this:
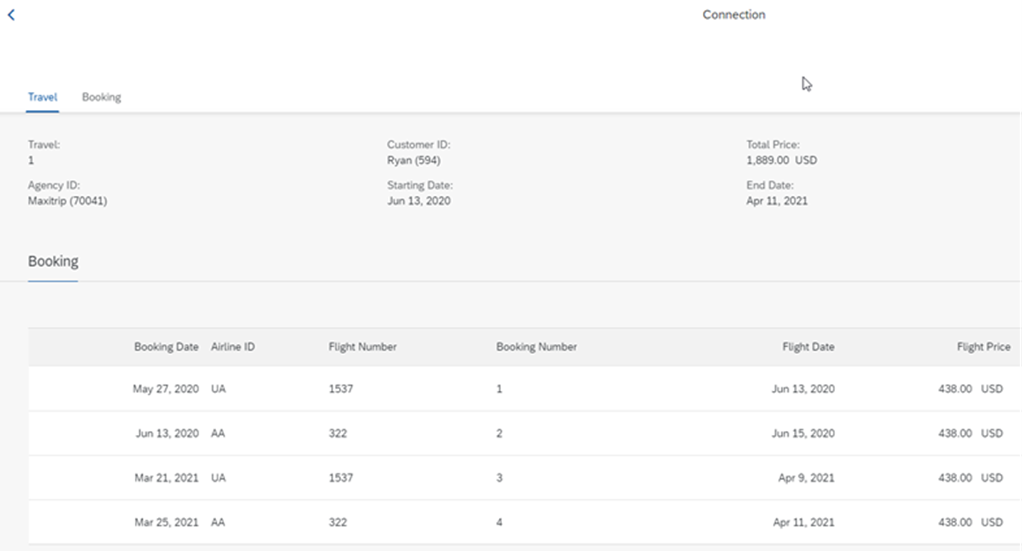
step9b-fep-booking-facet
You can also display information from another entity using an association.
In the CDS entity
Z_I_BOOKING_R_000, add an association from Booking to Connection.CDSassociation [1..1] to /DMO/I_Connection as _Connection on $projection.ConnectionId = _Connection.ConnectionIDYou will get a warning. If you choose Problem Description, you will see that this warning can be hidden, by adding the following pseudo-comment:
CDS/*+[hideWarning] { "IDS" : [ "CARDINALITY_CHECK" ] }*/Now add the following two elements to the CDS entity
Z_I_BOOKING_R_000:CDS@Semantics.quantity.unitOfMeasure: 'DistanceUnit' _Connection.Distance as Distance, @Semantics.unitOfMeasure: true _Connection.DistanceUnit as DistanceUnit,Optional: Test your Fiori Elements preview again. It should look like this:
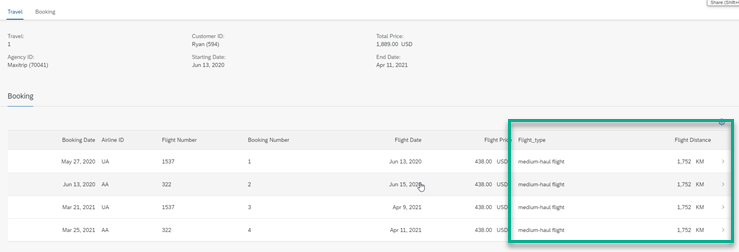
step12a-fep-plus-connection
Add the following code, immediately after the element
DistanceUnit:CDScase when _Connection.Distance >= 2000 then 'long-haul flight' when _Connection.Distance >= 1000 and _Connection.Distance < 2000 then 'medium-haul flight' when _Connection.Distance < 1000 then 'short-haul flight' else 'error' end as Flight_type,Also, make sure that the distance is in kilometers, by adding this code after the select list:
CDSwhere _Connection.DistanceUnit = 'KM'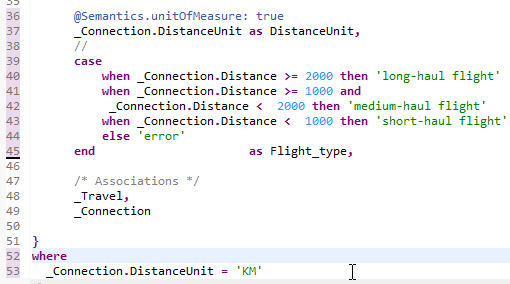
step13b-add-where-clause Format, save, and activate the CDS entity.
Test your Fiori Elements preview again. It should roughly look like this:
step13c-fep-CASE
Blog post: From Open SQL Joins to CDS Associations
SAP Help Portal: Defining UI Annotations
SAP Help Portal: Defining CDS Annotations for Metadata-Driven UIs
Troubleshooting: Blog post: Find Errors in Metadata Extensions, by Andre Fischer
Troubleshooting: Blog post: Use the SAP Gateway Error Log in ADT, by Andre Fischer
Resources
Discussion
Share feedback on this tutorial or join the conversation in SAP Community.