
Overview
You will learn
- In the provisioning system, how to expose a CDS view as an OData service using a Service Binding
- How to wrap this OData service in an inbound communication scenario, so that it can be accessed from another instance of SAP BTP, ABAP environment
- How to make the provisioning system service available for connection from other ABAP systems
- How to create an XML metadata file representing the remote service This approach involves some overhead for one consumer; however, the advantage is that you can add several consumer systems, or users (for example, with different authentication) pointing to the same HTTP service, wrapped in the same Communication Scenario. This tutorial mission was written for SAP BTP ABAP Environment. However, you should also be able to use it in SAP S/4HANA Cloud Environment in the same way. > Throughout this tutorial, replace
###or000with your initials or group number.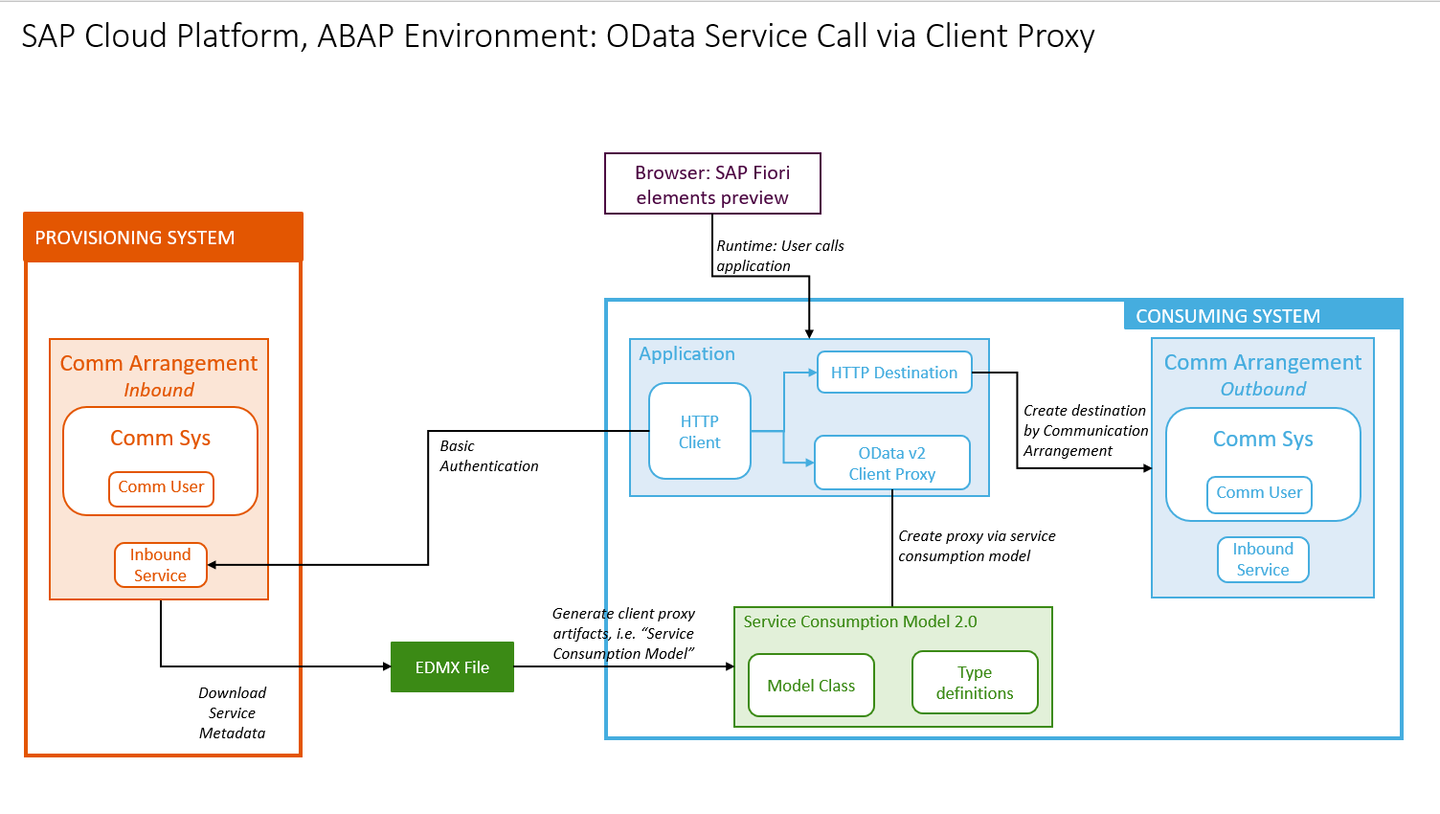
step0-overview-scm2


Prerequisites
Prerequisites
- You have created an OData service, e.g. by completing the tutorial group: Build an SAP Fiori elements App Using the ABAP RESTful Application Programming Model (RAP) [RAP100]
Steps
You start in your provisioning system by creating the ABAP artifacts in ABAP Development Tools (ADT), starting with a package.
select the ABAP Cloud Project and choose New > ABAP Package from the context menu.
Enter the following and choose Next:
- Name =
Z_INBOUND_ODATA_### - Description = Provide access from remote system - OData
- Package type = Development
- Name =
Choose Create new transport request, enter a description, such as Provide access from remote system - OData, then choose Finish.
Add it to Favorite Packages.
Select the package and choose New > Other Repository Object… from the context menu.
Add the filter
scen, then choose Communication Scenario, then choose Next.Enter the following, choose a transport request, then choose Finish.
- Name:
Z_IN_ODATA_TRAVEL_CSCEN - Description Get Travel w. OData API
- Name:
Your Communication Scenario appears in a new editor.
On the Inbound tab, choose Add….
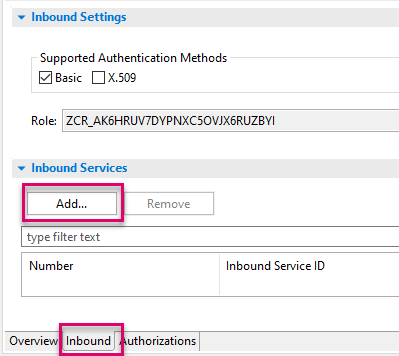
step2a-add-http-service IMPORTANT: Choose Browse. You cannot simply enter the name. Then add a filter, such as
Z###_, select your service binding - (with the endingIWSGorG4BAadded automatically) then choose Finish.
step2b-browse-inbound-service Your service binding
Z_C_TRAVEL_API_O2_###_IWSGappears. Save, then choose Publish Locally.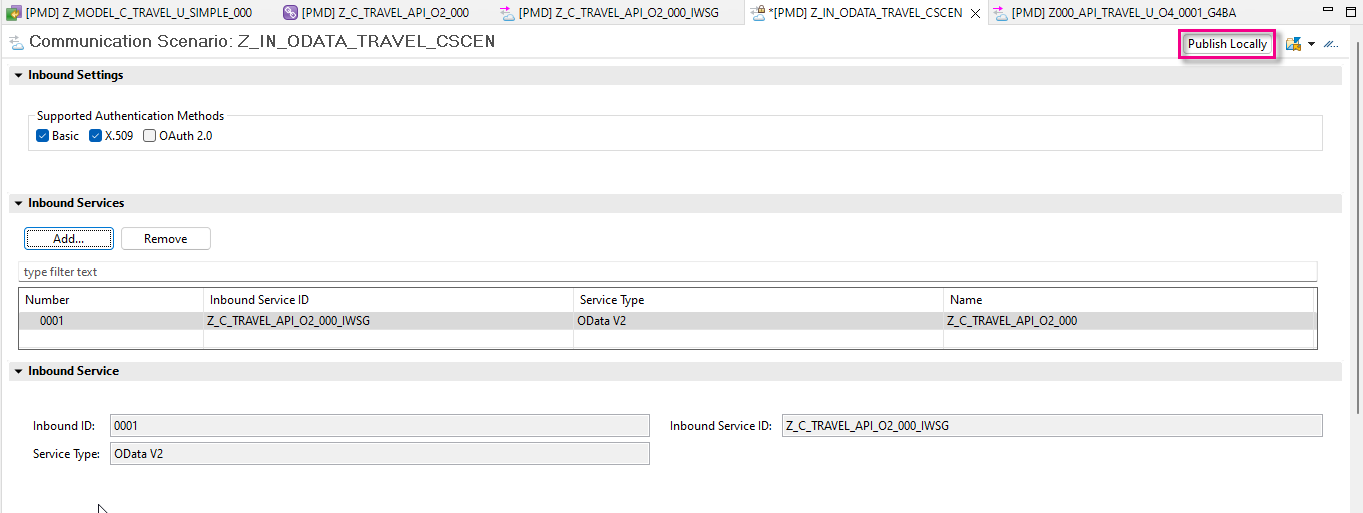
step2c-publish-service-locally
IWSGrefers to OData 2.0;G4BArefers to OData 4.0.
Now you will create several communication artifacts using the appropriate Fiori app.
Open the Fiori dashboard for your provisioning system in a browser. You can find the URL for the dashboard as follows:
- Select your system (that is, ABAP Project in Project Explorer)
- Choose Properties > ABAP Development > System URL from the context menu
- Copy this URL into your browser and choose Enter.
- IMPORTANT: Check that the URL does not contain the string
-api. If it does, delete it.

step5a-open-flp From the Dashboard Home screen, choose From Communication Management > Communication Systems.
Choose New.

step5b-comm-system-new Enter a System ID,
Z###_TO_CON_CSYS, where CON is your consuming system; accept the default (identical) System name; then choose Create.
step5c-comm-system-id-name In Technical Data:
Switch Destination Service to OFF.
Switch Cloud Connector to OFF.
In Host Name, enter the base URL of your provisioning system in the form
<GUID>.abap.<region>.hana.ondemand.com. Again, you can find the URL for the dashboard by selecting your system (that is, ABAP Project in Project Explorer), then choosing Properties > ABAP Development from the context menu.IMPORTANT:
Remove the protocol (e.g.https://) from the start and/from the end of the host name.
Make sure the domain starts withabap, notabap-webPort = 443

step5e-host-name Scroll down to Users for Inbound Communication, then create a new user by choosing the + icon.

step5f-create-comm-user Choose New User and the Authentication Method: User name and password.

step5g-comm-user-name Enter a name,
INBOUND_USER_PRV, and description, then choose Propose password, then choose Create > OK > Save.PRVis the name of the provisioning system, that is, this system.IMPORTANT: Save the proposed password, since you will need it later.
Save your changes.
From Communication Management, choose Communication Arrangement. Then choose New.

step6a-new-comm-arr Choose your scenario,
Z_IN_ODATA_TRAVEL_CSCENfrom the drop-down list. Accept the default (identical) Arrangement name.
step6b-choose-scenario From the dropdown list, choose your communication system
Z###_TO_CON_CSYSSave your changes.
Your Communication Arrangement should look roughly like this.
The information from the Communication System is filled in automatically. The Service URL / Service Interface = < Base URL of provisioning system > + relative path of your Inbound Service, here
/sap/opu/odata/sap/Z_C_TRAVEL_API_O2_###_IWSG.

On the left is the Service Definition, /DMO/TRAVEL_U.
Now, on the right, is the active service, including the Entity Set and the Service URL.

You will now create a metadata file for this service, which you will access later in your consuming system.
Click on the link Service URL. The
XMLfile is shown in the browser.Add the suffix
/$metadatato the Service URL (deleting parameters, such assap-client).
step2d-add-metadata-suffix The service metadata appears.
Choose Save As… from the context menu.
IMPORTANT: Make sure the file name is pre-filled as
$metadata.xml. Otherwise, it is not a valid metadata file.Navigate to an appropriate folder and choose Save.
Optional: You can now consume a custom OData Service such as the one described in: Integrate the SAP BTP, ABAP environment with SAP S/4HANA Cloud, public edition
Resources
Discussion
Share feedback on this tutorial or join the conversation in SAP Community.