
Overview
You will learn
- How to create a read-only CDS-based travel model
- How to display this CDS entity in a Fiori Elements preview
- How to extract the metadata of your CDS entity
- How to add semantic annotations
- How to add a search function
- How to add selection fields to the Fiori Elements preview


Prerequisites
Prerequisites
- You have a valid instance of SAP S/4HANA 1909 or later, on-premise edition - for example, SAP ABAP Platform 1909, developer edition or SAP S/4HANA Fully-Activated Appliance
- You have installed ABAP Development Tools, latest version
- You have downloaded the ABAP Flight Reference Scenario. To pull this reference scenario from
Github, see Downloading the ABAP Flight Reference Scenario. IMPORTANT This scenario is already included in SAP ABAP Platform 1909, developer edition
Steps
Intro
In summary, based on existing persistent data sources, you will create and implement a query for an OData service to get a running app with useful read-only features. You can then use some of these features in productive development to make your applications more powerful and more user-friendly. By the end of this tutorial, your application should look like this.
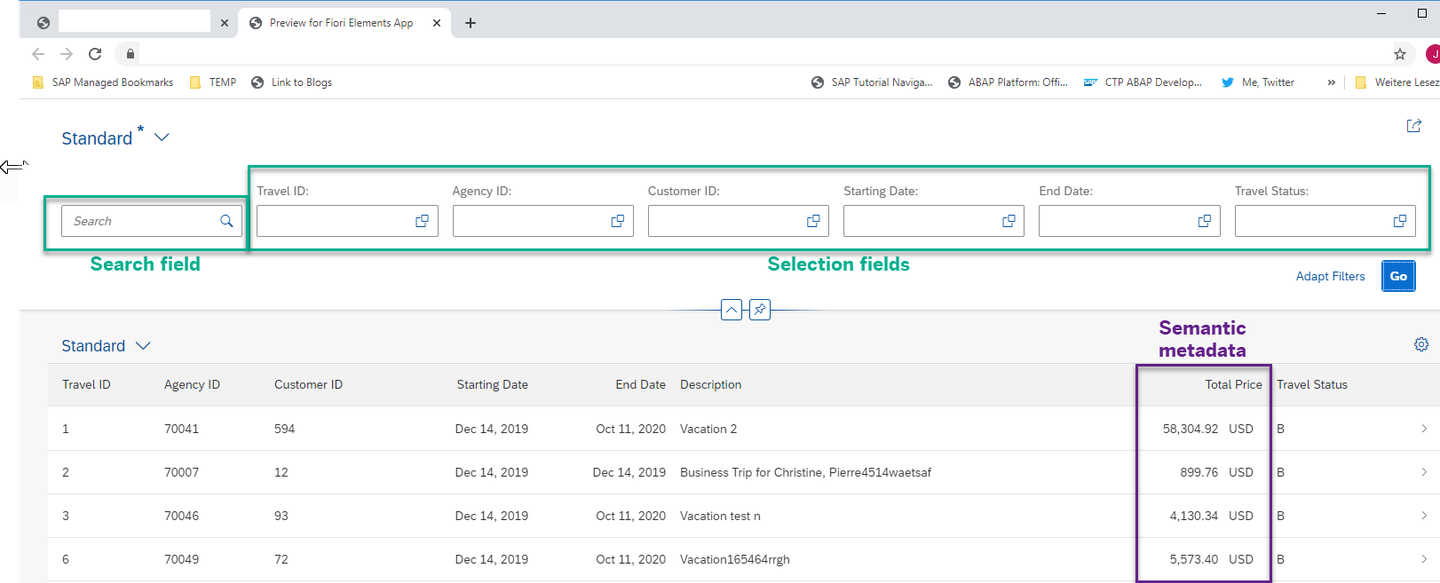
For more information on creating a read-only app, see the SAP Help Portal: Developing Read-Only List Reporting Apps.
Throughout this tutorial, object names may include a suffix or group number, such as XXX. Always replace this with your own group number or initials.
Create a new package for this tutorial, by choosing New > ABAP Package.

step1a-new-package Enter the following then follow the wizard, choosing a new transport request:
Name:
Z_ENHANCE_CDS_XXXDescription Enhance CDS Tutorial 2020
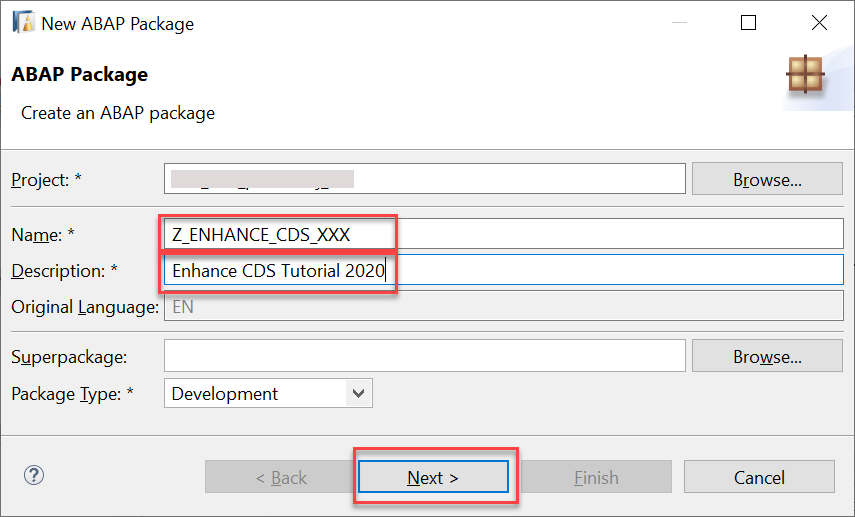
step1a-create-package 
step1b-new-tr
In your package, create a CDS view entity. Select the package, then choose New > Other from the context menu, then choose Data Definition.

step2a-new-cds Add the following:
- Name:
Z_I_TRAVEL_R_XXX - Description:
Travel Model View Entity - Read Only - Referenced object:
/DMO/I_TRAVEL_U
Your CDS view is a read-only view. It is based on the business object (BO) view,
/DMO/I_TRAVEL_U.- Name:
Choose or create a transport request, then choose Next. Do not choose Finish.
Choose Use template then choose Define View Entity.

step2b-choose-view-entity Finally, choose Finish.
Your CDS entity appears in a new editor, with the elements (fields and associations) from the referenced data object, ``, already inserted. Ignore the error for now.
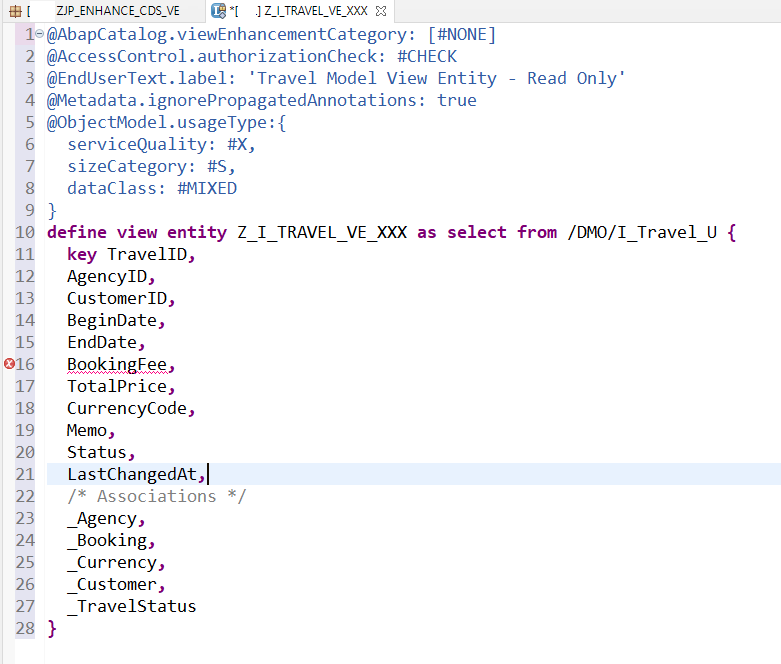
You will see 2 errors - at
BookingFeeandTotalPrice. Add the following annotations:CDS@Semantics.amount.currencyCode: 'CurrencyCode' BookingFee, @Semantics.amount.currencyCode: 'CurrencyCode' TotalPrice,Format, save, and activate your code by choosing
Shift+F1,Ctrl+S, Ctrl+F3. It should look like this:
@AbapCatalog.viewEnhancementCategory: [#NONE]
@AccessControl.authorizationCheck: #CHECK
@EndUserText.label: 'Travel Model View Entity - Read Only'
@Metadata.ignorePropagatedAnnotations: true
@ObjectModel.usageType:{
serviceQuality: #X,
sizeCategory: #S,
dataClass: #MIXED
}
define view entity Z_I_TRAVEL_R_XXX
as select from /DMO/I_Travel_U as Travel
{
key TravelID,
AgencyID,
CustomerID,
BeginDate,
EndDate,
@Semantics.amount.currencyCode: 'CurrencyCode'
BookingFee,

@Semantics.amount.currencyCode: 'CurrencyCode'
TotalPrice,
CurrencyCode,
Memo,
Status,
LastChangedAt,
/* Associations */
_Agency,
_Booking,
_Currency,
_Customer,
_TravelStatus
}If you define currency amounts and currency codes semantically, then the system will apply specific rules to handle these fields appropriately. For example, in this tutorial, if you define
TotalPriceas a currency amount, then the system will add the appropriate currency to theTotalPricecolumn automatically. There is no need to displayCurrencyCodeas a separate column.
Click anywhere in the editor and choose Open With > Data Preview from the context menu.

step4a-open-display-preview The Data Preview is displayed in a new tab. You can investigate the data, by filtering, specifying the number of rows, and so on. The values in
LastChangedAtare not user-friendly, but you solve that by providing a Fiori elements preview in the next step.
step4b-data-preview
You will now expose the CDS entity as a business service. This will allow you to preview your changes in Fiori elements preview.
A business service consists of a service definition and a service binding.
You use a service definition to define which data is to be exposed (with the required granularity) as a Business Service.
You then use the service binding to bind a service definition to a client-server communication protocol such as OData. This allows you to provide several bindings for the same definition, e.g. to expose the service to a UI, and to an A2X provider.
For more information, see:
SAP Help Portal: Creating a Service Definition
SAP Help Portal: Creating a Service Binding
First, create the service definition, by selecting your CDS entity and choosing New > Service Definition from the context menu.

step4a-new-sd Choose a name and description:
Z_EXPOSE_TRAVEL_XXX- Service exposes Travel data

step4b-sd-travel-data Choose the transport request; choose Next.
Use the selected template; choose Finish. The name of your custom entity is inserted automatically.

step4d-sd-editor To make the service definition more readable, add an alias to the expose statement:
CDSexpose Z_C_TRAVELS_XXX as Travels;Format, save, and activate (
Shift+F1, Ctrl+S, Ctrl+F3) the service definition.
Select your service definition, then choose Service Binding from the context menu, then choose Next.

step5a-new-sb Choose:
Name =
Z_BIND_TRAVEL_XXXDescription = Service binding for Travel data
Binding Type = ODATA V2 (UI…)
Service Definition =
Z_EXPOSE_TRAVEL_XXX
step5b-create-service-binding
Choose the transport request; choose Finish.
The service binding automatically references the service definition and thus the exposed custom entity.
In the editor that appears, choose Activate.
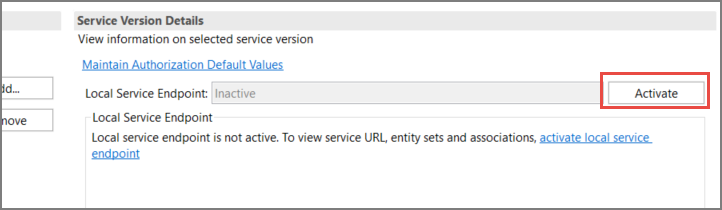
step13-activate-service-endpoint You can now see the Service URL and Entity Set.
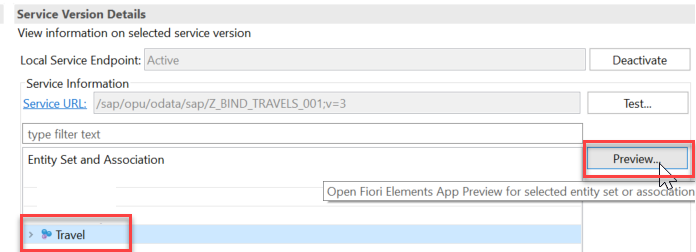
step13b-entity-set To open the Service Document (
XML) in your browser, choose Service URL.
step13c-open-service-url 
step13e-service-xml-in-browser In the browser, you can also see the Metadata Document of the Business Service by adding $metadata to the URL: `/sap/opu/odata/sap/Z_BIND_TRAVEL_XXX/$metadata`.

step13f-service-metadata-in-browser
Select the entity set and choose Preview.

step7a-display-fep Log in using your ABAP Environment user and password; the Fiori Elements preview appears.
By default, no columns are selected. To see the data, choose Settings, then choose Select All.

step7b-settings 
step7c-select-all Display the data by choosing Go.
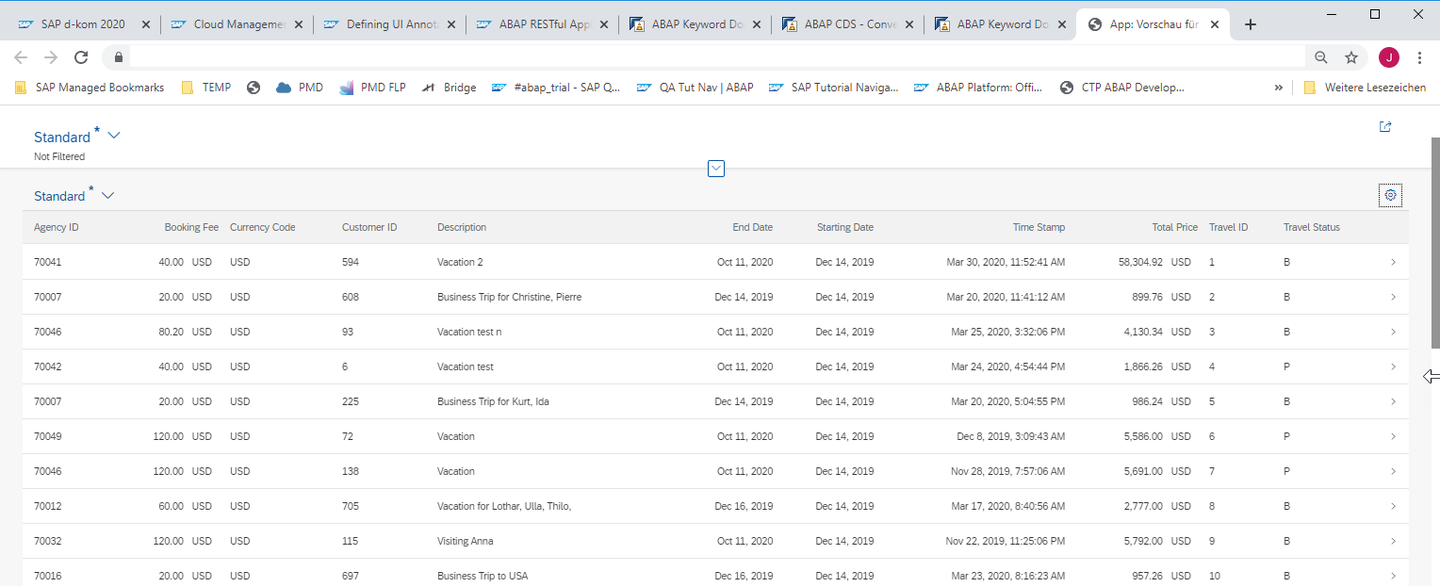
step7d-fep-w-data
It would be nice if at least some fields were displayed immediately for the user. To do this, simply add the following annotation to the relevant fields in
Z_I_TRAVEL_R_XXX. The start of your CDS entity will then look like this.BookingFeeis not automatically displayed. The numbers for each field are relative to the other fields and are responsive - they do not refer to a specific pixel position or similar. For larger entities, you can specify HIGH,MEDIUM, or LOW, so that less important fields are automatically hidden on a smaller screen, such as a mobile phone.CDS@UI : { lineItem : [{position: 10, importance: #HIGH}] } key TravelID; @UI : { lineItem : [{position: 15, importance: #HIGH}] } AgencyID, @UI : { lineItem : [{position: 20, importance: #HIGH}] } CustomerID, @UI : { lineItem : [{position: 30, importance: #HIGH}] } BeginDate, @UI : { lineItem : [{position: 40, importance: #HIGH}] } EndDate, BookingFee, @UI : { lineItem : [{position: 50, importance: #HIGH}] } TotalPrice,If you now refresh your Fiori Elements preview, you will notice that you do not have to choose the fields; you simply have to choose Go.
At present, you only have minimal annotations. As you add more, your CDS entity will start to get cluttered. So you should extract your UI annotations to a separate object, a metadata extensions object, as follows:
First add the annotation
@Metadata.allowExtensions: trueto your CDS entity.Then, click anywhere in the editor, then choose Source Code > Extract Metadata Extension from the context menu.
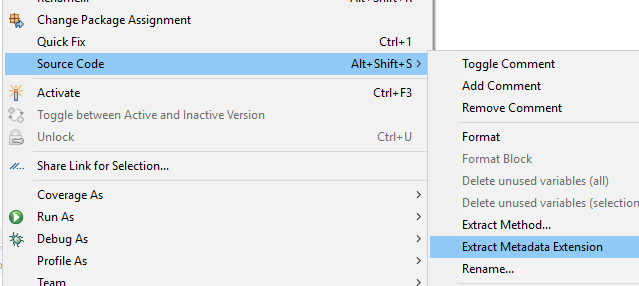
step9a-extract-metadata Enter a name and description for your metadata extension object, clearly similar to your CDS entity name, and choose Next:
Z_TRAVEL_METADATA_XXXMetadata for Z_I_TRAVEL_R_XXX
Accept the transport request, choose Next, select all elements, then choose Finish.

step9b-mde-select-elements You will get an error, because you have not yet assigned the metadata extension to a layer. Since you are in sandbox mode, enter the value
#COREusing auto-complete ( Ctrl+Space ).
step9c-assign-layer Layers allow customers or partners, for example, to enhance the metadata without modifying the CDS entity. You can also add industry- or country-specific enhancements.
The metadata extensions are evaluated in a specific order. For more information, see Annotation Propagation.
Format, save, and activate (
Shift+F1, Ctrl+S, Ctrl+F3).
If you define currency amounts and currency codes semantically, then the system will apply specific rules to handle these fields appropriately.
For example, in this tutorial, if you define TotalPrice as a currency amount, then the system will add the appropriate currency to the TotalPrice column automatically. There is no need to display CurrencyCode as a separate column.
To do this, add the following two annotations to your CDS entity:
CDS@Semantics.amount.currencyCode: 'CurrencyCode' TotalPrice, @Semantics.currencyCode CurrencyCode,Format, save, and activate (
Shift+F1, Ctrl+S, Ctrl+F3).If you refresh the Fiori Elements preview, the Total Price column now looks like this.

step10a-currency-code
You will now add a fuzzy search capability.
First, add the search annotation to your CDS entity:
CDS@Search.searchable: trueThen add the following two annotations to the field you want to search, in this case Memo:
CDS@Search.defaultSearchElement: true @Search.fuzzinessThreshold: 0.90For convenience, add the following annotation to the metadata extension object, so that the Memo field appears by default in the preview, then format, save, and activate (
Shift+F1, Ctrl+S, Ctrl+F3):CDS@UI: { lineItem : [{position: 60, importance: #HIGH}] } Memo;Refresh the Fiori elements preview in your browser.
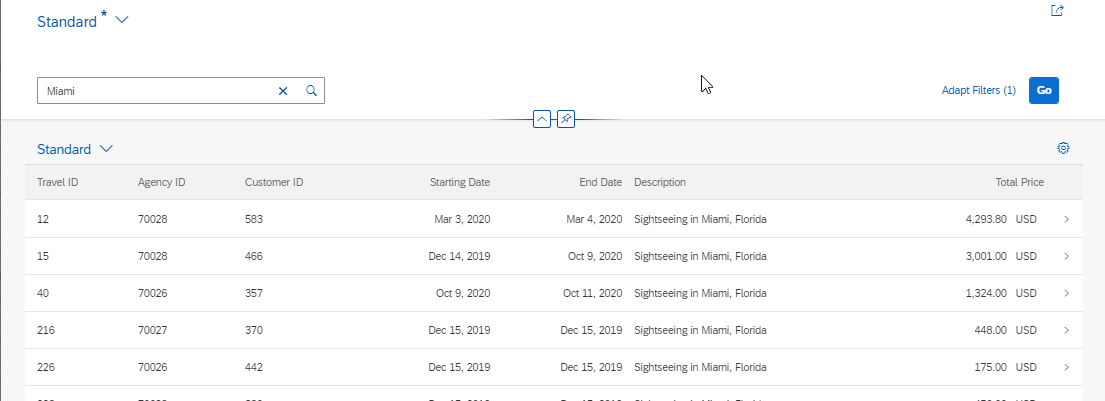
There is a new Search input field.
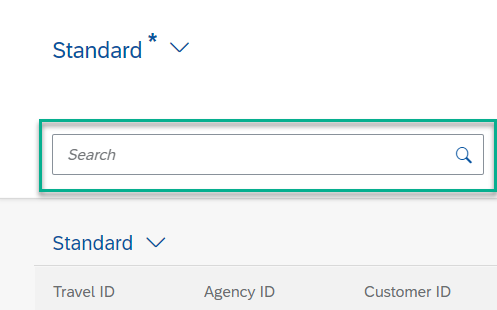
step11a-search-field Enter the search text Miami. The app only displays trips to Miami (to date, eleven trips).
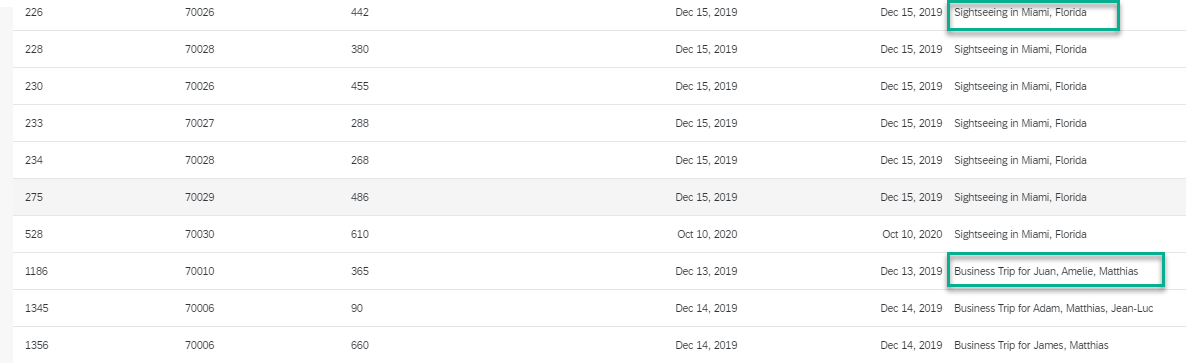
step11b-miami-90 Optional: You can test the fuzziness threshold by changing the value to 0.70. After you save and activate, the app will now show trips to Miami and trips involving Matthias. (You may need to empty the cache.)
step11b-miami-70
As well as search fields, you can filter the list using an input field. In the next tutorial, you will provide input value help for these fields.
Add the
selectionFieldannotation to the fieldTravelIDin your metadata extension file, so that the whole UI annotation looks like this:CDS@UI : { lineItem : [{position: 10, importance: #HIGH}], selectionField: [{position: 10 }] } TravelID;Format, save, and activate (
Shift+F1, Ctrl+S, Ctrl+F3). The Fiori elements preview should now look like this: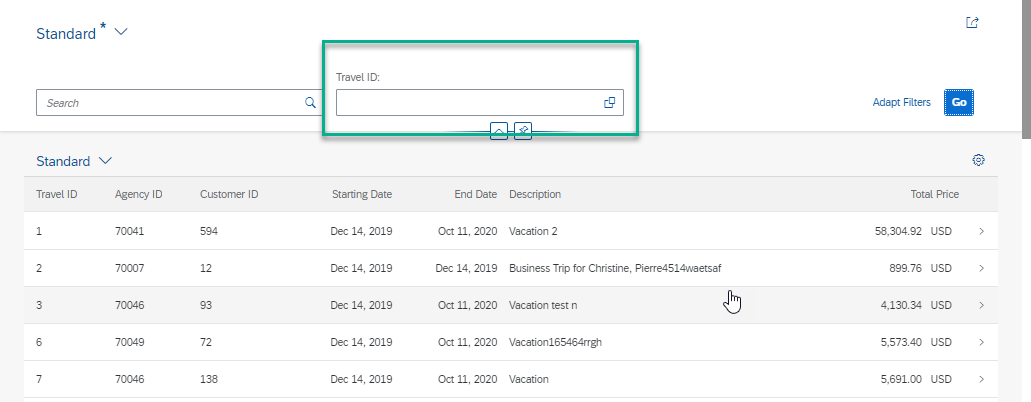
step12a-selection-field Add other fields as input fields by adding the following to the metadata extensions file, so that the file looks like this:
CDS@UI : { lineItem : [{position: 15, importance: #HIGH}], selectionField: [{position: 15 }] } AgencyID; @UI : { lineItem : [{position: 20, importance: #HIGH}], selectionField: [{position: 20 }] } CustomerID; @UI : { lineItem : [{position: 10, importance: #HIGH}], selectionField: [{position: 10 }] } TravelID; @UI : { lineItem : [{position: 30, importance: #HIGH}], selectionField: [{position: 30 }] } BeginDate; @UI : { lineItem : [{position: 40, importance: #HIGH}], selectionField: [{position: 40 }] } EndDate; @UI : { lineItem : [{position: 50, importance: #HIGH}] } TotalPrice; @UI : { lineItem : [{position: 50, importance: #HIGH}] } Memo; @UI : { lineItem : [{position: 60, importance: #HIGH}], selectionField: [{position: 60 }] } Status;Your app should now look like this:
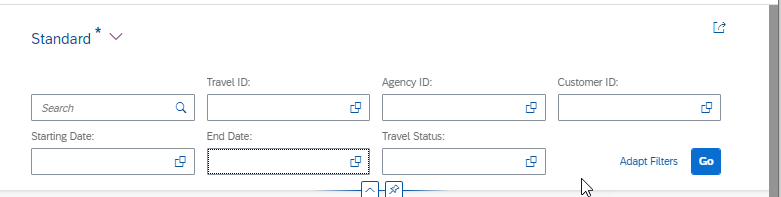
step12b-all-selection-fields-preview
Your CDS entity code should look like this:
@AbapCatalog.viewEnhancementCategory: [#NONE]
@AccessControl.authorizationCheck: #CHECK
@EndUserText.label: 'Travel Model View Entity - Read Only'
@Metadata.ignorePropagatedAnnotations: true
@Metadata.allowExtensions: true
@Search.searchable: true
@ObjectModel.usageType:{
serviceQuality: #X,
sizeCategory: #S,
dataClass: #MIXED
define view Z_I_TRAVEL_R_XXX as Travel
as select from /DMO/I_Travel_U as Travel
{
///DMO/I_Travel_U
key TravelID,
AgencyID,
CustomerID,
BeginDate,
EndDate,
@Semantics.amount.currencyCode: 'CurrencyCode'
BookingFee,
@Semantics.amount.currencyCode: 'CurrencyCode'
TotalPrice,
CurrencyCode,
@Search.defaultSearchElement: true
@Search.fuzzinessThreshold: 0.90
Memo,
Status,
LastChangedAt,
/* Associations */
///DMO/I_Travel_U
_Agency,
_Booking,
_Currency,
_Customer
}Your metadata extension code should look like this:
@Metadata.layer: #CORE
annotate view Z_I_TRAVEL_R_XXX with
{
@UI : {
lineItem : [{position: 15, importance: #HIGH}],
selectionField: [{position: 15 }]
}
AgencyID;
@UI : {
lineItem : [{position: 20, importance: #HIGH}],
selectionField: [{position: 20 }]
}
CustomerID;
@UI           : {
      lineItem      : [{position: 10, importance: #HIGH}],
      selectionField: [{position: 10 }]
      }
TravelID;
@UI : {
lineItem : [{position: 30, importance: #HIGH}],
selectionField: [{position: 30 }]
}
BeginDate;
@UI : {
lineItem : [{position: 40, importance: #HIGH}],
selectionField: [{position: 40 }]
}
EndDate;
@UI : {
lineItem : [{position: 50, importance: #HIGH}]
}
TotalPrice;
@UI : {
lineItem : [{position: 50, importance: #HIGH}]
}
Memo;
@UI : {
lineItem : [{position: 60, importance: #HIGH}],
selectionField: [{position: 60 }]
}
Status;
}Resources
Discussion
Share feedback on this tutorial or join the conversation in SAP Community.