
Overview
You will learn
- Which steps are required in order to add and use a new version
- This includes…
- adding a new version via the version management function
- which options are available to use the new version for your planning activities


Prerequisites
Prerequisites
- You are familiar with the SAP Commercial Planning (CX) Marketing Planning content from the xP&A Business Content Suite. Reference: Getting Started tutorial
- You have installed the SAP Commercial Planning (CX) Marketing Planning content in an SAP Analytics Cloud tenant. Reference: Business Content Installation Guide, Content Package User Guide.
Steps
Intro
The SAP Commercial Planning (CX) Marketing Planning content package comes with a number of pre-defined versions which can be used for your planning activities. Nevertheless you might want to add more versions according to your own business needs. In this case, you would need to adjust the planning applications as well as the reporting stories, so the planning grids and objects initialize with the correct version member.
In this tutorial, you will learn how to add a new version and how to make it available in the planning applications and reporting stories of this content package.
In the first step, it is necessary to add a new member to the Version dimension. In order to do so, you need to enter the Version Management section.
In the SAP Analytics Cloud Menu, navigate to the Files section.
Search for any application with a table. In this example, we will look for the
SAP_MKT_MarketingCampaignPlanningapplication and Open in Story Edit Mode.
analytic_application Click on the table and open the Version Management section in the Tools section.
INFORMATION:
Version Management is greyed out as long as you have not selected the table beforehand.

canvas_story
After clicking on the Version Management icon, a new section on the right-hand side expands, where public and private versions are listed. By default, there is a filter applied to only display Versions currently in use in the selected table. If you prefer, you can deselect that switch in the right-hand side panel in order to display all versions. In this step, that will not be necessary as you proceed to add a new public version to the data model based upon the currently selected Plan version.
Duplicate an existing version.
- Choose a version and click on the copy icon next to it. In this example, you will create a copy of the version
public.Plan.
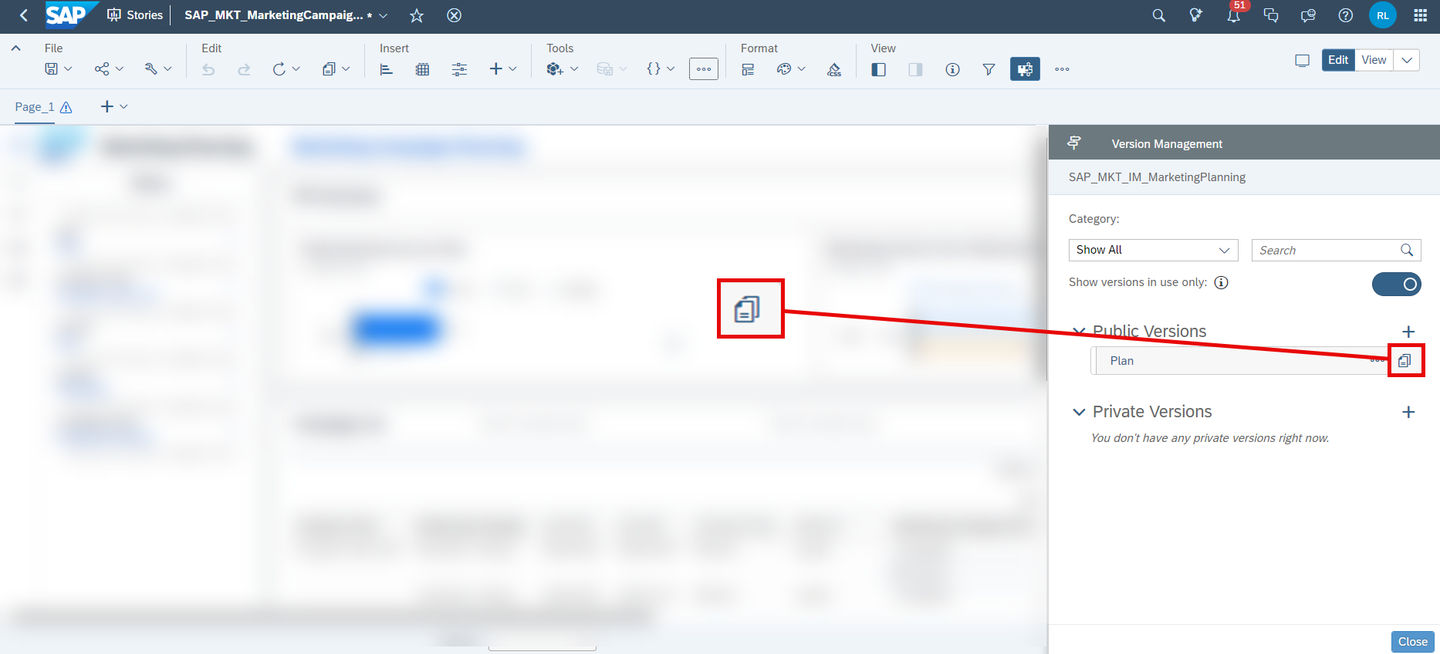
copy_version - Choose a version and click on the copy icon next to it. In this example, you will create a copy of the version
Define the version properties.
- Choose a valid name for your new version. In this example we will call it
Baseline. - Ensure to choose Planning as your version category.
- Choose one of the options provided for your copy operation. In this example, we will Copy all data from the
public.Planversion to the new version. - Click on OK to create the copy.

copy_version - Choose a valid name for your new version. In this example we will call it
Now that you created the new version, you need to publish it as it is initially created as a private version.
Click on the Publish icon next to your new version. Select the option Publish As.

publish_version Specify the version properties.
- Specify the version name once more. In this example, we will stick to the name
Baseline. - Specify the version category once more. Ensure to select Planning.
- Click on the Publish button when done.

publish_version - Specify the version name once more. In this example, we will stick to the name
Close your story.
- You may now close your story.
- There is no need to save it as it only served as an entry point for the version management section.
Now that you created your new version, you can make a couple of adjustments which are relevant for the planning activities. This includes changing the plan horizon or the reference period for instance.
In the SAP Analytics Cloud Menu, navigate to the Files section.
Search for the
SAP_MKT_IM_MarketingPlanningdata model and open it.
Data_Model Click on the dimension
Versionor on the Navigate to Dimension-button.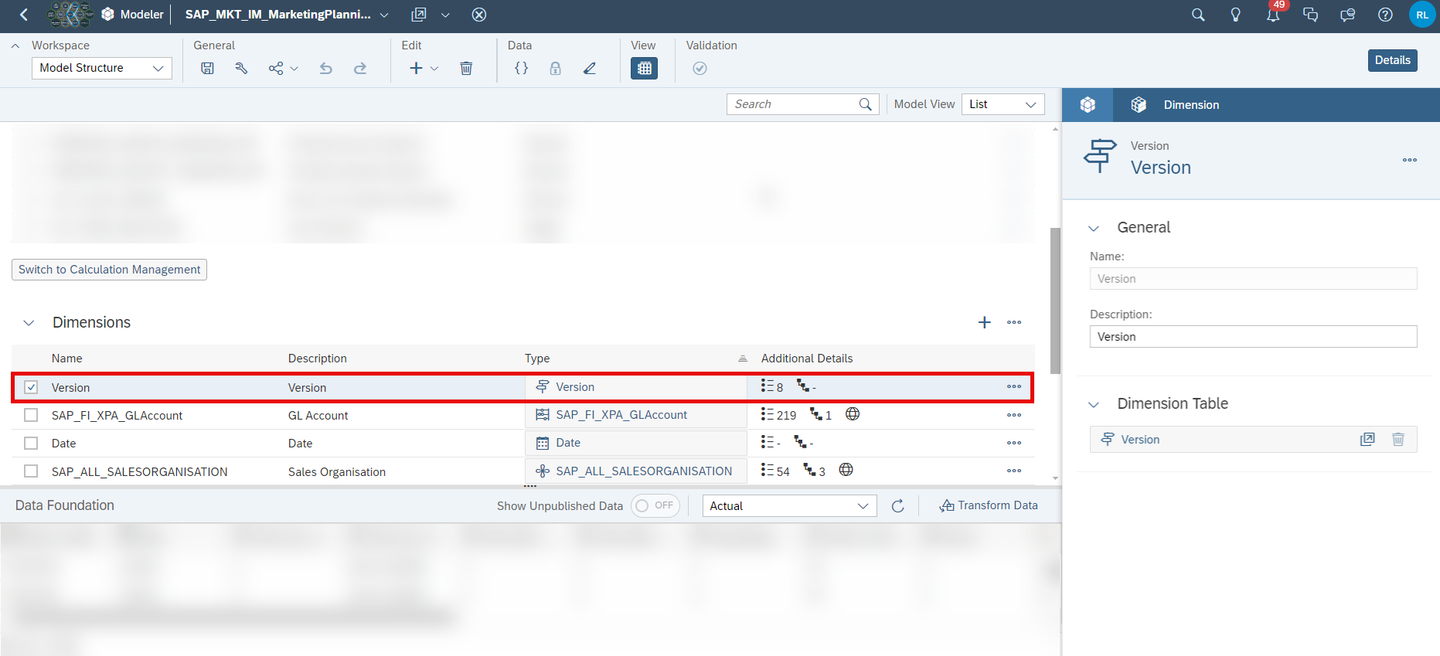
Version_Dim Adjust the version properties.
- As your new version
Baselinewas created based on a copy of the versionPlan, all properties were copied. - In this particular case, the version
Plandoes not have any property. - In case you want to add a property, you can do it here.
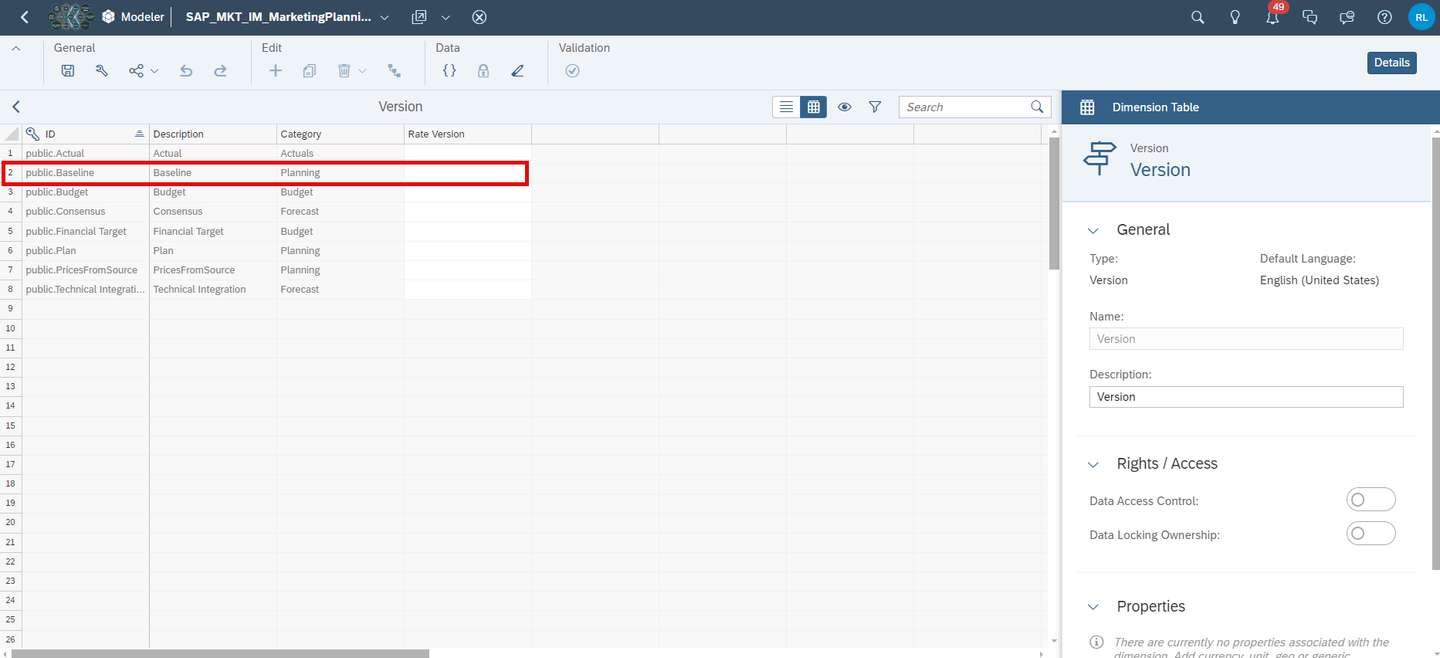
Version_Dim The below table offers an overview on the different properties and their impact.
Column Explanation ID Not editable. Displays the ID of the version member. Description Not editable. Represents the description of the version member. Category Not editable. Defines the category of the version member. Rate Version Used when planning with currency conversion and multiple sets of exchange rates. - As your new version
Save your changes in case you have done any.
Lastly, you need to make some final adjustments in order for the applications to initialize all objects with the new version.
Here you learn how to set the new version as the default version for the initialization of the objects used in the planning applications by adjusting the scripts, filters and variances. For example, some charts have a pre-defined filter on the specific version Plan.
In the SAP Analytics Cloud Menu, navigate to the Files section.
Search for the affected application, in which you want the objects to be initialized with new version. In this example, we will look for the
SAP_MKT_MarketingCampaignAnalysisapplication and Open in Story Edit Mode.
analytic_application INFORMATION:
Please note that the procedure is the exact same for any other application. Possible applications where the plan version can be changed in the charts are:
SAP_MKT_MarketingCampaignPlanningSAP_MKT_MarketingDemandPlanningSAP_MKT_MarketingPerformanceAnalysisSAP_MKT_Marketing_AdminPage
Open the Left Side Panel and open the Outline. Search for the table
pnl_chart_smallCharts_chart01or select the left most chart on Page_1 manually.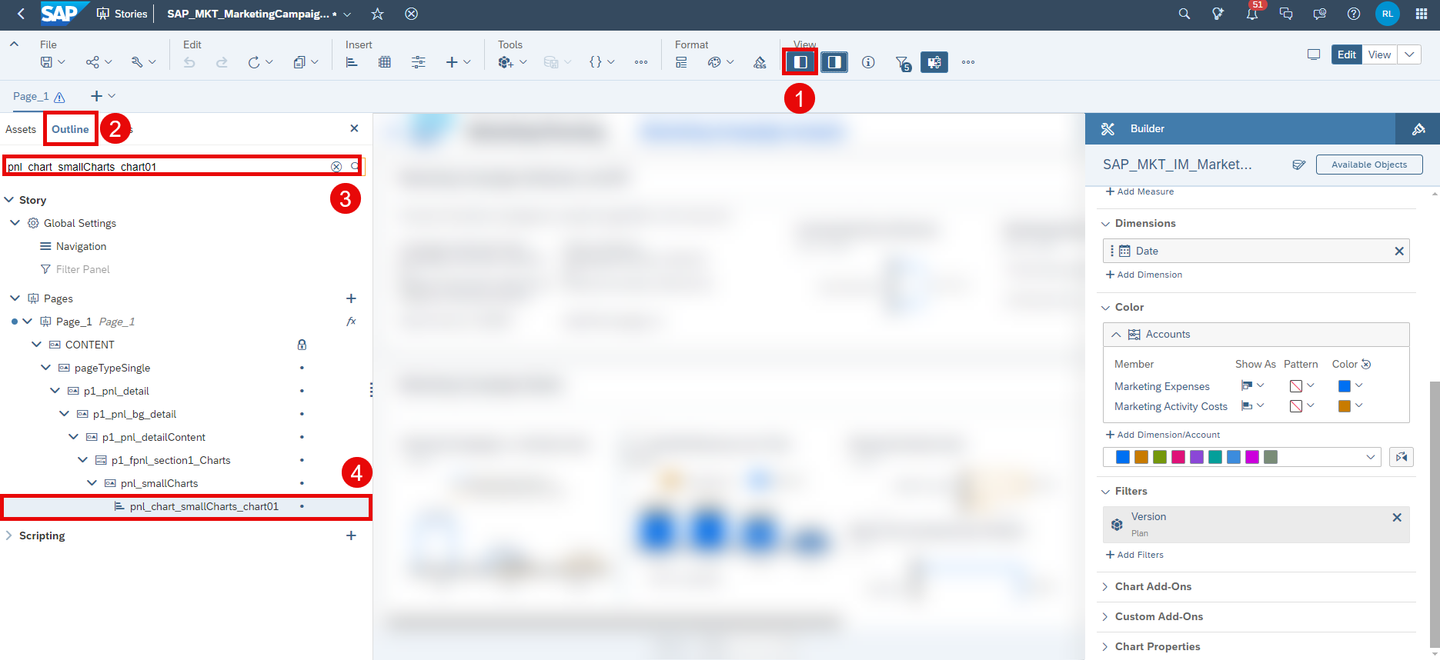
analytic_application Select Right Side Panel and click on the Version filter.
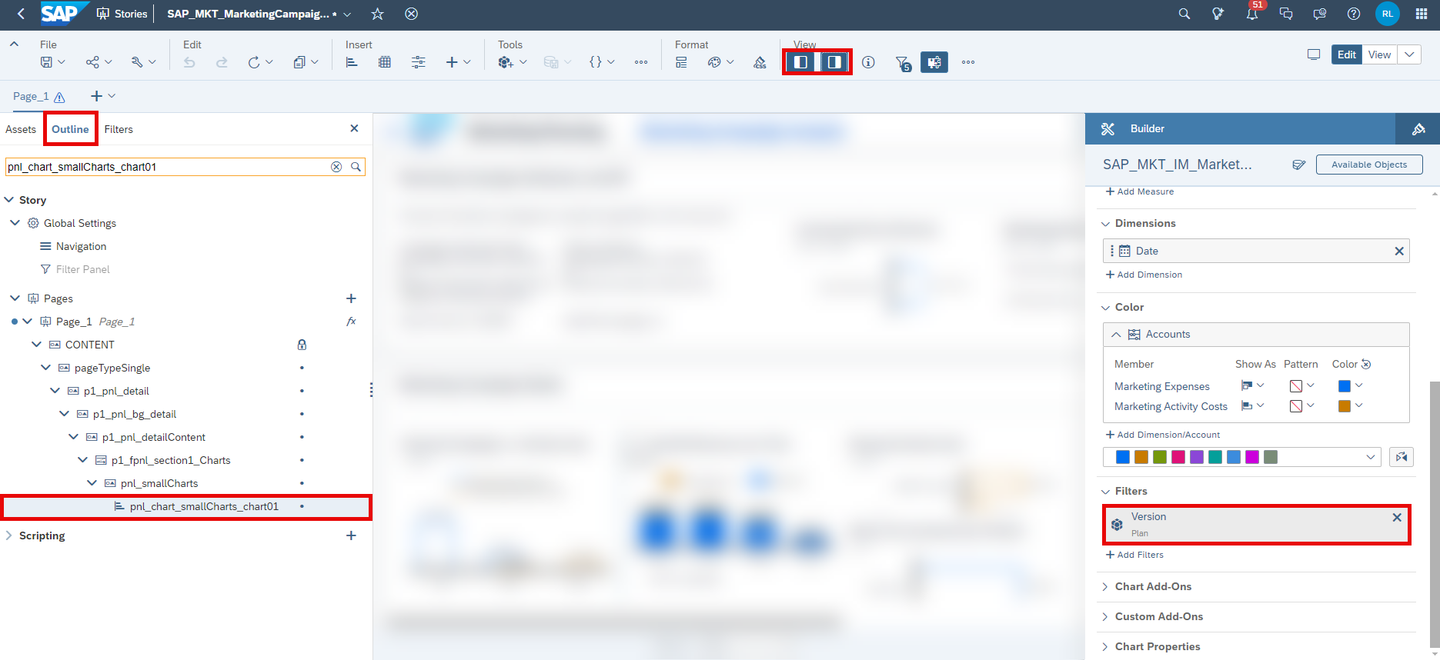
analytic_application Unselect the current version
Planand select the new versionBaseline. Click on OK.
analytic_application Follow step 3-5 for the remaining charts. You have to change the version filter for the following charts:
pnl_chart_smallCharts_chart02pnl_chart_smallCharts_chart03pnl_chart_smallCharts_chart04p1_barChart_pageHeader_chartsVersion_chart1p1_barChart_pageHeader_chartsVersion_chart2p1_barChart_pageHeader_chartsVersion_chart3
Save your changes.
You learn how to set the new version as an option in filter widgets inside the reporting story SAP_MKT_MarketingPerformanceAnalysis.
In the SAP Analytics Cloud Menu, navigate to the Files section.
Search for the affected application
SAP_MKT_MarketingPerformanceAnalysisand Open in Story Edit Mode.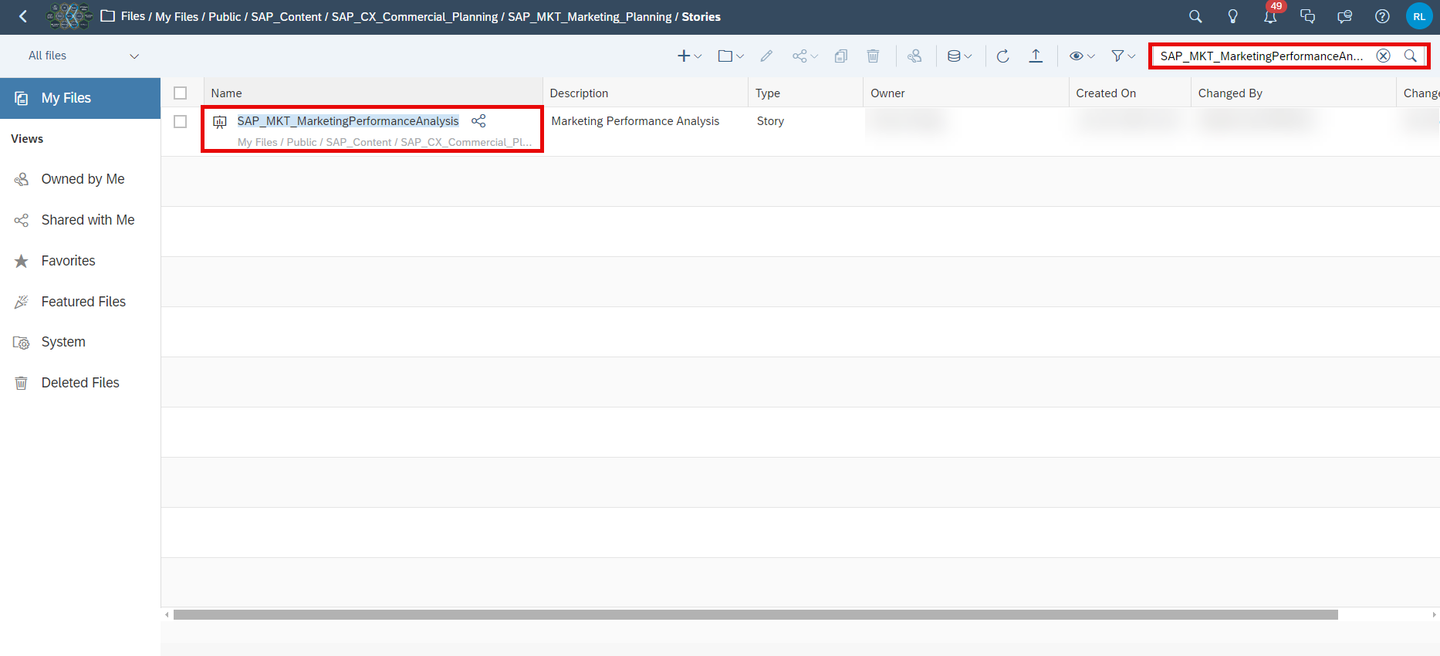
analytic_application Right-click on the input control
p1_ic_detailHeader_Version. (You can search the name of the object in the Outline in the Left Side Panel.) Click on Edit Filter in the context menu.
analytic_application Select
Baselineas additional value for your version. Press OK.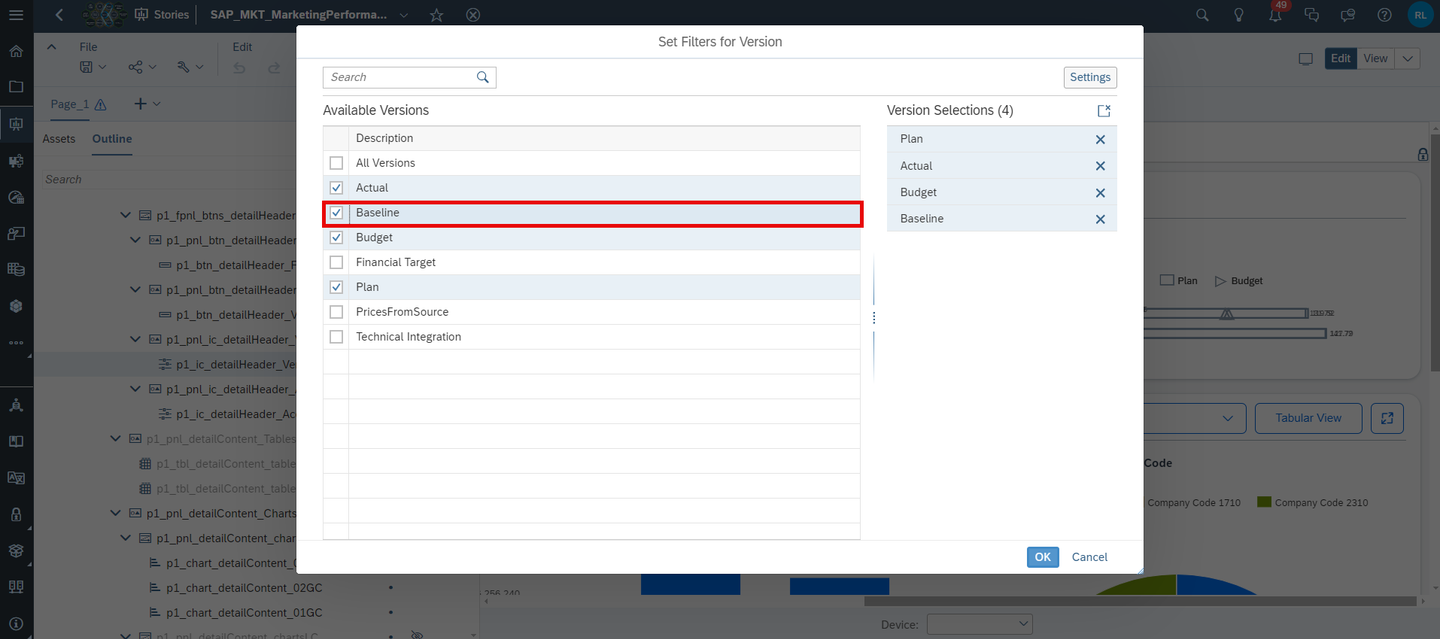
analytic_application Save the story.
You learn how to set the new version as default in the story SAP_MKT_MarketingDemandPlanning to run the data actions.
You learn how to overwrite the default in the section after this. However, in case anybody misses to provide the correct parameter while invoking the data actions, you have selected the correct default value as fall back in this section.
The data actions are used to switch back and forth between the quantity and revenue point of view in the table. This can be done by using the Table Settings button you will see once you have opened the app and its respective Table Setting Dialog. Without the change, the table would refresh to the Plan version when you use the Table Settings.
In the SAP Analytics Cloud Menu, navigate to the Files section.
Search for the story
SAP_MKT_MarketingDemandPlanningand open it in Edit Mode.
analytic_application Open the Left Side Panel and open the Outline. Scroll down to Data Actions. Click on
da_populateMeasures.
analytic_application Click on the value member selector of the Target Version drop down menu in the right side panel.
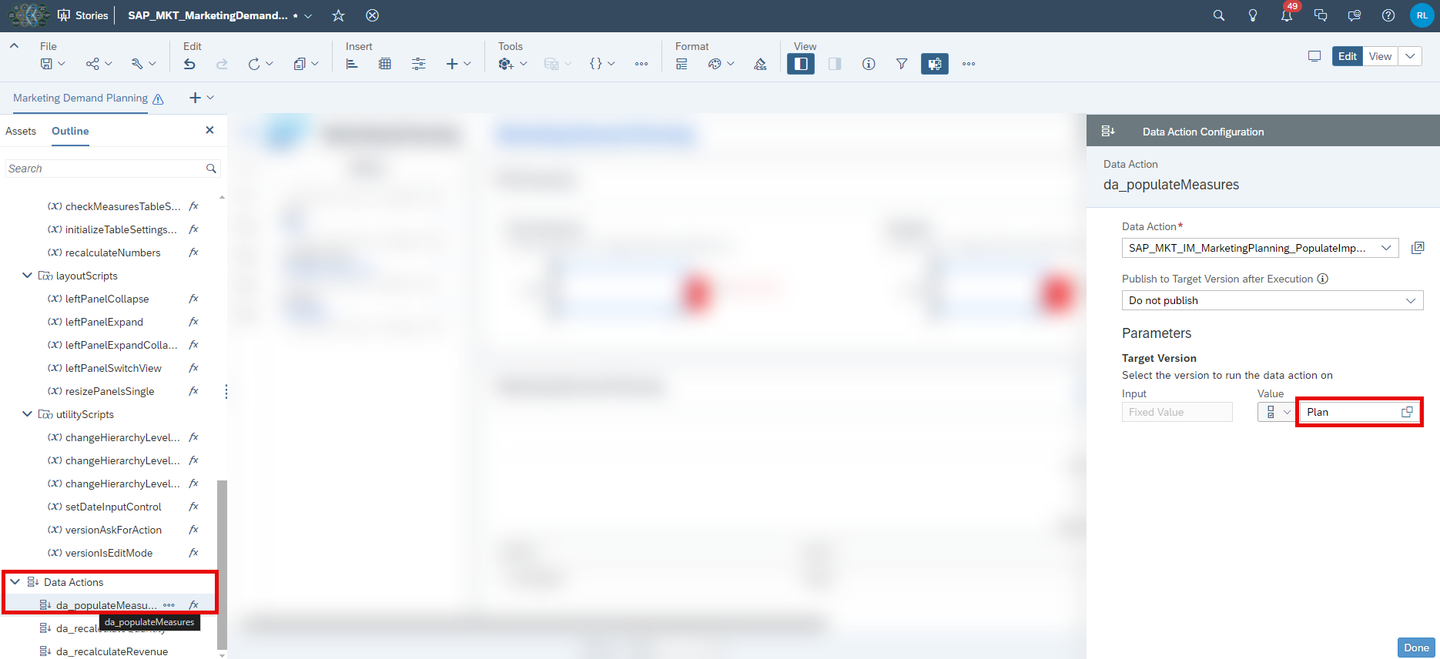
analytic_application Select the
Baselineversion and click on OK.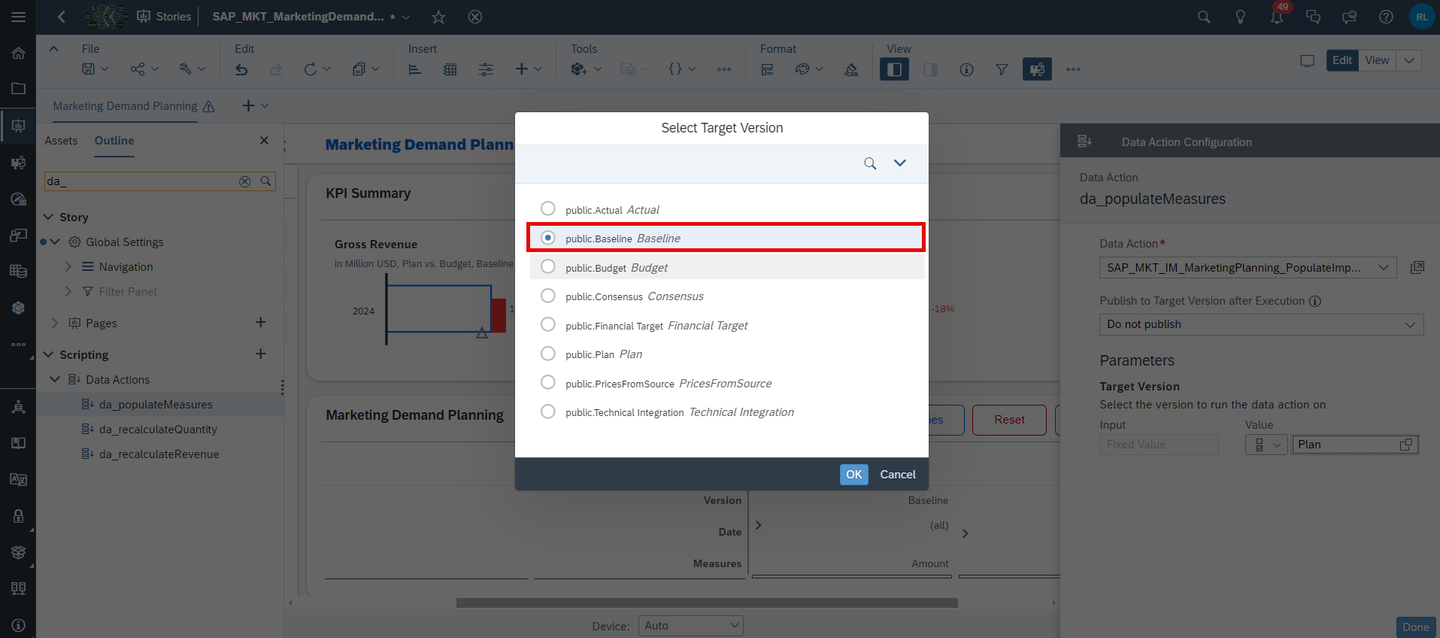
analytic_application Repeat step 3-5 for the other data actions
da_recalculateQuantityda_recalculateRevenue
Save the changes.
You learn how to set the new version as default in a variable in the story SAP_MKT_MarketingDemandPlanning to run data actions. In the previous section you adjusted the default version value of each data action. This is just a fall back in case you as the developer forget to do the next steps. The next steps show you how to change the variable for the version in a central place. You can either follow the steps 1 and 2 or skip them, if you are still in the story from the previous steps.
In the SAP Analytics Cloud Menu, navigate to the Files section.
Search for the story
SAP_MKT_MarketingDemandPlanningand open it in Edit Mode.analytic_application INFORMATION:
Please note that the procedure is the exact same for any other application. Possible applications where the plan version can be changed in script:
SAP_MKT_MarketingCampaignPlanning
Open the Left Side Panel and open the Outline. Scroll down to
p_MarketingDemandPlanning. Click onfxin order to Edit Scripts and then clickonInitialization.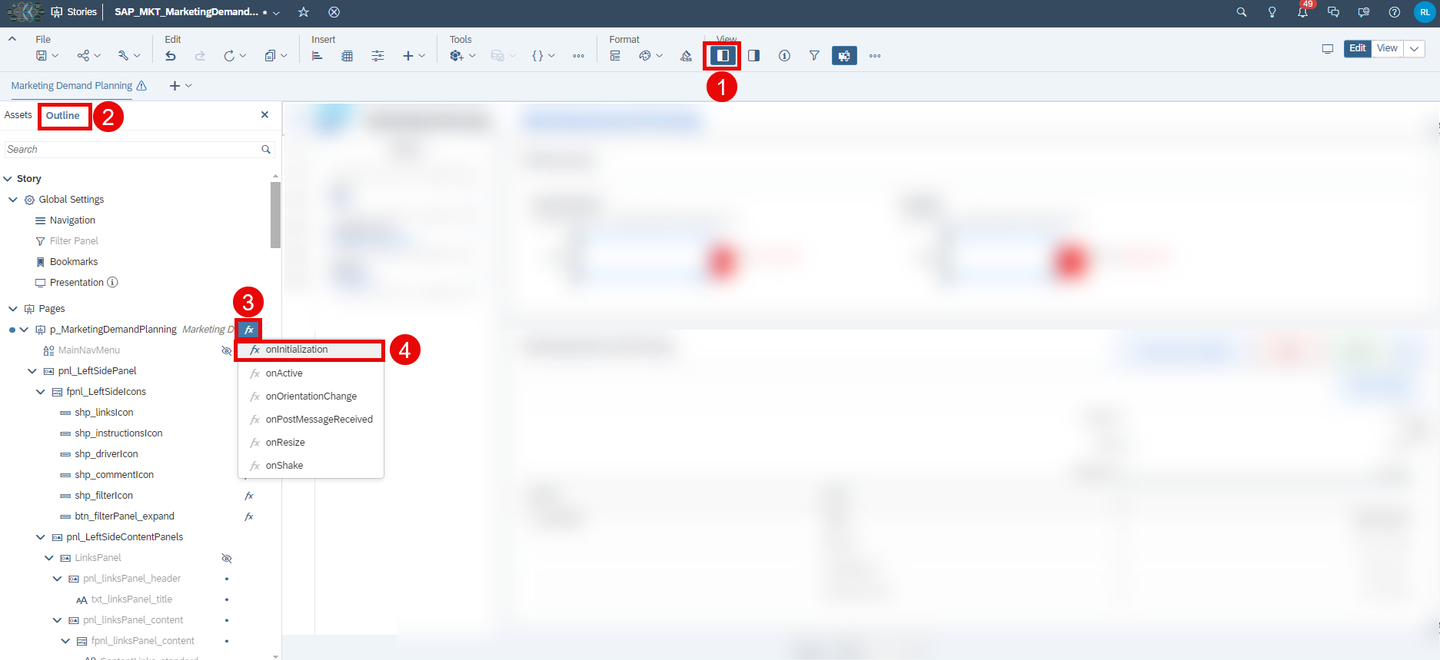
analytic_application Adjust line 60 of the script.

analytic_application Remove the old version
public.Planand add the new versionpublic.Baselinelike thiscfg_planVersion = 'public.Baseline';Use the Left Side Panel with the Outline again. Search for the Script Variable
cfg_planVersion. Click on...in order to Find Reference.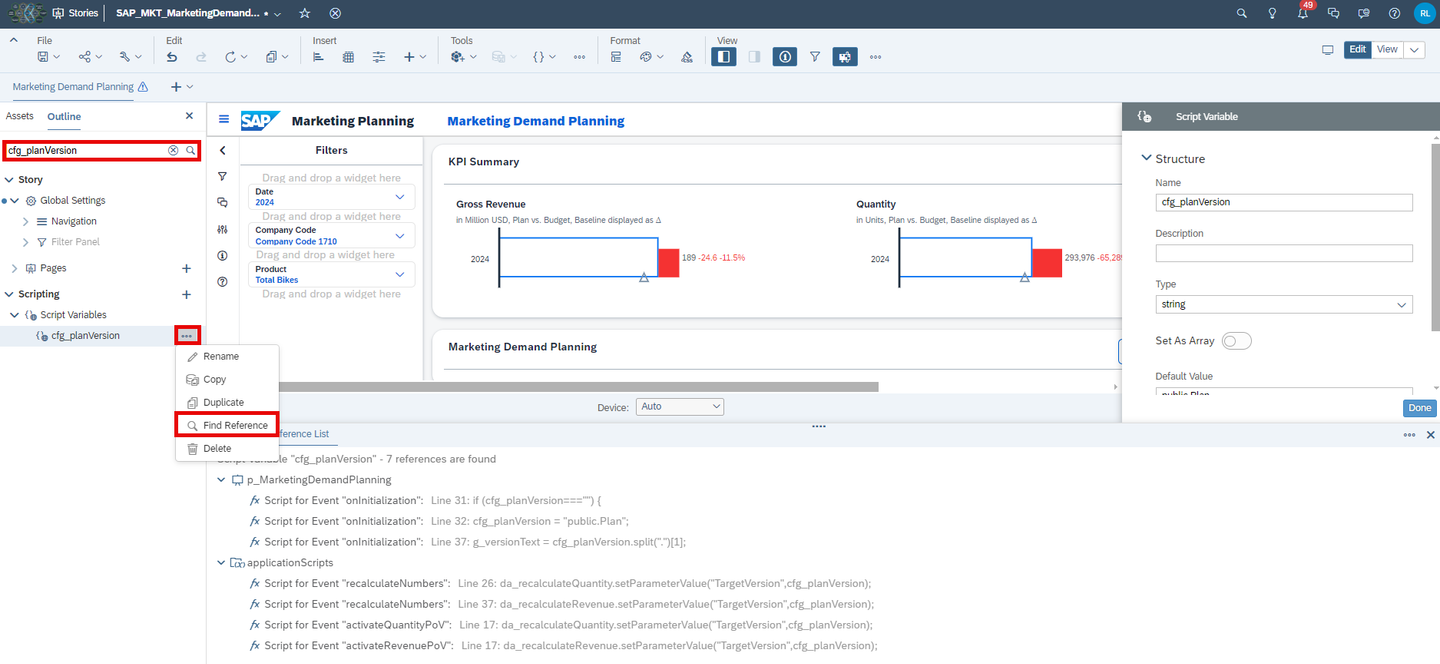
analytic_application Change the Default Value in the Right Side Panel to
public.Baseline. Dive deeper into the Reference List at the bottom to understand where the script variablecfg_planVersionis used.analytic_application Save the changes.
Congratulations! You have now successfully created a new version and embedded it into the planning applications and stories!
If you want to learn more about the modules of this content package, check out the following tutorials:
- xP&A Commercial Planning - Get to know the Sales Planning module
- xP&A Commercial Planning - Get to know the Portfolio Planning module
- xP&A Commercial Planning - Get to know the Marketing Planning module
If you want to customize the content and adjust it according to your own business requirements, the following resources might be helpful:
- xP&A Commercial Planning - Introduction to the Data Model
- xP&A Commercial Planning - Data Integration
- xP&A Commercial Planning - Manage data loads
- xP&A Commercial Planning - Understanding the technical structure of Stories
- xP&A Commercial Planning - Add additional sections to a story
- xP&A Commercial Planning - Add an additional story to the Navigation Menu
- xP&A Commercial Planning - Customize Default Settings
- xP&A Commercial Planning - Customize Table Settings Dialogue
- xP&A Commercial Planning (Marketing) - Add a new Driver
- xP&A Commercial Planning (Marketing) - Extend activity spend dates
- xP&A Commercial Planning (Sales) - Add a new Version
- xP&A Commercial Planning (Sales) - Add a new Tactic
- xP&A Commercial Planning (Sales) - Add a new Spend Type
If you want to get an overview of the entire xP&A Commercial Planning content package, make sure to check out the Mission.
Interested in more xP&A topics and related business content packages? Visit our community page Extended Planning & Analysis Business Content.
Resources
Discussion
Share feedback on this tutorial or join the conversation in SAP Community.