
Install and Set Up Desktop Agent 3
Install and set up the Desktop Agent 3 to run your automations
Overview
You will learn
- How to install the Desktop Agent 3
- How to register a tenant in the Desktop Agent 3


Prerequisites
Prerequisites
- A Windows PC
- If you are using a MAC, please install a VDI
- Access to a SAP BTP tenant with SAP Build Process Automation
Steps
The Desktop Agent 3 is an on-premise component of SAP Build Process Automation that is installed locally on user desktops. It executes automation projects that launch and run applications of various kinds, reads information from screens, enters data, clicks options, and processes data.
The very first time you launch the Desktop Agent 3 on your workstation, you will be prompted to log in. If you are unsure of your login details, please ask an administrator.
CAUTION: If you are a P user, you will have to download the Desktop Agent 3 from the SAP Development Tools. Please choose option Manually.
Follow these steps once and your Desktop Agent 3 will be regularly updated to the latest version.
You can install the Desktop Agent 3 from SAP Build. Navigate to the Control Tower in SAP Build lobby, choose Agent Update under Agent Configuration.

Agent Update The following steps are required if you have not set up your Secret ID yet.
Select Go to RBSC Portal.

RBSC Portal Select Add User.

Add User Please make sure you assign the
ProcessAutomationAdminrole when you subscribe to SAP Build Process Automation in your BTP account. If you do not do so you will not be able to add a user.Set the name of the user and choose Add user.

Set username Confirm with OK button.

Create user To generate a new Secret ID, choose Generate and then select OK.
Note the full username as it will be needed later.

Generate a new key When the Secret ID is generated, copy its value and click OK.

Generate a new key Go back to SAP Build, and select the Enter Secret ID button.

Enter Secret ID Set the Name and the Secret ID.
Choose Confirm.

Set the secret id Choose the Go to Download Page button.

Go to Download Page Download the file.

Download file
You will download the setup program from the SAP Development Tools. It is provided in the form of an industry standard Windows MSI installer.
Download the latest version of the MSI file extension.
MSI version will be updated for every new release. Always download the latest version.
Scroll down to SAP Process Automation: Desktop Agent 3 for Trial.
Select the desktop agent available for your operating system.
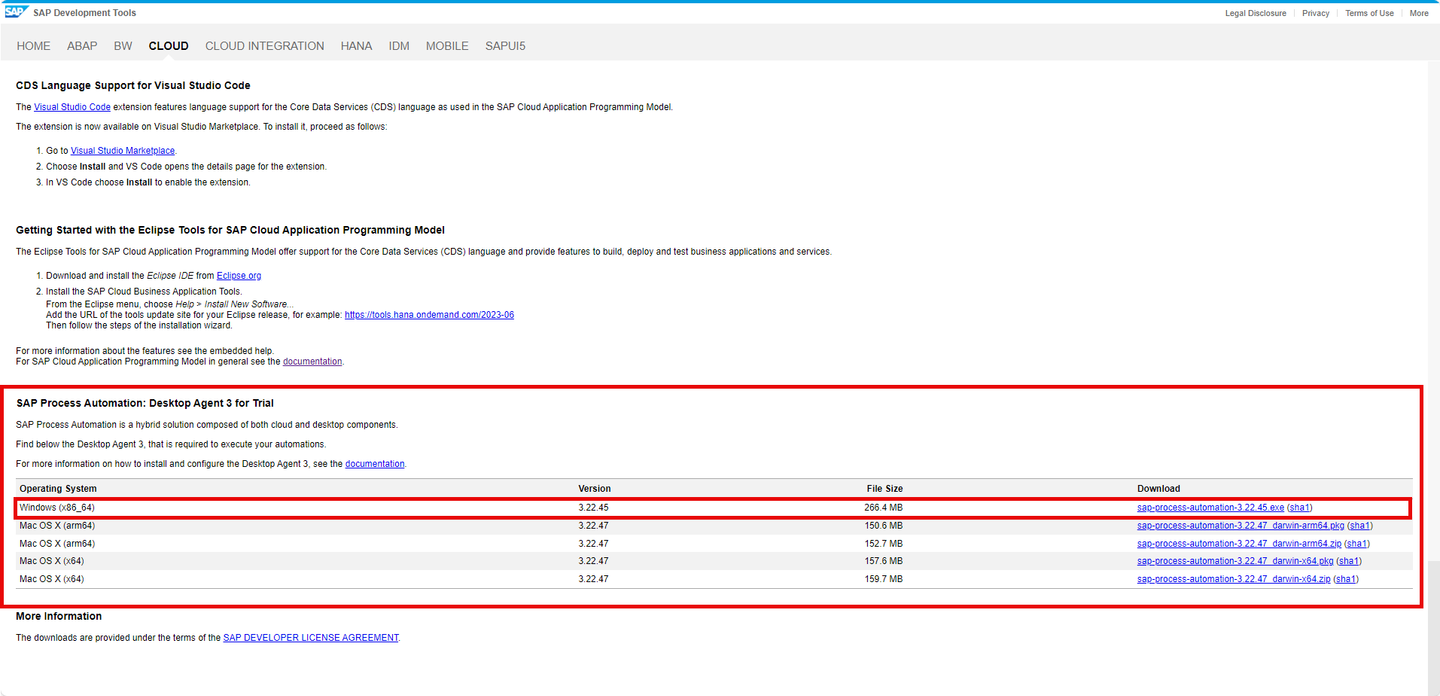
Desktop Agent 3 Trial download
When you install the Desktop Agent 3, it will automatically set up the SAP Build Process Automation web browser extension for Google Chrome and Edge.
To prevent issues during the installation, please close all the Chrome or Edge tabs opened on your machine.
The minimum version of the Desktop Agent supported by SAP Build Process Automation is 3.7.41.
Open the downloaded file. Select Next to begin the installation process.

Desktop Agent 3 Installation You can open the file with administrator rights, and install the service, only if your use case requires it. For example, using the agent in unattended mode in production. It is not required for following the tutorials.
Wait for the installation process to complete.

Desktop Agent 3 Installation Once the installation is successfully completed, choose Finish and launch the Desktop Agent 3.
A Google Chrome extension and an Edge add-on are installed when you install the Desktop Agent but you have to enable them (at least the Google Chrome extension).
On Google Chrome, select Manage extensions under Extensions.

Manage extensions Enable SAP Build Process Automation extension.

Enable extension Do the same for the Edge extension.

Enable extension
Once the installation steps of the SAP Build Process Automation setup wizard are completed, you need to register your agent and connect it to a SAP Build Process Automation tenant in order to execute automations.
The Agent icon will be available on your System Tray, when the Desktop Agent 3 is installed.
After installation is completed and browser extension allowed, open the Download Page and choose Refresh Page.
Once the extension is enabled, you may register your agent to your tenant. Choose Register Agent.

Register Agent The Agent is registered:

Refresh Page Once the process is completed, open the Desktop Agent 3.

Desktop Agent 3 Installation Confirm the tenant configuration.

Configure Tenant The tenant is active.

Tenant Activate Once you completed the previous actions, log in to your tenant with your user name or e-mail and password.

Activate Tenant The Agent should be in Idle state, waiting to start a project. To check, go to Control Tower, and select Agents.

Agent 
Agent Idle
Navigate to SAP Build lobby. Select Control Tower > Agents.
Agents Select Register new agent.

Register new agent In the Register New Agent window, select Copy and Close.

Register agent Select the Desktop Agent 3 icon.
Desktop Agent 3 Installation Choose Tenants, select Add Tenant button.
In Add Tenant window, do the following:
- In the Name field, enter a name for your Tenant,
- In the Domain field paste the URL you copied previously,
- Choose Save.

Tenant data Select the tenant, choose the three dots and select Activate.

Activate Tenant Once you completed the previous actions, log in to your tenant with your user name or e-mail and password.
Activate Tenant The Agent should be in Idle state, waiting to start a project. To check, go to Control Tower, and select Agents.
Activate Tenant
Navigate back to Control Tower. Select Environments under Tenant Configuration.

Environment Choose Create Environment.
In the Create Environment window do the following:
- Give your environment a name
- Select a color
- You may enter a short description
- Choose Create

Create Environment Select the created environment to add your agent in it.

Select environment Select Agent Management > Add Agent.
In the Add Agent window, select your agent and choose Add agent.

Agent Management Add Your agent is now added and ready to run.

Agent Management List
Resources
Discussion
Share feedback on this tutorial or join the conversation in SAP Community.