
Overview
You will learn
- How to build an automation in SAP Build Process Automation to extract data from a SAPUI5 screen.
- How to get the header and line items data of a table.
- How to use sub-automations.


Prerequisites
Prerequisites
- You have completed the first exercise: Capture Orders Management SAP UI5 Application Using Recorder
Steps
Intro
The screens and elements have been defined. You can now create the actual automation.
Think about what your bot should do. On a very high level it must:
- Open Excel and read supplier name from there.
- Open a Orders Management application in a web browser and extract order details from there, based on the supplier name from Excel.
- Write the order details back into Excel.
NOTE: You can reuse the automation Orders Management Automation created by the screen recorder and modify it later.
For now, start by creating two additional automations: the main one (named Order Management) and an other one for Excel (named Write Excel).
Make sure that the Overview tab is selected and then click the Create button and select the Automation artifact from the artifact menu.

001 Name the Automation: Order Management and click Create.

002 An empty automation is created.
Go back to the Overview tab, create a new Automation and name it: Write Excel.
Now you have three Automations:

003 Let’s reuse the Recorder generated automation Orders Management Automation. Rename it to Web Portal. You can also use it as a sub-automation to open the web (Orders Management Application) and extract the needed data.
Activate the Orders Management Automation tab. If the tab is closed, go to Overview and open it.
Go to the Info section of Automation Details.
Change the Name of the automation to Web Portal.
Click Save.

004
In this automation, you will retrieve the data from this excel.
Define the general structure of the automation. The following is the data that needs to be retrieved from excel:

Add the Open Excel Instance activity to the automation to open an Excel.

011 You want to open the correct workbook. Add the Open Workbook activity.

012 In the Input Parameters on the right, fill the
workbookPathfield with the path to the file and select the proposed string.
013 Or you can edit the expression and enter the full path to your file. Make sure the path is within quotation marks "…". For example:
"C:\Users\Public\sbpa\Demo_Procurement.xlsx"
014 Now, you must open a specific worksheet. Add the Activate Worksheet activity.

015 Set
worksheetNamefield to Overview.
016 Finally, you must get a value from a cell.
- Add the Get Values (Cells) activity
- Set
rangeDefinitionfield toB1 - Rename Output Parameters to
supplierName

017 So far, you read Excel Cell B1 and saved the result in a variable called
supplierName.
018 Add Web Portal and Write Excel sub-automations. They just act as placeholders.

019 At the end you must make sure that Excel is not used by SAP Build Process Automation anymore. Therefore, you add the Release Excel Instance activity to release the instance.

020 Click Save.
Now, you check how the bot works and if the automation has any mistakes.
Click the Test button.

021 Click Test.

023
Once the automation is completed, you can see the debug screen (Tester). Here, you can either check the output of the Test Console or click on single steps in the automation to see the details on the right side.
For instance, click on the Get Values (Cells) step and you can see the correct output value on the right Bottom-Dollar Markets. The automation ran correctly.

NOTE: Please don’t forget to close both excel, as well as the SAPUI5 application each time you test the automation.
The Recorder created an automation that you renamed to Web Portal. On a high level, refer to the following steps:
- Enter supplier name in the search box and search.
- Click on the result.
- This will open the details of the order.
Now, you must modify the recorded automation and enhance it. You must make sure that your bot saves all the relevant information which you will later write into Excel.
Open the Web Portal automation, either on the left menu or on the tab on the top.

028 Click on the Start Web Page step. There is no need to modify anything however if you want, here you can change the default web browser application. Select only chromium web browsers (Chrome or Microsoft Edge).

029 Click on the Browse Orders and choose Define Screen Activities.

030 To make your automation more robust, you must be sure that the screen is fully loaded. Search for the Wait (Screen) activity, and drag and drop it after the Start Web Page activity. SAP Build Process Automation will wait until the screen is fully loaded.

031 
032 Additionally, SAP Build Process Automation must wait to ensure that the search box loads as well. Search for the Wait (Element) activity. You have two options on how to add it to your automation. Check them and apply the one you prefer.
OPTION 1: Drag and drop the Wait (Element) activity on the search box. Make sure the cursor changes to + before releasing. The step is added as the last one. Move it just after the Wait (Screen) step.


OPTION 2: Drag and drop the Wait (Element) activity after the Wait (Screen) step.

Click on the Target editor.

Select the Search Field element and click Confirm.

In the Set Element (SAPUI5 Recorder) step, you search for the supplier name. You recorded a fixed value and now, you must modify the automation in such a way that you search for a value defined in Excel.
But how to get the name of the supplier from Excel? It’s not available in the Web Portal sub-automation yet. That variable is only available in the main Order Management automation. But you can pass the variable to the sub-automation using Parameters.
First, rename the automation label from Set Element (SAPUI5 Recorder) to Search String.

039 Click on an empty space to change the settings of the automation. Click the Input/Output tab and then click Add new input parameter.

040 Create an input parameter named
CustomerName.Make sure that the type is String. Click on an empty space (or press Enter).

041 Go back to the Search String step, delete the old value and select the
CustomerNamevariable, which is the input parameter passed to the sub-automation.
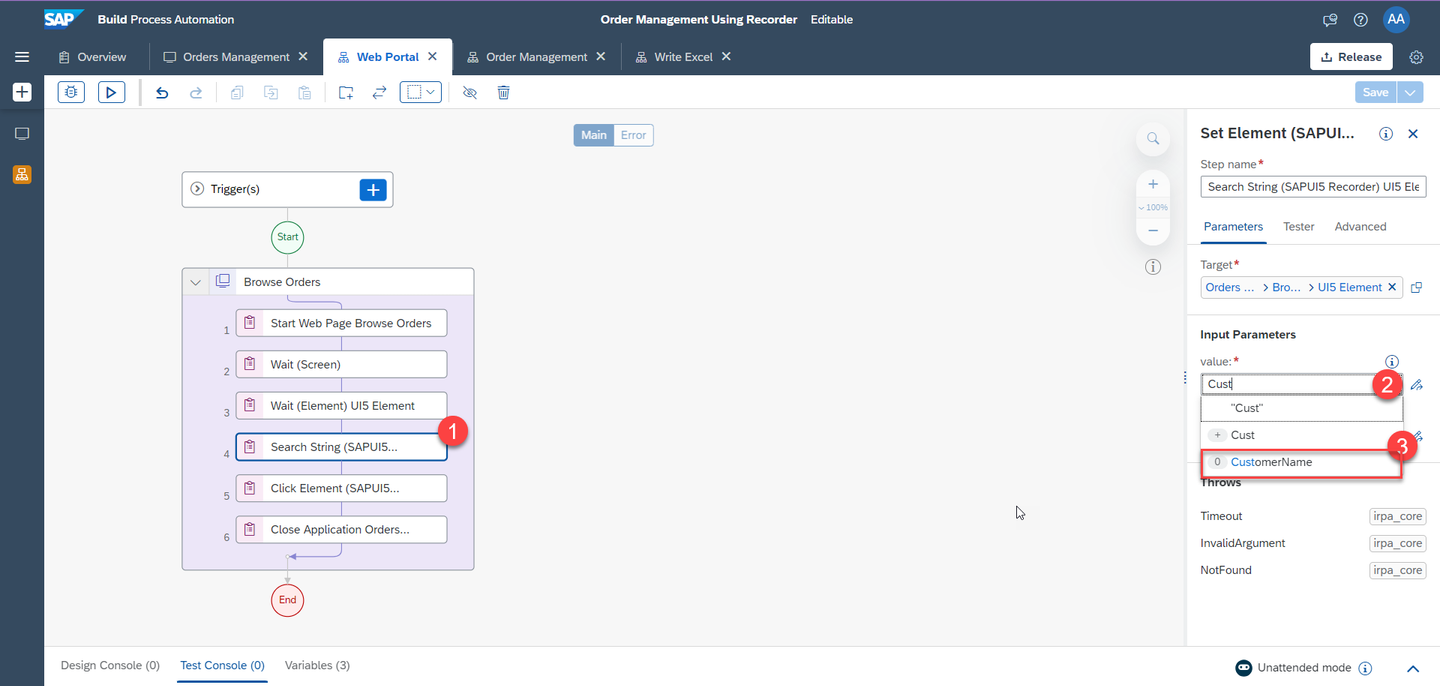
Click Save.
However, the value still hasn’t been passed from the main automation. To do that:
- Go to the main automation either from the left side or from the tabs at the top. Select the Web Portal step and set the
CustomerNamefield tosupplierName.
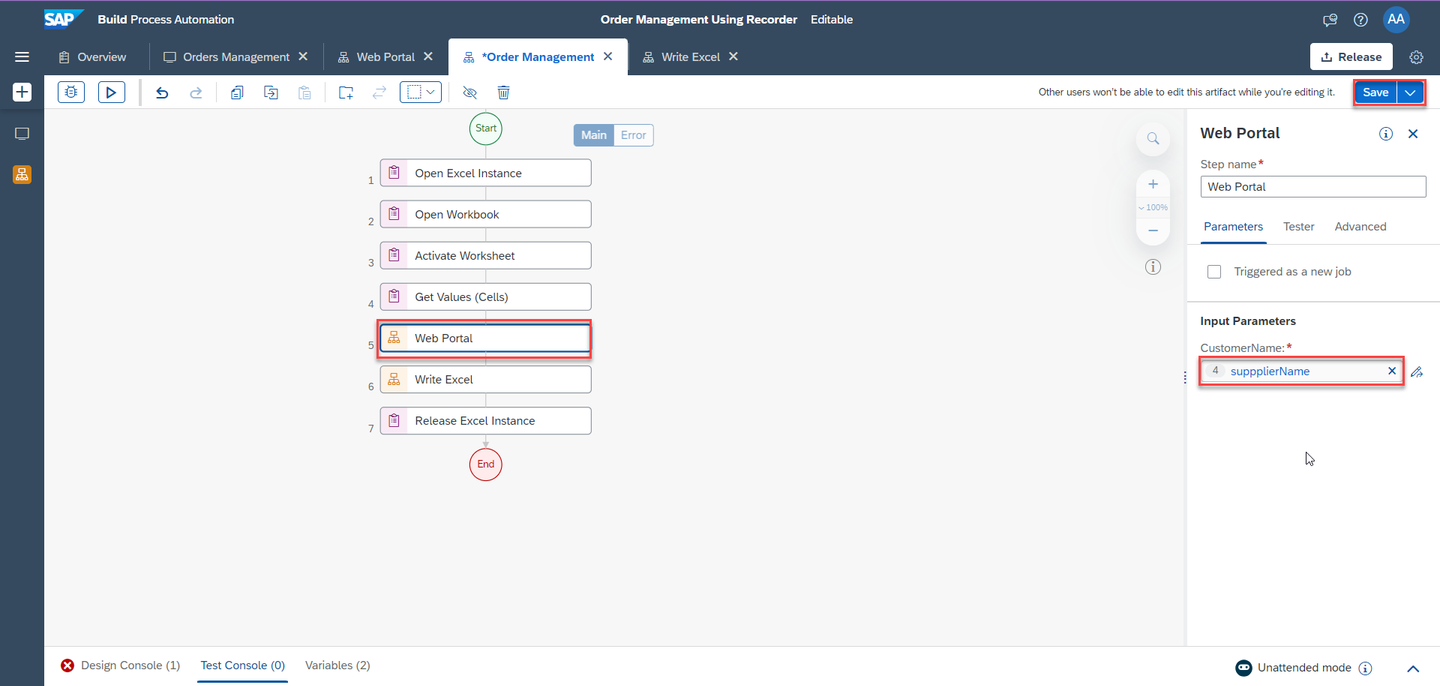
- Click Save.
Next, make sure that your search results are loaded before you continue with your automation.
Add the Wait (Element) activity just after the Search String step.

046 Click Target, select the
OrderFoundelement and choose Confirm.
047 SAP Build Process Automation should wait for the details screen to open and load. Add a Wait (Element) step.

048 Click Target, select the Price element and choose Confirm.

049 Save the Order Number in a variable. Click on the Get Element step.

050 Set the target to Order Number element and choose Confirm.

051 Rename the output parameter field to
orderNumber.
052 You can test now. If you go to the main automation (tab Order Management) and start test, you must select an environment. Don’t forget to close excel.
If you remain in the Web Portal tab, you must enter
CustomerNamebecause you will only test this automation and value will not be fetched from Excel (enter search value: Bottom-).In both cases, you will see that the received get element value is Order 2686.

053 Next, get the Price element and save it in the price variable.

054 If you run a test again you can check the value.

055-test NOTE: You can also rename these two Get Element activities to more meaningful names (for example, Get Element (price) and Get Element (order number)).
Use the Get Element activity for the Shipping Address table. Drag and drop the activity on the table.
Select ITEM: Shipping Address and INDEX: all.

056 The shipping address is nested so a “For Each” loop has been automatically created.

057 Click on the Get Element activity and define the Output Parameters field to array.
Click Save.

058 Use the Get Element activity for the Line Items table. Drag and drop the activity on the Table Data.
Select ITEM: Table Data and INDEX: all.

059 The Table Data is Two-Dimensional, hence two “For Each” loop have been automatically created.

060 Click on the Get Element activity and define the Output Parameters field to
TableCellData.Click Save.

061 Use the Log Message activity to display the values of each element.
Search for the Log Message activity and drag and drop into the workflow after the Get Element step of the For Each - 3 loop

062 Click on the Log Message activity and select
TableCellDatain the message field.Click Save.

063 Add another Log Message activity to display the value of the row number. Drag and drop it after the For Each - 2 loop.

064 Click on the Log Message activity, and click the expression editor button for the Input Parameters message.
Edit the expression to ‘Row no :’ + Step13.index.
NOTE: Step number 13 is the first for loop to display the row count.

065 Click Save and test the automation. As you can see in the Test Console, all the product information, product name, unit price, quantity, and total amount are displayed cell by cell.

066
The name, address, zip and so on from the shipping address are currently stored in an array. You can add better structure to that by using Data Types from SAP Build Process Automation. These data types can store multiple variables and named fields to represent more complex data structures. Create two data types: one for a shipping address and another for a line item.
Save the automation you have so far. Go to Overview tab.
Click Create > Data Type.

057 Name the data type Line Item and click Create.

058 Repeat the same steps to create another data type named Shipping Address.

059 Now, go back to the Line Item data type, create a new field by clicking on New Field.

060 Adjust the field properties to name Product and type String.

061 Repeat the steps to create the other fields:
UnitPrice,Quantity,Total. All of these are type String.
062 Repeat same steps to create fields inside the Shipping Address datatype: Name, Street, ZIP, Region, Country. All of these are type String.

063 Click Save to save both data types.
Go back to the Web Portal automation and drag and drop the Shipping Address data type just after the Get Element (Price) step.

067 Define the Output Parameters field to
shippingAddress.
068 Select the Input Parameters value to Create Custom Data.

069 
070 Drag a Condition step and drop it under Get Element step.

071 Select the Condition step and click Edit Formula.

072 In the Expression Editor, type Step11.index === 0 and click Save Expression.

073 Choose Add Condition and type the following formula in the Expression Editor:
- Step11.index === 1

073 Similarly, add three other Conditions and enter the following formulas in the Expression Editor:
- Step11.index === 2
- Step11.index === 3
- Step11.index === 4
The automation will look like this:

074 Now, drag a Set Variable Value activity and drop it below the first condition.

075 Click on the Set Variable Value activity and change the step name to Set Variable Name.
Select the variable field value to
shippingAddress.Select the value field value to Custom Data.
Select the Name field value to array.

076 Drag a Set Variable Value activity and drop it under each Condition.
Repeat steps 10-13 with the below information :
| Field Name | Value |
|---|---|
| Step Name | Set Variable Street |
| variable | shippingAddress |
| value | Street: array |
| Field Name | Value |
|---|---|
| Step Name | Set Variable Zip |
| variable | shippingAddress |
| value | Zip: array |
| Field Name | Value |
|---|---|
| Step Name | Set Variable Region |
| variable | shippingAddress |
| value | Region: array |
| Field Name | Value |
|---|---|
| Step Name | Set Variable Country |
| variable | shippingAddress |
| value | Country: array |

Start by creating a variable which will contain multiple line items.
Add the Line Item data type after the For Each loop.
Make sure to check the list option and define the Output Parameters field to
lineItems.
078 Now add a Line Item data type inside the For Each - 2 loop.
Select the Input Parameters value to Create Custom Data.
Set the Output Parameters field to
lineItem.
079 Drag an Add Item (List) activity and drop it as well in the For Each - 2 loop, after Log Message activity.

080 Select the Add Item (List) activity and set the
listfield value tolineItemsanditemToAddfield value tolineItem.
081 Drag and drop a Condition step in the For Each - 3 loop after Get Element activity.

082 Add four Conditions with the following Condition Expression:
- Step24.index === 0
- Step24.index === 1
- Step24.index === 2
- Step24.index === 3

083 Now, drag and drop a Set Variable Value activity for each Condition.

084 Click on the Set Variable Value activity and change the step name to Set Variable Product.
Select the variable field value to
lineItem.Select the value field value to Custom Data value.
Select the Product field value to
TableCellData.
085
Repeat steps 11-14 with the following information :
| Field Name | Value |
|---|---|
| Step Name | Set Variable Unit Price |
| variable | lineItem |
| value | Unit Price: TableCellData |
| Field Name | Value |
|---|---|
| Step Name | Set Variable Quantity |
| variable | lineItem |
| value | Quantity: TableCellData |
| Field Name | Value |
|---|---|
| Step Name | Set Variable Total |
| variable | lineItem |
| value | Total: TableCellData |

Now, you have to pass data between sub-automations. You can do this by using input and output parameters.
The web automation will get the partner name from the main automation and return the order number, price, shipping info and line item details. This data will in turn be passed to the excel automation.
Select the Web Portal automation. Click anywhere on the grey area to open the automation parameters.
Make sure that an input parameter called
CustomerNameof type string is defined.
091 Create output parameters and make sure that the List box is checked for Line Item parameter.
Name Type List orderNumberString no priceString no shippingAddressShipping Address no lineItemsLine Item yes 
092 Now, you define which variables will be returned. Click on End step, select Parameters and select the respective variables for outputs.

093 Click Save to save the automation.
Now, you must automate the Excel part. You have collected the data from the SAPUI5 application. You must insert the data back into Excel. You will do this in the Write Excel sub-automation.
The following is the expected result:


Switch to the Write Excel automation. Start by adding input parameters, which you received from the Web Portal sub-automation.

098 Add the same input parameters as the output parameters you added in the web automation.
Name Type List orderNumberString no priceString no shippingAddressShipping Address no lineItemsLine Item yes 
099 You can further enhance the bot by setting all the product details in the Excel. Use the Set Values activity of Excel to set the values in the Excel.
Use the Set Values (Cells) activity to write data into a specific cell. Drag and drop the activity into the workflow of the automation.

102 Click on the Set Values (Cells) activity, change the name to Set Cell (Order Number) and set the
rangeDefintionfield value toB2andvaluesfield value toorderNumber.
103 Duplicate this step (right click on Set Values (Cells)).

104 Change the name to Set Cell (Price) and set
rangeDefinitionfield value toB3andvaluesfield value toprice.
105 Duplicate this step (right click on Set Cell (Price)).
Change name to Set Cell (Name) and set
rangeDefinitionfield value toB4.Change the values using the expression editor, to get the value inside the data type.

106 Write Step0.shippingAddress.Name in the Expression Editor.
NOTE: Step0 contains the input parameters.

107 Duplicate the steps to save time and adjust the parameters according to the following table:
rangeDefinitionvalues B2orderNumberB3price B4Step0.shippingAddress.Name B5Step0.shippingAddress.Street B6Step0.shippingAddress.ZIP B7Step0.shippingAddress.Region B8Step0.shippingAddress.Country 
108
Now, you will add a second worksheet for the line item details.
Desired result:

Drag and drop an Activate Worksheet activity and configure
worksheetNamefield value to Details.Click Save.
This action will switch to the second worksheet with the order details.

110 Add a For Each control to loop through the order line items. The looping list is
lineItems.
111 Drag and drop a Set Values (Cells) activity inside the loop.

112 The data cells start at row 2, the index starts at 0, so use the following formula in the
rangeDefinitionfield to determine the correct cell:“A” + (Step9.index + 2)
For the Values parameter, set the
valuesfield value to:Step9.currentMember.Product
NOTE: Make sure that you use the Edit Expression to enter formulas in
rangeDefinition. The text should be in blue color, not black!
113 Duplicate and repeat for Unit Price, with column
Binstead.
114 Duplicate and repeat for Quantity, with column
Cinstead.
115 Duplicate and repeat for Total, with column
Dinstead.
116 Save all automations.
To add the headers : drag four Set Values (Cells) activities and drop them into the workflow after Activate Worksheet.
Adjust the parameters according to the following table:
rangeDefinitionvalues A1Product B1Price C1Quantity D1Total 
117
Within the main automation Order Management, you pass the outputs from Web Portal into the inputs of Write Excel

117 Make sure that output parameters are defined for both sub-automation as displayed in the following screenshots:

118 
119 Now, you can test the automation. You must see the following results:


Congratulations! You have now completed this tutorial that read complex data from a website and stored it into an Excel file with two Worksheets.
Resources
Discussion
Share feedback on this tutorial or join the conversation in SAP Community.