
Overview
You will learn
- How to create a Table in the Form.
- How to use List in Decision.
- How to bind List in Decision to Table in Form.
- How to retrieve the sample project from the Store.


Prerequisites
Prerequisites
- Complete the mission Boost your Business Process with Automation, Decision and Process Visibility.
- Download the Orders.xlsx on your local machine.
- Setup the desktop agent to run automation as explained in this tutorial
Steps
Intro
In this tutorial, you will be creating a Decision to validate the Purchase Order Details extracted from excel. If the Purchase Order Details has errors, the errors will be displayed in a table in a form.
Once you have completed the prerequisite mission, your process should look something like below.

In the Order Processing process:
- Choose + after the Get Order Details.

Automation - Select Decision.

Automation - Select Blank Decision.

Automation A pop up will appear to configure the decision. Enter Order Validity Check as decision name and choose Create.

Automation
Go to the Overview Tab. Choose the Create button. Create an artifact of the type Data Type.

Automation A new pop-up will appear.
- Enter Name of the data type: Error Output
- Enter Description of your choice
- Choose Create

Automation In the Data Type Error Output add new fields as following.
Field Name Type ErrorCodeString ErrorDescriptionString 
Automation 
Automation Choose Save.
Navigate to the Order Processing process.
Select the decision Order Validity Check menu option and choose Open Editor.

Automation Add Input and Output parameters.

Automation Edit Input and Output parameters as follows.
Parameter Name Data Type Parameter Type Description Input Sales OrderSales Order Input Input Sales Order Validity Check OutputError Output Output Validity Check Output CAUTION: Select the List checkbox to make the output type as list of Error Output.

Automation Select the Rules tab. Choose Add Rule.

Automation Enter Rule Name as Error Check and Rule Description of your choice.
For Hit Policy, select All Match.
What is going on?
With a First Match hit policy, the rule engine fetches the first occurrence that matches the condition and returns it as the result. On the other hand, with a All Match hit policy, the rule engine fetches all the occurrences that matches the condition and returns them as the result.
Choose Next Step.

Automation In the Configure Conditions section, expand the Input Sales Order parameter.

Automation For this scenario you will be choosing
expectedDeliveryDate,orderAmount,shippingCountryandorderStatus. Choose Next Step.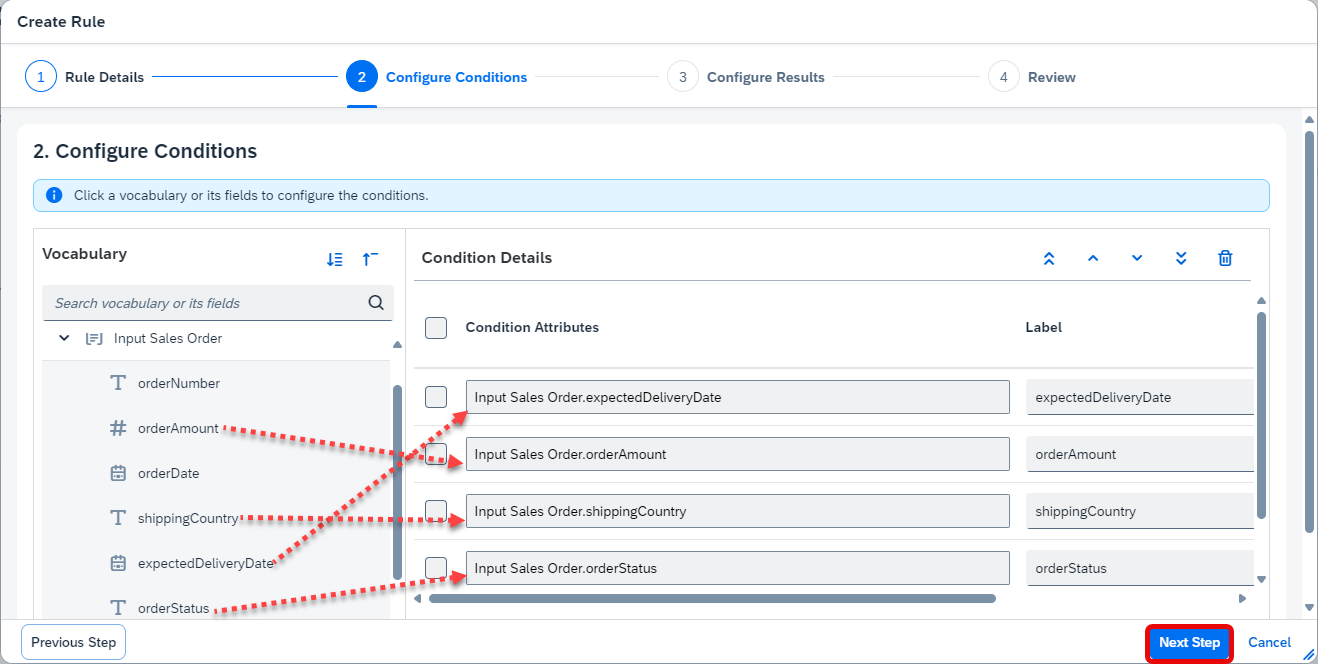
Automation In the Configure Results section, enter Validity Check Output (List) in Result Vocabulary. Choose Validity Check Output parameter. Choose Next Step.

Automation In the Review section, a summary of the rule to be added is displayed. Choose Create.

Automation Enter Full Screen Mode by clicking on the icon on the top right corner.

Automation In the Decision Table, add the below mentioned conditions.
Parameter Name Condition Error Code Error Description expectedDeliveryDate<TODAY() ‘ERR01’ ‘Delivery date is before current date’ orderAmount>100000 ‘ERR02’ ‘Fraudulent Request’ shippingCountryNOTEXISTSIN [‘India’,‘United Kingdom’] ‘ERR03’ ‘Delivery not supported in this country’ orderStatus=’' ‘ERR04’ ‘Order status is not set’ Click on the first column.

Automation Type
<TODAY, and choose TODAY from Array Operators. When finished, click outside the input field to confirm.
Automation Proceed in the same way for Error Code and Error Description (or Then section):

Automation Remember that for all String type data object attributes, you must add a single quote (’) before and after the text.
To add a new row to the decision table:
- Choose the check-box of the first row
- Choose Add Row
- From the dropdown options, select Insert After

Automation Similarly, enter the above values for the next rows.
Choose Save.
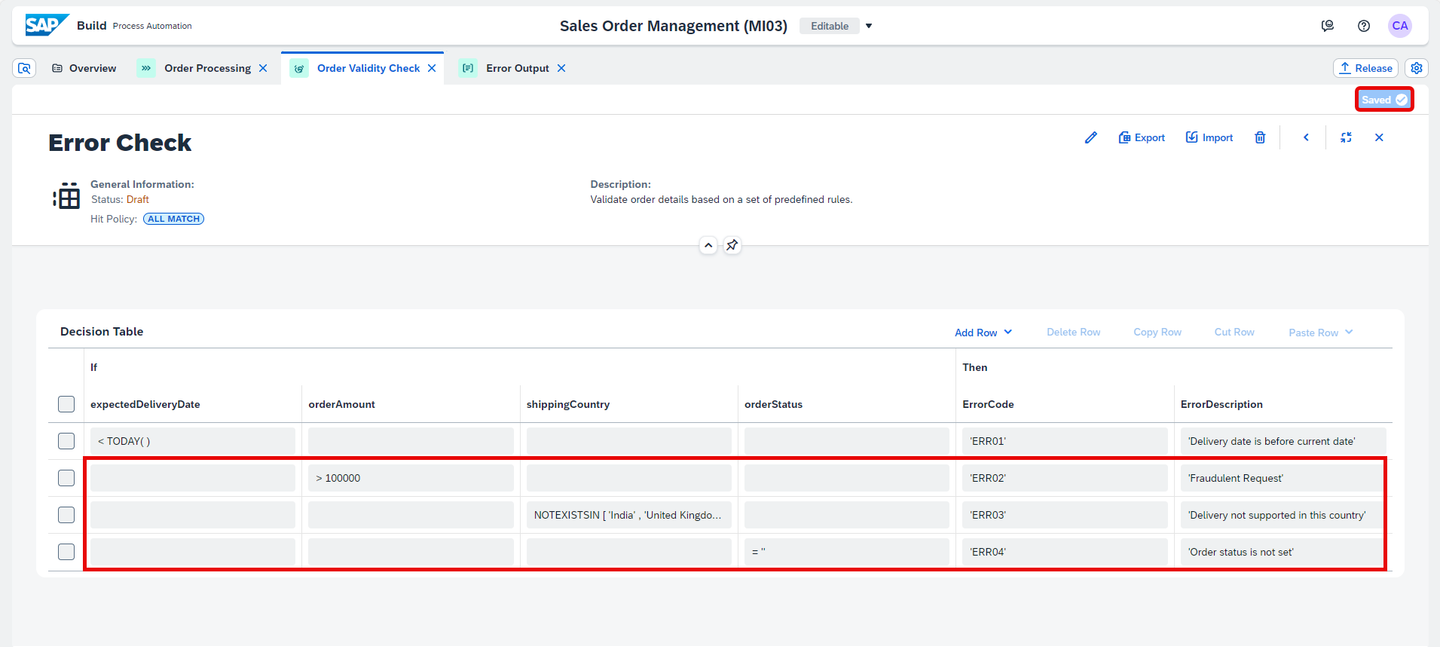
Automation
Navigate back to the Order Processing process.
Select the Order Validity Check decision and choose Inputs in decision details.
Map the input parameters listed in
Input Sales Orderto theselectedOrderoutput variables from Get Order Details automation.Choose save.

Automation
In the Overview tab, click the Create dropdown and choose Form.

Automation In the Create Form popup, enter the form name and choose Create.

Automation Add a Headline and Paragraph to provide necessary details. Add two Text fields and name them Customer Name and Order Number.
Check both Text fields as read only.

Automation Add a Table with Error Details as title. Mark it as Read Only.

Automation Choose the + icon in the table and select Text. Enter Error Code as field name.

Automation Choose the + icon beside Error Code field and select Text.

Automation Enter Error Description as field name and choose Save.

Automation
In the Order Processing process choose the + sign after the Order Visibility Check decision.

Automation Choose Controls and Events.

Automation Select Condition.

Automation Choose the Open Condition Editor for the new condition.

Automation In the Edit Branch Condition popup select the
list-Validity Check Outputparameter.
Automation Put 0 as value and select Apply.

Automation In the If branch of the new condition, choose + to add a new artifact.

Automation Select Form.
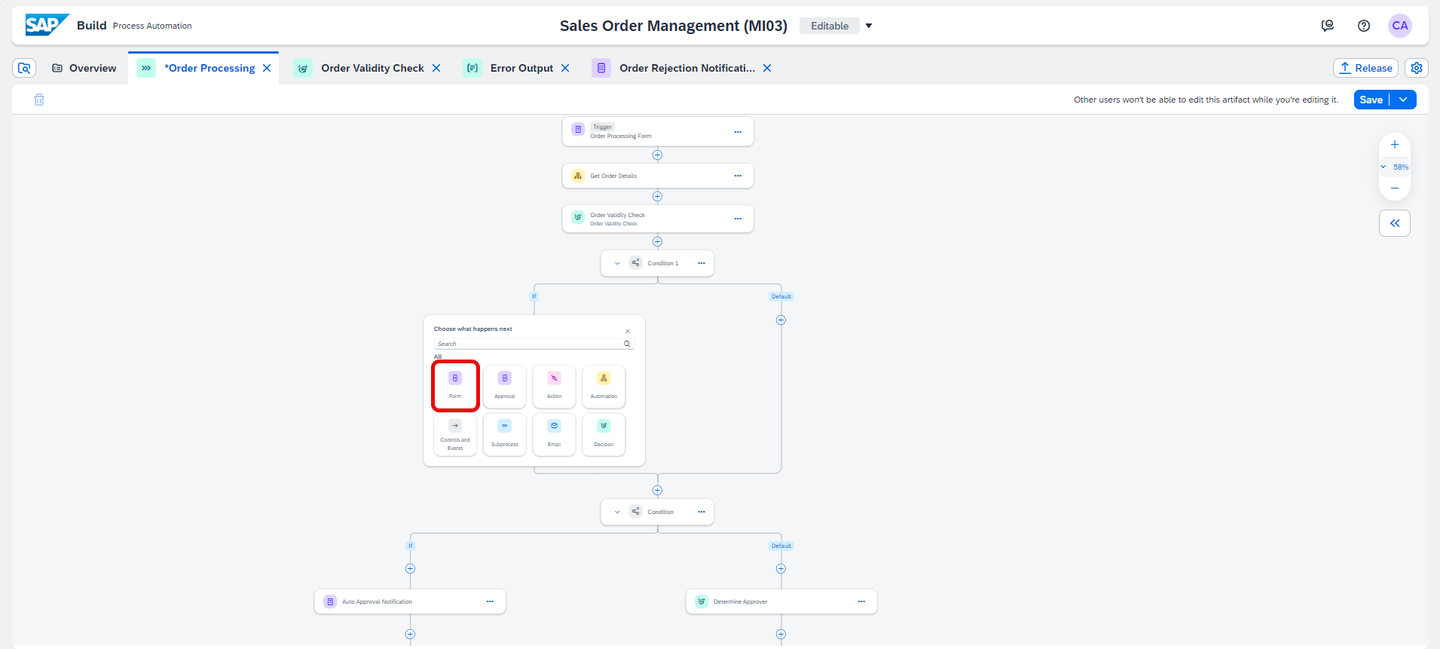
Automation Select Order Rejection Notification With Errors under Available Forms.

Automation In the General section of form details:
- Enter as Subject: Order Rejected due to errors
- Choose Process Started By as users under Recipients

Automation Under Inputs section, choose Select list and bind
list-Validity Check Outputto it.
Automation Choose the Order Number and Customer Name from trigger form to map them with the respective input fields.
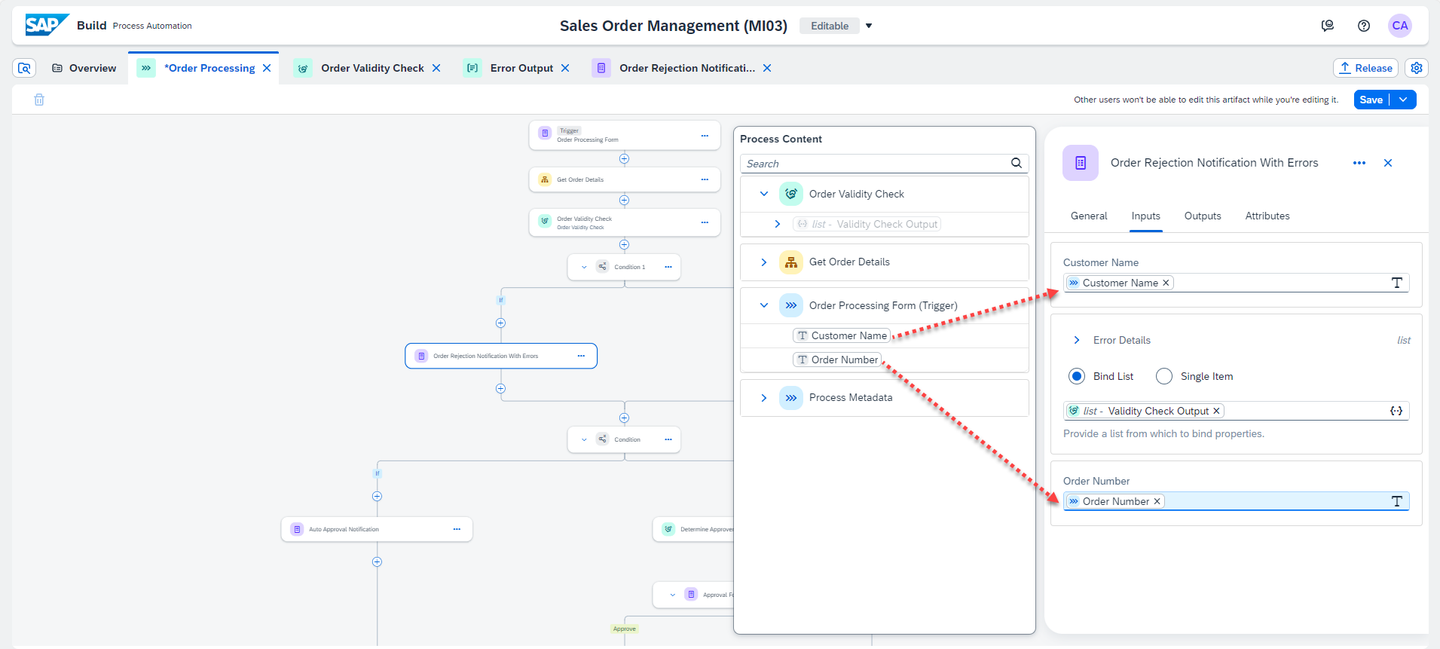
Automation Select the + after Order Rejection Notification with Errors form.

Automation Choose Controls and Events.

Automation Choose End.
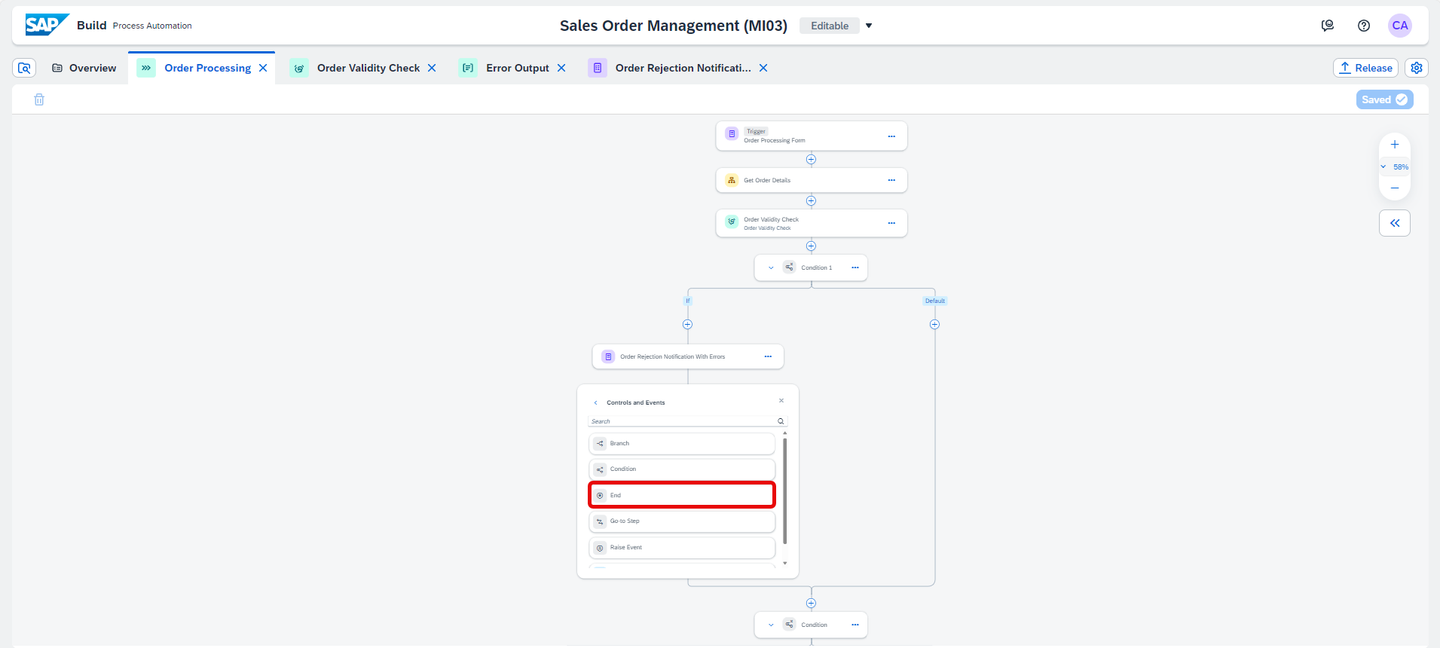
Automation At the end, your process will look like this.
Save your work.

Automation
In the Order Processing process, choose the Release button on the top right corner.

Automation In the Release Project popup, select Release.

Automation In the Overview section that appears, choose Deploy.

Automation Choose the Environment and select Deploy.

Automation In the Define Variables section, enter the
OrderfilePathfor the excel file you downloaded in the prerequisites section. Choose Deploy.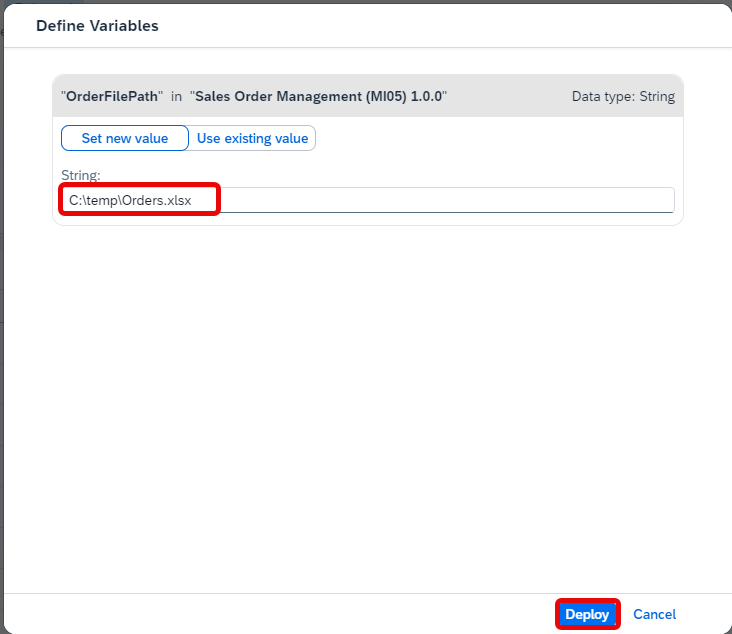
Automation Your project is deployed.

Automation
In the Order Processing process, choose the Order Processing Form artifact. On the right panel that appears, select the Copy Link icon next to Form Link field.

Automation Before executing the process, make sure your desktop agent is in unattended mode. You can refer to the prerequisites to Execute the Process with an Automation.

Automation In a new tab in your browser, enter the form link. Enter the details required in the form and select Submit.

Automation When you enter the order number in the form, the automation fetches the order details from excel stored in your machine. The details are validated according to the rules in the decision table and the respective errors are shown in a table in the form.
In the SAP Build Lobby, choose the Inbox icon on the top right.

Automation You will get a notification with the error details in a table.

Automation
This sample project can be downloaded from the SAP Build Store.
To retrieve this sample, please follow these steps:
From the SAP Build Lobby, navigate to Store.
Search for the sample project: Sales Order Management (MI05).
Choose Create from Template to retrieve the sample and save it as a new project in your lobby.

Store Choose Create.

Create Your project gets created in editable version. You may release and deploy it and run the project.
Navigate back to the lobby by clicking on the SAP logo.

Project You can see your project is available in the lobby.

Lobby
Resources
Discussion
Share feedback on this tutorial or join the conversation in SAP Community.