
Overview
You will learn
- How to leverage the result of the Decision in an approval form
- How to create an approval form
- How to create forms to notify process participants


Prerequisites
Prerequisites
- Created the trigger, the automation and also the decision to come to this point in the process
Steps
Intro
There are different requirements and business situations when a form is needed in a business process. You have already created a form to start the process. Most often you probably need a form to maintain some input data or to approve or reject a request or even to send out some notifications. The two latter ones are your focus now.
Choose + at the connection flow after the decision Determine Approver to open the context menu.

New Approval Form Then select Approval.

New Approval Form Click on Blank Approval

New Approval Form Maintain the Name
Invoice Approval Formand also the DescriptionForm to approve the invoice. Choose Create. The Identifier is created automatically.
Maintain approval form name Choose the three dots on the created form’s artifact and select Open Editor to do the same. Just ignore the red frames, you will fill them later.

Open Editor Now you are in the Form’s Editor, where you can define the layout and input fields. First add via drag and drop a new Headline 1 into the canvas. Provide this headline
Invoice Approval.
Add Headline Drag and drop a Paragraph into the canvas. Insert
Invoice Detailsin the paragraph.
Add paragraph Include a Text field in your form, change the name to
Company Nameand select Read Only, as you will display here some information from the process content.
Maintain text field Add some further input fields to your form. Please ensure you have selected the correct type and also maintain all of them as Read Only.
Field Type Name Text Invoice NumberNumber Gross AmountText Employee NameYou are done with the layout and input fields of the approval form. Save your work.

Further input fields Go back to your process, you will recognize some errors, e.g. inputs are missing. No need to worry, you will provide the required details in the next steps.

Errors Select the Invoice Approval Form and in the General tab of the form properties, move to Subject and choose Select Item.

Select Item Enter the text
Please approve the invoiceand add the process content Document Number. You will find this underneath Invoice Details. This combines plain text with process-related information and serves as an unique identifier for the end user.
Add process content In the Decision you have defined the approver of the invoice. The output of the decision has been an email address. Now add from the process content within
Approver_Outputthe eMail in the Recipients as Users. This means only the selected approver will get this approval in the inbox.
Approval user Switch to the Inputs tab and within Company Name, choose Select Item. The process content will open again.

Approval Form inputs Now add the attributes from the process content to the related input fields.
You can only assign fields with the same type, e.g. text in the process content to text input field. If you cannot assign, e.g. Invoice Number from the process content to the Invoice Number in the input field, the type of the input field might be wrong. If so, please correct your form.
Process Content Input Field Employee Name Employee Name Sender Name Company Name Gross Amount Gross Amount Document Number Invoice Number As this mapping of process content and forms is quite important to ensure a proper flow of the relevant data in your process, please check them again. It should look like this.

Check Approval Form inputs Save your work.
Choose the + of the control flow for Approve coming from the Invoice Approval Form you just created.

New Approval Notification Form In the context menu, select Form.

New Approval Notification Form Click on Blank Form.

New Approval Notification Form Maintain the Name
Invoice Approval Notification Formand also the DescriptionForm to notify about the approved invoiceand choose Create. As always, the Identifier has been created automatically.
Maintain Notification Form In the newly created Invoice Approval Notification Form, choose the three dots and select Open Editor.

Open Editor In the form, add a Headline 1
Invoice Approval, a ParagraphYour invoice has been approved.and also a TextInvoice Numberand select here Read Only. Save your work.
Invoice Approval Notification Form Go back to the process, select Invoice Approval Notification Form to maintain the information in General tab.

Approval Notification General Maintain Subject, choose Select Item and type
Approved Invoice:and add the process content Document Number.Select for the Users in this case Process Started By from the process content.

Approval Notification General Entries Select Inputs tab and assign the Invoice Number from the process content here.

Approval Notification Input Save your work.
With this you completed designing and configuring the approval notification form. You can copy the same form to create another form to send a rejection notification to the requester.
If copy is not available then create the form in the same way and modify the texts wherever relevant as shown below.
To add the new rejection form, you will use the Duplicate feature.
Duplicate feature is used to copy artifacts within the Business Process whereas Copy feature is used to copy artifacts across the business processes.
Click on the Overview.

Click Overview In the Overview screen, do the following:
- Find Invoice Approval Notification Form under the Artifacts section and click on ….
- Choose Duplicate.

Duplicate Form The duplicate artifact pop-up will appear. Change the name to
Invoice Reject Notification Formand click Duplicate.
Invoice Rejection Form The
Invoice Reject Notification Formis automatically opened in the form builder.The screen shown will be the same as
Invoice Approval Notification Form.
Invoice Rejection Form Change the invoice rejection form in the form builder to reflect the data for rejection case.
Change the Description to
Form to notify about the rejected invoiceand the following fields to:Form Fields Field Settings with Label Headline 1 Invoice Rejection Paragraph Your invoice has been rejected Keep the text field
Invoice Numberand Save your work.
Invoice Reject Notification Form Go back to the process builder and add the invoice rejection notification form to the process. Choose the + of the control flow for Reject coming from the Invoice Approval Form.
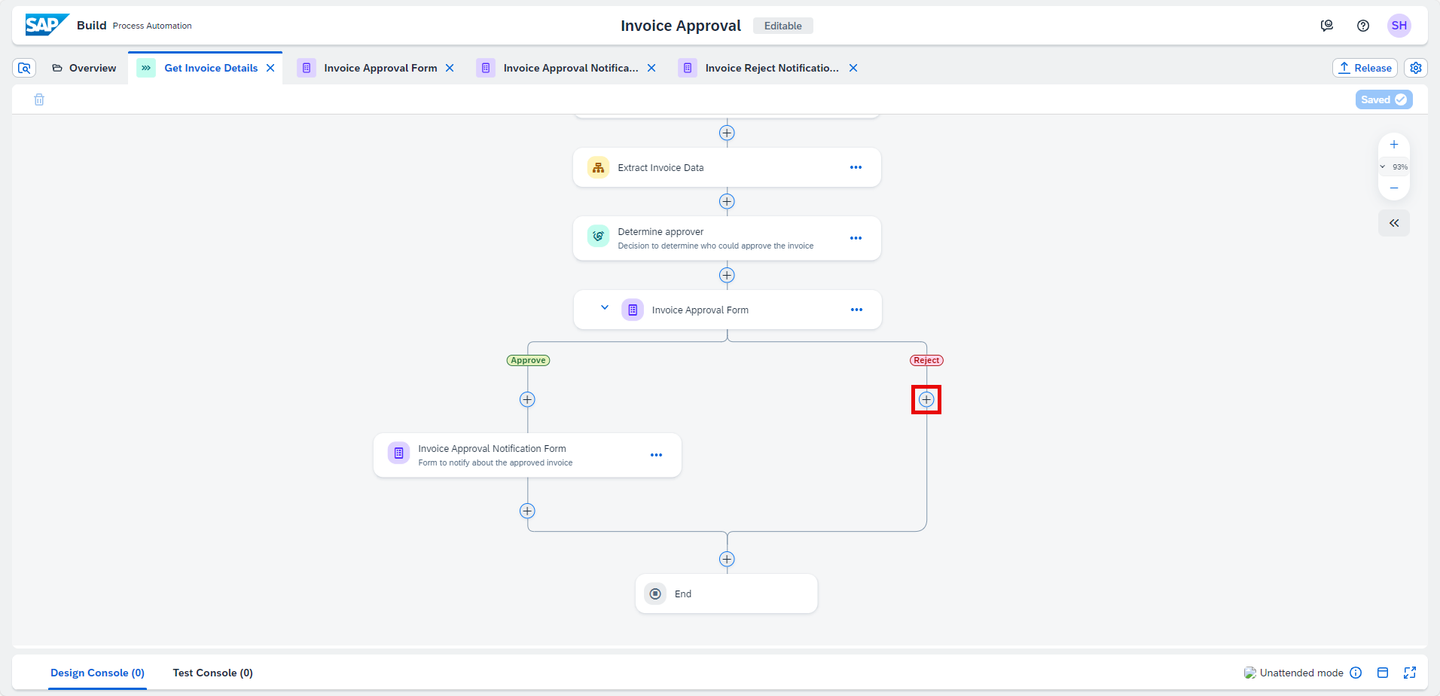
Add Invoice Rejection Notification Choose Form.
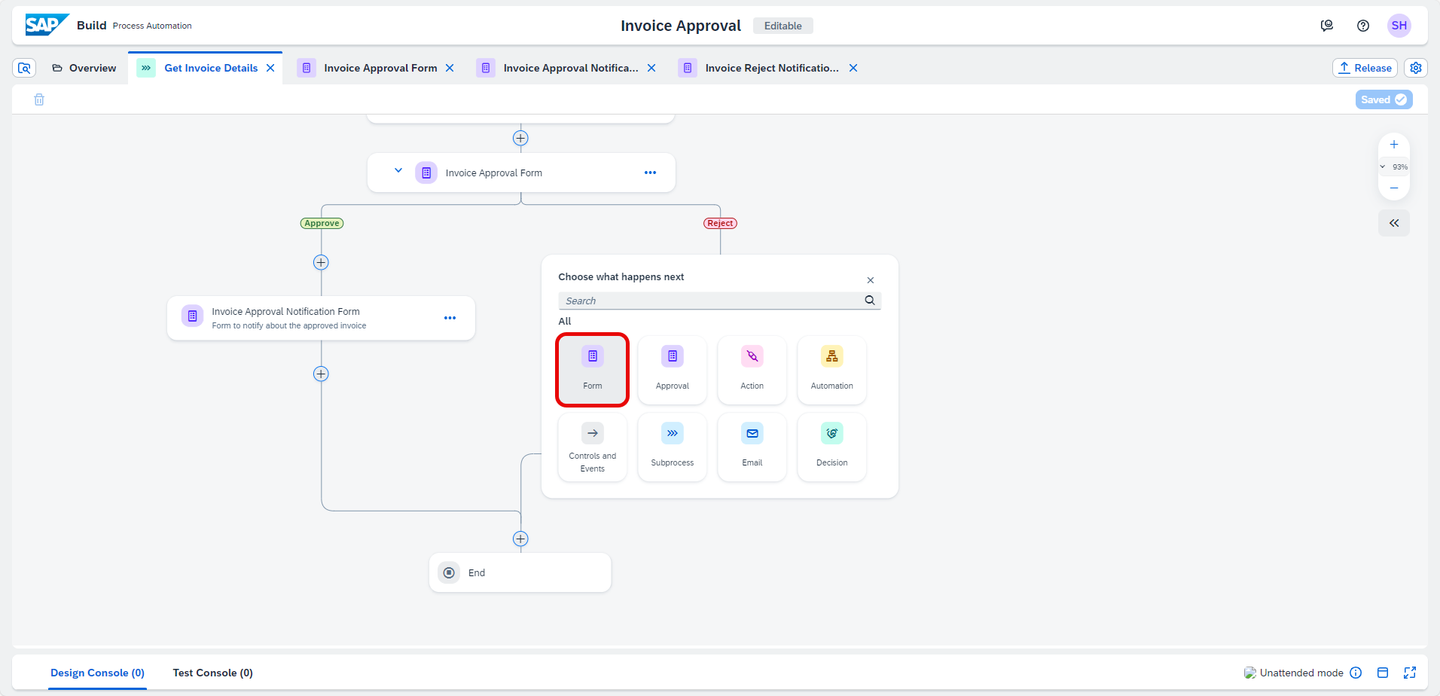
Add Invoice Rejection Notification Select Invoice Reject Notification Form

Add Invoice Rejection Notification Select Invoice Reject Notification Form to maintain the information in General tab.

Reject Notification General Maintain Subject, choose Select Item and type
Rejected Invoice:and add the process content Document Number.Select for the Users in this case Process Started By from the process content.

Reject Notification General Entries Select Inputs tab and assign the Invoice Number from the process content here.

Reject Notification Input Your process is ready to be released, deployed and executed. Save your work.

Final process
Resources
Discussion
Share feedback on this tutorial or join the conversation in SAP Community.