
Overview
You will learn
- How to create and configure a process condition
- How to define different process flows for each conditional criteria


Prerequisites
Prerequisites
- Complete Create and Configure Forms tutorial
Steps
Intro
In this unit, you will learn how to use process condition in a business process to get rid of unnecessary approvals when the process is routed for auto-approval or one-step-approval flow based on the sales order criteria.
A process condition routes the business process based on certain criteria. These conditions apply an If or Else rule to the process content and respond according to the rules defined as settings in the process builder.
Once the process with forms is designed, define which process flow should run based on if/else condition criteria.
To add a condition to a process open the Process Builder. Choose + below the Trigger.

Process Condition Choose Controls and Events.

Process Condition Choose Condition.

Process Condition To configure the condition, choose Open Condition Editor.

Process Condition Process content will contain a list of attributes that have been defined in previous skills. For example: in the screenshot below, you can see attributes from the trigger form. You will use this process content to configure different skills during business process modelling.
Edit your branch condition:
- Set Order Amount from the process content
- Select is less than
- Enter 100000 as the value

Process Condition You have configured your if branch to: if Order Amount is less than 100000.
Similarly, add one more condition. Select Add Group.

Add Groupe In the group section select Any to make it OR conditional group. Select conditions:
Item Condition Value Shipping Country is equal to India Shipping Country is equal to Germany Choose Apply to add the condition to the business process.
You can expand the Summary section to see how the process conditions are designed

Process Condition Both If and Default link branches are connected to the Approval Form.
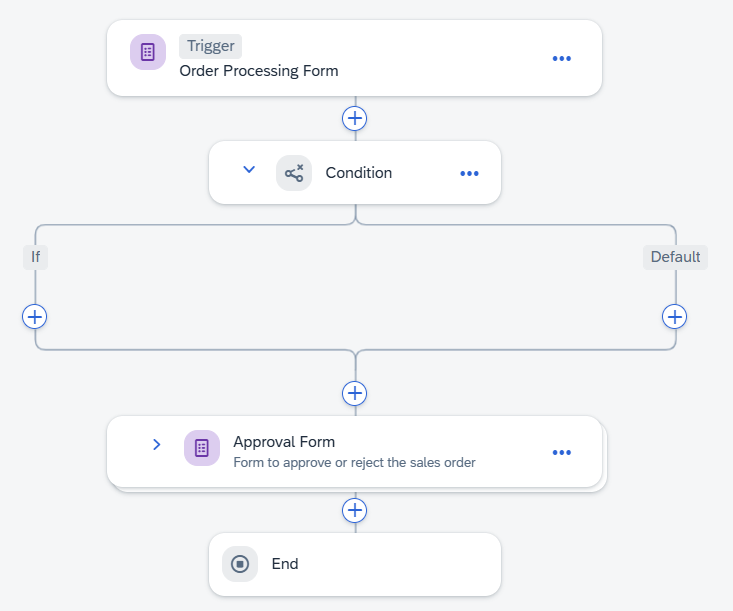
Process Condition With this process condition, only the sales order above a specific amount will be sent for approval and the rest will be auto-approved.
You have to add a notification form in the If connection to notify the requester of the auto-approval and terminate the process.
To create the new form, choose + below the If.

Process Condition Choose Form.

Process Condition Choose Blank form.

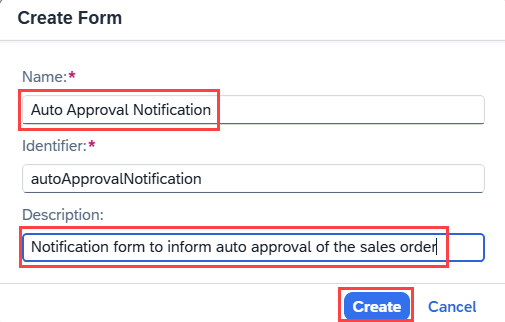
Process Condition In the Create Form window:
- Enter the Name: Auto Approval Notification
- Enter a Description: Notification form to inform auto approval of the sales order
- Choose Create
Process Condition Select Open Editor of the form.

Process Condition Design the notification form, the same way as in the previous chapter, to send another notification to the requester about auto-approval. Add Layout fields:
Form Fields Field Settings with Label Headline 1 Automatic Order Confirmation Paragraph Your order has been received and we will send you the details as soon as the order is shipped. You can find the details of your order below, please review and verify your request: Paragraph Your Sales Order Details: 
Process Condition For all below Input Fields, enter the labels and select the Read Only checkbox.
Form Fields Field Settings with Label Text Order Number Number Order Amount Date Expected Delivery Date Add Layout field:
Form Fields Field Settings with Label Paragraph Please press the SUBMIT button to acknowledge the order status. Save your work.

Process Condition
Go back to the process builder and configure the Auto Approval Notification.
Select the Auto Approval Notification to configure the General section.
In the Subject field, do the following:
- Enter: Your order
- Choose: Order Number from Order Processing Form
- Enter: has been successfully received
In the Users section, under Recipients select Process Started By from Process Metadata.

Process Condition Select Inputs section and configure the following inputs:
Form Input Fields Process Content Entry Order Number Order Number Order Amount Order Amount Expected Delivery Date Expected Delivery Date Choose Save.

Process Condition Below Auto Approval Notification, select +.

Process Condition Choose Controls and Events.

Process Condition Choose End.

Process Condition Save your work.

Process Condition
This completes the process design with condition criteria that will decide what process flow is executed and whether there will be an auto-approval or a one-step approval route.
Resources
Discussion
Share feedback on this tutorial or join the conversation in SAP Community.