
Overview
You will learn
- How to create a Supplier Approval Form which will be sent to the approvers determined by the decision table for their approval.
- How to create a Notification Form to inform the requester whether their sales order is approved or rejected by the supplier.


Prerequisites
Prerequisites
- Access to a SPA Tenant.
Steps
In the process builder, choose + of the Determine Approver conditional flow and select Form > New Approval Form.

New Approval Form In the Create Form dialog box, do the following:
- Enter Approval Form (Supplier) in the Name field.
- Enter Supplier will approve or reject the purchase order in the Description field.
- Choose Create.

Create Form Now you have to model the form. For that, select the three-vertical-dots on Approval Form (Supplier) form to open the menu and choose Open Editor.

Open Editor In the Form Editor, choose or drag-and-drop the following layout and input fields in the given sequence on the form editor:
| Sequence | Layout | Text |
|---|---|---|
| 1 | Headline1 | Approve Sales Order |
| 2 | Headline2 | Customer has requested your approval for the new order. Please review and confirm whether the requirements can be met or not. |
| 3 | Paragraph | Sales Order Details: |
| Sequence | Input Field | Field Settings |
|---|---|---|
| 4 | Text | Name: Customer Name Read Only : checked |
| 5 | Text | Name: Order Number Read Only : checked |
| 6 | Number | Name: Order Amount Read Only : checked |
| 7 | Date | Name: Delivery Date Read Only : checked |

| Sequence | Layout | Text |
|---|---|---|
| 8 | Paragraph | Supplier Acknowledgment |
| Sequence | Input Field | Field Settings |
|---|---|---|
| 9 | Checkbox | Name: I acknowledge that we have received your purchase order and will deliver on or before scheduled date |
| 10 | Text Area | Name: Message to buyer: |

Once done, choose Save.
Go back to the process builder, select Approval Form (Supplier) form.
Select the General tab, and do the following:
You will use dynamic value from process content to define the subject.
In the Subject box, enter Review and Approve Order.
Then select
selectedOrder>orderNumberfrom the process content.Again enter from, then select Order Processing Form > Customer Name from the process content.
Select
determineApprover_Output>Emailfrom process content as Users in Recipients.Select
determineApprover_Output>UserGroupfrom process content as Groups in Recipients.note: the recipients are determined by the decision and the output after the decision execution is collected in the
determineApprover_Outputdata type
Approval Form General Select the Inputs tab.
Map the following decision table input with the process content:
Form Input Field Process Content Delivery Date selectedOrder>expectedDeliveryDateCustomer Name Order Processing Form>Customer NameOrder Amount selectedOrder>orderAmountOrder Number selectedOrder>orderNumber
Approval Form Inputs Once completed, choose Save to save the process.

Approval Form Save
In the process builder, choose + of the Approve conditional flow of Approval Form (Supplier) and select Form > New Form.

New Form In the Create Form dialog box, do the following:
- Enter Sales Order Notification (Approved) in the Name field.
- Enter Notification form to inform customer of the sales order approval by the supplier in the Description field.
- Choose Create.

Create Form Now you have to model the form. For that, select the three-vertical-dots on Sales Order Notification (Approved) form to open the menu and choose Open Editor.

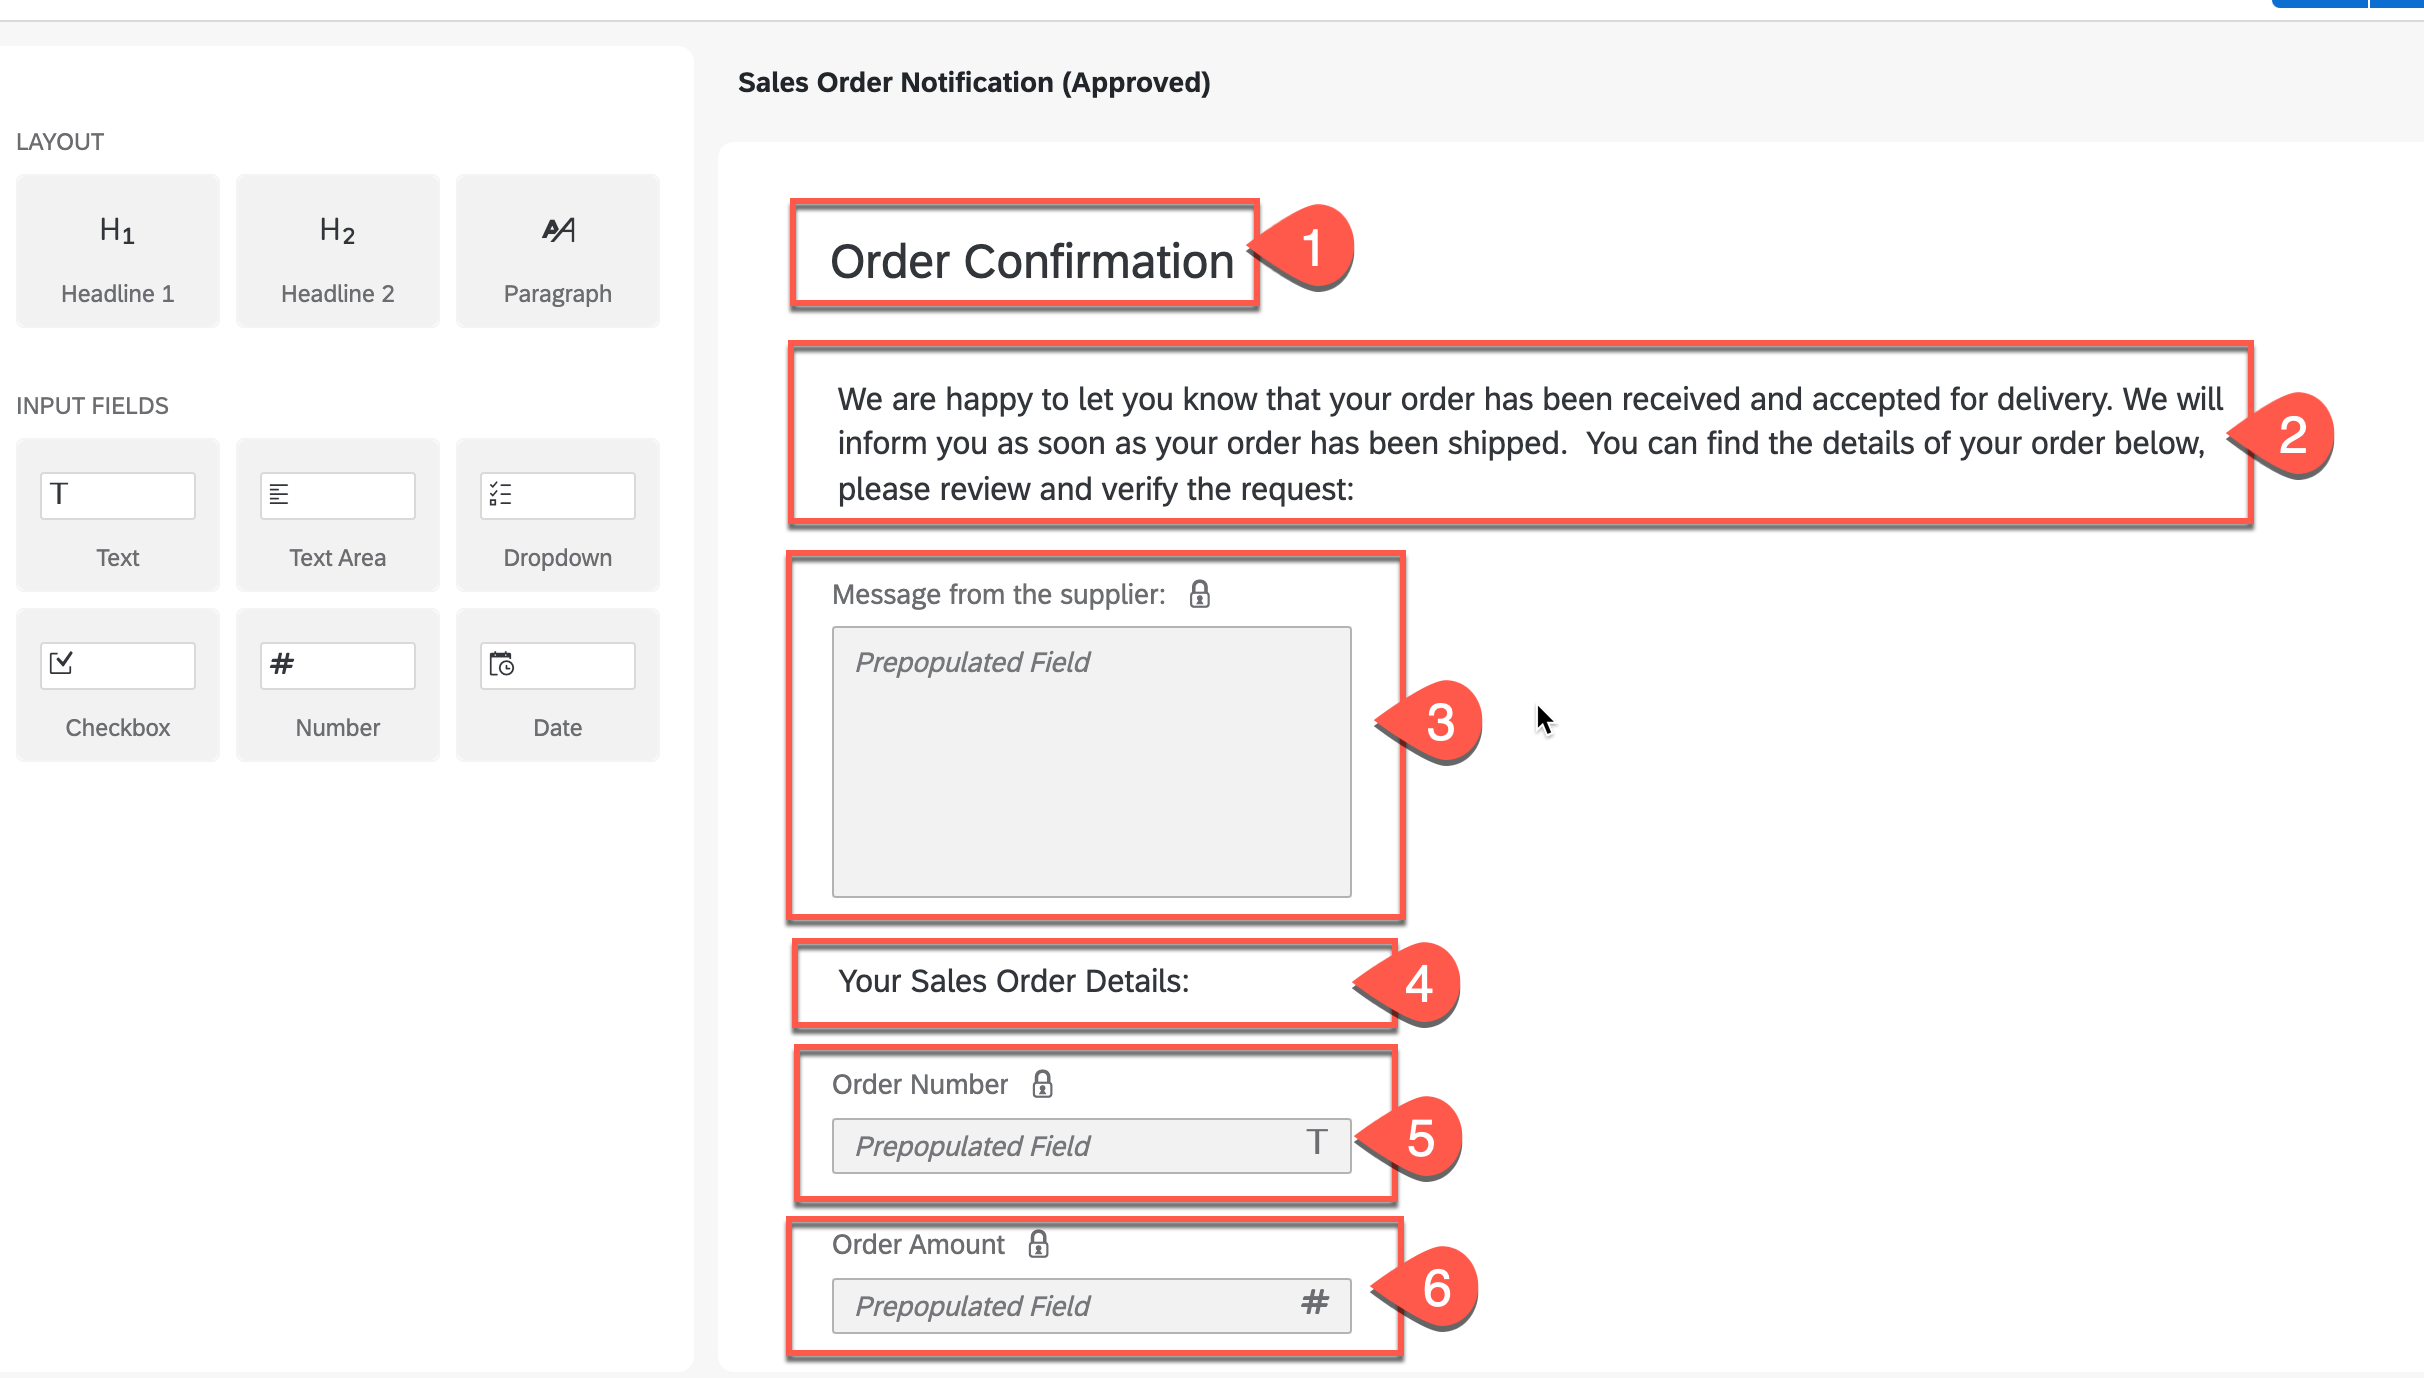
Open Editor In the Form Editor, choose or drag-and-drop the following layout and input fields in the given sequence on the form editor:
| Sequence | Layout | Text |
|---|---|---|
| 1 | Headline1 | Order Confirmation |
| 2 | Paragraph | We are happy to let you know that your order has been received and accepted for delivery. We will inform you as soon as your order has been shipped. You can find the details of your order below, please review and verify the request: |
| Sequence | Input Field | Field Settings |
|---|---|---|
| 3 | Text Area | Name: Message from the supplier: Read Only : checked |
| Sequence | Layout | Text |
|---|---|---|
| 4 | Paragraph | Your Sales Order Details: |
| Sequence | Input Field | Field Settings |
|---|---|---|
| 5 | Text | Name: Order Number Read Only : checked |
| 6 | Number | Name: Order Amount Read Only : checked |
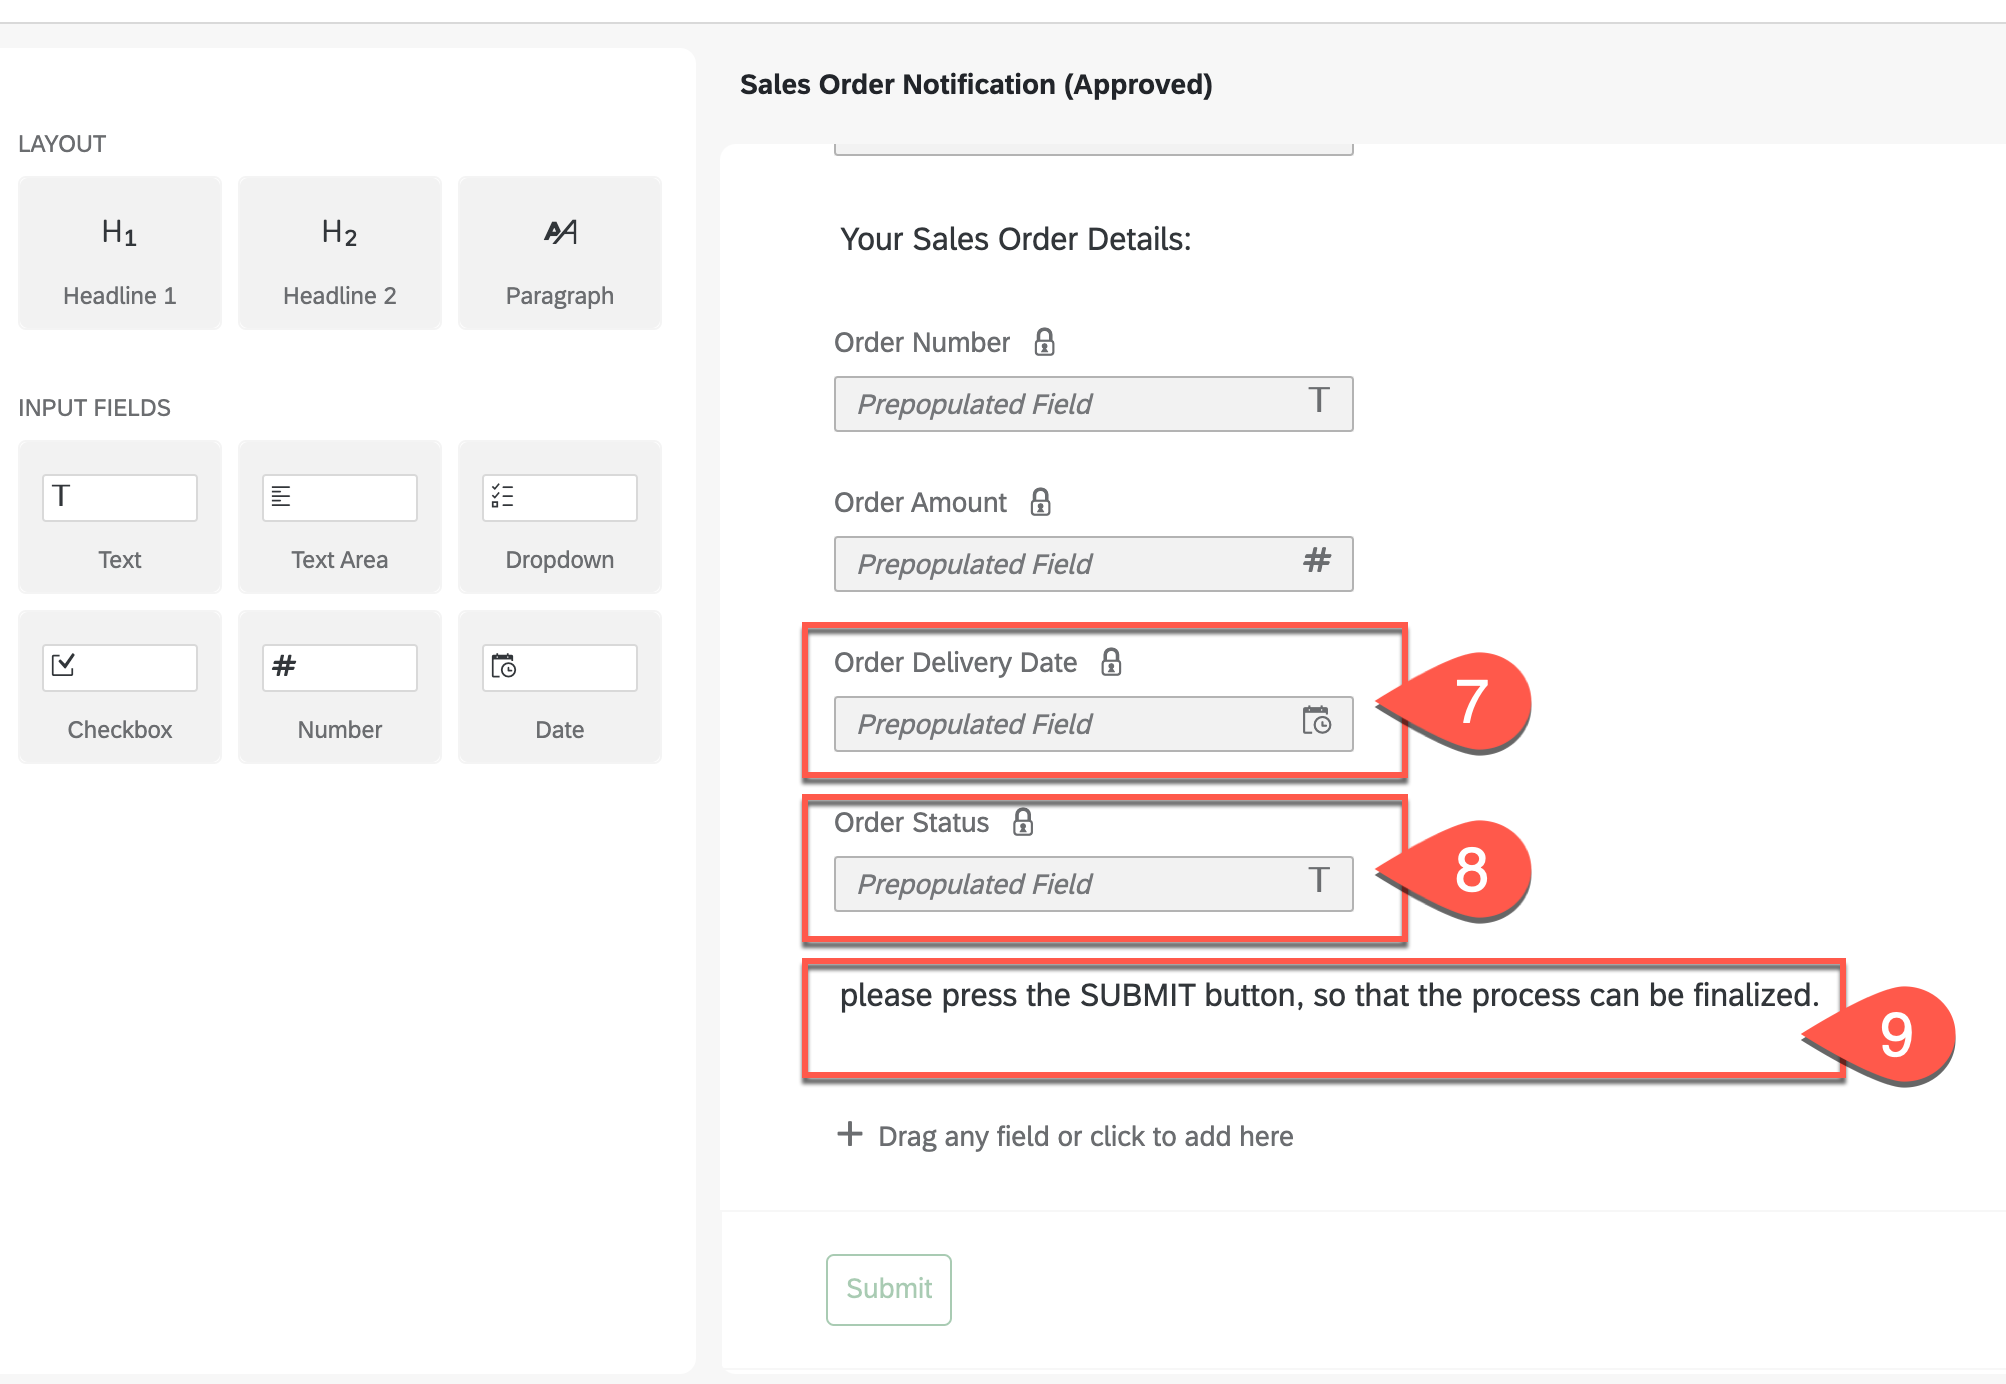
| 7 | Date | Name: Order Delivery Date Read Only : checked |
| 8 | Text | Name: Order Status Read Only : checked |
| Sequence | Layout | Text |
|---|---|---|
| 9 | Paragraph | Please press the SUBMIT button, so that the process can be finalized. |
Once done, choose Save.
Go back to the process builder, select Sales Order Notification (Approved) form.
Select the General tab, and do the following:
You will use dynamic value from process content to define the subject.
In the Subject box, enter Your Order.
Then select
selectedOrder > orderNumberfrom the process content.Again enter is confirmed by the supplier/
Select Process Metadata » Process Started By from process content as Users in Recipients.

Process Content General Select the Inputs tab.
Map the following decision table input with the process content:
Form Input Field Process Content Order Number selectedOrder > orderNumberOrder Delivery Date selectedOrder > expectedDeliveryDateMessage from supplier Approval Form > Message to buyerOrder Amount selectedOrder > Order AmountOrder Status Order Processing Form > Order Status 
Process Content Inputs Drag and drop the connection flow from Submit action to End step in the process.

End Process Once completed, choose Save to save the process.
Repeat the above steps to create one more notification form to inform the requester about the rejection of the sales order.
In the process builder, choose + of the Reject conditional flow of Approval Form (Supplier) and select Form > New Form.

New Form In the Create Form dialog box, do the following: - Enter Sales Order Notification (Rejected) in the Name box. - Enter Notification form to inform that the sales order is rejected by the supplier in the Description box. - Click Create.

Create Form Now you have to model the form. For that, select the three-vertical-dots on Sales Order Notification (Rejected) form to open the menu and choose Open Editor.
In the Form Editor, choose or drag-and-drop the following layout and input fields in the given sequence on the form editor:
Sequence Layout Text 1 Headline1 Order Rejection 2 Paragraph We are sorry to inform you that your order cannot not be accepted. Any inconvenience caused due to refusal of order is regretted. You can find the reason of rejection and the details of your order below, please confirm the request: Sequence Input Field Field Settings 3 Text Area Name: Message from the supplier:
Read Only : checkedSequence Layout Text 4 Paragraph Your Sales Order Details: 
Sales Order Notification Rejected Sequence Input Field Field Settings 5 Text Name: Order Number
Read Only : checked6 Number Name: Order Amount
Read Only : checked7 Date Name: Order Delivery Date
Read Only : checked8 Text Name: Order Status
Read Only : checkedSequence Layout Text 9 Paragraph please press the SUBMIT button, so that the process can be finalized. 
Sales Order Notification Rejected Once done, choose Save.
Go back to the process builder, select Sales Order Notification (Rejected) form.
Select the General tab.
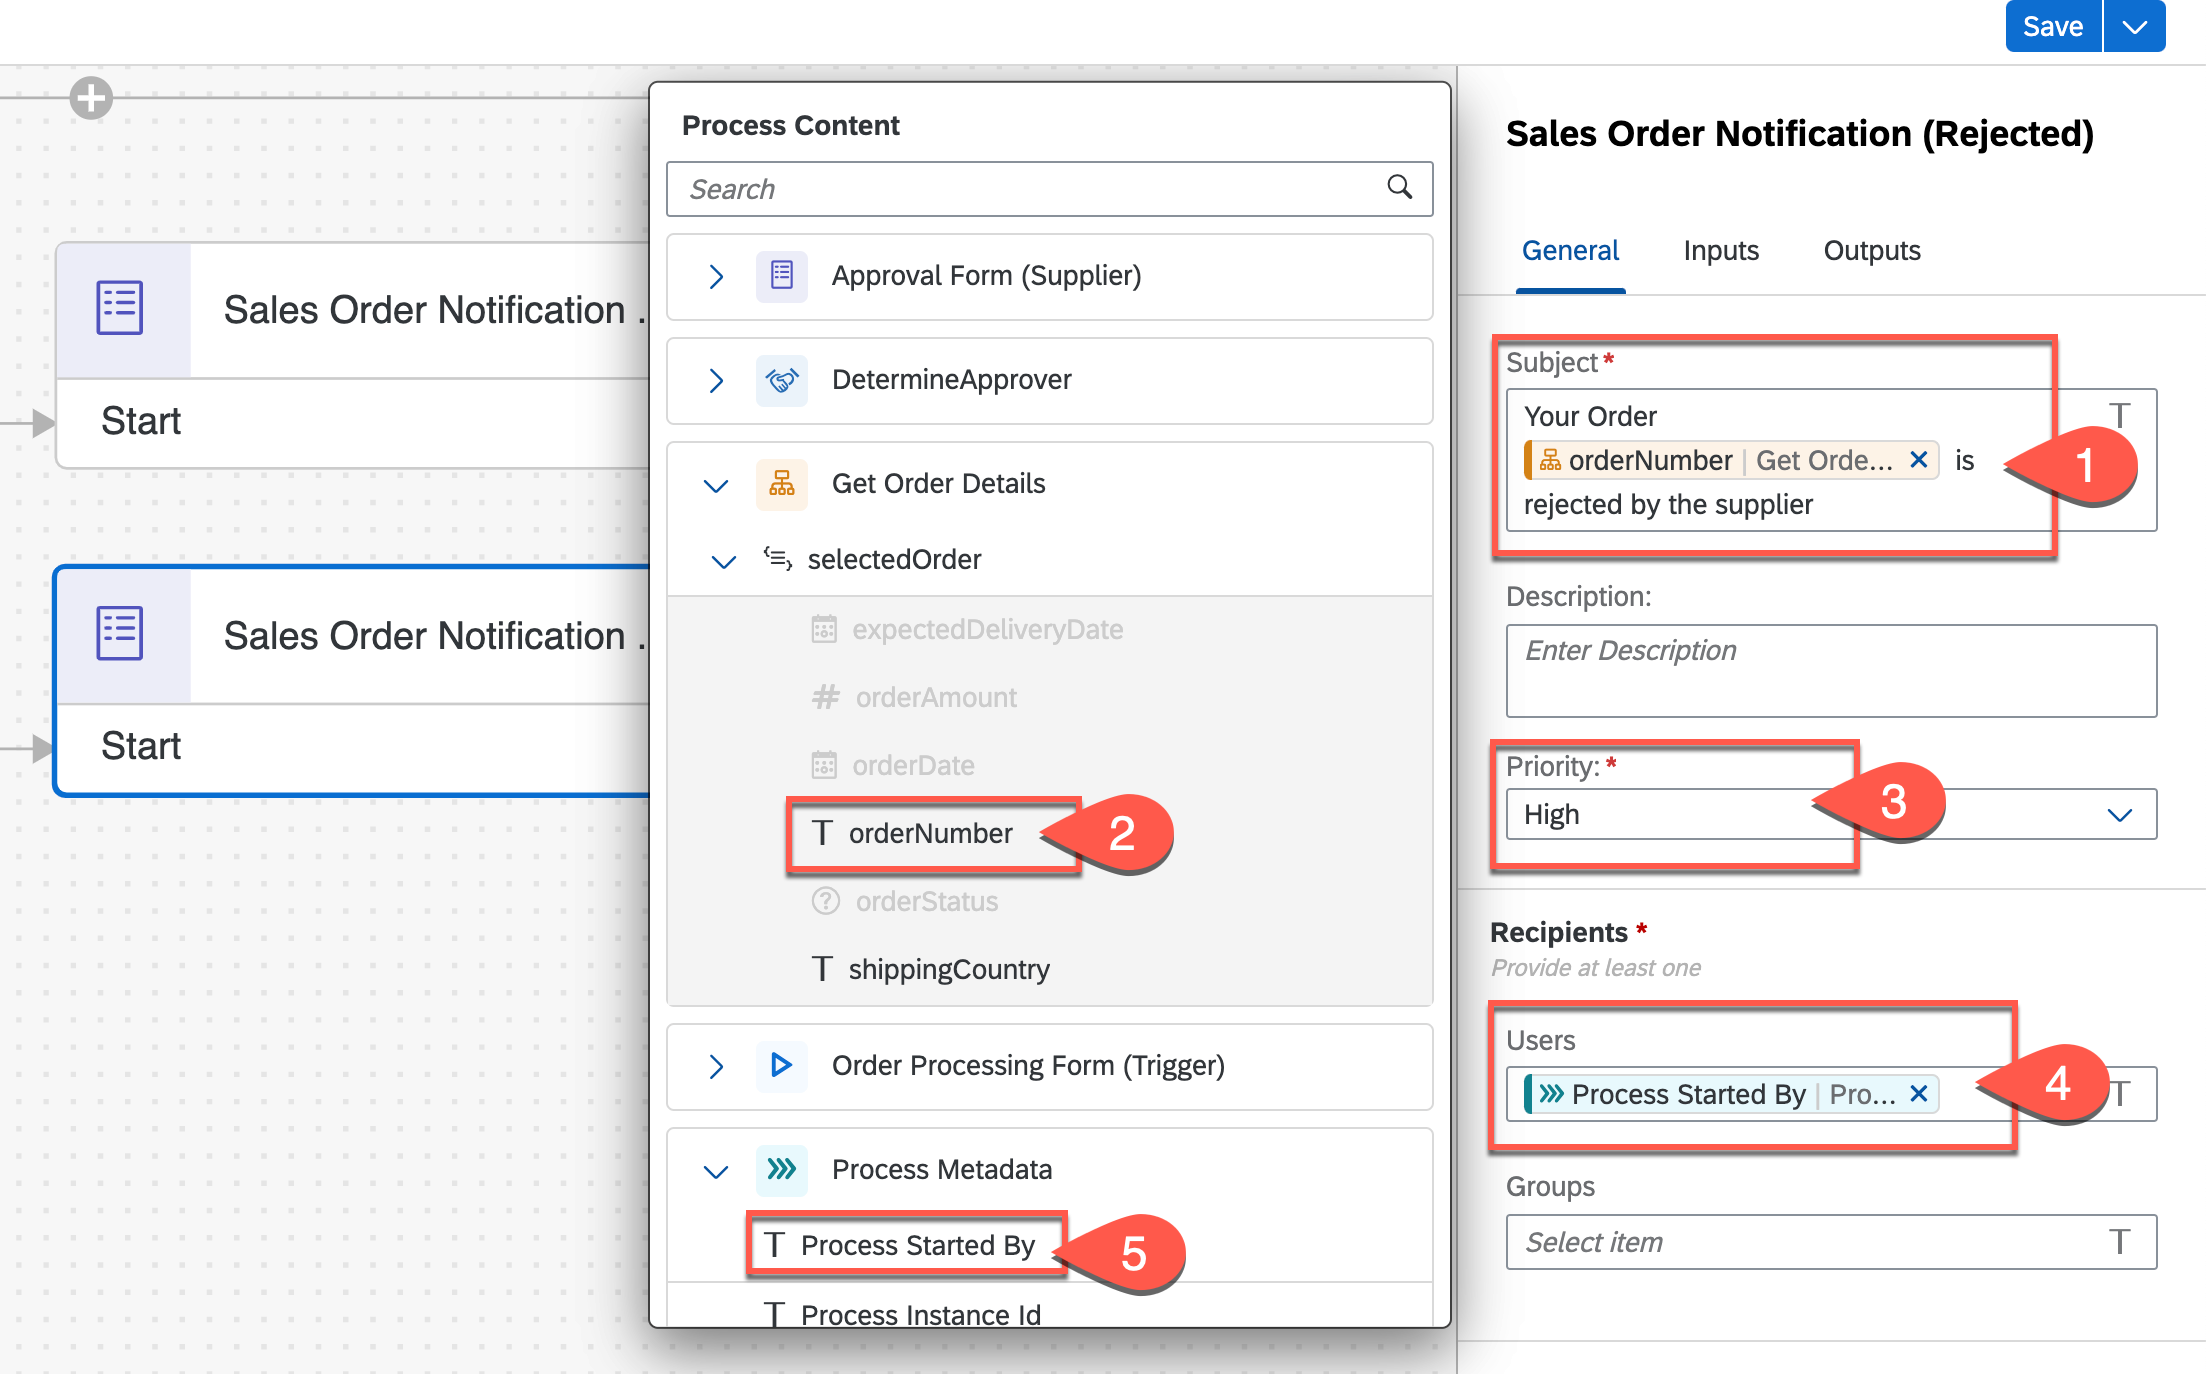
You will use dynamic value from process content to define the subject.
In the Subject box, enter Your Order.
Then select
selectedOrder > orderNumberfrom the process content.Again enter is rejected by the supplier.
Change the Priority to High.
Select Process Metadata » Process Started By from process content as Users in Recipients.
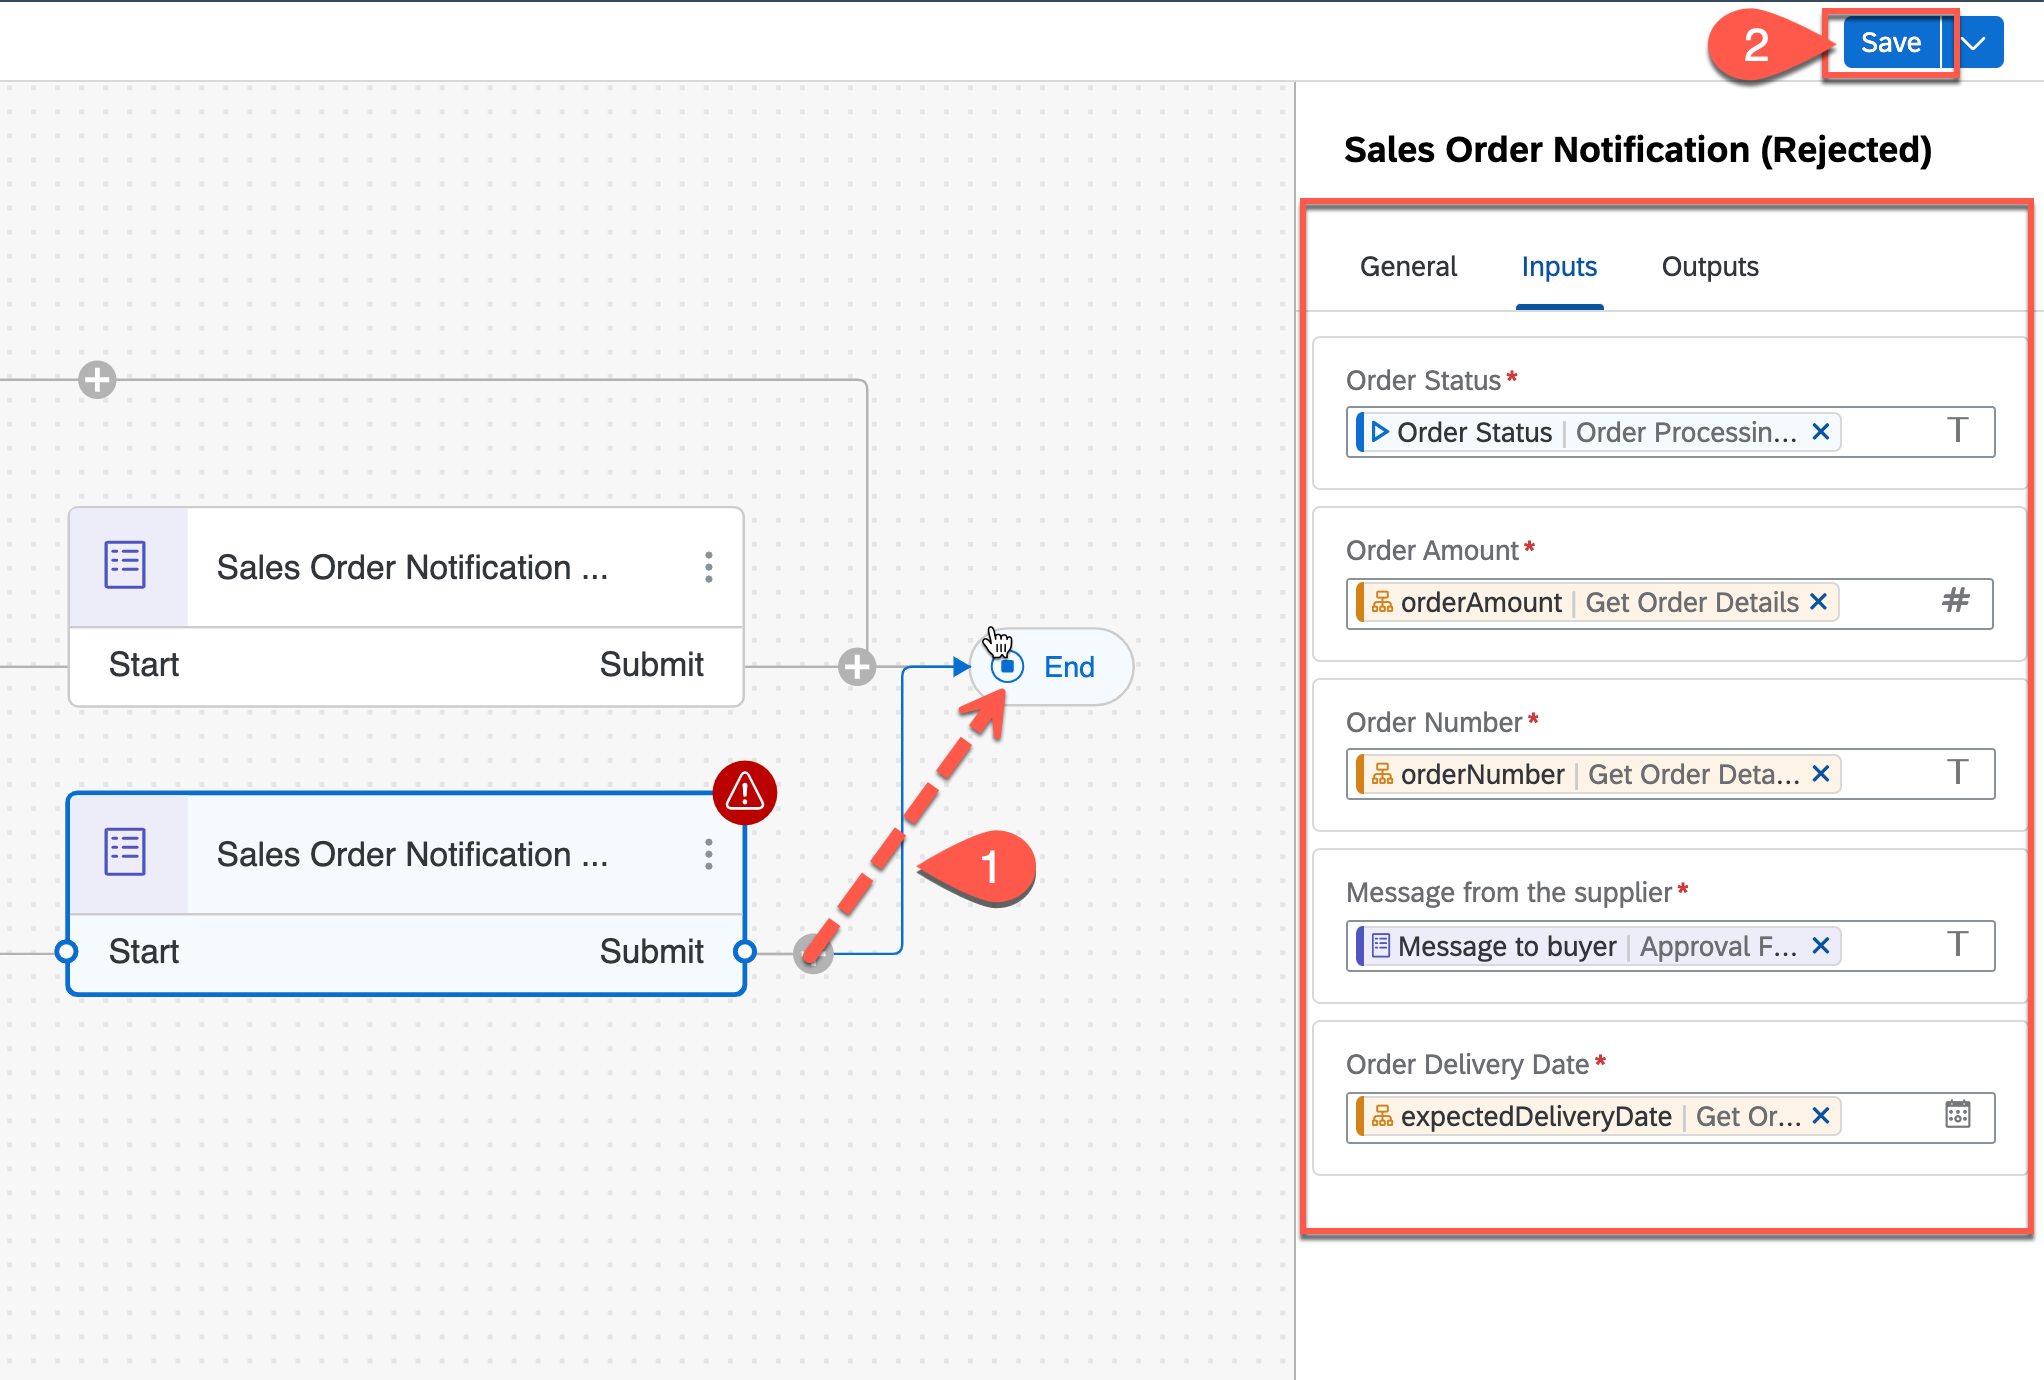
Select the Inputs tab.
Map the following decision table input with the process content:
| Form Input Field | Process Content | |---|---| | Order Status | Order Processing Form > Order Status | | Order Amount | selectedOrder > orderAmount | | Order Number | selectedOrder > orderNumber | | Order Delivery Date | selectedOrder > expectedDeliveryDate | | Message from supplier | Approval Form > Message to buyer | 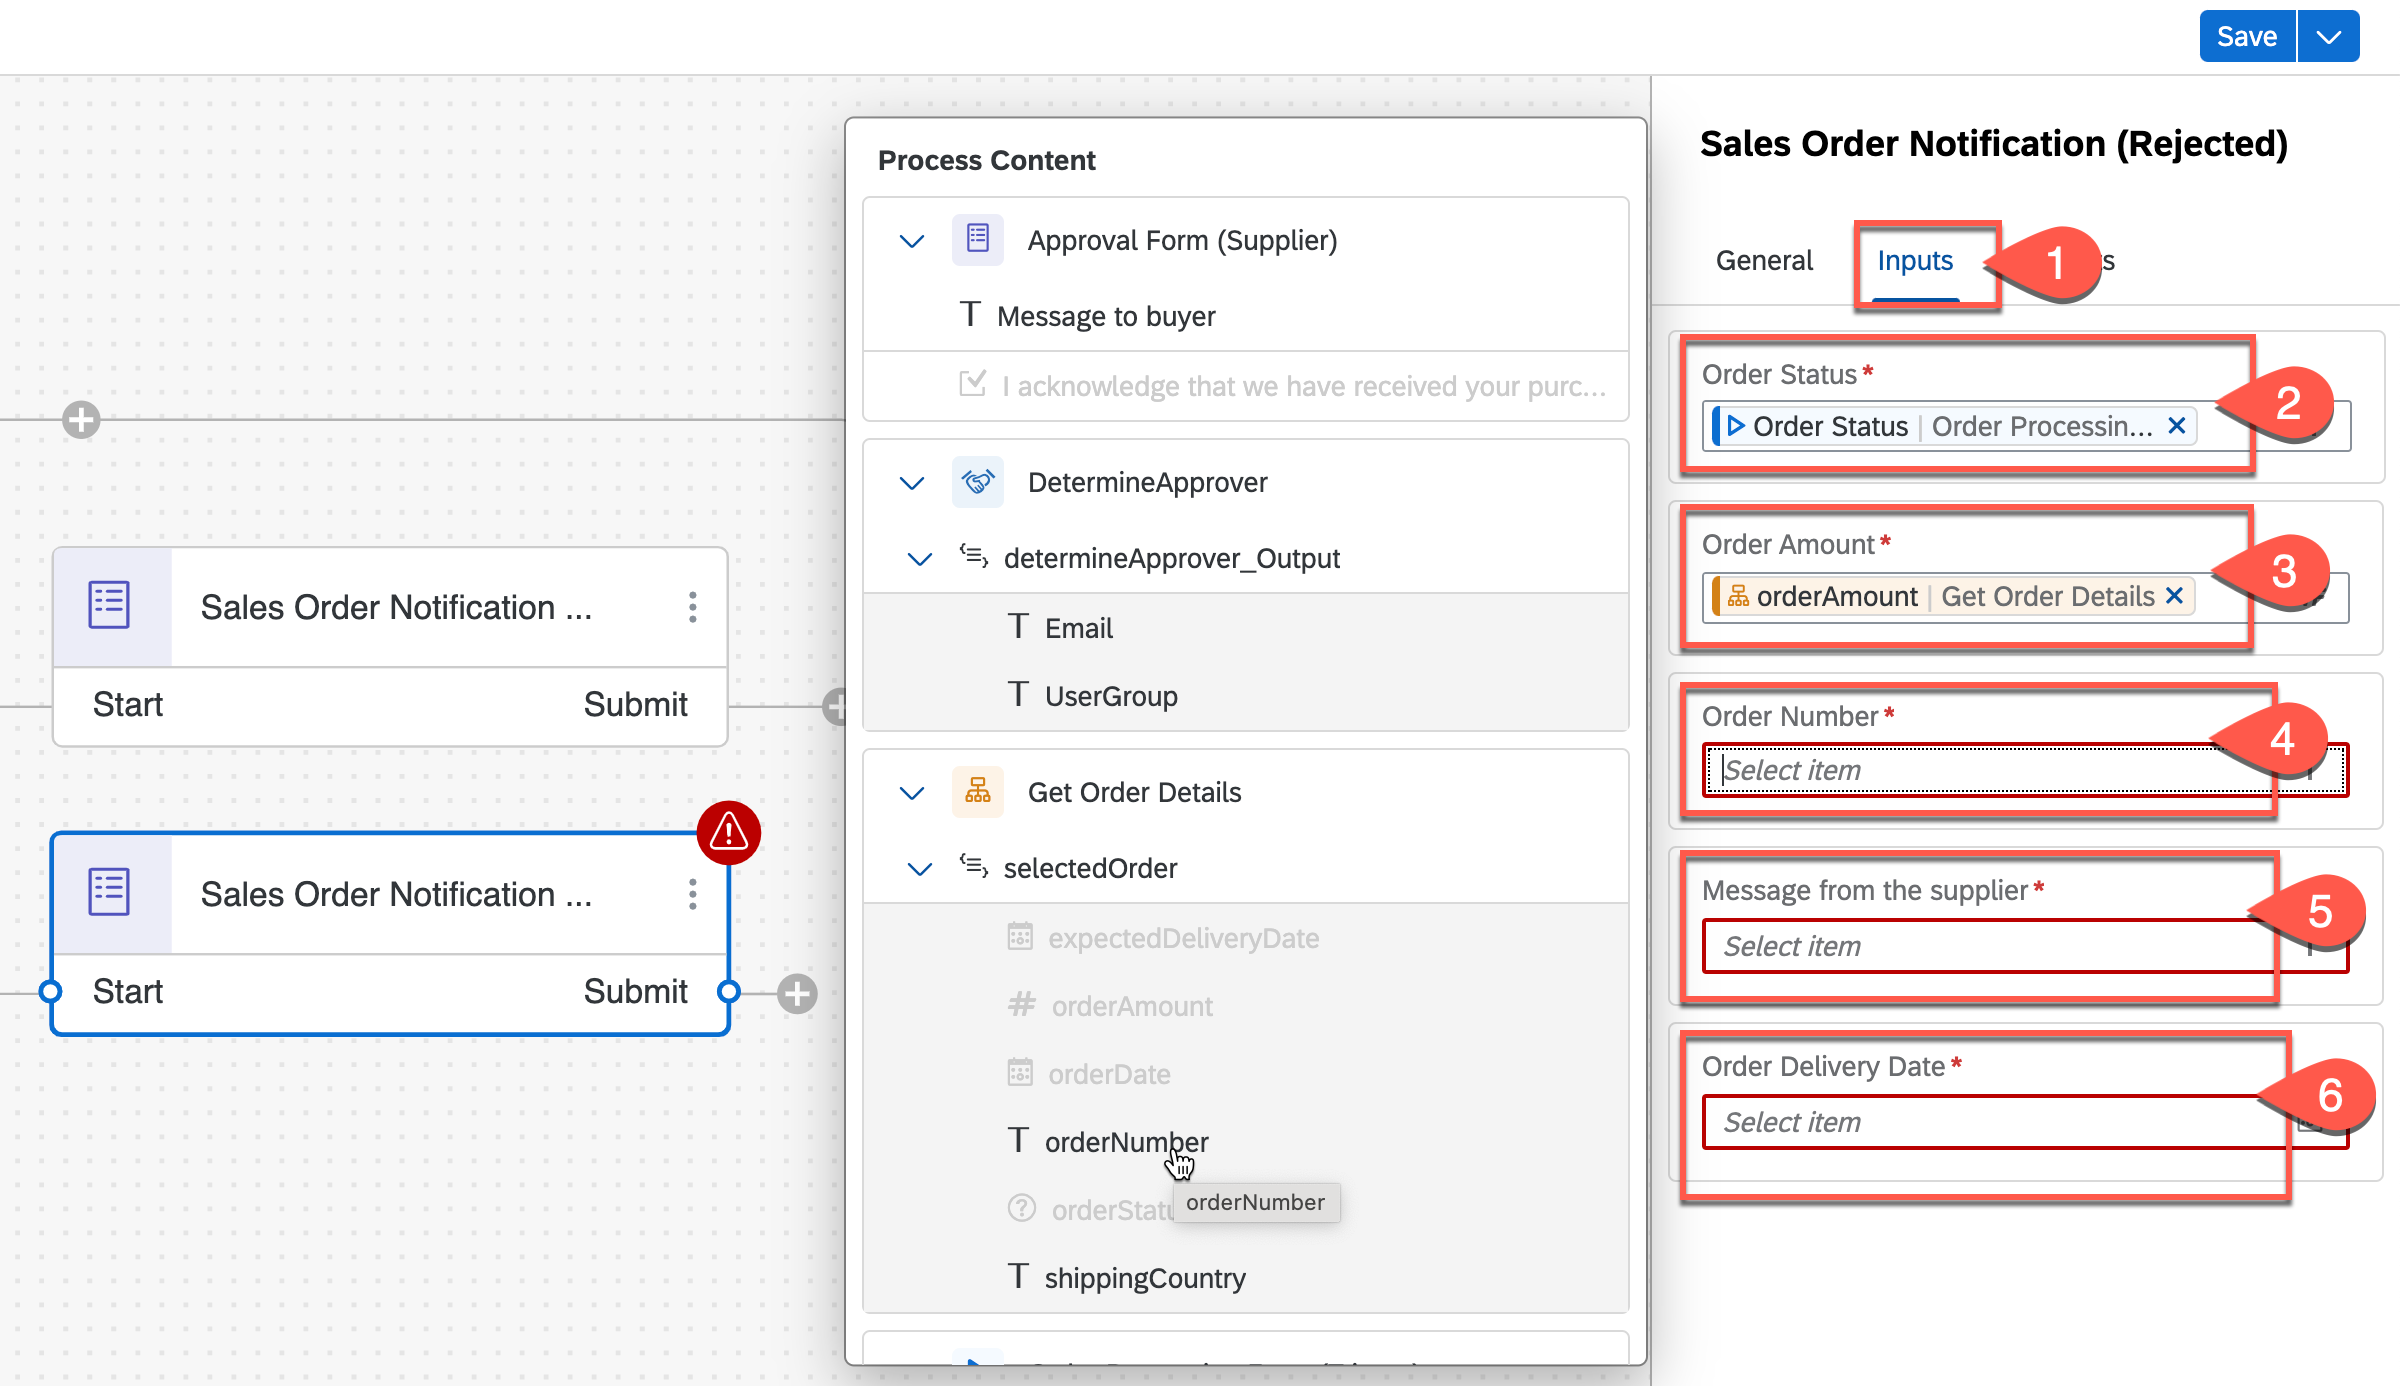Drag and drop the connection flow from Submit action to End step in the process.
Once completed, choose Save to save the process.
Resources
Discussion
Share feedback on this tutorial or join the conversation in SAP Community.