
Overview
You will learn
- How to activate the OData and Ingestion API in SAP Signavio Process Intelligence
- Read event log data using the OData API of SAP Signavio Process Intelligence
- Enrich the event log with machine learning algorithms with the python capabilities in SAP Build Code - Business Application Studio
- Push the enriched event log back into SAP Signavio Process Intelligence


Prerequisites
Steps
Intro
In this tutorial, I want to take you on a journey into the world of SAP Signavio Process Intelligence. We’ll explore how you can extend your event log, enrich it with machine learning algorithms, and seamlessly push back the updated event log into SAP Signavio Process Intelligence. The goal? To create a smarter, more proactive process management system.
Imagine this: You have a wealth of process mining data at your fingertips, but it’s static. What if you could predict outcomes and consume these predictions into your event log, transforming it into a dynamic, intelligent asset? That’s exactly what we’re going to do using SAP Build Code with its Python and Jupyter capabilities.
Example 1: Predicting Sales Order Delivery Times
One of the most powerful applications of this approach is predicting when a sales order will be delivered. By analyzing historical event logs, we can uncover patterns and trends that influence delivery times. Using machine learning algorithms, we can predict future delivery times based on various factors such as order size, product type, and current workload. These predictions are then fed back into the event log, providing real-time insights into expected delivery times. This not only helps in better planning but also improves customer satisfaction by setting accurate delivery expectations.
Example 2: Customer Satisfaction Prediction
Another fascinating example is predicting customer satisfaction with support tickets. By examining event logs, we can identify factors that impact satisfaction, such as cycle times, resolution speed, and communication quality. Machine learning models can then predict the likelihood of a customer being satisfied based on these factors. This predictive data is reintegrated into the event log, enabling support teams to proactively address potential dissatisfaction and improve the overall customer experience.
Why Is This Important?
The essence of leveraging machine learning algorithms on event log data lies in the proactive insights it generates. Static event logs offer valuable historical data, but by applying machine learning, we transform this data into a predictive powerhouse. This empowers businesses to anticipate challenges, optimize processes, and deliver superior outcomes. The ability to consume these predictions into the event logs ensures that the process intelligence is always up-to-date and actionable. In conclusion, extending your event log in SAP Signavio Process Intelligence with machine learning algorithms and reintegrating the predictions creates a smarter, more responsive process management system. Whether it’s predicting delivery times, customer satisfaction, or identifying bottlenecks, the possibilities are limited only by your imagination. So, let’s dive in and unlock the true potential of your process mining data with SAP Build Code and its Python and Jupyter capabilities.
An overview of the tutorial steps performed can be found below.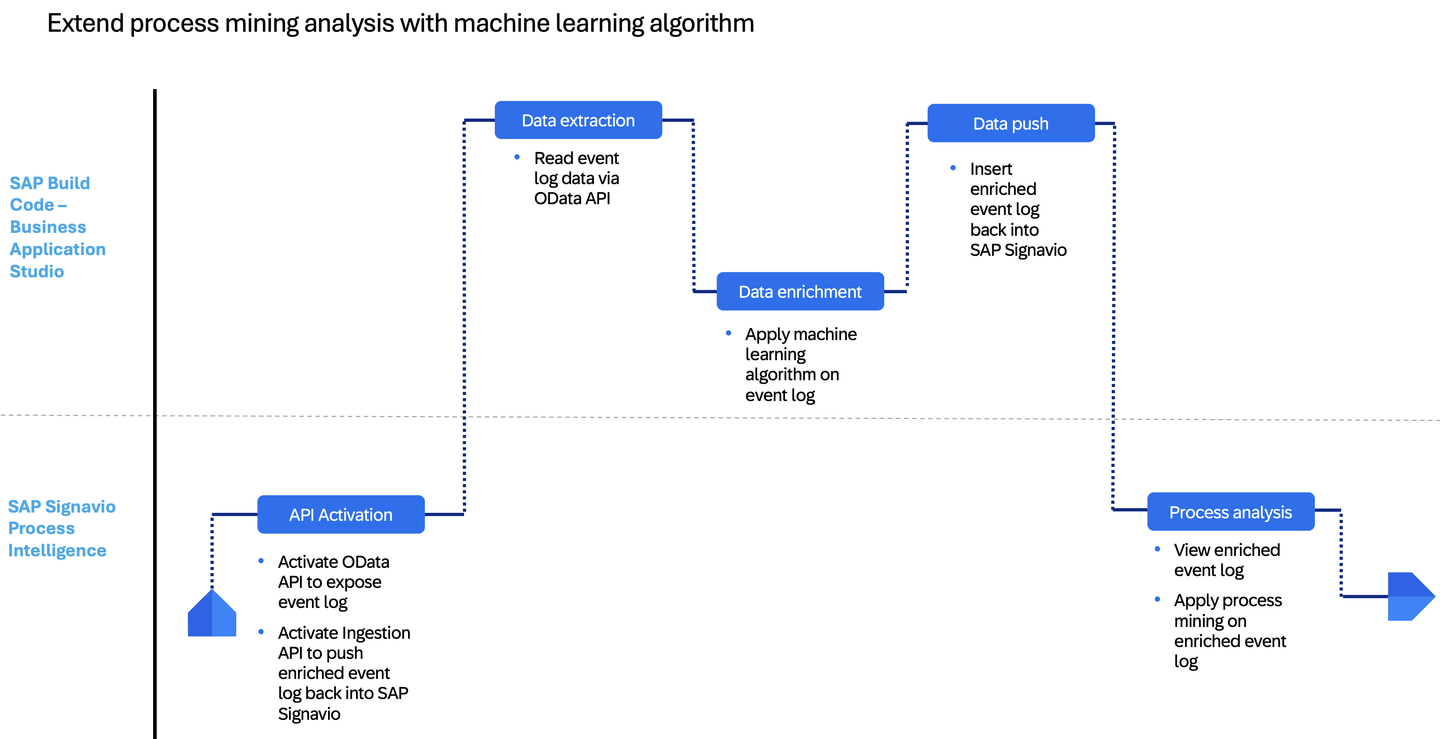
Firstly we need to activate the OData API and Ingestion API that allows us to retrieve and push data in and out of the system. We start with activating the Ingestion API.
Logon to SAP Signavio where you will enter the SAP Signavio Collaboration Hub. On the top right corner, click on the dots-icon and select Process Intelligence.
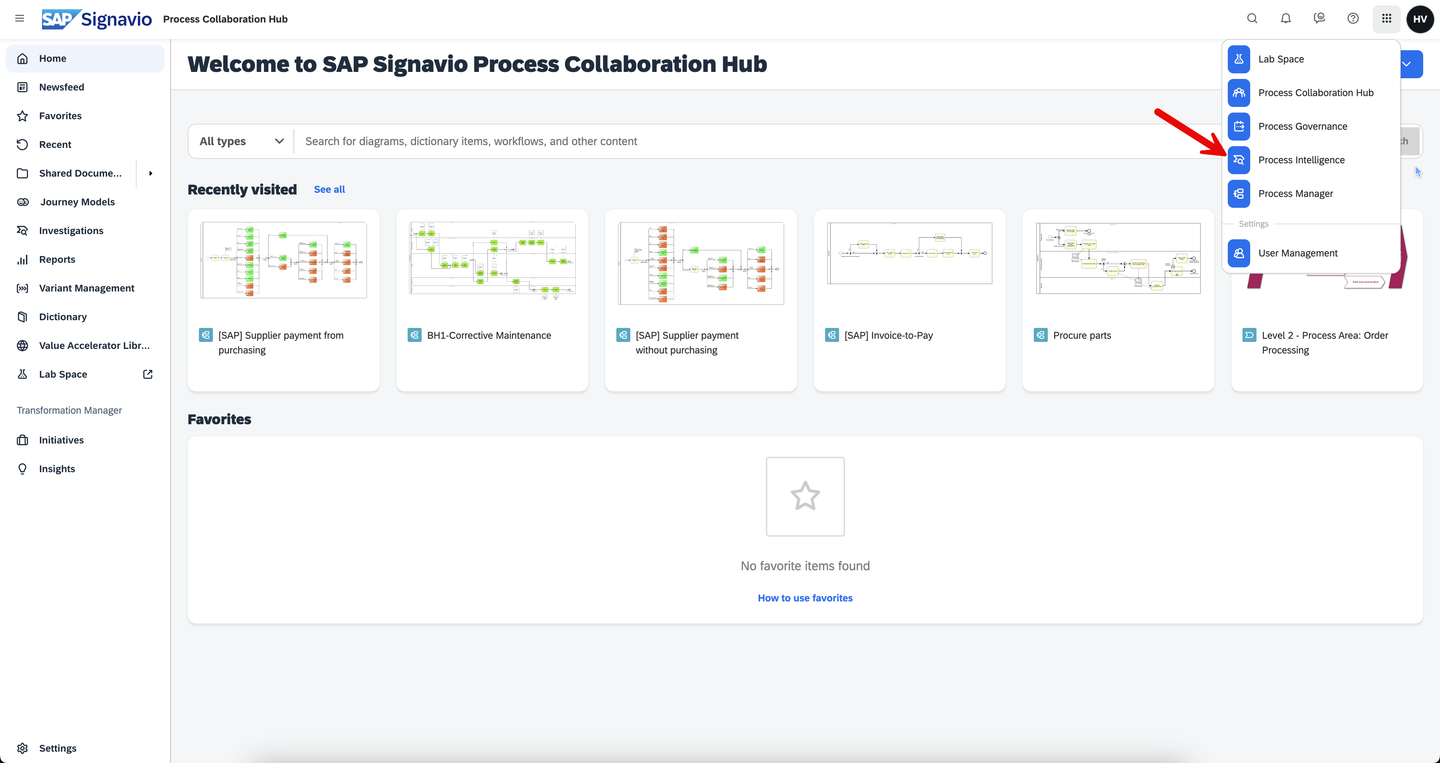
SAP Signavio Collaboration Hub Once you have enter SAP Signavio Process Intelligence, you can click on Data Integration and create a new Source Data.
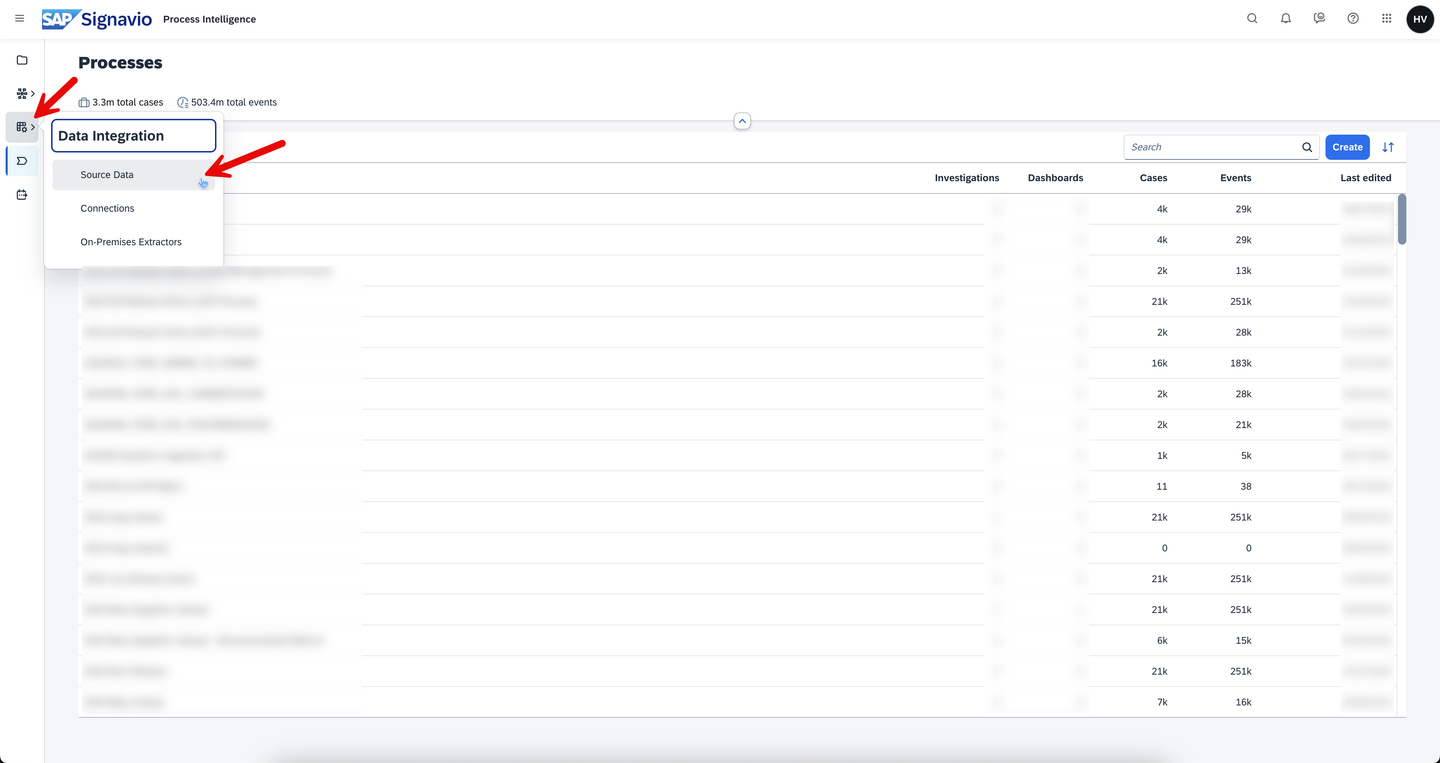
SAP Signavio Process Intelligence You will find a list of all created source data in your system. As we want to create a new one, click on the create button on the right side.

Create source data Here we need to provide a respective name and select as Connection Type Ingestion API. As I want to consume this API from SAP Build Code, I name the respective source data SAP Build Code.
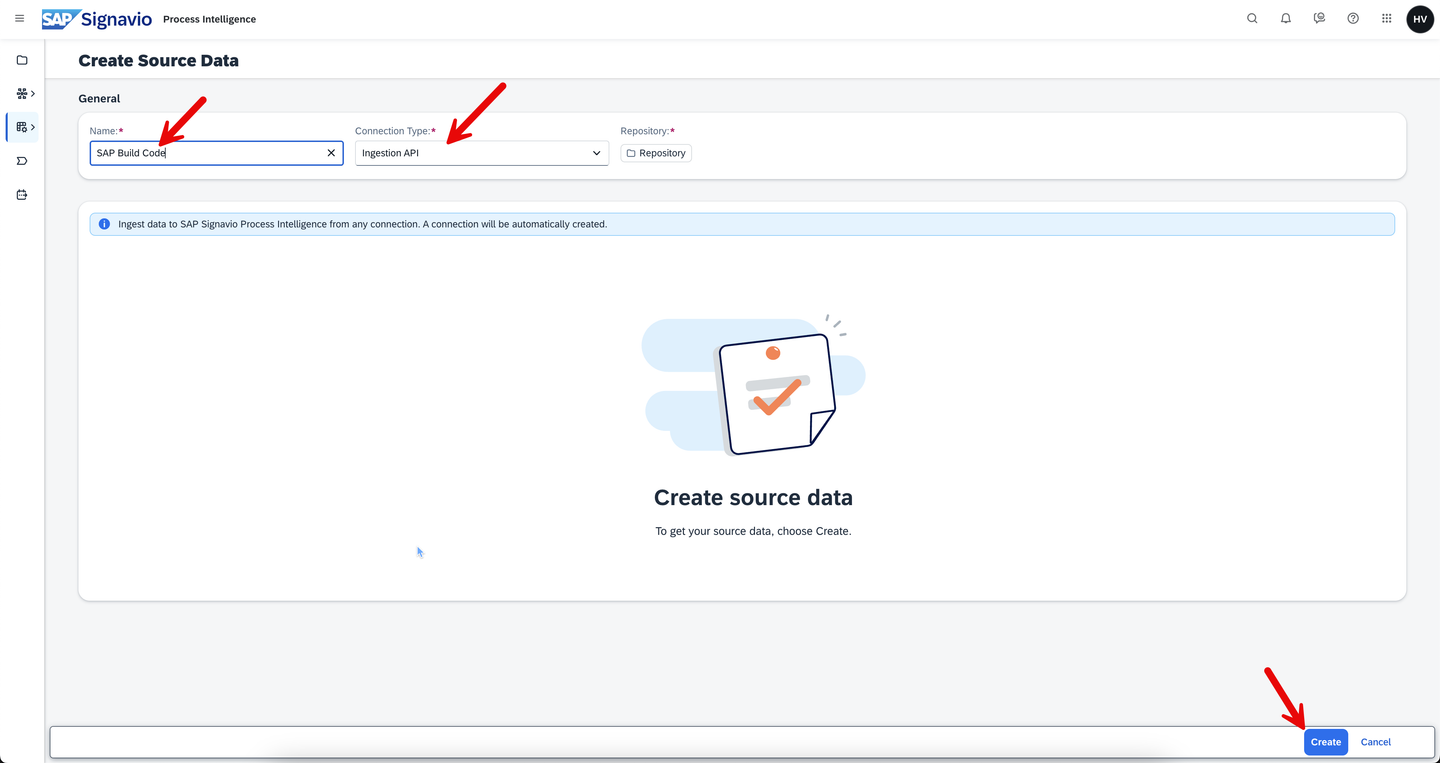
Source Data configuration Once we have created the Source Data, we can view the respective Connection that was automatically created with it. To view this information, we click on Connection on the top right corner.

Source Data and Connection You can view the details of the Connection that is linked to the Source Data. By clicking on it, you can view the details of the Connection.

Connection details Here you can retrieve the details of the Connection itself. This includes the API endpoint that we will need to insert as URL from SAP Build Code and also the authentication mechanism using the token. Note down both infos as you will be using these in subsequent steps.
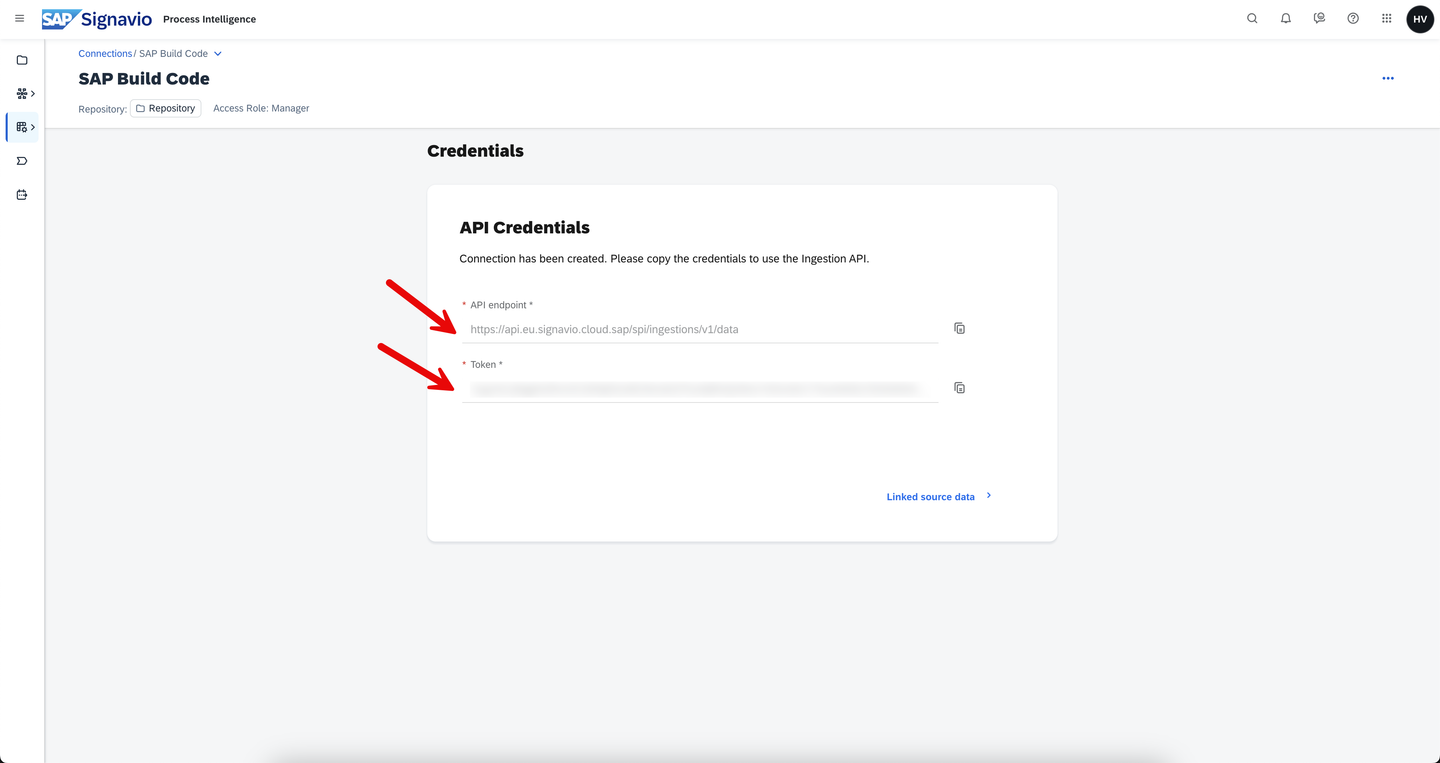
Credentials You have successfully activated the Ingestion API. More information on how to activate the ingestion API and retrieve URL endpoint and API token can be found in the official Signavio documentation.
Then we activate an OData API in SAP Signavio Process Intelligence that allows us to extract data from the system.
For that we search for the process where we want to expose data for via OData API.

SAP Signavio Process Intelligence - Process overview Within the process, we need to enter the configuration area via the settings-icon on the top right corner.
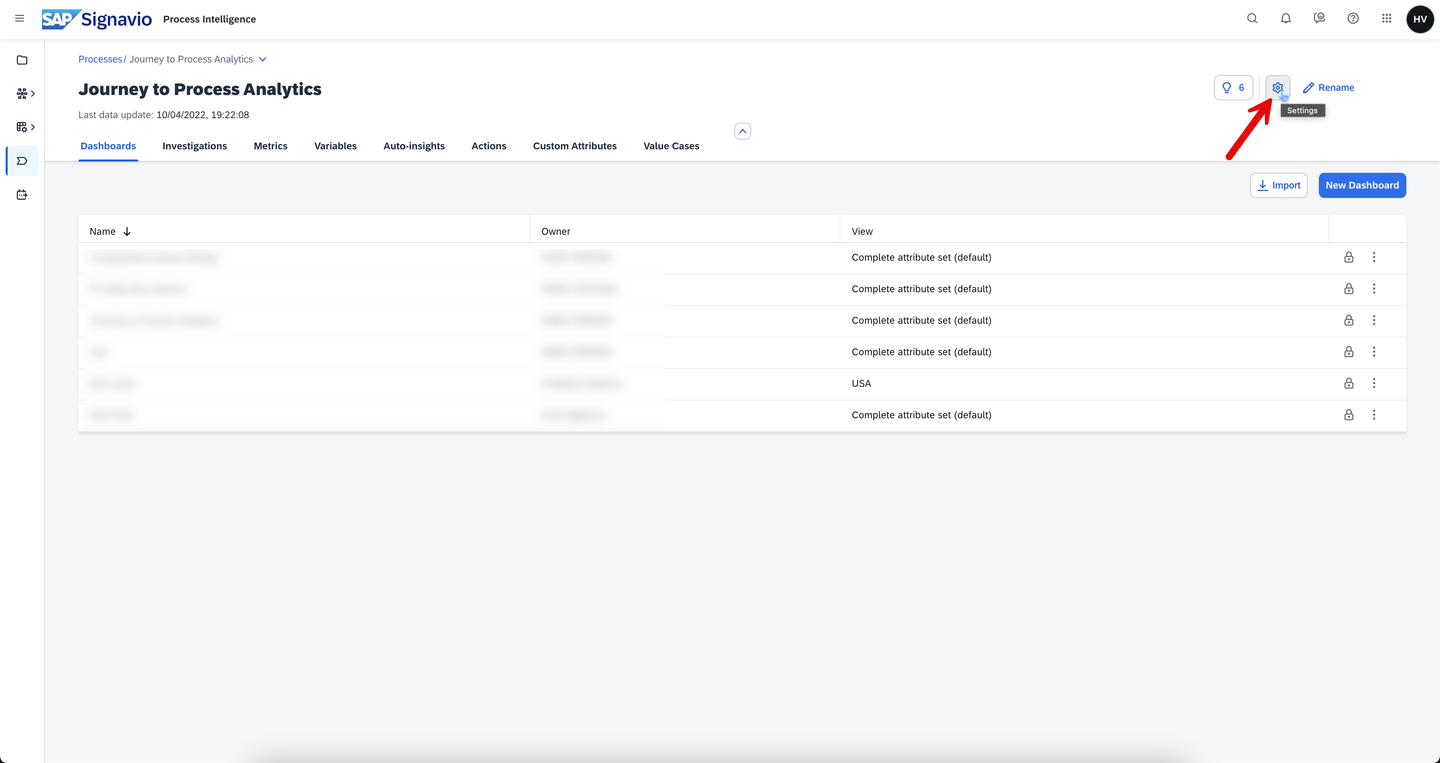
SAP Signavio Process Intelligence - Process overview Once we reach the configuration area, navigate to the tab OData views.

SAP Signavio Process Intelligence - Process overview Here we can create an OData view, that details out which data is getting exposed of the event log within the process.

Define data for API exposure We create an API token and a respective OData view that defines which data from the event log we want to expose.
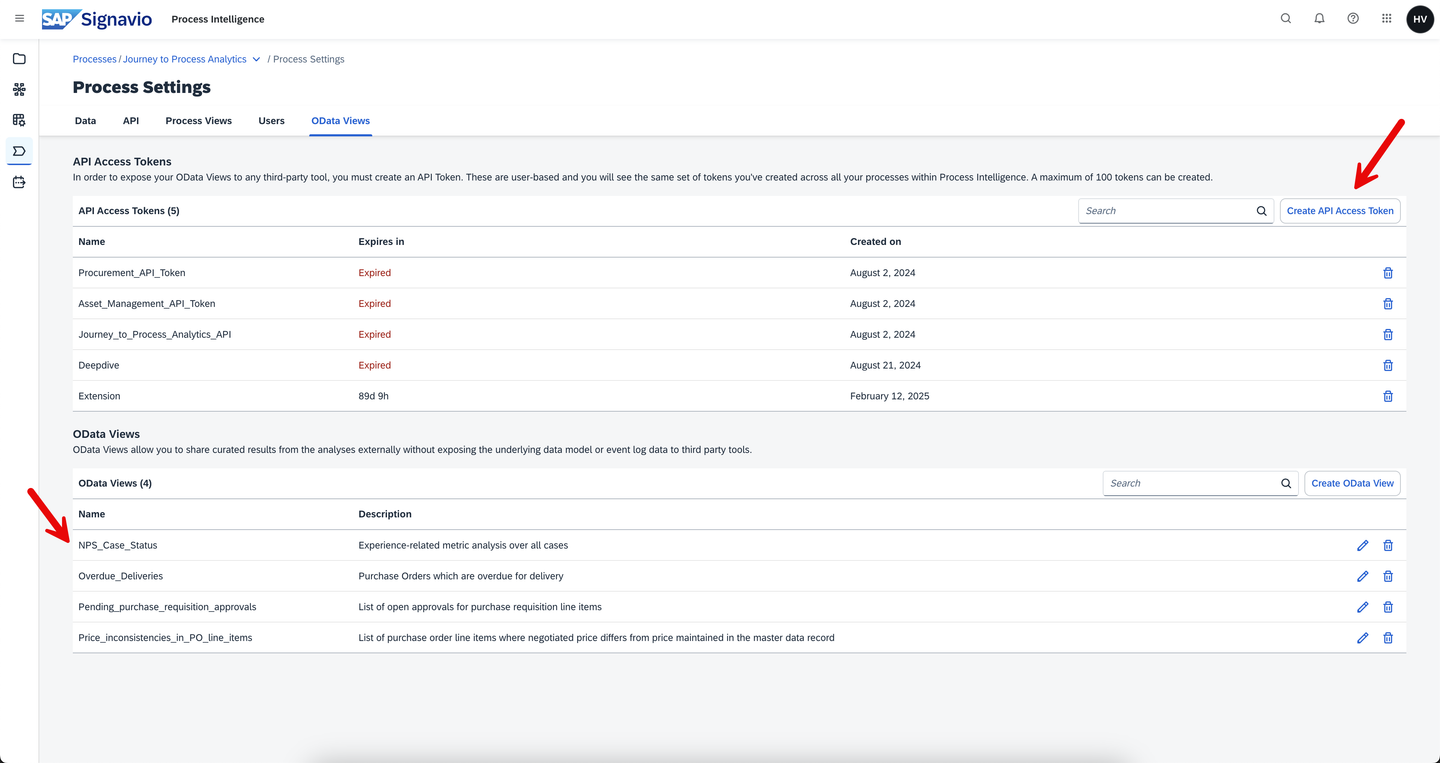
OData view More information on the activation of the OData API can be found in this blog post.
When we call the API endpoint using Postman, we can see the data and how the payload is structured. We see that there is a node called value and underneath it multiple records of the actual data of the event log.
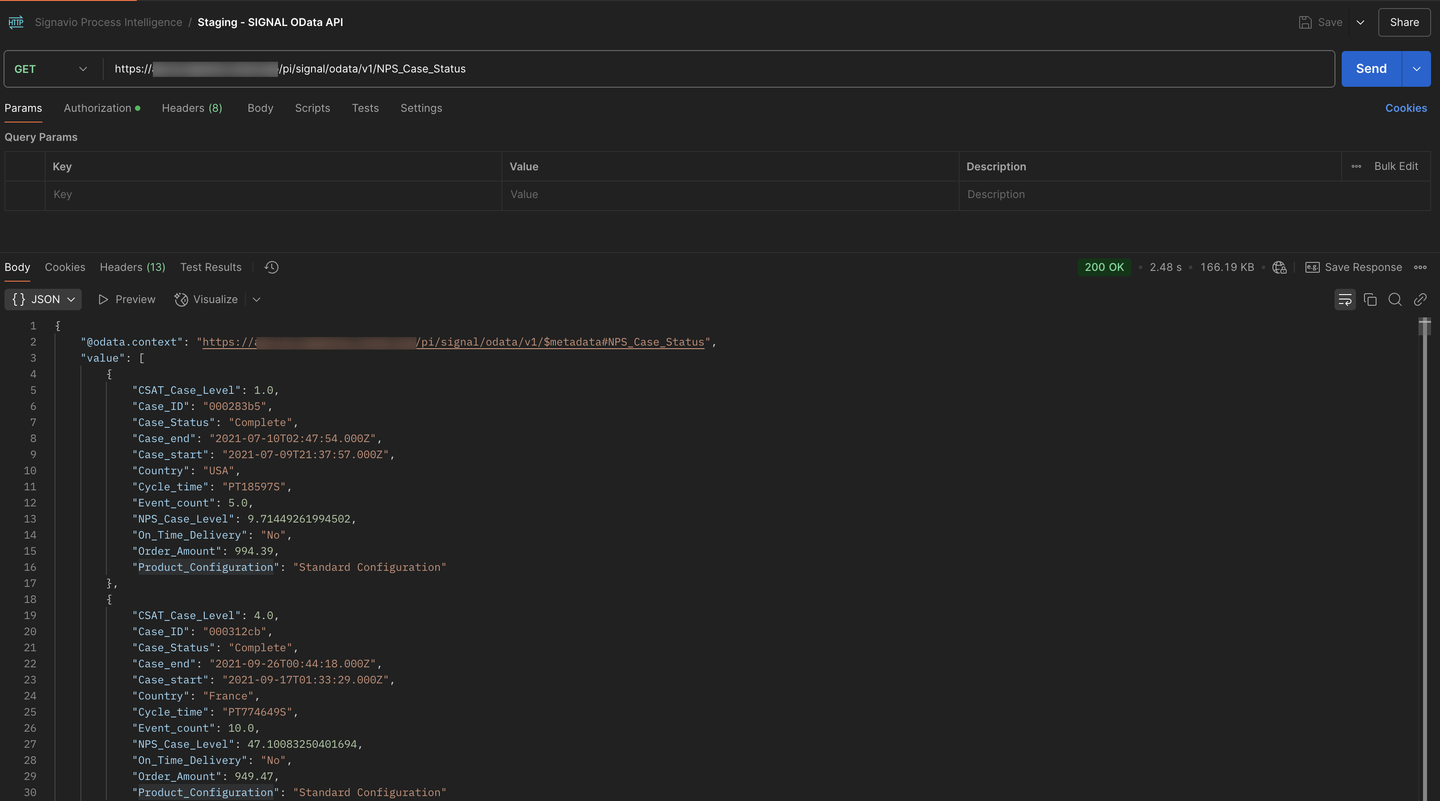
Postman response
Before we can read data from the OData API, we need to establish a SAP Build Code environment and install the Python and Jupyter capabilities on it.
Log on to SAP Build Code - Business Application Studio and create a new dev space.
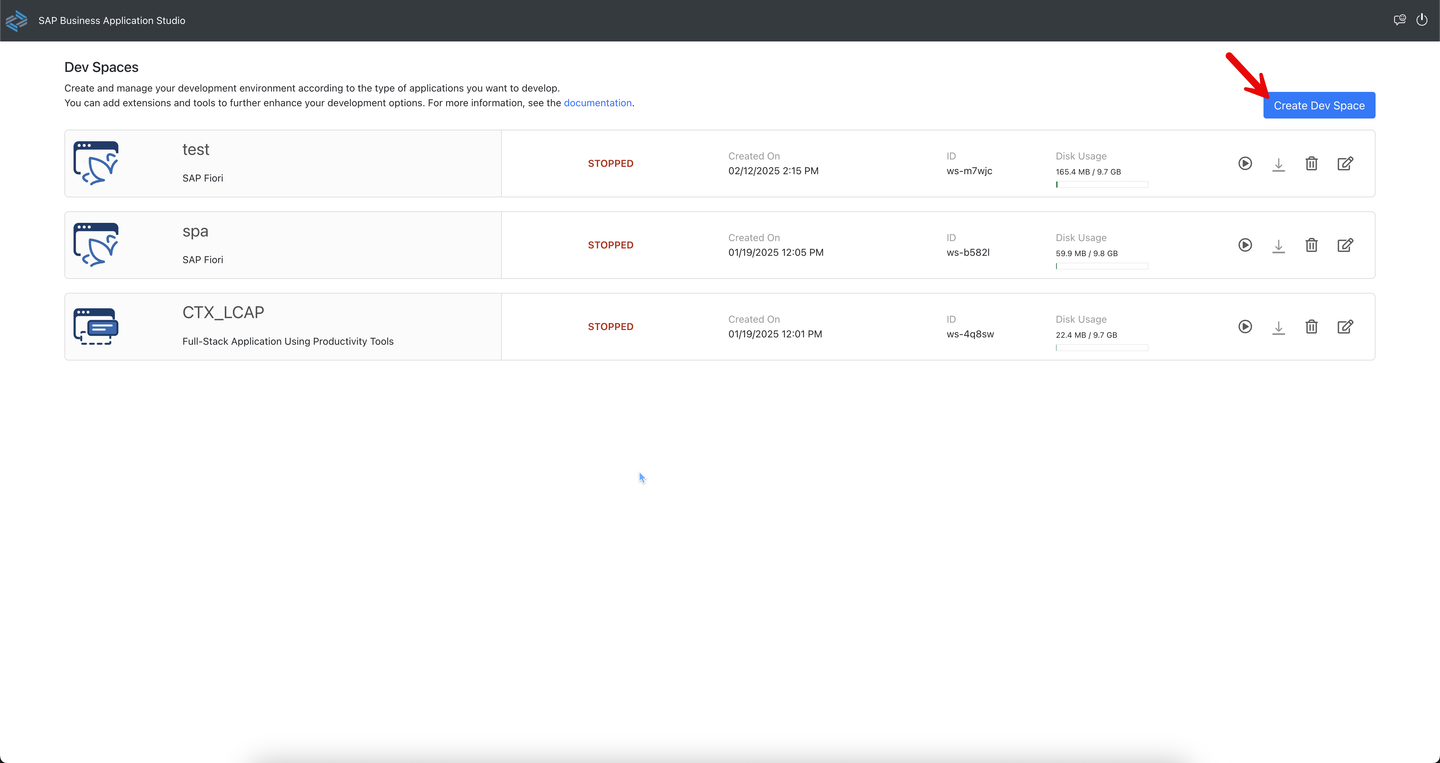
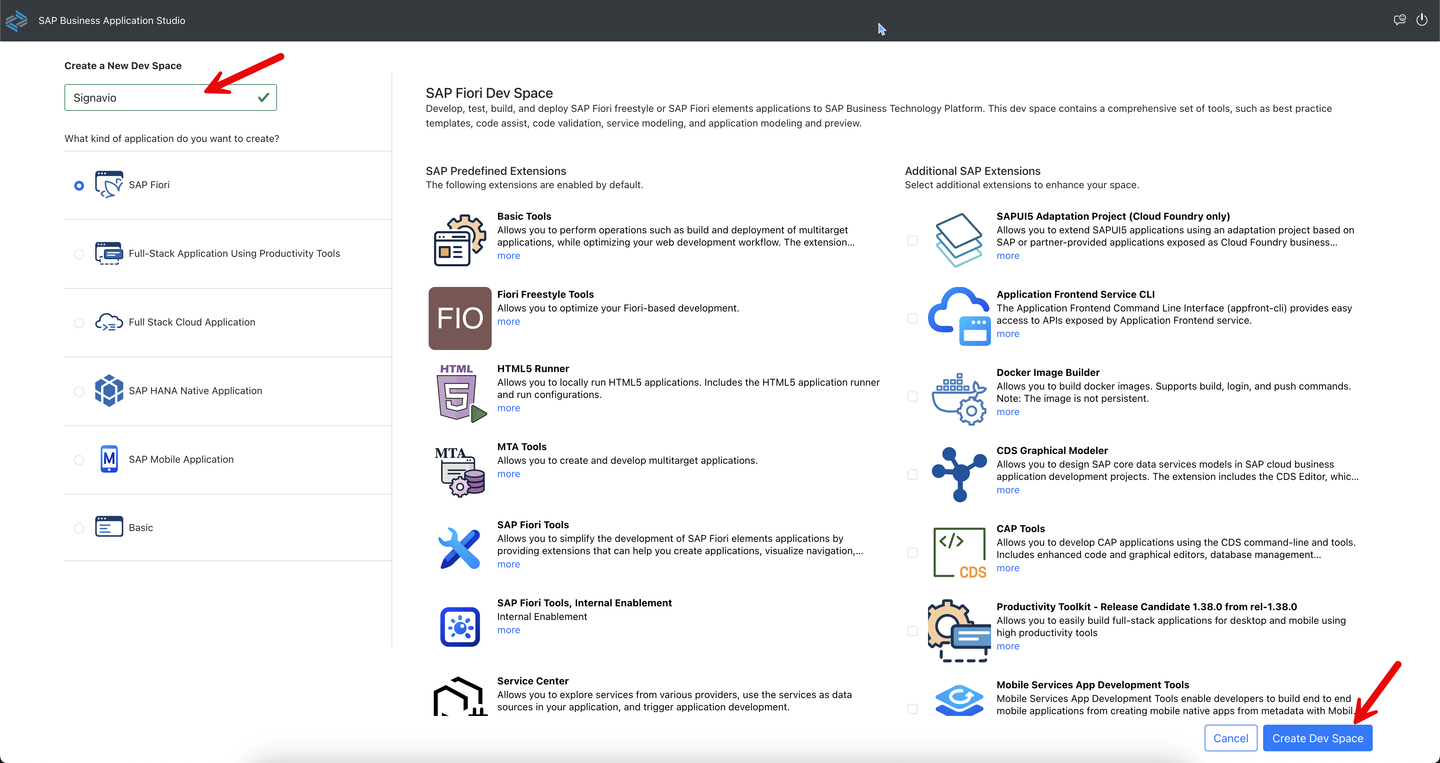
Business Application Studio Give the dev space a name, in this case I used Signavio, and then click on Create Dev Space.
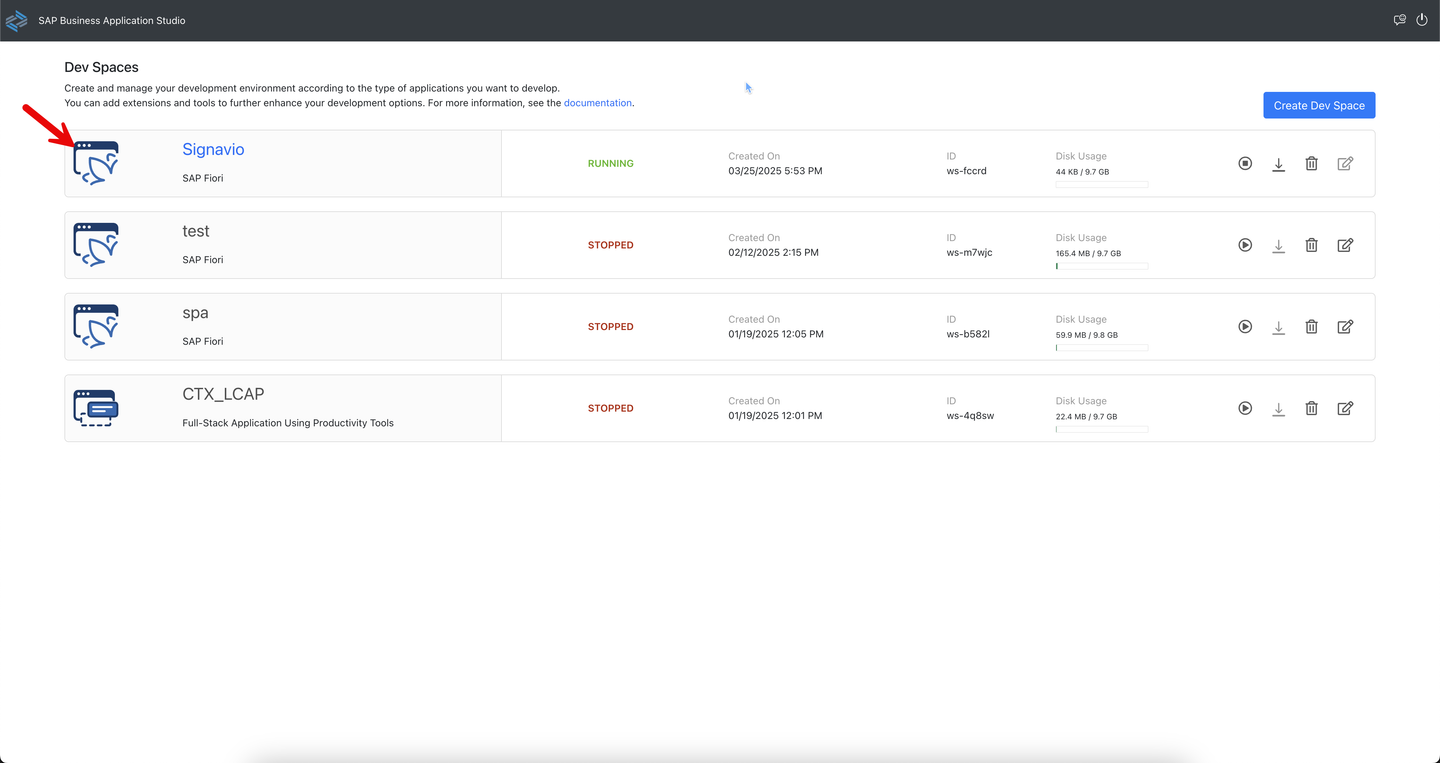
Create Dev Space Once the dev space has successfully deployed, it will show up as Running and you can enter it by clicking on it.
Enter Dev Space Once you enter Business Application Studio, run following command to create a new terminal in the search bar in the top middle area :
>create new terminal. Then click on the create new terminal submenu.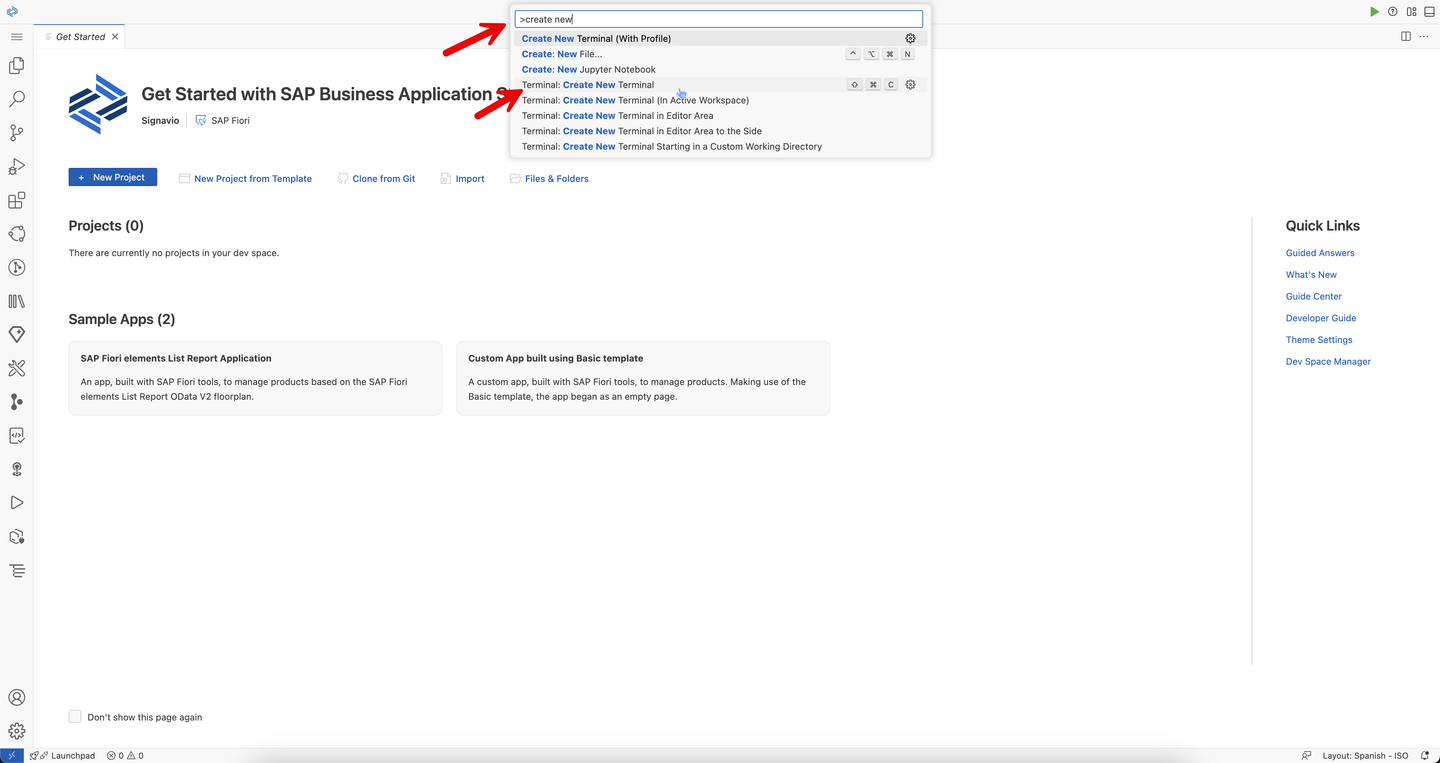
Create new terminal Here we now need to update the pip package. For that, run the following command:
pip3 install --upgrade pip
Update pip package On the left side, search for Extensions and install the packages Python and Jupyter.
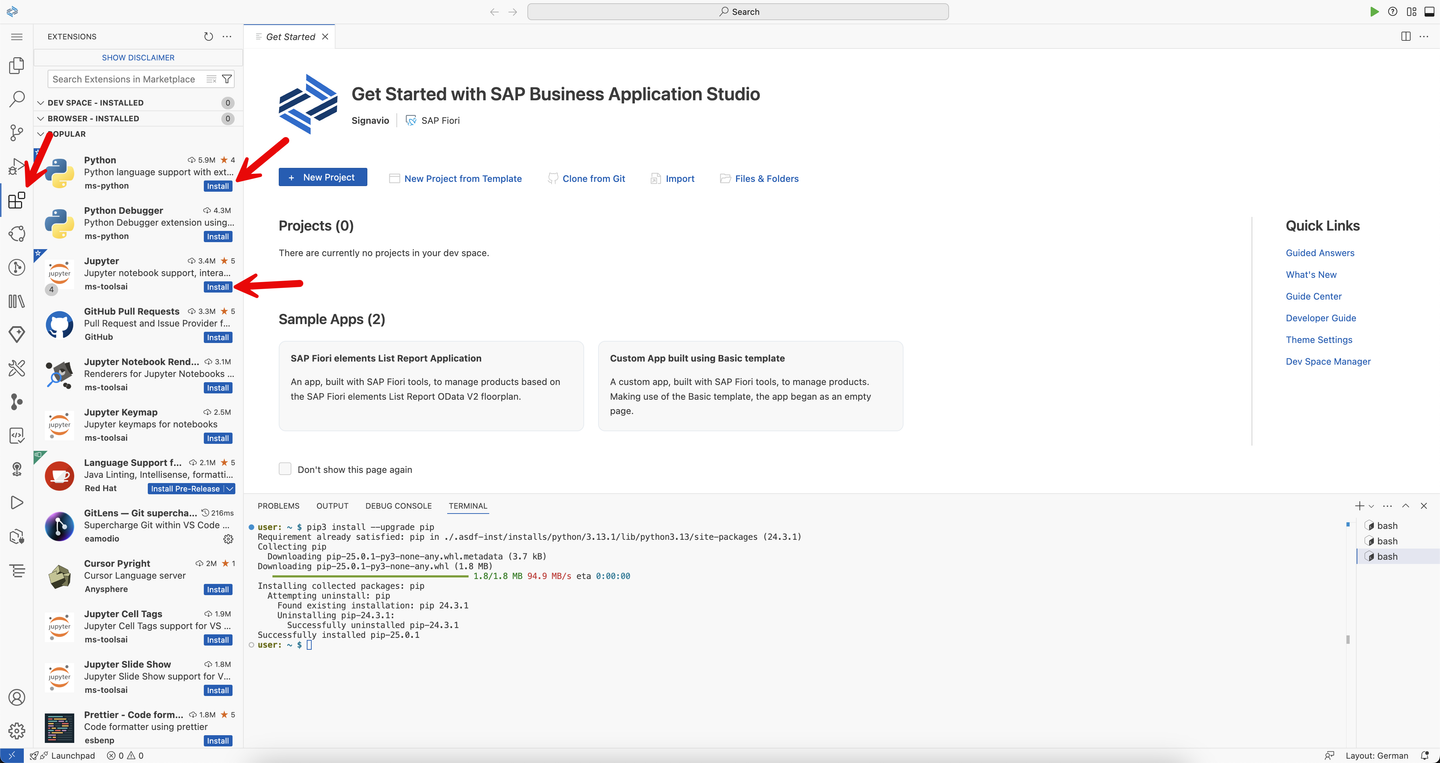
Install Python and Jupyter Once Python and Jupyter are installed, run the command:
>jupyterand create a new Jupyter notebook.
Create new Jupyter notebook Now you need to initiate your environment using the prompts from the top search bar relating your pip package. A popup on the bottom right corner should appear highlighting you the progress of this initiation. Once it is complete run a simple command to test whether your environment works properly. For more information on these setup steps, you can follow this blog post.

Initiate pip environment and run first test command With that your Python and Jupyter setup in SAP Build Code - Business Application Studio is complete and you can now connect to SAP Signavio Process Intelligence.
Now instead of using Postman, we can also use Python in SAP Build Code to call our OData API. For that we can follow this blog post on how to call an OData API in Python.
We then need to adapt the code to our API, that means changing the URL, providing the API token and also selecting the specific columns that we want to retrieve. A sample python code of how to call the OData API can be found below.
Once we receive the JSON response, we need to loop through the response and select the data we are interested in. In this example we are interested in
Case_ID,Country,Order_AmountandProduct_Configuration.This basically filters the payload for only these fields and then saves it into a
csvattachment. We also added a print command at the end so we can see what the actual data looks like that is being retrieved.Pythonimport requests import pyodata import pandas as pd import io import json from datetime import datetime # Assign absolute URL to variable SERVICE_URL and call the get request with authentication details with header Prefer: odata.maxpagesize=500,odata.track-changes # Header Prefer: odata.track-changes only for delta capable extractors SERVICE_URL = 'https://api.<region>.signavio.cloud.sap/pi/signal/odata/v1/NPS_Case_Status?$format=json' response = requests.get(SERVICE_URL,auth = ("<not-applicable>", "<odata-api-token>"), headers = {"Prefer": "odata.maxpagesize=500","Prefer": "odata.track-changes"}) # load JSON response Python dictionary object init_json = json.loads(response.content) # Determine the length of Python dictionary length = len(init_json['value']) # Declare two list l_record to capture individual record & l_output to capture complete output. l_output = [] l_record = [] # Create & append header row l_record = ('Case_ID', 'Country', 'Order_Amount', 'Product_Configuration') l_output.append(l_record) # loop through dictionary to read each record and append it to output list l_output i = 0 while i < length: l_record = (init_json['value'][i]['Case_ID'], init_json['value'][i]['Country'],init_json['value'][i]['Order_Amount'],init_json['value'][i]['Product_Configuration']) l_output.append(l_record) i += 1 # Create a dynamic file name: result_YYYY_MM_DD_HH_MM_SS.csv file_name = 'result_' + str(datetime.now().strftime('%Y_%m_%d_%H_%M_%S')) + '.csv' # Copy data from output list l_output into data frame df_file and write to file df_file = pd.DataFrame(l_output) df_file.to_csv(file_name, index = False, header = False) print(l_output)Once the data has been extracted successfully, we can see a preview of the dataset.

Data preview
Now that we have successfully retrieved the event log data, we can apply any python algorithm on it. In this example we split the event log data into a training (70%) and test (30%) dataset and apply the random forest algorithm to predict a specific column for us, in this case
Product_Configuration.We start of by creating a data frame from the selected JSON payload we saved from the OData API call and check for consistencies within the data, such as whether the first row of the data excludes column names and whether
Order_Amountis a numeric field. As we also do not need theCase_IDto training the machine learning model, we can also remove it from the data set for the time being.The column
CountryandProduct_Configurationare string fields, with which the machine learning algorithm can’t work with. Hence we need to apply an encoder, which breaks the string outputs into numbers.Once we have defined the matrix of input columns of the model, which is
CountryandOrder_Amount, and our to be predicted column, which isProduct_Configuration, we can train this model using the training dataset and test its accuracy using the test dataset. We can also then add a validation column that checks whether the model predicted correctly or wrongly.Once we have trained the model, we also add back the
Case_IDcolumn. A sample code on how to enrich the event log by applying a random forest model can be found below:Pythonimport pandas as pd from sklearn.ensemble import RandomForestClassifier from sklearn.model_selection import train_test_split from sklearn.preprocessing import LabelEncoder from sklearn.metrics import accuracy_score # Create DataFrame from l_output data = pd.DataFrame(l_output, columns=["Case_ID", "Country", "Order_Amount", "Product_Configuration"]) # Check if the first row mistakenly contains column names if data.iloc[0].equals(pd.Series(["Case_ID", "Country", "Order_Amount", "Product_Configuration"], index=data.columns)): data = data.iloc[1:].reset_index(drop=True) # Drop the first row and reset index # Retain Case_ID for later use data_case_id = data['Case_ID'] # Drop Case_ID from the data for model training data = data.drop(columns=["Case_ID"]) # Ensure 'Order_Amount' is numeric data["Order_Amount"] = pd.to_numeric(data["Order_Amount"], errors='coerce') # Encode "Country" encoder = LabelEncoder() data["Country"] = encoder.fit_transform(data["Country"]) # Encode "Product_Configuration" label_encoder = LabelEncoder() data["Product_Configuration"] = label_encoder.fit_transform(data["Product_Configuration"]) # Prepare the feature matrix (X) and target vector (y) X = data[['Country', 'Order_Amount']] y = data['Product_Configuration'] # Split the data into training and test sets X_train, X_test, y_train, y_test = train_test_split(X, y, test_size=0.3, random_state=42) # Train Random Forest model rf = RandomForestClassifier(n_estimators=10, max_depth=5, min_samples_split=10, min_samples_leaf=10, random_state=42) rf.fit(X_train, y_train) # Make predictions y_pred = rf.predict(X_test) # Convert predictions and actual values back to original labels y_pred_labels = label_encoder.inverse_transform(y_pred) y_true_labels = label_encoder.inverse_transform(y_test) # Convert encoded 'Country' back to original names X_test['Country'] = encoder.inverse_transform(X_test['Country']) # Calculate accuracy accuracy = accuracy_score(y_true_labels, y_pred_labels) print(f"Model Accuracy: {accuracy * 100:.2f}%") # Create test results DataFrame test_results = X_test.copy() test_results.insert(0, 'Case_ID', data_case_id.loc[test_results.index]) # Ensure Case_ID is first column test_results['Actual_Configuration'] = y_true_labels test_results['Predicted_Configuration'] = y_pred_labels # Add a column to mark correct predictions ("Yes") and incorrect ones ("No") test_results["Correct_Prediction"] = (test_results["Actual_Configuration"] == test_results["Predicted_Configuration"]).map({True: "Yes", False: "No"}) # Print test results print(test_results)If our conversion is successful, we will see a preview of the data frame including a percentage of the model accuracy.
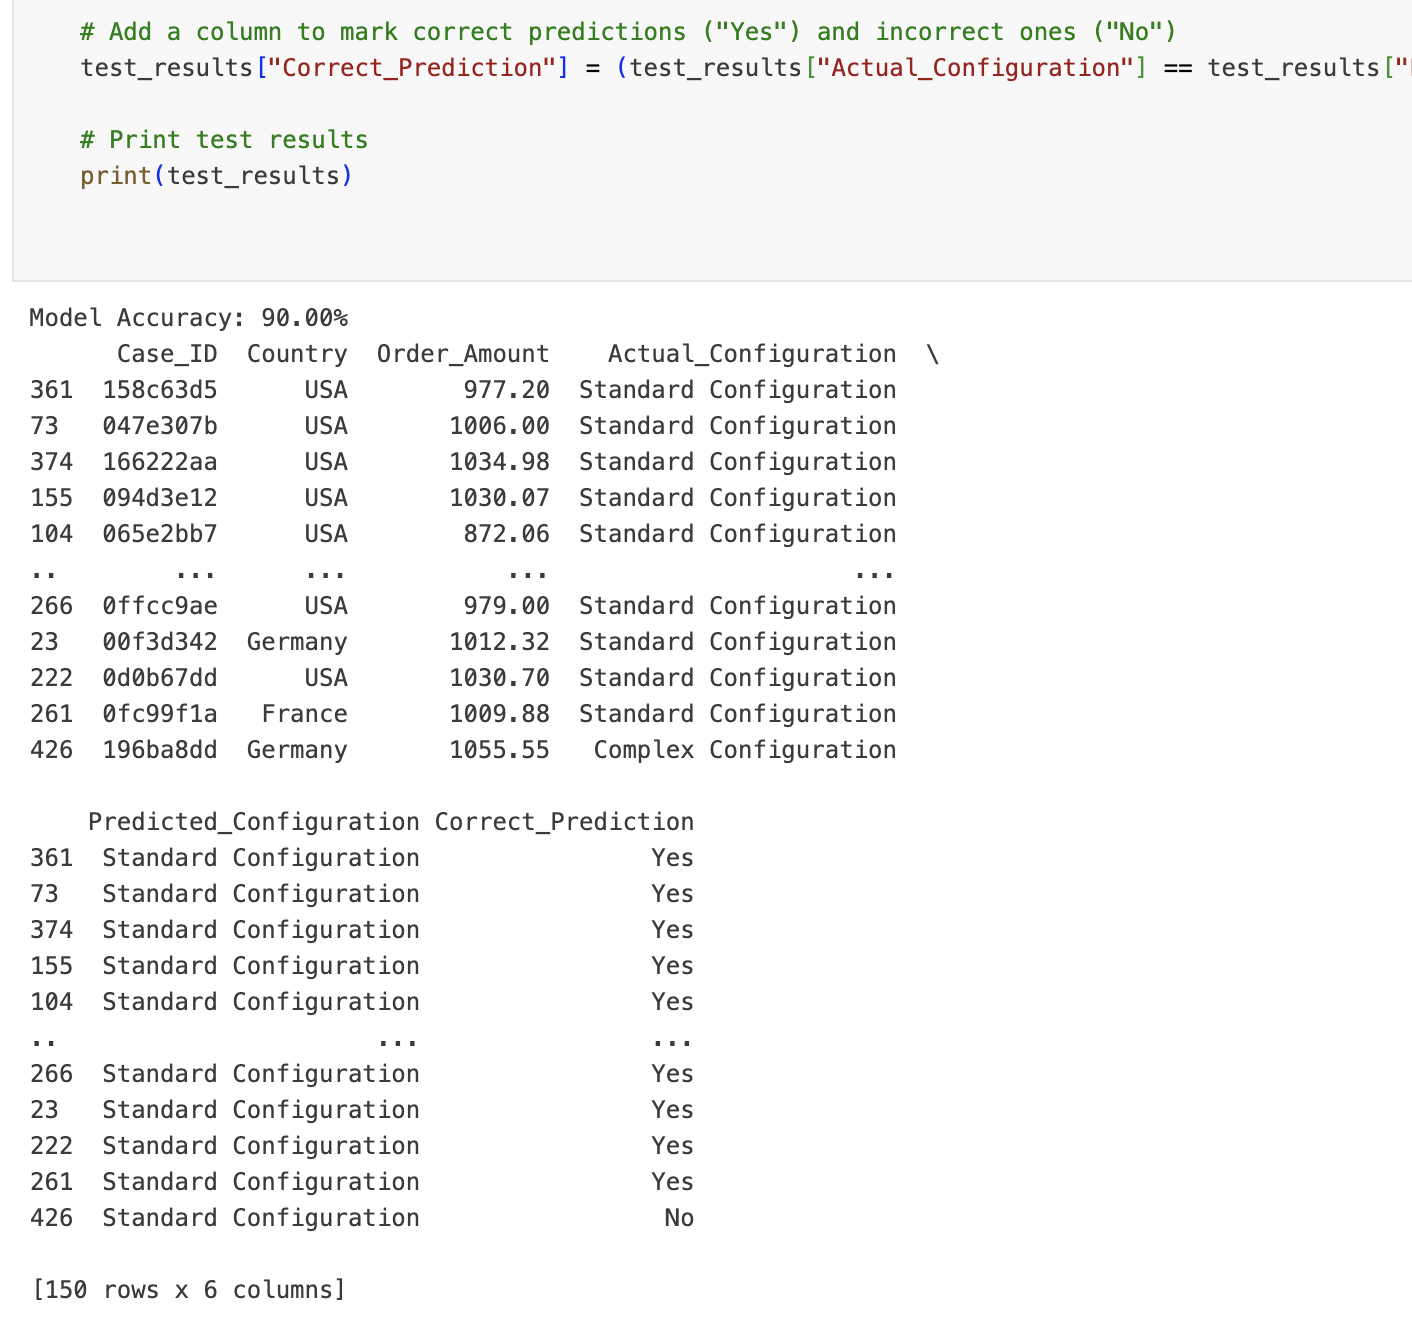
Machine learning model Once we have trained and tested our model, we need to convert the data frame into a
csvformat so that we can push the updated data back into SAP Signavio Process Intelligence.We also need to add the column names in the first row of the
csvfile. A sample python code can be found below:Python[# Convert the results to CSV format with the column names as the first row csv_data = test_results.to_csv(index=False, sep=',', header=True) print(csv_data) # Optionally, save to a CSV file without the first row as it is already handled: test_results.to_csv('test_results_with_predictions.csv', index=False)]If our
csvconversion is successful, we can see our data incsvformat with the column name in the first row.
Data in CSV format
Now that we have activated the Ingestion API and enriched the event log, we can perform the data push into SAP Signavio Process Intelligence.
For that we leverage the official API specification of the Ingestion API in combination with the transformation logic we used in our developer tutorial using SAP Integration Suite.
As a result we get a python code that can perform the data push. A sample python code can be found below:
Pythonimport requests import json # Define API endpoint (Choose correct region) url = "https://api.<region>.signavio.cloud.sap/spi/ingestions/v1/data" # Change region if needed # Access token for authentication access_token = "<api-token>" # Define schema as JSON (adjust fields based on your data structure) schema = json.dumps({ "type": "record", "name": "RandomForrestPrediction", "fields": [ {"name": "Case_ID", "type": ["null", "string"]}, {"name": "Country", "type": ["null", "string"]}, {"name": "Order_Amount", "type": ["null", "double"]}, {"name": "Actual_Configuration", "type": ["null", "string"]}, {"name": "Predicted_Configuration", "type": ["null", "string"]}, {"name": "Correct_Prediction", "type": ["null", "string"]} ] }) # Define primary keys primary_keys = "Case_ID" # Adjust based on your needs csv_data = test_results.to_csv(index=False, sep=',', header=True) # Construct the multipart request body manually boundary = "cpi" body = ( f"--{boundary}\r\n" f'Content-Disposition: form-data; name="schema"\r\n\r\n' f"{schema}\r\n" f"--{boundary}\r\n" f'Content-Disposition: form-data; name="files"; filename="RandomForrestPrediction.csv"\r\n' f"Content-Type: text/csv\r\n\r\n" f"{csv_data}\r\n" f"--{boundary}\r\n" f'Content-Disposition: form-data; name="primaryKeys"\r\n\r\n' f"{primary_keys}\r\n" f"--{boundary}--\r\n" ) # Define headers headers = { "Authorization": f"Bearer {access_token}", "Content-Type": f"multipart/form-data; boundary={boundary}" } # Make the request response = requests.post(url, headers=headers, data=body) # Print the response print(response.status_code, response.text)If the API call is successful, we should receive a HTTP 200 response.
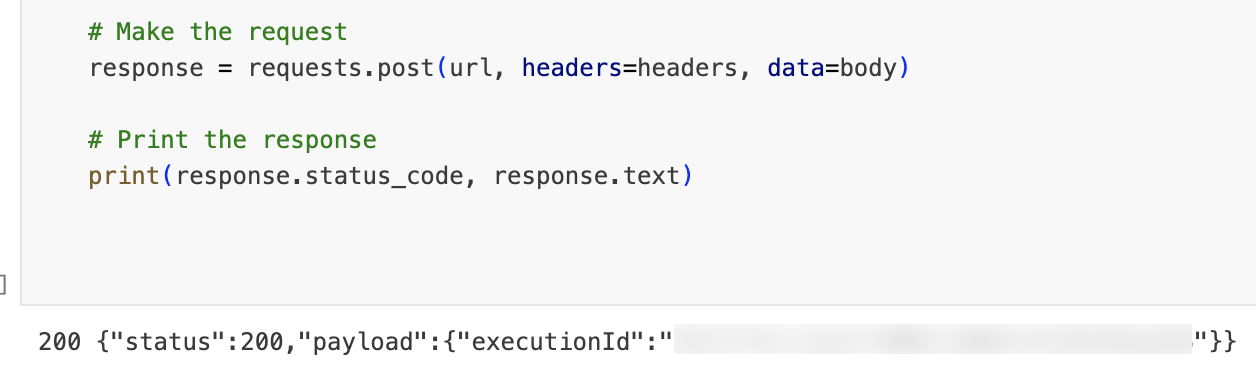
HTTP status
Once the data push of the enriched event log was successful, we can view the new data model in our source data.
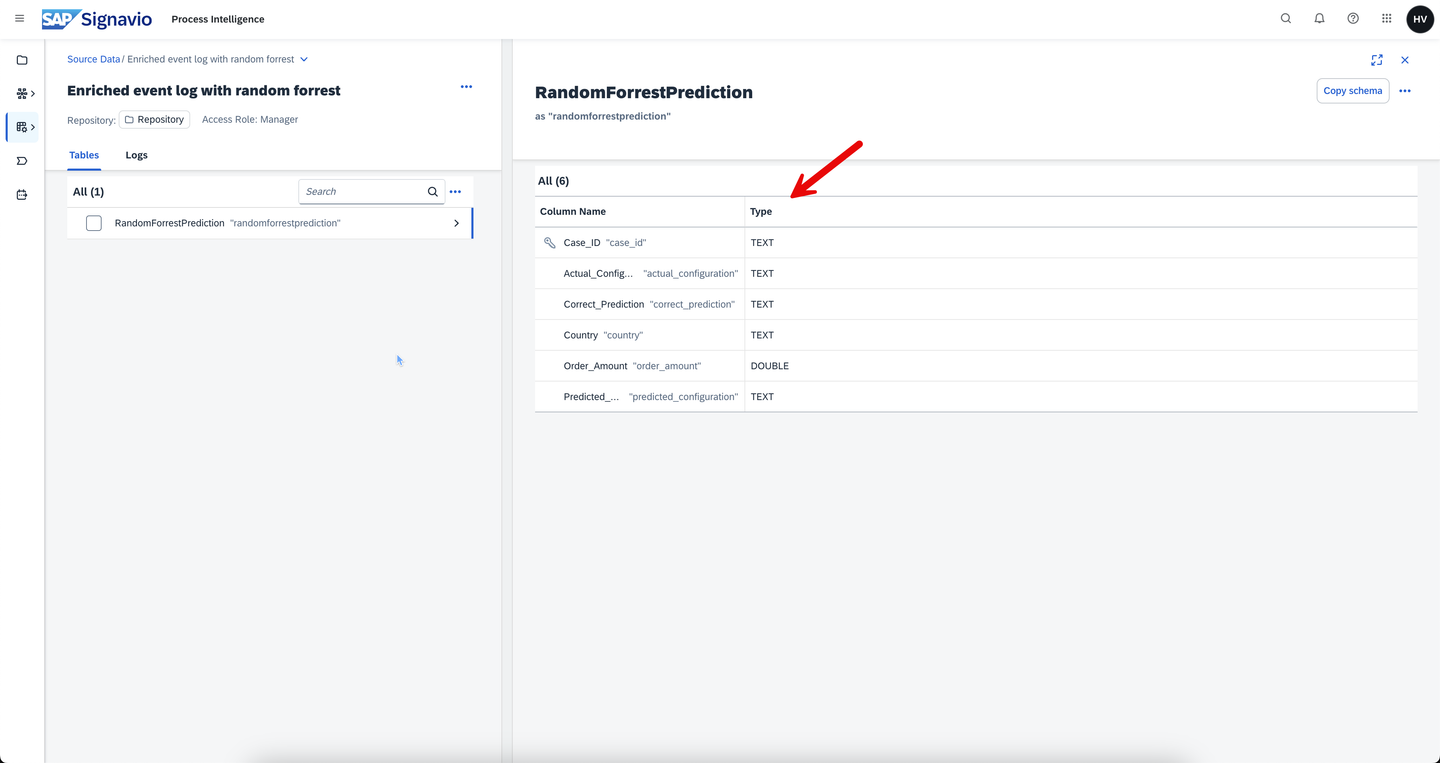
Source data We can also view the underlying values by previewing a dedicated data view.
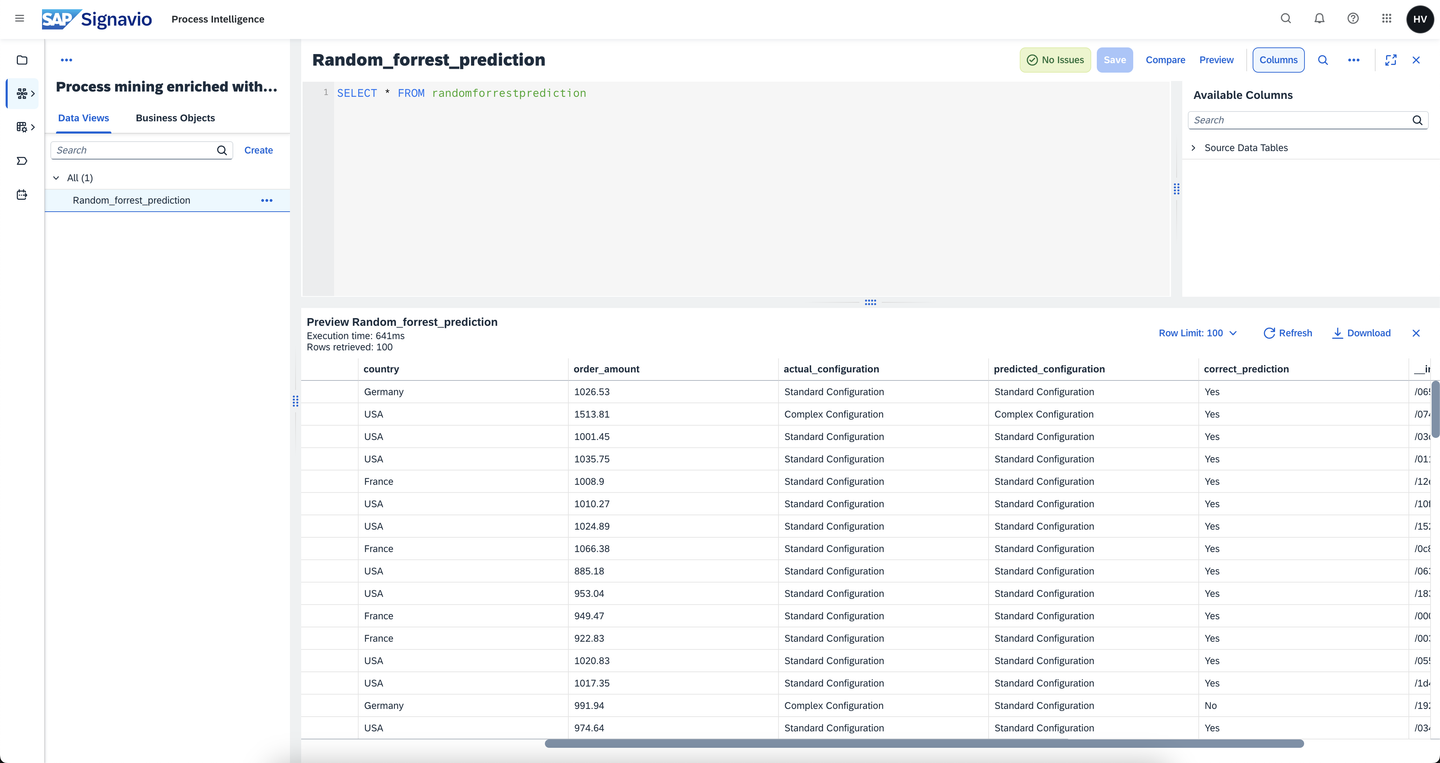
Data preview
With that we have successfully implemented a machine learning scenario using SAP Build Code - Business Application Studio by enriching the event log in SAP Signavio Process Intelligence. We were able to:
- Enriched our dataset that can now enhance our process mining analysis for many use cases
- We setup the technical connectivity, data transformation and applied machine learning algorithm
Below some useful links relating our API documentation. If you have any questions feel free to reach out to me
SAP Signavio Process Intelligence APIs
Ingestion API - Help documentation
Ingestion API - Postman collection
Ingestion API - Business Accelerator Hub
OData API - Help documentation
Resources
Discussion
Share feedback on this tutorial or join the conversation in SAP Community.