
Overview
You will learn
- How to add a Google Map to the wizard-generated app and display customer locations
- How to add a Fiori Map control and try out its features


Prerequisites
Prerequisites
You have:
- Set Up a BTP Account for Tutorials. Follow the instructions to get an account, and then to set up entitlements and service instances for the following BTP services.
- SAP Mobile Services
- Completed Try Out SAP BTP SDK Wizard for Android.
Steps
Intro
A Fiori Map control extends the Google Maps SDK for Android. It provides additional APIs that handle clustering, as well as a toolbar, panel, and an editor to annotate map. For additional details, see Fiori Design Guidelines.
In this section you will create a new activity to display a map.
In Android Studio, in the
AndroidManifest.xmlfile, add the following content as a child of the<application>tag right before<activity>tags:XML<!-- TODO: Before you run your application, you need a Google Maps API key. To get one, follow the directions here: https://developers.google.com/maps/documentation/android-sdk/get-api-key Once you have your API key (it starts with "AIza"), define a new property in your project's local.properties file (e.g. MAPS_API_KEY=Aiza...). --> <meta-data android:name="com.google.android.geo.API_KEY" android:value="${MAPS_API_KEY}" />Follow the directions mentioned in the above comments to obtain an API key.
Open the
local.propertiesfile in your project-level directory and then add the following code. ReplaceYOUR_API_KEYwith your API key.CodeMAPS_API_KEY=YOUR_API_KEYIn Android Studio, in the top-level
build.gradlefile, add the following code to thedependencieselement underbuildscript.Gradlebuildscript { dependencies { // ... classpath("com.google.android.libraries.mapsplatform.secrets-gradle-plugin:secrets-gradle-plugin:2.0.1") } }Open the module-level
build.gradlefile and add the following code to thepluginselement.Gradleplugins { id("com.android.application") // ... id("com.google.android.libraries.mapsplatform.secrets-gradle-plugin") }Add the following dependency to the module-level
build.gradlefile and click Sync Now to sync the project:Gradledependencies { // Android Maps Compose composables for the Maps SDK for Android implementation("com.google.maps.android:maps-compose:6.12.2") ... ... }In the project explorer, navigate to
app > kotlin+java > com.sap.wizapp > ui > odata > screens > customer.Right-click and choose New > Kotlin Class / File.
Name the file as
CustomersMapScreen. Select File and then pressEnter.Replace the content of
CustomersMapScreenwith the following:
package com.sap.wizapp.ui.odata.screens.customer

import androidx.compose.foundation.layout.fillMaxSize
import androidx.compose.runtime.Composable
import androidx.compose.ui.Modifier
import com.google.android.gms.maps.model.CameraPosition
import com.google.android.gms.maps.model.LatLng
import com.google.maps.android.compose.GoogleMap
import com.google.maps.android.compose.Marker
import com.google.maps.android.compose.rememberCameraPositionState
import com.google.maps.android.compose.rememberMarkerState
import com.sap.wizapp.ui.odata.viewmodel.ODataViewModel

val CustomersMapScreen:
        @Composable
            (
            navigateToHome: () -> Unit,
            navigateUp: () -> Unit,
            viewModel: ODataViewModel<EntityValue>,
            isExpandScreen: Boolean,
        ) -> Unit =
    { _, _, _, _ ->
        val sydney = LatLng(-33.865143, 151.209900)
        val sydneyMarkerState = rememberMarkerState(position = sydney)
        val cameraPositionState = rememberCameraPositionState {
            position = CameraPosition.fromLatLngZoom(sydney, 1f)
        }
        GoogleMap(
            modifier = Modifier.fillMaxSize(),
            cameraPositionState = cameraPositionState
        ) {
            Marker(
                state = sydneyMarkerState,
                title = "Sydney",
                snippet = "Marker in Sydney"
            )
        }
}On Windows, press
Ctrl+Shift+N, or, on a Mac, presscommand+shift+O, and typeODataCommonUIto openODataCommonUI.kt.On Windows, press
Ctrl+F, or, on a Mac, presscommand+F, and search forCustomerEntitiesScreen.Replace
CustomerEntitiesScreenwithCustomersMapScreenso that when the user taps on Customers, the app will navigate to the newly added screen that includes a map.Run the app. Select Customers.
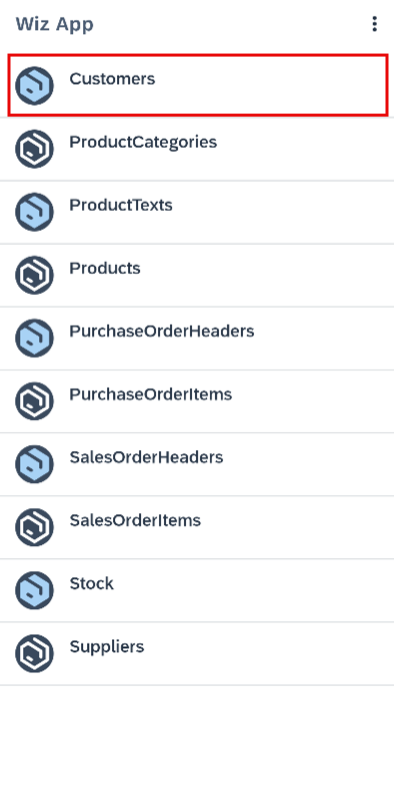
Entities screen Instead of a customer list, a map is now displayed.

Map screen If a message appears that says Wiz App is having trouble with Google Play services, try running the app on an Android emulator that includes the Google Play Store app.
In Android Studio, in the
AndroidManifest.xmlfile, add the following content as a child of the<application>tag right before<activity>tags:XML<!-- TODO: Before you run your application, you need a Google Maps API key. To get one, follow the directions here: https://developers.google.com/maps/documentation/android-sdk/get-api-key Once you have your API key (it starts with "AIza"), define a new property in your project's local.properties file (e.g. MAPS_API_KEY=Aiza...). --> <meta-data android:name="com.google.android.geo.API_KEY" android:value="${MAPS_API_KEY}" />Follow the directions mentioned in the above comments to obtain an API key.
Open the
local.propertiesfile in your project-level directory and then add the following code. ReplaceYOUR_API_KEYwith your API key.CodeMAPS_API_KEY=YOUR_API_KEYIn Android Studio, in the top-level
build.gradlefile, add the following code to thedependencieselement underbuildscript.Gradlebuildscript { dependencies { // ... classpath("com.google.android.libraries.mapsplatform.secrets-gradle-plugin:secrets-gradle-plugin:2.0.1") } }Open the module-level
build.gradlefile and add the following code to the top of the file.Gradleapply plugin: 'com.google.android.libraries.mapsplatform.secrets-gradle-plugin'Add the following dependency to the module-level
build.gradlefile and click Sync Now to sync the project:Gradledependencies { implementation 'com.google.android.gms:play-services-maps:19.2.0' ... ... }In the project explorer, navigate to
app > kotlin+java > com.sap.wizapp > mdui > customers.Right-click and choose New > Activity > Empty Views Activity.
Set Activity Name to be
CustomersMapActivityand click Finish.Replace the class content with the following:
package com.sap.wizapp.mdui.customers

import androidx.appcompat.app.AppCompatActivity
import android.os.Bundle
import com.sap.wizapp.R

import com.google.android.gms.maps.CameraUpdateFactory
import com.google.android.gms.maps.GoogleMap
import com.google.android.gms.maps.OnMapReadyCallback
import com.google.android.gms.maps.SupportMapFragment
import com.google.android.gms.maps.model.LatLng
import com.google.android.gms.maps.model.MarkerOptions
import com.sap.wizapp.databinding.ActivityCustomersMapBinding

class CustomersMapActivity : AppCompatActivity(), OnMapReadyCallback {

    private lateinit var mMap: GoogleMap
    private lateinit var binding: ActivityCustomersMapBinding

    override fun onCreate(savedInstanceState: Bundle?) {
        super.onCreate(savedInstanceState)

        binding = ActivityCustomersMapBinding.inflate(layoutInflater)
        setContentView(binding.root)

        // Obtain the SupportMapFragment and get notified when the map is ready to be used.
        val mapFragment = supportFragmentManager
            .findFragmentById(R.id.map) as SupportMapFragment
        mapFragment.getMapAsync(this)
    }

    /**
    * Manipulates the map once available.
    * This callback is triggered when the map is ready to be used.
    * This is where we can add markers or lines, add listeners or move the camera. In this case,
    * we just add a marker near Sydney, Australia.
    * If Google Play services is not installed on the device, the user will be prompted to install
    * it inside the SupportMapFragment. This method will only be triggered once the user has
    * installed Google Play services and returned to the app.
    */
    override fun onMapReady(googleMap: GoogleMap) {
        mMap = googleMap

        // Add a marker in Sydney and move the camera
        val sydney = LatLng(-34.0, 151.0)
        mMap.addMarker(MarkerOptions().position(sydney).title("Marker in Sydney"))
        mMap.moveCamera(CameraUpdateFactory.newLatLng(sydney))
    }
}On Windows, press
Ctrl+Shift+N, or, on a Mac, presscommand+shift+O, and typeactivity_customers_mapto openactivity_customers_map.xml.Replace its contents with the following:
<?xml version="1.0" encoding="utf-8"?>
<fragment xmlns:android="http://schemas.android.com/apk/res/android"
    xmlns:map="http://schemas.android.com/apk/res-auto"
    xmlns:tools="http://schemas.android.com/tools"
    android:id="@+id/map"
    android:name="com.google.android.gms.maps.SupportMapFragment"
    android:layout_width="match_parent"
    android:layout_height="match_parent"
    tools:context=".mdui.customers.CustomersMapActivity" />
On Windows, press
Ctrl+N, or, on a Mac, presscommand+O, and typeEntitySetListActivityto openEntitySetListActivity.kt.On Windows, press
Ctrl+F, or, on a Mac presscommand+F, and search forCustomersActivity::class.Replace
CustomersActivity::classwithCustomersMapActivity::classso that when the user taps on Customers, the app will navigate to the newly added activity that includes a map.Run the app. Select Customers.
Entities screen Instead of a customer list, a map is now displayed.

Map screen If a message appears that says Wiz App is having trouble with Google Play services, try running the app on an Android emulator that includes the Google Play Store app.
In this section, you will add code to place a marker on the map for each customer.
On Windows, press
Shift+Ctrl+N, or, on a Mac, pressshift+command+O, and typeCustomersMapScreento openCustomersMapScreen.kt.Add the following variables:
Kotlinprivate val locations = HashMap<String, LatLng>() private var customerList = mutableListOf<Customer>()Add the following method:
Kotlinprivate suspend fun getCustomerList() { val query = DataQuery() .from(ESPMContainerMetadata.EntitySets.customers) .where( Customer.country.equal("US") .or(Customer.country.equal("CA")) .or(Customer.country.equal("MX"))) val eSPMContainer = SAPServiceManager.eSPMContainer eSPMContainer?.getCustomers(query)?.also { customerList = it } } private fun getCustomerLatLongFromAddress(address: String, context: Context): LatLng? { locations[address]?.let { return it } val coder = Geocoder(context) try { // May throw an IOException val addresses = coder.getFromLocationName(address, 5) if (addresses.isNullOrEmpty()) { return null } val location = addresses[0] return LatLng(location.latitude, location.longitude) } catch (ex: IOException) { ex.printStackTrace() return null } }Replace the variable
CustomersMapScreenwith the following:Kotlinval CustomersMapScreen: @Composable ( navigateToHome: () -> Unit, navigateUp: () -> Unit, viewModel: ODataViewModel<EntityValue>, isExpandScreen: Boolean, ) -> Unit = { _, _, viewModel, _ -> val centre = LatLng(39.8283, -98.5795) val cameraPositionState = rememberCameraPositionState { position = CameraPosition.fromLatLngZoom(centre, 1f) } // For demo purposes, speed up the lookup of address details. // Will use Geocoder to translate an address to a LatLng if address is not in this list locations["Wilmington, Delaware, US"] = LatLng(39.744655, -75.5483909) locations["Antioch, Illinois, US"] = LatLng(42.4772418, -88.0956396) locations["Santa Clara, California, US"] = LatLng(37.354107899999995, -121.9552356) locations["Hermosillo, MX"] = LatLng(29.0729673, -110.9559192) locations["Bismarck, North Dakota, US"] = LatLng(46.808326799999996, -100.7837392) locations["Ottawa, CA"] = LatLng(45.4215296, -75.69719309999999) locations["México, MX"] = LatLng(23.634501, -102.55278399999999) locations["Boca Raton, Florida, US"] = LatLng(26.368306399999998, -80.1289321) locations["Carrollton, Texas, US"] = LatLng(32.9756415, -96.8899636) locations["Lombard, Illinois, US"] = LatLng(41.8800296, -88.00784349999999) locations["Moorestown, US"] = LatLng(39.9688817, -74.948886) runBlocking { getCustomerList() } GoogleMap( modifier = Modifier.fillMaxSize(), cameraPositionState = cameraPositionState ) { customerList.forEach { customer -> Log.d("", "Adding a marker for " + customer.city) val latLng = getCustomerLatLongFromAddress(customer.city + ", " + customer.country, viewModel.getApplication()) latLng?.let { val markerState = rememberMarkerState(position = it) Marker( state = markerState, title = customer.firstName + " " + customer.lastName, tag = customer ) } } } }Run the app.
Select Customers and notice that a map is displayed that contains a marker for every customer.

Map screen with markers If a marker is tapped, an info marker is displayed with additional customer details.
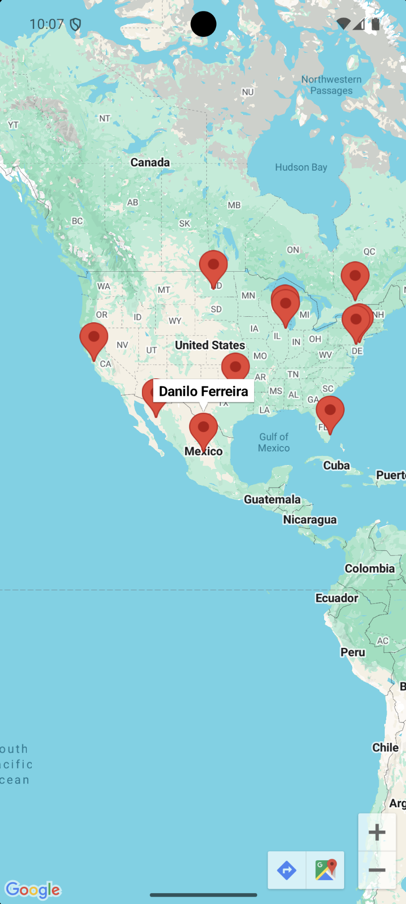
Map screen with info markers
On Windows, press
Ctrl+N, or, on a Mac, presscommand+O, and typeCustomersMapActivityto openCustomersMapActivity.kt.Add the following class variable:
Kotlinprivate val locations = HashMap<String, LatLng>()Add the following methods:
Kotlinprivate fun addCustomersToMap() { val query = DataQuery() .from(ESPMContainerMetadata.EntitySets.customers) .where(Customer.country.equal("US") .or(Customer.country.equal("CA")) .or(Customer.country.equal("MX"))) val sapServiceManager = (application as SAPWizardApplication).sapServiceManager val eSPMContainer = sapServiceManager?.eSPMContainer eSPMContainer?.let { it.getCustomersAsync(query, { customers: List<Customer> -> for (customer in customers) { Log.d("", "Adding a marker for " + customer.city) addCustomerMarkerToMap(customer) } }, { re: RuntimeException -> Log.d("", "An error occurred during async query: " + re.message) }) } } private fun getCustomerLatLongFromAddress(address: String): LatLng? { locations[address]?.let { return it } val coder = Geocoder(this) try { // May throw an IOException val addresses = coder.getFromLocationName(address, 5) if (addresses.isNullOrEmpty()) { return null } val location = addresses[0] return LatLng(location.latitude, location.longitude) } catch (ex: IOException) { ex.printStackTrace() return null } } private fun addCustomerMarkerToMap(customer: Customer) { val latLng = getCustomerLatLongFromAddress(customer.city + ", " + customer.country) latLng?.let { val customerMarker = mMap.addMarker(MarkerOptions() //.snippet("") .position(it) .title(customer.firstName + " " + customer.lastName) ) customerMarker?.tag = customer } }On Windows, press
Ctrl+F12, or, on a Mac, presscommand+F12, and typeonMapReadyto move to theonMapReadymethod.Replace it with the following code:
Kotlinoverride fun onMapReady(googleMap: GoogleMap) { mMap = googleMap val centre = LatLng(39.8283, -98.5795) mMap.moveCamera(CameraUpdateFactory.newLatLng(centre)) // For demo purposes, speed up the lookup of address details. // Will use Geocoder to translate an address to a LatLng if address is not in this list locations.put("Wilmington, Delaware, US", LatLng(39.744655, -75.5483909)) locations.put("Antioch, Illinois, US", LatLng(42.4772418, -88.0956396)) locations.put("Santa Clara, California, US", LatLng(37.354107899999995, -121.9552356)) locations.put("Hermosillo, MX", LatLng(29.0729673, -110.9559192)) locations.put("Bismarck, North Dakota, US", LatLng(46.808326799999996, -100.7837392)) locations.put("Ottawa, CA", LatLng(45.4215296, -75.69719309999999)) locations.put("México, MX", LatLng(23.634501, -102.55278399999999)) locations.put("Boca Raton, Florida, US", LatLng(26.368306399999998, -80.1289321)) locations.put("Carrollton, Texas, US", LatLng(32.9756415, -96.8899636)) locations.put("Lombard, Illinois, US", LatLng(41.8800296, -88.00784349999999)) locations.put("Moorestown, US", LatLng(39.9688817, -74.948886)) addCustomersToMap() }Run the app.
Select Customers and notice that a map is displayed that contains a marker for every customer.

Map screen with markers If a marker is tapped, an info marker is displayed with additional customer details.

Map screen with info markers
In this section, you will add code to display the customer detail screen when the info marker is tapped.
In the
CustomersMapScreen.ktfile, add a parameteronInfoWindowClicktoMarkerwhich is located inGoogleMapof the variableCustomersMapScreenwith the following code:KotlinonInfoWindowClick = { viewModel.onClickAction(customer) }Then
Markerwill look like below:KotlinMarker( state = markerState, title = customer.firstName + " " + customer.lastName, tag = customer, onInfoWindowClick = { viewModel.onClickAction(customer) } )Run the app. Select Customers, and tap on a marker. Then tap on the info marker.
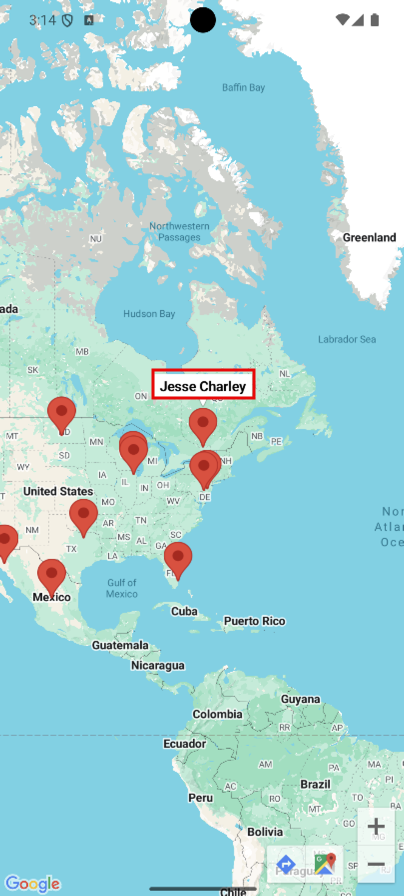
Map screen with info markers This sequence displays the customer details page.
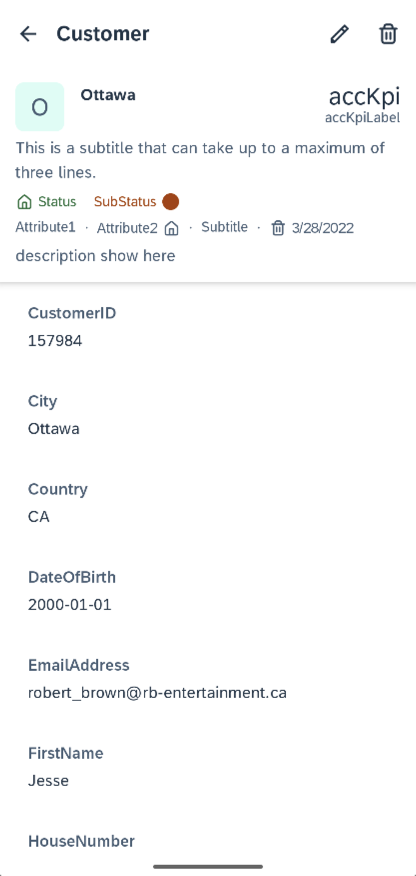
Customer details screen
In the class definition for
CustomersMapActivity, afterOnMapReadyCallback, add:Kotlin, GoogleMap.OnInfoWindowClickListenerAdd the following method to the class:
Kotlinoverride fun onInfoWindowClick(marker: Marker) {//import com.google.android.gms.maps.model.Marker val customer = marker.tag as Customer val intent = Intent(this, CustomersActivity::class.java) intent.putExtra(BundleKeys.ENTITY_INSTANCE, customer) startActivity(intent) }In the
onMapReadymethod inCustomersMapActivity, add the following line to the end of the method:KotlinmMap.setOnInfoWindowClickListener(this)On Windows, press
Ctrl+N, or, on a Mac, presscommand+O, and typeCustomersActivityto openCustomersActivity.kt.On Windows, press
Ctrl+F12, or, on a Mac, presscommand+F12, and typeonCreateto navigate to theonCreatemethod.Replace the
if (savedInstanceState == null)block (keepelse-blockunchanged) in theonCreatemethod with the following code:Kotlinif (savedInstanceState == null) { val listFragment = CustomersListFragment() intent.extras?.let { if (it.containsKey(BundleKeys.ENTITY_INSTANCE)) { listFragment.arguments = it } } supportFragmentManager.beginTransaction() .replace(R.id.masterFrame, listFragment, UIConstants.LIST_FRAGMENT_TAG) .commit() }On Windows, press
Ctrl+N, or, on a Mac, presscommand+O, and typeCustomersListFragmentto openCustomersListFragment.kt.Add the following variable to the top of the class:
Kotlinprivate var entityFromMap: Customer? = nullOn Windows, press
Ctrl+F12, or, on a Mac, presscommand+F12, and typeonCreateto navigate to theonCreatemethod.Add the following code to the end of the method:
arguments?.let {
    if (it.containsKey(BundleKeys.ENTITY_INSTANCE)) {
        entityFromMap = it.get(BundleKeys.ENTITY_INSTANCE) as Customer
    }
}
On Windows, press
Ctrl+F12, or, on a Mac, presscommand+F12, and typeonViewStateRestoredto navigate to theonViewStateRestoredmethod.Add the following code to the end of the method:
entityFromMap?.let {
    viewModel.setSelectedEntity(it)
    listener?.onFragmentStateChange(UIConstants.EVENT_ITEM_CLICKED, it)
    entityFromMap = null
}
Run the app. Select Customers, and tap on a marker. Then tap on the info marker.

Map screen with info markers This sequence displays the customer details page.

Customer details screen
In this section, you will create a new activity that uses the Fiori Map control.
Press
Shifttwice, and typestyles.xmlto openapp/src/main/res/value/styles.xml.Add the following code right after
AppThemeand beforeAppTheme.NoActionBar:XML<style name="FioriMap.NoActionBar" parent="Theme.Fiori.Horizon.NoActionBar"> <item name="colorPrimary">?attr/sap_fiori_color_s2</item> <item name="windowActionBar">false</item> <item name="windowNoTitle">true</item> <item name="windowActionModeOverlay">true</item> </style>On Windows, press
Ctrl+Shift+N, or on a Mac, presscommand+shift+O, and typelibs.versions.tomlto openlibs.versions.toml.Add the following content right before
sap-cloud-foundation:Gradlegoogle-maps = { group = "com.sap.cloud.android", name = "google-maps", version.ref = "sapSdkVersion" }Add the following dependencies in the app module’s
build.gradlefile to thedependencieselement and click Sync Now.Gradleimplementation("androidx.appcompat:appcompat:1.7.1") implementation("com.google.android.material:material:1.13.0") implementation("androidx.activity:activity-ktx:1.12.1") implementation("androidx.constraintlayout:constraintlayout:2.2.1") implementation(libs.google.maps)In Android Studio, using the project explorer, navigate to
app > kotlin+java > com.sap.wizapp > ui.Right-click and choose New > Activity > Empty Views Activity.
Set Activity Name to be
CustomersFioriMapActivity.Click Finish.
Replace the file contents in the newly created
CustomersFioriMapActivity.ktwith the following code:
package com.sap.wizapp.ui

import android.app.SearchManager
import android.content.Context
import android.location.Geocoder
import android.os.Bundle
import android.view.LayoutInflater
import android.view.inputmethod.InputMethodManager
import android.widget.ArrayAdapter
import android.widget.ImageButton
import androidx.appcompat.app.AppCompatActivity
import com.google.android.gms.maps.CameraUpdateFactory
import com.google.android.gms.maps.GoogleMap
import com.google.android.gms.maps.model.LatLng
import com.sap.cloud.android.odata.espmcontainer.Customer
import com.sap.cloud.android.odata.espmcontainer.ESPMContainerMetadata
import com.sap.cloud.mobile.fiori.maps.FioriMapSearchView
import com.sap.cloud.mobile.fiori.maps.FioriMarkerOptions
import com.sap.cloud.mobile.fiori.maps.FioriPoint
import com.sap.cloud.mobile.fiori.maps.LegendButton
import com.sap.cloud.mobile.fiori.maps.LocationButton
import com.sap.cloud.mobile.fiori.maps.SettingsButton
import com.sap.cloud.mobile.fiori.maps.ZoomExtentButton
import com.sap.cloud.mobile.fiori.maps.google.GoogleFioriMapView
import com.sap.cloud.mobile.fiori.maps.google.GoogleMapActionProvider
import com.sap.cloud.mobile.fiori.maps.google.GoogleMapViewModel
import com.sap.cloud.mobile.kotlin.odata.DataQuery
import com.sap.wizapp.R
import com.sap.wizapp.service.SAPServiceManager
import kotlinx.coroutines.runBlocking
import java.io.IOException

class CustomersFioriMapActivity : AppCompatActivity(), GoogleFioriMapView.OnMapCreatedListener {
    private lateinit var mGoogleFioriMapView: GoogleFioriMapView
    private var mUseClustering = false
    private var mMapType: Int = 0
    private val locations = HashMap<String, LatLng>() // Used for demo purposes to speed up the process of converting an address to lat, long
    private val markers = HashMap<String, FioriMarkerOptions>() // Used to associate an address with a marker for search
    private val addresses = arrayListOf<String>() // Used to populate the list of addresses that are searchable
    private lateinit var mActionProvider: GoogleMapActionProvider

    override fun onCreate(savedInstanceState: Bundle?) {
        super.onCreate(savedInstanceState)

        val intent = intent
        setContentView(R.layout.activity_customers_fiori_map)

        mGoogleFioriMapView = findViewById(R.id.googleFioriMap)
        mGoogleFioriMapView.onCreate(savedInstanceState)

        savedInstanceState?.let {
            mUseClustering = it.getBoolean("UseClustering", false)
            mMapType = it.getInt("MapType", GoogleMap.MAP_TYPE_NORMAL)
        }
        mGoogleFioriMapView.setOnMapCreatedListener(this)
    }

    /**
    * Manipulates the map once available.
    * This callback is triggered when the map is ready to be used.
    * This is where we can add markers or lines, add listeners or move the camera. In this case,
    * we just add a marker near Toronto, Canada.
    */
    override fun onMapCreated() {
        mActionProvider = GoogleMapActionProvider(mGoogleFioriMapView, this)
        // For demo purposes, speed up the lookup of address details.
        // Will use Geocoder to translate an address to a LatLng if address is not in this list
        locations["Wilmington, Delaware, US"] = LatLng(39.744655, -75.5483909)
        locations["Antioch, Illinois, US"] = LatLng(42.4772418, -88.0956396)
        locations["Santa Clara, California, US"] = LatLng(37.354107899999995, -121.9552356)
        locations["Hermosillo, MX"] = LatLng(29.0729673, -110.9559192)
        locations["Bismarck, North Dakota, US"] = LatLng(46.808326799999996, -100.7837392)
        locations["Ottawa, CA"] = LatLng(45.4215296, -75.69719309999999)
        locations["México, MX"] = LatLng(23.634501, -102.55278399999999)
        locations["Boca Raton, Florida, US"] = LatLng(26.368306399999998, -80.1289321)
        locations["Carrollton, Texas, US"] = LatLng(32.9756415, -96.8899636)
        locations["Lombard, Illinois, US"] = LatLng(41.8800296, -88.00784349999999)
        locations["Moorestown, US"] = LatLng(39.9688817, -74.948886)
        addCustomersToMap()

        // Setup toolbar buttons and add to the view.
        val settingsButton = SettingsButton(mGoogleFioriMapView.toolbar.context)
        val legendButton = LegendButton(mGoogleFioriMapView.toolbar.context)
        legendButton.isEnabled = true
        val locationButton = LocationButton(mGoogleFioriMapView.toolbar.context)
        val extentButton = ZoomExtentButton(mGoogleFioriMapView.toolbar.context)
        val buttons = arrayOf<ImageButton>(settingsButton, legendButton, locationButton, extentButton)
        mGoogleFioriMapView.toolbar.addButtons(buttons.asList())

        // Setup draggable bottom panel
        val inflater = getSystemService(Context.LAYOUT_INFLATER_SERVICE) as LayoutInflater
        val detailView = inflater.inflate(R.layout.detail_panel, null)
        mGoogleFioriMapView.setDefaultPanelContent(detailView)

        mActionProvider.setClustering(false)

        val currentPosition = (mActionProvider.mapViewModel as GoogleMapViewModel).latLng
        val currentZoom = (mActionProvider.mapViewModel as GoogleMapViewModel).zoom
        if (currentPosition != null && currentZoom != 0f) {
            // Position the camera after a lifecycle event.
            mGoogleFioriMapView.map?.moveCamera(CameraUpdateFactory.newLatLngZoom(currentPosition, currentZoom))
        } else {
            // Move the camera to the centre of North America
            val centre = LatLng(39.8283, -98.5795)
            mGoogleFioriMapView.map?.animateCamera(CameraUpdateFactory.newLatLng(centre))
        }

        findViewById<FioriMapSearchView>(com.sap.cloud.mobile.fiori.maps.google.R.id.fiori_map_search_view)?.let {
            val searchManager = getSystemService(Context.SEARCH_SERVICE) as SearchManager
            it.setSearchableInfo(searchManager.getSearchableInfo(componentName))
            it.setAdapter(ArrayAdapter(this@CustomersFioriMapActivity, R.layout.search_auto_complete, R.id.search_auto_complete_text, addresses))
            it.setThreshold(2)
            it.setOnItemClickListener{ parent, _, position, _ ->
                it.setQuery(parent.getItemAtPosition(position).toString(), false)
                searchResultSelected(parent.getItemAtPosition(position) as String)
                val inputMethodManager = getSystemService(INPUT_METHOD_SERVICE) as InputMethodManager
                inputMethodManager.hideSoftInputFromWindow(it.windowToken, 0) }
        }
    }

    private fun searchResultSelected(selectedSearchResult: String) {
        locations[selectedSearchResult]?.let { latLng ->
            // Center the marker.
            mGoogleFioriMapView.map?.moveCamera(CameraUpdateFactory.newLatLng(latLng))
            // Select the marker (or cluster the marker is in).
            mActionProvider.selectMarker(markers[selectedSearchResult])
        }
    }

    // Methods overriding the lifecycle events are required for FioriMapView to run properly
    override fun onStart() {
        super.onStart()
        mGoogleFioriMapView.onStart()
    }

    override fun onResume() {
        super.onResume()
        mGoogleFioriMapView.onResume()
    }

    override fun onPause() {
        super.onPause()
        mGoogleFioriMapView.onPause()
    }

    override fun onStop() {
        super.onStop()
        mGoogleFioriMapView.onStop()
    }

    override fun onDestroy() {
        super.onDestroy()
        mGoogleFioriMapView.onDestroy()
    }

    override fun onSaveInstanceState(outState: Bundle) {
        super.onSaveInstanceState(outState)
        mGoogleFioriMapView.onSaveInstanceState(outState)

        outState.putBoolean("UseClustering", mUseClustering)
        outState.putInt("MapType", mMapType)
    }

    @Deprecated("Deprecated in Java")
    override fun onLowMemory() {
        super.onLowMemory()
        mGoogleFioriMapView.onLowMemory()
    }

    private fun getCustomerLatLongFromAddress(address: String) : LatLng? {
        locations[address]?.let {
            return it
        }

        // String strAddress = "Wilmington, Delaware";
        val coder = Geocoder(this)
        try
        {   // May throw an IOException
            val addresses = coder.getFromLocationName(address, 5)
            if (addresses.isNullOrEmpty())
            {
                return null
            }

            val location = addresses[0]
            return LatLng(location.latitude, location.longitude)
        }
        catch (ex: IOException) {
            ex.printStackTrace()
            return null
        }
    }

    private fun addCustomerMarkerToMap(customer: Customer) {
        getCustomerLatLongFromAddress(customer.city + ", " + customer.country)?.let {latLng ->
            val customerMarker = FioriMarkerOptions.Builder()
                .tag(customer)
                .point(FioriPoint(latLng.latitude, latLng.longitude))
                .title(customer.firstName + " " + customer.lastName)
                .legendTitle("Customer")
                .build()
            mActionProvider.addMarker(customerMarker)
            markers[customer.city + ", " + customer.country] = customerMarker
            mGoogleFioriMapView.map?.moveCamera(CameraUpdateFactory.newLatLng(latLng))
        }
    }

    private fun addCustomersToMap() {
        val query = DataQuery()
            .from(ESPMContainerMetadata.EntitySets.customers)
            .where(Customer.country.equal("US")
                .or(Customer.country.equal("CA"))
                .or(Customer.country.equal("MX")))
        val eSPMContainer = SAPServiceManager.eSPMContainer
        eSPMContainer?.let {
            runBlocking {
                it.getCustomers(query).also { customers ->
                    for (customer in customers)
                    {
                        addCustomerMarkerToMap(customer)
                        addresses.add(customer.city + ", " + customer.country)
                    }
                    mActionProvider.doExtentsAction()
                }
            }
        }
    }
}Press Shift twice and type
activity_customers_fiori_map.xmlto openactivity_customers_fiori_map.xml.Replace its contents with the following code.
<?xml version="1.0" encoding="utf-8"?>
<androidx.constraintlayout.widget.ConstraintLayout xmlns:android="http://schemas.android.com/apk/res/android"
    xmlns:app="http://schemas.android.com/apk/res-auto"
    xmlns:tools="http://schemas.android.com/tools"
    android:id="@+id/main"
    android:layout_width="match_parent"
    android:layout_height="match_parent"
    android:fitsSystemWindows="true"
    tools:context=".ui.CustomersFioriMapActivity">

    <com.sap.cloud.mobile.fiori.maps.google.GoogleFioriMapView
        android:id="@+id/googleFioriMap"
        android:layout_width="match_parent"
        android:layout_height="match_parent"
        />

</androidx.constraintlayout.widget.ConstraintLayout>- Right-click on the folder
app/src/main/res/layoutto create a new Layout Resource File in it calleddetail_panel.xmland replace its contents with the following code.
<?xml version="1.0" encoding="utf-8"?>
<androidx.constraintlayout.widget.ConstraintLayout xmlns:android="http://schemas.android.com/apk/res/android"
    xmlns:tools="http://schemas.android.com/tools"
    android:layout_width="match_parent"
    android:layout_height="match_parent"
    tools:layout_constraintVertical_weight="100">

    <TextView
        android:layout_width="match_parent"
        android:layout_height="match_parent"
        android:paddingTop="4dp"
        android:paddingLeft="4dp"
        android:text="Default panel content goes here" />

</androidx.constraintlayout.widget.ConstraintLayout>- Create a new Layout Resource File in
app/src/main/res/layoutcalledsearch_auto_complete.xmland replace its contents with the following code.
<?xml version="1.0" encoding="utf-8"?>
<LinearLayout xmlns:android="http://schemas.android.com/apk/res/android"
    xmlns:app="http://schemas.android.com/apk/res-auto"
    android:layout_width="match_parent"
    android:layout_height="match_parent">
    <androidx.appcompat.widget.AppCompatTextView
        android:id="@+id/search_auto_complete_text"
        android:layout_width="match_parent"
        android:layout_height="50dp" />

</LinearLayout>
On Windows, press
Ctrl+Shift+N, or on a Mac, presscommand+shift+O, and typeEntitySetsScreento openEntitySetsScreen.kt.Declare a context variable right before
FioriObjectCell(:
val context = LocalContext.currentOn Windows, press
Ctrl+F, or on a Mac, presscommand+F, and search foronClick.Replace
onClickparameter with the following code so that when the user taps on Customers, the app will navigate to the newly added activity with the Fiori map on it.
onClick = {
    if (item.entityType == ESPMContainerMetadata.EntityTypes.customer) {
        context.startActivity(Intent(context, CustomersFioriMapActivity::class.java))
    } else {
        onRowClick(
            item.entityType
        )
    }
}- Add the necessary imports to the top of the file if they are not auto-imported.
import android.content.Intent
import com.sap.wizapp.ui.CustomersFioriMapActivity
import com.sap.cloud.android.odata.espmcontainer.ESPMContainerMetadata
On Windows, press
Ctrl+Shift+N, or on a Mac, presscommand+shift+O, and typeAndroidManifestto openAndroidManifest.xml.On Windows, press
Ctrl+F, or on a Mac, presscommand+F, and search forCustomersFioriMapActivity.Modify the activity so it specifies the
NoActionBartheme, which will cause the activity to not display an action bar.
<activity
    android:name=".ui.CustomersFioriMapActivity"
    android:theme="@style/FioriMap.NoActionBar"
    android:exported="false" />
Run the app.
You should be able to see markers on the screen that represent customers.
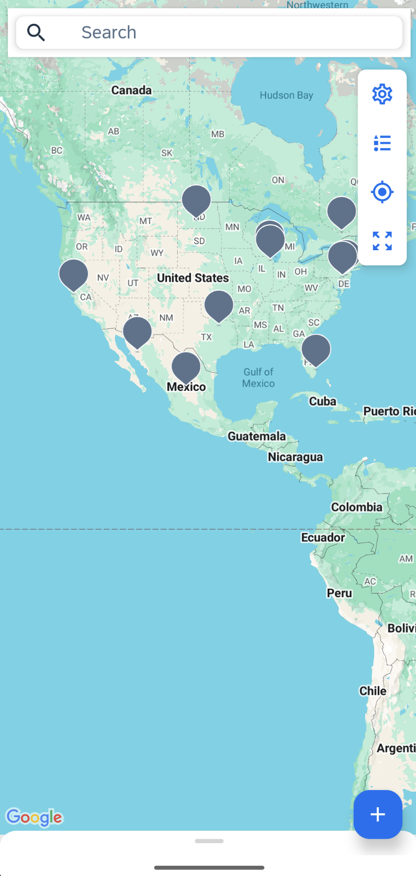
Fiori Map View Users can use the search bar at the top of the screen to find markers. For example, enter
IllinoisorMX.
Search for MX markers The toolbar on the side provides icons for a settings dialog, marker legend, current location, and zoom to the extent of the markers on the map.

Map toolbar The floating action button in the bottom right corner opens the edit annotations panel, which provides the capability to draw points, lines, and polygons on the map.
The bottom panel is where additional details for a selected marker can be displayed.
Press
Shifttwice, and typestyles.xmlto openstyles.xml.Add the following code right after
AppThemeand beforeAppTheme.NoActionBar:XML<style name="FioriMap.NoActionBar" parent="FioriTheme.Onboarding"> <item name="colorPrimary">?attr/sap_fiori_color_s2</item> <item name="windowActionBar">false</item> <item name="windowNoTitle">true</item> <item name="windowActionModeOverlay">true</item> </style>Add the following dependency in the app module’s
build.gradlefile in the dependencies object and click Sync Now.Gradleimplementation group: 'com.sap.cloud.android', name: 'google-maps', version: sdkVersionRight-click on the folder
app/src/main/res/layoutto create a new Layout Resource File in it calleddetail_panel.xmland replace its contents with the following code.XML<?xml version="1.0" encoding="utf-8"?> <androidx.constraintlayout.widget.ConstraintLayout xmlns:android="http://schemas.android.com/apk/res/android" xmlns:tools="http://schemas.android.com/tools" android:layout_width="match_parent" android:layout_height="match_parent" tools:layout_constraintVertical_weight="100"> <TextView android:layout_width="match_parent" android:layout_height="match_parent" android:paddingTop="4dp" android:paddingLeft="4dp" android:text="Default panel content goes here" /> </androidx.constraintlayout.widget.ConstraintLayout>Create a new Layout Resource File in
app/src/main/res/layoutcalledsearch_auto_complete.xmland replace its contents with the following code.XML<?xml version="1.0" encoding="utf-8"?> <LinearLayout xmlns:android="http://schemas.android.com/apk/res/android" xmlns:app="http://schemas.android.com/apk/res-auto" android:layout_width="match_parent" android:layout_height="match_parent"> <androidx.appcompat.widget.AppCompatTextView android:id="@+id/search_auto_complete_text" android:layout_width="match_parent" android:layout_height="50dp" /> </LinearLayout>In Android Studio, using the project explorer, navigate to
app > kotlin+java > com.sap.wizapp > mdui > customers.Right-click and choose New > Activity > Empty Views Activity.
Set Activity Name to be
CustomersFioriMapActivity.Click Finish.
Replace the file contents in the newly created
CustomersFioriMapActivity.ktwith the following code:
package com.sap.wizapp.mdui.customers

import android.app.SearchManager
import android.content.Context
import android.location.Geocoder
import android.os.Bundle
import android.util.Log
import android.view.LayoutInflater
import android.view.inputmethod.InputMethodManager
import android.widget.ArrayAdapter
import android.widget.ImageButton
import androidx.appcompat.app.AppCompatActivity
import com.google.android.gms.maps.CameraUpdateFactory
import com.google.android.gms.maps.GoogleMap
import com.google.android.gms.maps.model.LatLng
import com.sap.cloud.android.odata.espmcontainer.Customer
import com.sap.cloud.android.odata.espmcontainer.ESPMContainerMetadata
import com.sap.cloud.mobile.fiori.maps.FioriMapSearchView
import com.sap.cloud.mobile.fiori.maps.FioriMarkerOptions
import com.sap.cloud.mobile.fiori.maps.FioriPoint
import com.sap.cloud.mobile.fiori.maps.LegendButton
import com.sap.cloud.mobile.fiori.maps.LocationButton
import com.sap.cloud.mobile.fiori.maps.SettingsButton
import com.sap.cloud.mobile.fiori.maps.ZoomExtentButton
import com.sap.cloud.mobile.fiori.maps.google.GoogleFioriMapView
import com.sap.cloud.mobile.fiori.maps.google.GoogleMapActionProvider
import com.sap.cloud.mobile.fiori.maps.google.GoogleMapViewModel
import com.sap.cloud.mobile.odata.DataQuery
import com.sap.wizapp.R
import com.sap.wizapp.app.SAPWizardApplication
import java.io.IOException

class CustomersFioriMapActivity : AppCompatActivity(), GoogleFioriMapView.OnMapCreatedListener {
    private lateinit var mGoogleFioriMapView: GoogleFioriMapView
    private var mUseClustering = false
    private var mMapType: Int = 0
    private val locations = HashMap<String, LatLng>() // Used for demo purposes to speed up the process of converting an address to lat, long
    private val markers = HashMap<String, FioriMarkerOptions>() // Used to associate an address with a marker for search
    private val addresses = arrayListOf<String>() // Used to populate the list of addresses that are searchable
    private lateinit var mActionProvider: GoogleMapActionProvider

    override fun onCreate(savedInstanceState: Bundle?) {
        super.onCreate(savedInstanceState)

        val intent = intent
        setContentView(R.layout.activity_customers_fiori_map)

        mGoogleFioriMapView = findViewById(R.id.googleFioriMap)
        mGoogleFioriMapView.onCreate(savedInstanceState)

        savedInstanceState?.let {
            mUseClustering = it.getBoolean("UseClustering", false)
            mMapType = it.getInt("MapType", GoogleMap.MAP_TYPE_NORMAL)
        }
        mGoogleFioriMapView.setOnMapCreatedListener(this)
    }

    /**
     * Manipulates the map once available.
     * This callback is triggered when the map is ready to be used.
     * This is where we can add markers or lines, add listeners or move the camera. In this case,
     * we just add a marker near Toronto, Canada.
     */
    override fun onMapCreated() {
        mActionProvider = GoogleMapActionProvider(mGoogleFioriMapView, this)
        // For demo purposes, speed up the lookup of address details.
        // Will use Geocoder to translate an address to a LatLng if address is not in this list
        locations.put("Wilmington, Delaware, US", LatLng(39.744655, -75.5483909))
        locations.put("Antioch, Illinois, US", LatLng(42.4772418, -88.0956396))
        locations.put("Santa Clara, California, US", LatLng(37.354107899999995, -121.9552356))
        locations.put("Hermosillo, MX", LatLng(29.0729673, -110.9559192))
        locations.put("Bismarck, North Dakota, US", LatLng(46.808326799999996, -100.7837392))
        locations.put("Ottawa, CA", LatLng(45.4215296, -75.69719309999999))
        locations.put("México, MX", LatLng(23.634501, -102.55278399999999))
        locations.put("Boca Raton, Florida, US", LatLng(26.368306399999998, -80.1289321))
        locations.put("Carrollton, Texas, US", LatLng(32.9756415, -96.8899636))
        locations.put("Lombard, Illinois, US", LatLng(41.8800296, -88.00784349999999))
        locations.put("Moorestown, US", LatLng(39.9688817, -74.948886))
        addCustomersToMap()

        // Setup toolbar buttons and add to the view.
        val settingsButton = SettingsButton(mGoogleFioriMapView.toolbar.context)
        val legendButton = LegendButton(mGoogleFioriMapView.toolbar.context)
        legendButton.isEnabled = true
        val locationButton = LocationButton(mGoogleFioriMapView.toolbar.context)
        val extentButton = ZoomExtentButton(mGoogleFioriMapView.toolbar.context)
        val buttons = arrayOf<ImageButton>(settingsButton, legendButton, locationButton, extentButton)
        mGoogleFioriMapView.toolbar.addButtons(buttons.asList())

        // Setup draggable bottom panel
        val inflater = getSystemService(Context.LAYOUT_INFLATER_SERVICE) as LayoutInflater
        val detailView = inflater.inflate(R.layout.detail_panel, null)
        mGoogleFioriMapView.setDefaultPanelContent(detailView)

        mActionProvider.setClustering(false)

        val currentPosition = (mActionProvider.mapViewModel as GoogleMapViewModel).latLng
        val currentZoom = (mActionProvider.mapViewModel as GoogleMapViewModel).zoom
        if (currentPosition != null && currentZoom != 0f)
        {
            // Position the camera after a lifecycle event.
            mGoogleFioriMapView.map?.moveCamera(CameraUpdateFactory.newLatLngZoom(currentPosition, currentZoom))
        }
        else
        {
            // Move the camera to the centre of North America
            val centre = LatLng(39.8283, -98.5795)
            mGoogleFioriMapView.map?.animateCamera(CameraUpdateFactory.newLatLng(centre))
        }

        findViewById<FioriMapSearchView>(R.id.fiori_map_search_view)?.let {
            val searchManager = getSystemService(Context.SEARCH_SERVICE) as SearchManager
            it.setSearchableInfo(searchManager.getSearchableInfo(componentName))
            it.setAdapter(ArrayAdapter<String>(this@CustomersFioriMapActivity, R.layout.search_auto_complete, R.id.search_auto_complete_text, addresses))
            it.setThreshold(2)
            it.setOnItemClickListener{ parent, view, position, id ->
                it.setQuery(parent.getItemAtPosition(position).toString(), false)
                searchResultSelected(parent.getItemAtPosition(position) as String)
                val inputMethodManager = getSystemService(INPUT_METHOD_SERVICE) as InputMethodManager
                inputMethodManager.hideSoftInputFromWindow(it.windowToken, 0) }
        }
    }

    private fun searchResultSelected(selectedSearchResult: String) {
        locations[selectedSearchResult]?.let { latLng ->
            // Center the marker.
            mGoogleFioriMapView.map?.moveCamera(CameraUpdateFactory.newLatLng(latLng))
            // Select the marker (or cluster the marker is in).
            mActionProvider.selectMarker(markers[selectedSearchResult])
        }
    }

    // Methods overriding the lifecycle events are required for FioriMapView to run properly
    override fun onStart() {
        super.onStart()
        mGoogleFioriMapView.onStart()
    }

    override fun onResume() {
        super.onResume()
        mGoogleFioriMapView.onResume()
    }

    override fun onPause() {
        super.onPause()
        mGoogleFioriMapView.onPause()
    }

    override fun onStop() {
        super.onStop()
        mGoogleFioriMapView.onStop()
    }

    override fun onDestroy() {
        super.onDestroy()
        mGoogleFioriMapView.onDestroy()
    }

    override fun onSaveInstanceState(bundle: Bundle) {
        super.onSaveInstanceState(bundle)
        mGoogleFioriMapView.onSaveInstanceState(bundle)

        bundle.putBoolean("UseClustering", mUseClustering)
        bundle.putInt("MapType", mMapType)
    }

    override fun onLowMemory() {
        super.onLowMemory()
        mGoogleFioriMapView.onLowMemory()
    }

    private fun getCustomerLatLongFromAddress(address: String) : LatLng? {
        locations[address]?.let {
            return it
        }

        // String strAddress = "Wilmington, Delaware";
        val coder = Geocoder(this)
        try
        {   // May throw an IOException
            val addresses = coder.getFromLocationName(address, 5)
            if (addresses.isNullOrEmpty())
            {
                return null
            }

            val location = addresses[0]
            return LatLng(location.latitude, location.longitude)
        }
        catch (ex: IOException) {
            ex.printStackTrace()
            return null
        }
    }

    private fun addCustomerMarkerToMap(customer: Customer) {
        getCustomerLatLongFromAddress(customer.city + ", " + customer.country)?.let {latLng ->
            val customerMarker = FioriMarkerOptions.Builder()
                    .tag(customer)
                    .point(FioriPoint(latLng.latitude, latLng.longitude))
                    .title(customer.firstName + " " + customer.lastName)
                    .legendTitle("Customer")
                    .build()
            mActionProvider.addMarker(customerMarker)
            markers.put(customer.city + ", " + customer.country, customerMarker)
            mGoogleFioriMapView.map?.moveCamera(CameraUpdateFactory.newLatLng(latLng))
        }
    }

    private fun addCustomersToMap() {
        val query = DataQuery()
                .from(ESPMContainerMetadata.EntitySets.customers)
                .where(Customer.country.equal("US")
                        .or(Customer.country.equal("CA"))
                        .or(Customer.country.equal("MX")))
        val sapServiceManager = (application as SAPWizardApplication).sapServiceManager
        val eSPMContainer = sapServiceManager?.eSPMContainer
        eSPMContainer?.let {
            it.getCustomersAsync(query, { customers: List<Customer> ->
                for (customer in customers)
                {
                    addCustomerMarkerToMap(customer)
                    addresses.add(customer.city + ", " + customer.country)
                }
                mActionProvider.doExtentsAction() }, { re: RuntimeException -> Log.d("", "An error occurred during async query: " + re.message) })
        }
    }
}Press Shift twice and type
activity_customers_fiori_map.xmlto openactivity_customers_fiori_map.xml.Replace its contents with the following code.
<?xml version="1.0" encoding="utf-8"?>
<androidx.constraintlayout.widget.ConstraintLayout xmlns:android="http://schemas.android.com/apk/res/android"
    xmlns:app="http://schemas.android.com/apk/res-auto"
    xmlns:tools="http://schemas.android.com/tools"
    android:layout_width="match_parent"
    android:layout_height="match_parent"
    android:fitsSystemWindows="true"
    tools:context=".mdui.customers.CustomersFioriMapActivity">

    <com.sap.cloud.mobile.fiori.maps.google.GoogleFioriMapView
        android:id="@+id/googleFioriMap"
        android:layout_width="match_parent"
        android:layout_height="match_parent"
        />

</androidx.constraintlayout.widget.ConstraintLayout>
On Windows, press
Ctrl+N, or, on a Mac, presscommand+O, and typeEntitySetListActivityto openEntitySetListActivity.kt.On Windows, press
Ctrl+F, or, on a Mac, presscommand+F, and search forCustomersMapActivity::class.Replace
CustomersMapActivity::classwithCustomersFioriMapActivity::classso that when the user taps on Customers, the app will navigate to the newly added activity with the Fiori map on it.On Windows, press
Ctrl+Shift+N, or, on a Mac, presscommand+shift+O, and typeAndroidManifestto openAndroidManifest.xml.On Windows, press
Ctrl+F, or, on a Mac, presscommand+F, and search forCustomersFioriMapActivity.Modify the activity so it specifies the
NoActionBartheme, which will cause the activity to not display an action bar.
<activity
    android:name=".mdui.customers.CustomersFioriMapActivity"
    android:theme="@style/FioriMap.NoActionBar"
    android:exported="false" />
Run the app.
You should be able to see markers on the screen that represent customers.
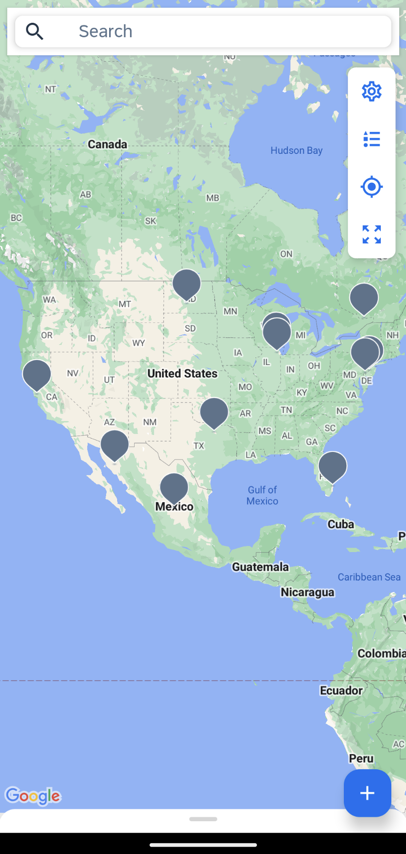
Fiori Map View Users can use the search bar at the top of the screen to find markers. For example, enter
IllinoisorMX.Search for MX markers The toolbar on the side provides icons for a settings dialog, marker legend, current location, and zoom to the extent of the markers on the map.

Map toolbar The floating action button in the bottom right corner opens the edit annotations panel, which provides the capability to draw points, lines, and polygons on the map.
The bottom panel is where additional details for a selected marker can be displayed.
In this section, the bottom panel will be populated with details of the selected marker and an action will be implemented to enable navigation to the selected customer’s detail page.
On Windows, press
Ctrl+N, or on a Mac, presscommand+O, and typeCustomersFioriMapActivityto openCustomersFioriMapActivity.kt.At the top of the class, add the following variables:
private lateinit var mMapResultsAdapter: MapResultsAdapter- At the bottom of the class, add the following methods and the
MapResultsAdapterclass.
private fun setupInfoProvider() {
    val infoAdapter = object: AnnotationInfoAdapter {
        override fun getInfo(tag: Any) : Any {
            return tag
        }

        override fun onBindView(mapPreviewPanel: MapPreviewPanel, info: Any) {
            val customer = info as Customer
            mapPreviewPanel.setTitle(customer.firstName + " " + customer.lastName)

            val objectHeader = mapPreviewPanel.objectHeader
            objectHeader.apply {
                headline = customer.city + ", " + customer.country
                val customerLatLng = getCustomerLatLongFromAddress(customer.city + ", " + customer.country)
                customerLatLng?.let {
                    body = "Latitude: " + it.latitude
                    footnote = "Longitude " + it.longitude
                }
            }

            val cell = ActionCell(this@CustomersFioriMapActivity)
            cell.apply {
                setText(customer.phoneNumber)
                setIcon(com.sap.cloud.mobile.fiori.compose.R.drawable.ic_phone_black_24dp)
            }

            val cell2 = ActionCell(this@CustomersFioriMapActivity)
            cell2.apply {
                setText(customer.emailAddress)
                setIcon(com.sap.cloud.mobile.fiori.compose.R.drawable.ic_email_black_24dp)
            }

            val cell3 = ActionCell(this@CustomersFioriMapActivity)
            cell3.apply {
                setText(customer.houseNumber + " " + customer.street)
                setIcon(com.sap.cloud.mobile.fiori.compose.R.drawable.ic_map_marker_unselected)
            }

            val cell4 = ActionCell(this@CustomersFioriMapActivity)
            cell4.apply {
                setText("Additional Details")
                setIcon(com.sap.cloud.mobile.fiori.compose.R.drawable.ic_list_24dp)
                setOnClickListener{
                    val intent = Intent(this@CustomersFioriMapActivity, ODataActivity::class.java)
                    intent.putExtra("customer", customer)
                    startActivity(intent)
                }
            }

            mapPreviewPanel.setActionCells(cell, cell2, cell3, cell4)
        }
    }
    mActionProvider.annotationInfoAdapter = infoAdapter
}

private fun setListAdapter() {
    val mMapListPanel = mGoogleFioriMapView.mapListPanel
    mMapResultsAdapter = MapResultsAdapter()
    mMapListPanel.setAdapter(mMapResultsAdapter)
}

class ViewHolder(itemView: View): RecyclerView.ViewHolder(itemView) {
    lateinit var objectCell: ObjectCell
    init{
        if (itemView is ObjectCell) {
            objectCell = itemView
        }
    }
}

inner class MapResultsAdapter: RecyclerView.Adapter<ViewHolder>(), MapListPanel.MapListAdapter {
    val customers = arrayListOf<Customer>()

    override fun onCreateViewHolder(parent: ViewGroup, viewType: Int) : ViewHolder {
        val cell = ObjectCell(parent.context)
        cell.preserveIconStackSpacing = true
        cell.preserveDetailImageSpacing = false
        return ViewHolder(cell)
    }

    override fun onBindViewHolder(holder: ViewHolder, position: Int) {
        val customer = customers[position]
        val resultCell = holder.objectCell
        resultCell.apply {
            headline = customer.firstName + " " + customer.lastName
            subheadline = customer.houseNumber + " " + customer.street + ", " + customer.city
            setStatus(customer.country, 1)
            setOnClickListener{
                val intent = Intent(this@CustomersFioriMapActivity, ODataActivity::class.java)
                intent.putExtra("customer", customer)
                startActivity(intent)
            }
        }
    }

    override fun getItemCount(): Int {
        return customers.size
    }

    override fun clusterSelected(list: List<FioriMarkerOptions>?) {
        customers.clear()
        list?.let { l ->
            for (fmo in l) {
                fmo.tag?.let {
                    customers.add(it as Customer)
                }
            }
        }
    }
}On Windows, press
Ctrl+F12, or, on a Mac, presscommand+F12, and search foronMapCreated.At the top of the method, below the line that sets
mActionProvider, add the following code:
setupInfoProvider()
setListAdapter()- In the same method, comment out the following code. This will disable the default content panel so that the panel can be populated by the new methods.
val detailView = inflater.inflate(R.layout.detail_panel, null)
mGoogleFioriMapView.setDefaultPanelContent(detailView)
On Windows, press
Ctrl+N, or on a Mac, presscommand+O, and typeCustomerODataViewModelto openCustomerODataViewModel.kt.Add the companion object into the class:
companion object {
    internal var selectedCustomerEntity: Customer? = null
}
On Windows, press
Ctrl+N, or on a Mac, presscommand+O, and typeODataActivityto openODataActivity.kt.Before calling function
ODataApp, add the following code to get the selected customer.
val entity: Customer? = intent.extras?.let {
    if (it.containsKey("customer")) {
        it.get("customer") as Customer
    } else {
        null
    }
}
CustomerODataViewModel.selectedCustomerEntity = entity
On Windows, press
Ctrl+Shift+N, or on a Mac, presscommand+shift+O, and typeODataNavHostto openODataNavHost.kt.Add the following code to the bottom of the function
ODataNavHost:
CustomerODataViewModel.selectedCustomerEntity?.let {
    val customer = EntityScreenInfo.Customers.entityType
    navController.navigateToEntityList(customer)
}
On Windows, press
Ctrl+Shift+N, or on a Mac, presscommand+shift+O, and typeCustomersMapScreento openCustomersMapScreen.kt.Add the following code to the top of the body of
CustomersMapScreen:
CustomerODataViewModel.selectedCustomerEntity?.let {
    viewModel.onClickAction(it)
    return@let
}
On Windows, press
Ctrl+Shift+N, or on a Mac, presscommand+shift+O, and typeCustomerEntityDetailScreento openCustomerEntityDetailScreen.kt.Declare a context variable right before
OperationScreen(:
val context = LocalContext.currentOn Windows, press
Ctrl+F, or on a Mac, presscommand+F, and search fornavigateUp = if (isExpandedScreen).Replace it with the following so we can navigate back from the customer detail screen to the fiori map screen:
navigateUp = if (isExpandedScreen) {
            null
        } else if (CustomerODataViewModel.selectedCustomerEntity != null) {
            {
                context.startActivity(Intent(context, CustomersFioriMapActivity::class.java))
            }
        } else {
            navigateUp
        },
Run the app.
Now, when you tap on a marker, the bottom panel should be populated with customer data.

Tap on marker to open details Tap on Additional Details.

Customer details in a fully opened panel Notice that the customer details screen is now displayed.
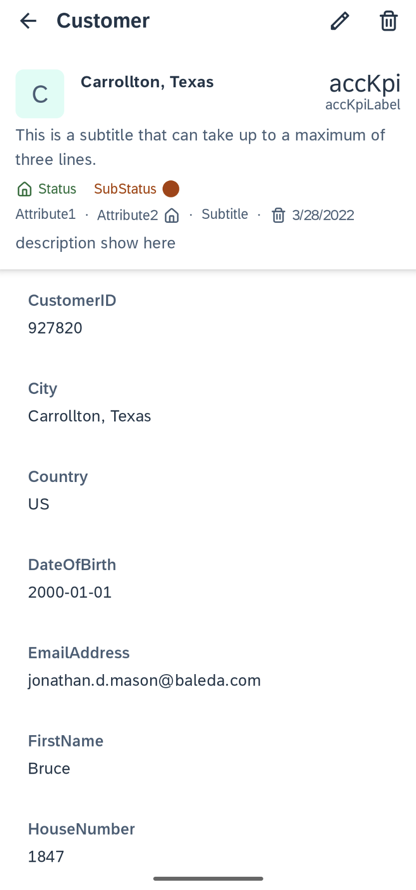
Customer details
On Windows, press
Ctrl+N, or on a Mac, presscommand+O, and typeCustomersFioriMapActivityto openCustomersFioriMapActivity.kt.At the top of the class, add the following variables:
private lateinit var mMapResultsAdapter: MapResultsAdapter- At the bottom of the class, add the following methods and the
MapResultsAdapterclass.
private fun setupInfoProvider() {
    val infoAdapter = object:AnnotationInfoAdapter {
        override fun getInfo(tag: Any) : Any {
            return tag
        }

        override fun onBindView(mapPreviewPanel: MapPreviewPanel, info: Any) {
            val customer = info as Customer
            mapPreviewPanel.setTitle(customer.firstName + " " + customer.lastName)

            val objectHeader = mapPreviewPanel.objectHeader
            objectHeader.apply {
                headline = customer.city + ", " + customer.country
                val customerLatLng = getCustomerLatLongFromAddress(customer.city + ", " + customer.country)
                customerLatLng?.let {
                    body = "Latitude: " + it.latitude
                    footnote = "Longitude " + it.longitude
                }
            }

            val cell = ActionCell(this@CustomersFioriMapActivity)
            cell.apply {
                setText(customer.phoneNumber)
                setIcon(R.drawable.ic_phone_black_24dp)
            }

            val cell2 = ActionCell(this@CustomersFioriMapActivity)
            cell2.apply {
                setText(customer.emailAddress)
                setIcon(R.drawable.ic_email_black_24dp)
            }

            val cell3 = ActionCell(this@CustomersFioriMapActivity)
            cell3.apply {
                setText(customer.houseNumber + " " + customer.street)
                setIcon(R.drawable.ic_map_marker_unselected)
            }

            val cell4 = ActionCell(this@CustomersFioriMapActivity)
            cell4.apply {
                setText("Additional Details")
                setIcon(R.drawable.ic_list_24dp)
                setOnClickListener{ v ->
                    val intent = Intent(this@CustomersFioriMapActivity, CustomersActivity::class.java)
                    intent.putExtra(BundleKeys.ENTITY_INSTANCE, customer)
                    startActivity(intent) }
            }

            mapPreviewPanel.setActionCells(cell, cell2, cell3, cell4)
        }
    }
    mActionProvider.annotationInfoAdapter = infoAdapter
}

private fun setListAdapter() {
        val mMapListPanel = mGoogleFioriMapView.mapListPanel
        mMapResultsAdapter = MapResultsAdapter()
        mMapListPanel.setAdapter(mMapResultsAdapter)
}

class ViewHolder(itemView: View): RecyclerView.ViewHolder(itemView) {
    lateinit var objectCell: ObjectCell
    init{
        if (itemView is ObjectCell) {
            objectCell = itemView
        }
    }
}

inner class MapResultsAdapter: RecyclerView.Adapter<ViewHolder>(), MapListPanel.MapListAdapter {
    val customers = arrayListOf<Customer>()

    override fun onCreateViewHolder(parent: ViewGroup, viewType: Int) : ViewHolder {
        val cell = ObjectCell(parent.context)
        cell.preserveIconStackSpacing = true
        cell.preserveDetailImageSpacing = false
        return ViewHolder(cell)
    }

    override fun onBindViewHolder(holder: ViewHolder, position: Int) {
        val customer = customers[position]
        val resultCell = holder.objectCell
        resultCell.apply {
            headline = customer.firstName + " " + customer.lastName
            subheadline = customer.houseNumber + " " + customer.street + ", " + customer.city
            setStatus(customer.country, 1)
            setOnClickListener{ v->
                val intent = Intent(this@CustomersFioriMapActivity, CustomersActivity::class.java)
                intent.putExtra(BundleKeys.ENTITY_INSTANCE, customer)
                startActivity(intent) }
        }
    }

    override fun getItemCount(): Int {
        return customers.size
    }

    override fun clusterSelected(list: List<FioriMarkerOptions>?) {
        customers.clear()
        list?.let { l ->
            for (fmo in l) {
                fmo.tag?.let {
                    customers.add(it as Customer)
                }
            }
        }
    }
}On Windows, press
Ctrl+F12, or, on a Mac, presscommand+F12, and search foronMapCreated.At the top of the method, below the line that sets
mActionProvider, add the following code:
setupInfoProvider()
setListAdapter()- In the same method, comment out the following code. This will disable the default content panel so that the panel can be populated by the new methods.
val detailView = inflater.inflate(R.layout.detail_panel, null)
mGoogleFioriMapView.setDefaultPanelContent(detailView)
Run the app.
Now, when you tap on a marker, the bottom panel should be populated with customer data.
Tap on marker to open details Tap on Additional Details.
Customer details in a fully opened panel Notice that the customer details screen is now displayed.

Customer details
In this section you will implement the settings dialog to include a map type setting and a clustering toggle.
- Create a new Layout Resource File in
app/src/main/res/layoutcalledsettings_panel.xmland replace its contents with the following code. This creates the layout for the settings page.
<?xml version="1.0" encoding="utf-8"?>
<ScrollView xmlns:android="http://schemas.android.com/apk/res/android"
    xmlns:app="http://schemas.android.com/apk/res-auto"
    android:layout_width="match_parent"
    android:layout_height="match_parent">

    <LinearLayout
        android:layout_width="match_parent"
        android:layout_height="wrap_content"
        android:orientation="vertical">

        <LinearLayout
            android:layout_width="match_parent"
            android:layout_height="wrap_content"
            android:layout_gravity="fill_horizontal"
            android:orientation="horizontal">

            <com.sap.cloud.mobile.fiori.formcell.ChoiceFormCell
                android:id="@+id/map_type"
                android:layout_width="match_parent"
                android:layout_height="wrap_content"
                app:key="Map Type" />

        </LinearLayout>

        <com.sap.cloud.mobile.fiori.formcell.SwitchFormCell
            android:id="@+id/use_clustering"
            android:layout_width="match_parent"
            android:layout_height="wrap_content"
            android:showText="true"
            app:key="Clustering"
            app:value="true" />

    </LinearLayout>
</ScrollView>On Windows, press
Ctrl+N, or, on a Mac, presscommand+O, and typeCustomersFioriMapActivityto openCustomersFioriMapActivity.kt.On Windows, press
Ctrl+F12, or, on a Mac, presscommand+F12, and typeonMapCreatedto navigate to theonMapCreatedmethod.Find the following line of code:
mActionProvider.setClustering(false)- Replace the line above with the following code:
val settingsView = inflater.inflate(R.layout.settings_panel, null)

// Setup selection of a different map type
val mapTypeChoice = settingsView.findViewById<ChoiceFormCell>(R.id.map_type)
mapTypeChoice.valueOptions = arrayOf<String>("Normal", "Satellite", "Terrain", "Hybrid")
mapTypeChoice.cellValueChangeListener = object : FormCell.CellValueChangeListener<Int>() {
    override fun cellChangeHandler(value: Int?) {
        value?.let {
            when (it) {
                0 -> mMapType = GoogleMap.MAP_TYPE_NORMAL
                1 -> mMapType = GoogleMap.MAP_TYPE_SATELLITE
                2 -> mMapType = GoogleMap.MAP_TYPE_TERRAIN
                3 -> mMapType = GoogleMap.MAP_TYPE_HYBRID
            }
            mGoogleFioriMapView.map?.mapType = mMapType
        }
    }
}

if (mMapType == 0) {
    mapTypeChoice.value = mMapType
} else {
    mapTypeChoice.value = mMapType - 1
}

mGoogleFioriMapView.setSettingsView(settingsView)

if (mMapType != GoogleMap.MAP_TYPE_NONE) {
    mGoogleFioriMapView.map?.mapType = mMapType
}

// Setup clustering selection.
val useClusteringSwitch = settingsView.findViewById<SwitchFormCell>(R.id.use_clustering)
useClusteringSwitch.value = mUseClustering
mActionProvider.setClustering(mUseClustering)
useClusteringSwitch.cellValueChangeListener = object: FormCell.CellValueChangeListener<Boolean>() {
    override fun cellChangeHandler(value: Boolean?) {
        value?.let {
            mUseClustering = it
            mActionProvider.setClustering(mUseClustering)
        }
    }
}Run the app.
Tap on the settings icon in the toolbar.

Setting icon in toolbal Change the map type to Hybrid and turn Clustering on.

Settings 
Hybrid map example Notice that the markers in close proximity are now grouped together and a number indicates how many markers are in the cluster.

Map panel for Cluster
Congratulations! You have now successfully added a Fiori Map to an application and tried out some of the features it provides.
In this section, you will test the three different types of annotations.
On Windows, press
Ctrl+N, or, on a Mac, presscommand+O, and typeCustomersFioriMapActivityto openCustomersFioriMapActivity.kt.On Windows, press
Ctrl+F12, or, on a Mac, presscommand+F12, and typeonCreateto navigate to theonCreatemethod.Add the following code after the
mGoogleFioriMapView.onCreateis called. This will save any points, polylines, or polygons drawn on the map.Kotlin// Handle the editor's save event. // This is where you can implement functions to save the new annotated points, polylines, and polygons mGoogleFioriMapView.editorView.setOnSaveListener{annotation -> var message: String? = null when (annotation) { is PointAnnotation -> { message = "This is a point" } is PolylineAnnotation -> { message = "This is a polyline with " + annotation.points.size + " points" } is PolygonAnnotation -> { message = "This is a polygon with " + annotation.points.size + " points" } } // import android.app AlertDialog val builder = AlertDialog.Builder(mGoogleFioriMapView.context, com.sap.cloud.mobile.fiori.R.style.FioriAlertDialogStyle) builder.setMessage(message) builder.setPositiveButton("Save") { _, _ -> // Close the editor. mGoogleFioriMapView.isEditable = false when (annotation) { is PointAnnotation -> { mActionProvider.addCircle( FioriCircleOptions.Builder().center(annotation.points[0] as FioriPoint).radius(40.0).strokeColor(resources.getColor( com.sap.cloud.mobile.fiori.maps.google.R.color.maps_marker_color_5 , null)).fillColor(resources.getColor(com.sap.cloud.mobile.fiori.maps.google.R.color.maps_marker_color_6, null)).title("Editor Circle").build()) } is PolylineAnnotation -> { mActionProvider.addPolyline( FioriPolylineOptions.Builder().addAll(annotation.points as Iterable<FioriPoint>).color(resources.getColor(com.sap.cloud.mobile.fiori.maps.google.R.color.maps_marker_color_3, null)).strokeWidth(4f).title("Editor Polyline").build()) } is PolygonAnnotation -> { mActionProvider.addPolygon( FioriPolygonOptions.Builder().addAll(annotation.points as Iterable<FioriPoint>).strokeColor(resources.getColor(com.sap.cloud.mobile.fiori.maps.google.R.color.maps_marker_color_3, null)).fillColor(resources.getColor(com.sap.cloud.mobile.fiori.maps.google.R.color.maps_marker_color_4, null)).strokeWidth(4f).title("Editor Polygon").build()) } } } builder.setNegativeButton("Cancel") { dialogInterface, _ -> dialogInterface.cancel() } val dialog = builder.create() dialog.show() }Add the following code in the app module’s
build.gradlefile in theconfigurations.configureEachblock and click Sync Now.GradleresolutionStrategy { force("com.google.android.gms:play-services-location:21.3.0") }Run the app.
Change the emulator’s location information so that Waterloo, Ontario, is the new default location.
Click on the three dots on the emulator’s toolbar to navigate to the emulator’s settings.

Emulator toolbar settings button Under Location > Single points, search for
University of Waterlooand select the first instance.
Up to date emulator location settings screen 1 Tap SAVE POINT.

Up to date emulator location settings screen 2 Set the name you want to save as.

Up to date emulator location settings screen 3 Select the saved point and tap SET LOCATION to set the default location.

Up to date emulator location settings screen 4 Tap the current location button to zoom into the University of Waterloo and you should see the screen below. (If tapping doesn’t work, quit the app, try google Maps app first, then restart the app, and try the button again.)

Zoom into current location To annotate the map, tap on the floating action button in the corner.

Floating action button to edit annotations The bottom panel displays options to annotate the map.

Edit annotations panel To add the current location as a point:
Tap on the Add Point option in the panel. Note that it may take a few moments for the emulator to process the new coordinates from before.

Add point button in panel Tap on Current Location under the search bar.
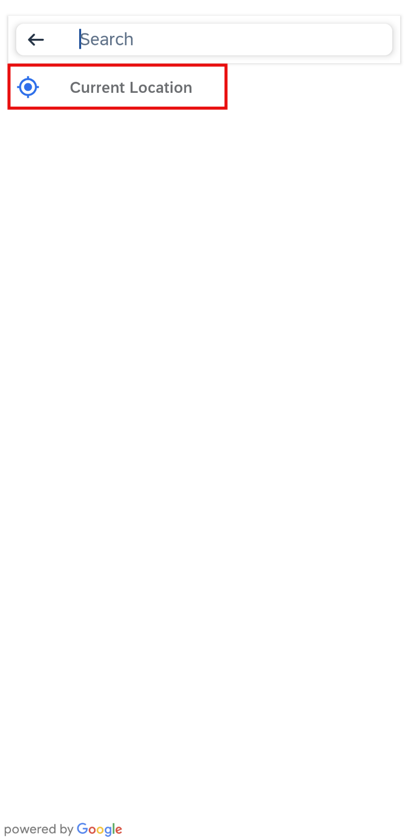
Current location button A list of location options at the University of Waterloo is displayed.

List of University of Waterloo buildings
If an API error occurs, such as
Failed to get location address com.google.android.gms.common.api.ApiException, or nothing happens after tapping Current Location, ensure that the Places API is enabled on the Google Cloud Platform. TypePlaces APIin the search bar and you’ll be redirected to the following page.
Google Cloud Platform Places API page If you enabled Places API but still nothing happens after tapping, use
https://maps.googleapis.com/maps/api/place/details/json?place_id=ChIJN1t_tDeuEmsRUsoyG83frY4&fields=name,rating,formatted_phone_number&key=YOUR_API_KEYto see if your application could get certain place details successfully. Note that you’ll need to replace the key in this example with your own API key. See Google Maps Platform for additional information.
You can also add a point by tapping directly on the map. This will create a white and blue dot indicating where the new point is located. The added point will appear in the panel under the Address section. You can only add one point to the map. You can move it by long pressing on it and then dragging it to a new location or you can delete it (select the point and then click the X mark in the ADDRESS list) and then add a new point.

To add a polyline to the map, select the Polyline option and tap different places on the map to add multiple points. The added points will be connected with a line.
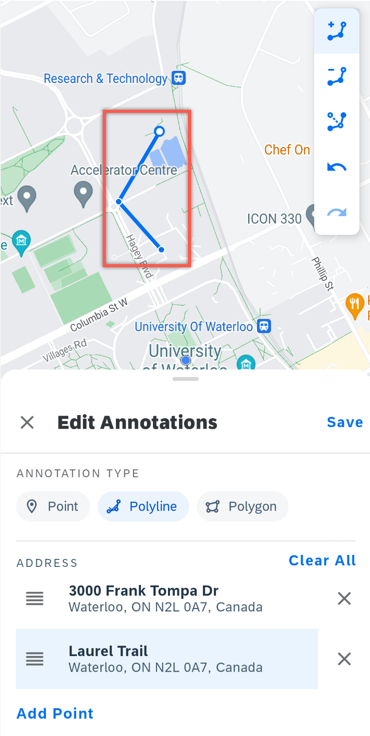
Add polyline to map To add a polygon, select the Polygon option and tap different places on the map to add multiple points. The points are connected in the order that they appear in the list within the panel and take up the least amount of area.

Add polygon to map You can move the existing points on the map by holding onto a point and then dragging it to the desired location.
On Windows, press
Ctrl+N, or, on a Mac, presscommand+O, and typeCustomersFioriMapActivityto openCustomersFioriMapActivity.kt.On Windows, press
Ctrl+F12, or, on a Mac, presscommand+F12, and typeonCreateto navigate to theonCreatemethod.Add the following code after the
mGoogleFioriMapView.onCreateis called. This will save any points, polylines, or polygons drawn on the map.Kotlin// Handle the editor's save event. // This is where you can implement functions to save the new annotated points, polylines, and polygons mGoogleFioriMapView.editorView.setOnSaveListener{annotation -> var message: String? = null when (annotation) { is PointAnnotation -> { message = "This is a point" } is PolylineAnnotation -> { message = "This is a polyline with " + annotation.points.size + " points" } is PolygonAnnotation -> { message = "This is a polygon with " + annotation.points.size + " points" } } // import android.app AlertDialog val builder = AlertDialog.Builder(mGoogleFioriMapView.context, com.sap.cloud.mobile.fiori.R.style.FioriAlertDialogStyle) builder.setMessage(message) builder.setPositiveButton("Save") { _, _ -> // Close the editor. mGoogleFioriMapView.isEditable = false when (annotation) { is PointAnnotation -> { mActionProvider.addCircle( FioriCircleOptions.Builder().center(annotation.points[0] as FioriPoint).radius(40.0).strokeColor(resources.getColor(R.color.maps_marker_color_5, null)).fillColor(resources.getColor(R.color.maps_marker_color_6, null)).title("Editor Circle").build()) } is PolylineAnnotation -> { mActionProvider.addPolyline( FioriPolylineOptions.Builder().addAll(annotation.points as Iterable<FioriPoint>).color(resources.getColor(R.color.maps_marker_color_3, null)).strokeWidth(4f).title("Editor Polyline").build()) } is PolygonAnnotation -> { mActionProvider.addPolygon( FioriPolygonOptions.Builder().addAll(annotation.points as Iterable<FioriPoint>).strokeColor(resources.getColor(R.color.maps_marker_color_3, null)).fillColor(resources.getColor(R.color.maps_marker_color_4, null)).strokeWidth(4f).title("Editor Polygon").build()) } } } builder.setNegativeButton("Cancel") { dialogInterface, _ -> dialogInterface.cancel() } val dialog = builder.create() dialog.show() }Add the following code in the app module’s
build.gradlefile in theconfigurations.allblock and click Sync Now.GradleresolutionStrategy { force("com.google.android.gms:play-services-location:21.3.0") }
Force play-services-location version Run the app.
Change the emulator’s location information so that Waterloo, Ontario, is the new default location.
Click on the three dots on the emulator’s toolbar to navigate to the emulator’s settings.
Emulator toolbar settings button Under Location > Single points, search for
University of Waterlooand select the first instance.Up to date emulator location settings screen 1 Tap SAVE POINT.
Up to date emulator location settings screen 2 Set the name you want to save as.
Up to date emulator location settings screen 3 Select the saved point and tap SET LOCATION to set the default location.
Up to date emulator location settings screen 4 Tap the current location button to zoom into the University of Waterloo and you should see the screen below. (If tapping doesn’t work, quit the app, try google Maps app first, then restart the app, and try the button again.)
Zoom into current location To annotate the map, tap on the floating action button in the corner.
Floating action button to edit annotations The bottom panel displays options to annotate the map.
Edit annotations panel To add the current location as a point:
Tap on the Add Point option in the panel. Note that it may take a few moments for the emulator to process the new coordinates from before.
Add point button in panel Tap on Current Location under the search bar.
Current location button A list of location options at the University of Waterloo is displayed.
List of University of Waterloo buildings
If an API error occurs, such as
Failed to get location address com.google.android.gms.common.api.ApiException, or nothing happens after tapping Current Location, ensure that the Places API is enabled on the Google Cloud Platform. TypePlaces APIin the search bar and you’ll be redirected to the following page.Google Cloud Platform Places API page If you enabled Places API but still nothing happens after tapping, use
https://maps.googleapis.com/maps/api/place/details/json?place_id=ChIJN1t_tDeuEmsRUsoyG83frY4&fields=name,rating,formatted_phone_number&key=YOUR_API_KEYto see if your application could get certain place details successfully. Note that you’ll need to replace the key in this example with your own API key. See Google Maps Platform for additional information.
You can also add a point by tapping directly on the map. This will create a white and blue dot indicating where the new point is located. The added point will appear in the panel under the Address section. You can only add one point to the map. You can move it by long pressing on it and then dragging it to a new location or you can delete it (select the point and then click the X mark in the ADDRESS list) and then add a new point.
To add a polyline to the map, select the Polyline option and tap different places on the map to add multiple points. The added points will be connected with a line.
Add polyline to map To add a polygon, select the Polygon option and tap different places on the map to add multiple points. The points are connected in the order that they appear in the list within the panel and take up the least amount of area.
Add polygon to map You can move the existing points on the map by holding onto a point and then dragging it to the desired location.
In order to redraw the points the next time the map is opened, you must save and store them in the app using the on save click listener.
In this section you will customize the map markers based on the customer’s country. The different marker colors will be recorded in the legend as well.
On Windows, press
Ctrl+N, or, on a Mac, presscommand+O, and typeCustomersFioriMapActivityto openCustomersFioriMapActivity.kt.On Windows, press
Ctrl+F12, or, on a Mac, presscommand+F12, and typeaddCustomerMarkerToMapto navigate to theaddCustomerMarkerToMapmethod.Replace the method with the following code:
private fun addCustomerMarkerToMap(customer: Customer) {
    val country = customer.country
    getCustomerLatLongFromAddress(customer.city + ", " + country)?.let { latLng ->
        var color = ("#E9573E".toColorInt()) // US
        if (country == "MX") {
            color = ("#FFA02B".toColorInt())
        } else if (country == "CA") {
            color = "#0070F2".toColorInt()
        }
        val customerMarker = FioriMarkerOptions.Builder()
            .tag(customer)
            .point(FioriPoint(latLng.latitude, latLng.longitude))
            .title(customer.firstName + " " + customer.lastName)
            .legendTitle(customer.country)
            .color(color)
            .build()
        mActionProvider.addMarker(customerMarker)
        markers[customer.city + ", " + customer.country] = customerMarker
        mGoogleFioriMapView.map?.moveCamera(CameraUpdateFactory.newLatLng(latLng))
    }
}
Run the app.
The markers now have different colors depending on whether they are located in Canada (CA), the United States (US), or Mexico (MX). The meaning of the colors is shown in the legend.

Marker Legend With clustering enabled, notice that clustered markers turn white if the markers in the cluster are located in different countries.
Congratulations. You have now seen how an app can make use of the Fiori map control.
Resources
Discussion
Share feedback on this tutorial or join the conversation in SAP Community.