
Overview
You will learn
- How to install a mock server in the SAP BTP, Kyma runtime.
- How to create a destination to the mock server in the same subaccount.


Prerequisites
Prerequisites
- You have an enterprise global account in SAP BTP. To use services for free, you can sign up for an SAP BTPEA (SAP BTP Enterprise Agreement) or a Pay-As-You-Go for SAP BTP global account and use the free tier services only. See Using Free Service Plans.
- You have a platform user. See User and Member Management.
- You’re an administrator of the global account in SAP BTP.
- You have a subaccount in SAP BTP to deploy the services and applications.
OUT OF MAINTENANCE
This tutorial is no longer maintained. For an up-to-date version and support with any issues, refer to the Develop a Side-by-Side CAP-Based Extension Application Following the SAP BTP Developer’s Guide mission in the SAP Discovery Center.
Steps
If you don’t have access to an SAP back end system (SAP ECC, SAP S/4HANA Cloud or an SAP on-premise system) but still need OData services with some data, you can use this mock server application. It contains entities of SAP OData services with sample data.
You need to:
Install the mock server in the SAP BTP, Kyma runtime.
Create a destination to the mock server in the same subaccount in SAP BTP.
The installation of the mock server is only needed if you want to test an application deployed in the SAP BTP, Kyma runtime. For local development testing, you can use the local mock server.
Clone the mock server GitHub repository:
Shellgit clone -b mock https://github.com/SAP-samples/cloud-extension-ecc-business-process.gitNavigate to the mock server project:
Shellcd cloud-extension-ecc-business-processOpen the project in VS Code:
Shellcode .
Make sure you’re logged in to your Kyma cluster. See Login to your Kyma cluster for detailed steps how to log in.
Make sure you’re logged in to your container registry.
If you’re using any device with a non-x86 processor (for example, MacBook M1/M2), you need to instruct Docker to use x86 images by setting the DOCKER_DEFAULT_PLATFORM environment variable using the command
export DOCKER_DEFAULT_PLATFORM=linux/amd64. Check Environment variables for more info.
Create the productive CAP build for the mock server application:
Shellcds build --productionBuild the mock server application image:
Shellpack build <your-container-registry>/mockserver-srv:<image version> --path gen/srv --builder paketobuildpacks/builder-jammy-base --publishMake sure to replace
<your-container-registry>with your docker server URL and keep in mind that<image version>is a string.Looking for your docker server URL?
The docker server URL is the same as the path used for docker login, so you can quickly check it by running the following command in your terminal:
JSONcat ~/.docker/config.jsonIn case you’re using Docker Hub as your container registry, replace the placeholder
<your-container-registry>with your Docker Hub user ID.Add Helm chart:
Shellcds add helm --yCAP provides a configurable Helm chart for Node.js applications. As a result from running the command, you see a newly created chart folder in your project. The chart folder holds the helm configuration, including the values.yaml file where you add your container image settings later on.
Change the chart/values.yaml file:
Remove the lines
messaging:andserviceInstanceName: event-meshfrom thesrv.bindingssection:YAMLsrv: bindings: destination: serviceInstanceName: 'destination' messaging: serviceInstanceName: event-mesh image: repository: mockserver-srv ...Remove the
event-meshsection:yaml[7-9]... destination: serviceOfferingName: 'destination' servicePlanName: 'lite' parameters: version: '1.0.0' event-mesh: serviceOfferingName: enterprise-messaging servicePlanName: defaultRun the following command to get the domain name of your Kyma cluster:
Shellkubectl get gateway -n kyma-system kyma-gateway \ -o jsonpath='{.spec.servers[0].hosts[0]}'The result looks like this:
Shell*.<xyz123>.kyma.ondemand.com<xyz123>is a placeholder for a string of characters that’s unique for your cluster.In the chart/values.yaml file, add the result without the leading
*.in thedomainproperty so that the URL of your CAP service can be generated:yaml[2]global: domain: <your-cluster-domain> ...
Open the chart/Chart.yaml file and remove the dependency for
event-mesh(last 3 lines) from it:YAMLdependencies: - name: web-application alias: srv version: ">0.0.0" - name: service-instance alias: destination version: ">0.0.0" - name: service-instance alias: event-mesh version: ">0.0.0"Update the productive CAP build for your application:
Shellcds build --productionDeploy the mock server in the same namespace as your application (for example, incident-management):
Shellhelm upgrade --install mock ./gen/chart -n incident-managementThe mock server must be deployed in the same namespace as your application. If you’ve followed the Deploy a Full-Stack CAP Application in SAP BTP, Kyma Runtime Following SAP BTP Developer’s Guide group of tutorial, you’ve created a namespace incident-management already. In case you haven’t created a namespace yet, run the following command to create it now:
Shellkubectl create namespace incident-management kubectl label namespace incident-management istio-injection=enabledCopy the application route (URL) of the mock server from the CLI output:
bash[6]Thank you for installing mockserver version 1.0.0. The release mock is installed in namespace incident-management. Your services are available at: srv - https://mock-srv-incident-management.<xyz123>.kyma.ondemand.com<xyz123>is a placeholder for a string of characters that’s unique for your cluster.
Go back to the SAP BTP cockpit, navigate to your subaccount overview, and choose Connectivity → Destination. Then, choose Create Destination.
Enter the following values:
- Name =
your-destination-name - Type =
HTTP - URL =
The application route of the mock server - Proxy Type =
Internet - Authentication =
NoAuthentication
- Name =
Select the Use default JDK truststore checkbox.
Save your settings.
Choose Check Connection. You get a
200 OKmessage.
Destination Configuration
Paste the application route that you’ve copied in the address bar of the browser.
Verify that there are a few API endpoints that display data.
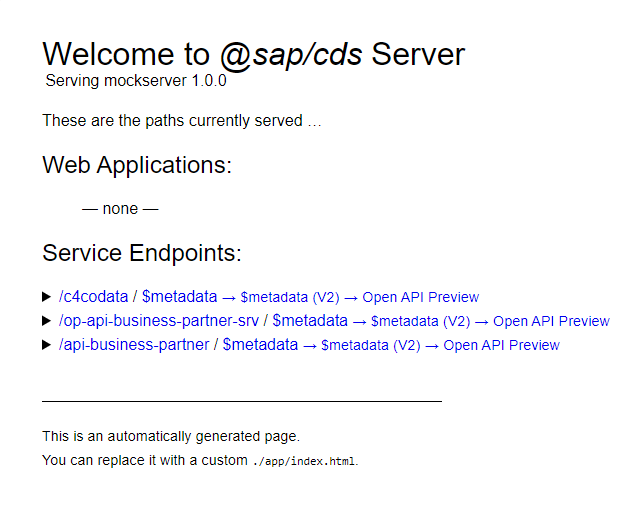
Mock server endpoints
Resources
Discussion
Share feedback on this tutorial or join the conversation in SAP Community.