
Overview
You will learn
- How to subscribe to SAP Build Work Zone, standard edition.
- How to assign the SAP Build Work Zone, standard edition role collection to your user.
- How to integrate your application with SAP Build Work Zone, standard edition.


Prerequisites
Prerequisites
- You’ve created a role collection and assigned it to a user. Follow the steps in the Assign the User Roles tutorial that is part of the Deploy a Full-Stack CAP Application in SAP BTP, Kyma Runtime Following SAP BTP Developer’s Guide tutorial group.
- You have an enterprise global account in SAP BTP. To use services for free, you can sign up for an SAP BTPEA (SAP BTP Enterprise Agreement) or a Pay-As-You-Go for SAP BTP global account and use the free tier services only. See Using Free Service Plans.
- You have a platform user. See User and Member Management.
- You’re an administrator of the global account in SAP BTP.
- You have a subaccount in SAP BTP to deploy the services and applications.
- You have a tenant of SAP Cloud Identity Services. See Get Your Tenant for details how to get a tenant of SAP Cloud Identity Services if you don’t have one yet.
- You’ve established trust between your tenant of SAP Cloud Identity Services and your SAP BTP account. This established trust allows you to use your SAP Cloud Identity Services tenant as an identity provider or a proxy to your own identity provider hosting your business users. See Establish Trust and Federation Between SAP Authorization and Trust Management Service and SAP Cloud Identity Services.
- You have one of the following browsers that are supported for working in SAP Business Application Studio:
- Mozilla Firefox
- Google Chrome
- Microsoft Edge
This tutorial follows the guidance provided in the SAP BTP Developer’s Guide.
Steps
Navigate to your subaccount and choose Services → Service Marketplace on the left.
Search for the SAP Build Work Zone, standard edition tile and choose Create.

Create SAP Build Work Zone, standard edition Keep the default setting for Service and choose free for Plan.
Choose Create.

New Instance or Subscription
You have now subscribed to the SAP Build Work Zone, standard edition.
You need to assign your user to the Launchpad_Admin role collection, so you don’t get an error accessing the SAP Build Work Zone, standard edition site later on.
Choose Security → Users on the left.
Choose your user.
Under Role Collections on the right, choose Assign Role Collection and assign the Launchpad_Admin role collection to your user.
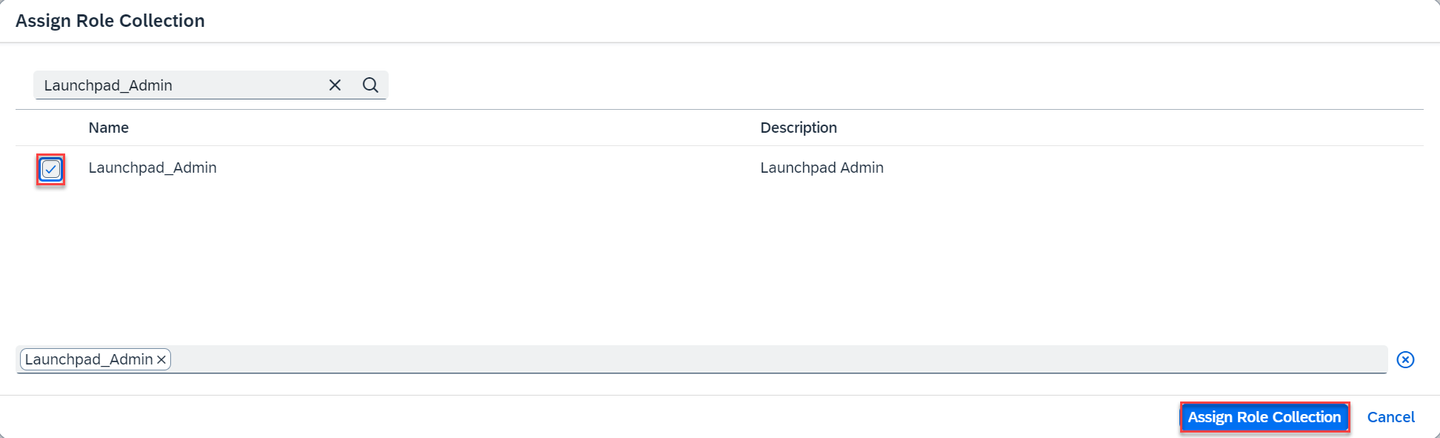
Add role You’ve assigned the Launchpad_Admin role collection to your user.
Log out and log back in to make sure your new role collection is considered.
See section Initial Setup in the SAP Build Work Zone, standard edition’s documentation for more details.
There are two different ways to integrate your application with SAP Build Work Zone, standard edition. You have to choose one way or the other and follow through. It’s currently not possible to mix the approaches. Both ways provide the same result. You can integrate your application with SAP Build Work Zone, standard edition through the SAP BTP cockpit or through Common Data Model. The tabs SAP BTP cockpit and Common Data Model provide detailed steps for each alternative way.
Update content
Open your subaccount and navigate to Instances and Subscriptions.
Choose the application SAP Build Work Zone, standard edition.
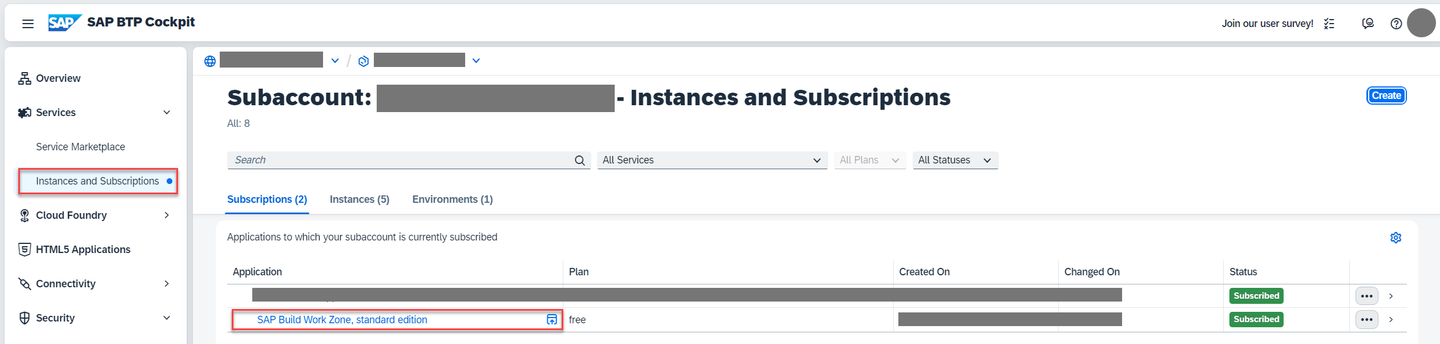
WorkZone0 In the menu on the left side, choose the icon for Channel Manager.
Choose the refresh icon to fetch the updated content.

WorkZone1
Add application to Content Explorer
Choose Content Manager in the menu on the left and choose the Content Explorer button.

WorkZone2 Select the tile HTML5 Apps with your respective subdomain name.

WorkZone2 In the items table, set the checkmark for the app Incidents and choose the button Add.
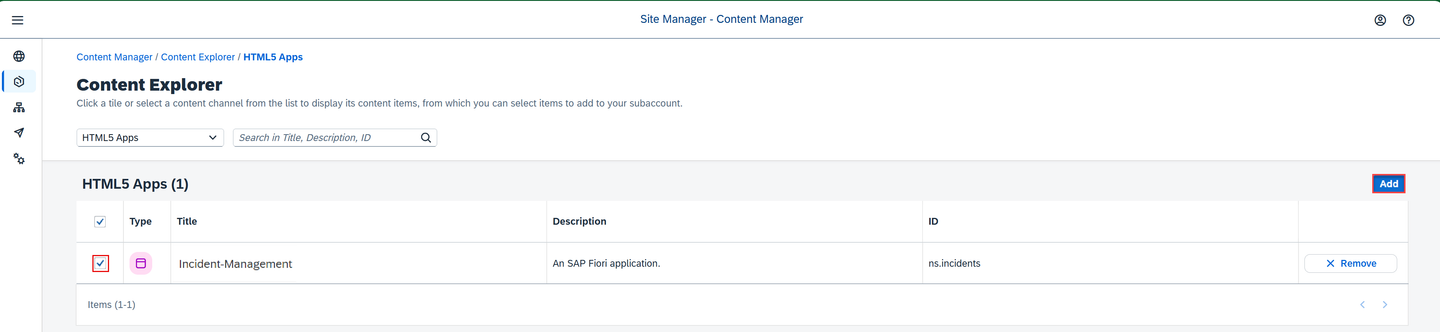
WorkZone3
Create a group
Go back to the Content Manager and choose Create → Group.
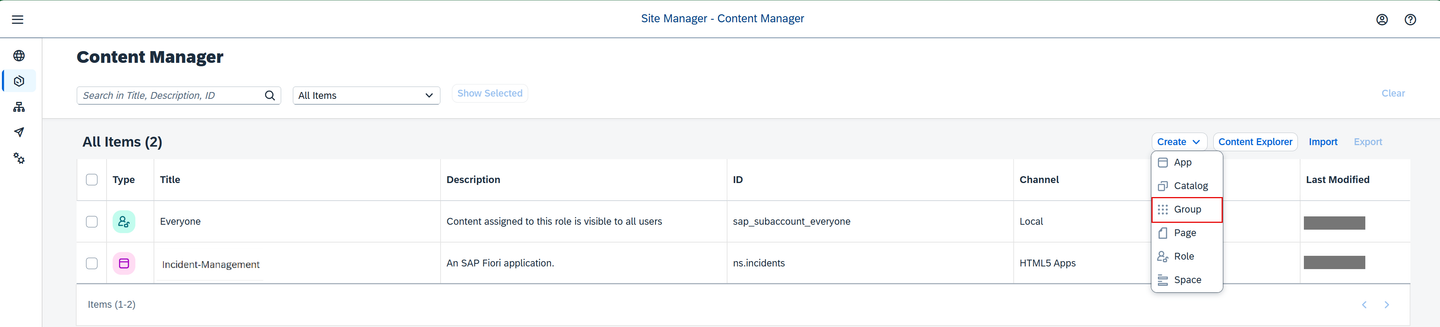
WorkZone4 Add the title Incident Management Group.
In the Assignment Status, choose the slider to assign the Incident-Management app to the group.
Choose Save.
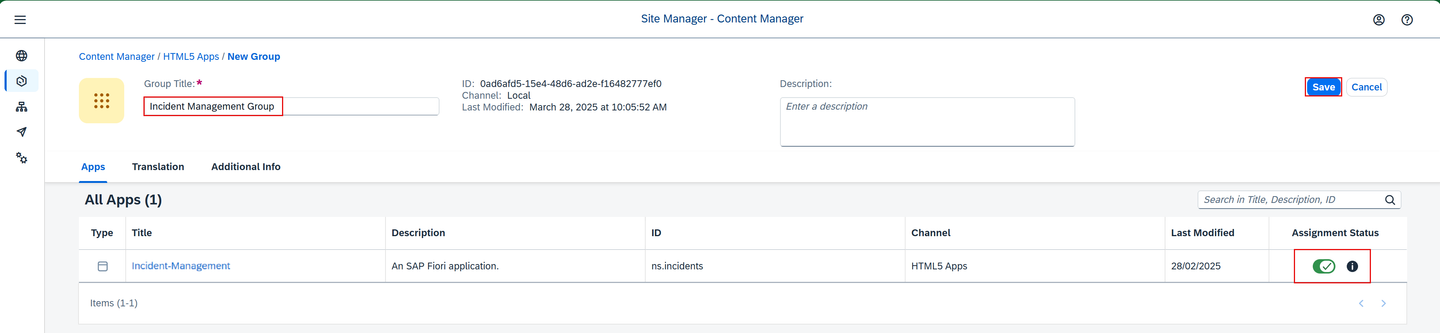
WorkZone5
Add application to the Everyone role
Back in the Content Manager, choose role Everyone and choose Edit.
In the Assignment Status, choose the slider to assign the Incident-Management app to the role.
Choose Save.
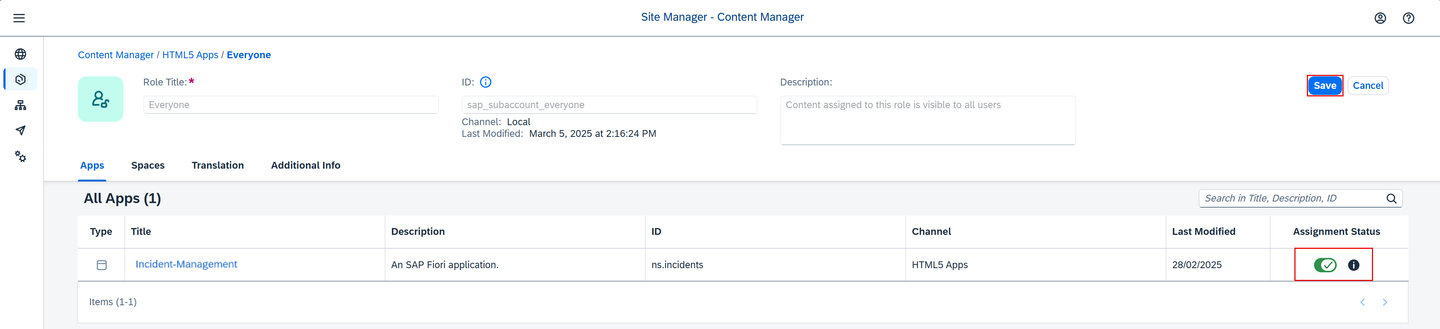
WorkZone6
Create site
Navigate to Site Directory and choose Create Site.

WorkZone7 Enter the site name as Incident Management Site and choose Create.
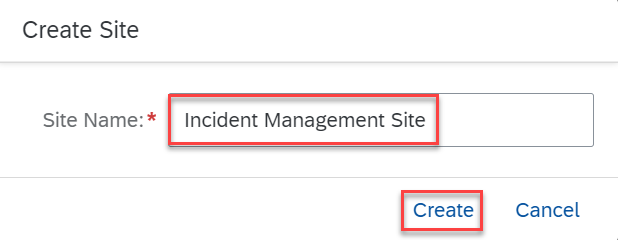
WorkZone7 Now, you’re forwarded to your created site.
The Common Data Model (CDM) is the basis for interoperability and content federation of business content from various SAP and third-party products, all integrated in a unified manner in one site that serves as a central entry point. Business content items such as roles, catalogs, groups, spaces, and pages can be included in the CDM. For this purpose, developers must specify the business content of the site in a cdm.json file that is part of the multitarget application (MTA) and also define design-time and runtime destinations in the mta.yaml file. For more information, see Developing HTML5 Business Solutions as Content Providers and About the Common Data Model.
Update the Chart.yaml file and the values.yaml file
Add the following code snippet to chart/Chart.yaml file:
YAML- name: service-instance alias: html5-apps-repo-runtime version: ">0.0.0"Run the following command to automate the setup for HTML5 application deployment:
Shellcds add html5-repoAdd the following configurations for creating an
html5-apps-repo-runtimeservice instance in the values.yaml file:YAMLhtml5-apps-repo-runtime: serviceOfferingName: html5-apps-repo servicePlanName: app-runtimeDelete the destination configuration from chart/values.yaml:
YAMLdestination: serviceOfferingName: 'destination' servicePlanName: 'lite' parameters: version: '1.0.0' HTML5Runtime_enabled: trueUpdate the
html5-apps-deployersection:Delete the
SAP_CLOUD_SERVICEline and the linesdestination:andserviceInstanceName: destination:YAMLhtml5-apps-deployer: env: SAP_CLOUD_SERVICE: incidentmanagementservice image: repository: "incident-management-html5-deployer" bindings: xsuaa: serviceInstanceName: xsuaa destination: serviceInstanceName: destinationDelete
envFrom:and the fields under it:YAMLenvFrom: - configMapRef: name: "{{ .Release.Name }}-html5-apps-deployer-configmap"Delete
backendDestinations:and its properties.Under
env, add the following:yaml[2-3]env: ASYNC_UPLOAD: "true" destinations: '[{"forwardAuthToken":true,"name":"srv-api","url":"https://incident-management-srv-incident-management.<cluster-domain>"}]'
Update the placeholder
<cluster-domain>with the domain of your Kyma cluster.Run the following command to get your Kyma cluster’s domain:
Shellkubectl get gateway -n kyma-system kyma-gateway \ -o jsonpath='{.spec.servers[0].hosts[0]}'Add the result without the leading
*.in the placeholder<cluster-domain>.
Create the CDM configuration
In the ui-resources/resources folder, create a new file cdm.json and paste the following code snippet in the file:
JSON[ { "_version": "3.0", "identification": { "id": "defaultCatalogId", "title": "{{title}}", "entityType": "catalog" }, "payload": { "viz": [ { "appId": "ns.incidents", "vizId": "incidents-display" } ] }, "texts": [ { "locale": "", "textDictionary": { "title": "Default Catalog Title" } } ] }, { "_version": "3.0", "identification": { "id": "defaultGroupId", "title": "{{title}}", "entityType": "group" }, "payload": { "viz": [ { "appId": "ns.incidents", "vizId": "incidents-display" } ] }, "texts": [ { "locale": "", "textDictionary": { "title": "Business Apps" } } ] }, { "_version": "3.0", "identification": { "id": "defaultRole", "entityType": "role", "title": "Default Role" }, "payload": { "apps": [ { "id": "ns.incidents" } ], "catalogs": [ { "id": "defaultCatalogId" } ], "groups": [ { "id": "defaultGroupId" } ] } } ]
Build the images and deploy your application in SAP BTP, Kyma runtime
Build the UI deployer image:
Shellpack build <your-container-registry>/incident-management-html5-deployer:<image-version> \ --path ui-resources \ --builder paketobuildpacks/builder-jammy-base \ --publishMake sure to replace
<your-container-registry>with the link to your container registry and keep in mind that<image version>is a string.Looking for your docker server URL?
The docker server URL is the same as the path used for docker login, so you can quickly check it by running the following command in your terminal:
JSONcat ~/.docker/config.jsonIn case you’re using Docker Hub as your container registry, replace the placeholder
<your-container-registry>with your Docker Hub user ID.Update the productive CAP build for your application:
Shellcds build --productionDeploy using the Helm command:
Shellhelm upgrade --install incident-management --namespace incident-management ./gen/chart \ --set-file xsuaa.jsonParameters=xs-security.jsonWith the helm upgrade –install command, you can install a new chart as well as upgrade an existing chart.
Create destinations
When the application is successfully deployed, you have to configure design and runtime destinations. Design and runtime destinations enable SAP Build Work Zone, standard edition to configure sites with the application configurations like groups, roles, categories, and so on.
Create a runtime destination:
Navigate to your subaccount and choose Connectivity → Destinations on the left.
Choose Create Destination.

Create Destination Enter the following values:
- Name =
incident-management-rt - Type =
HTTP - URL =
https://<subaccount-subdomain>.launchpad.cfapps.sap.hana.ondemand.com - Proxy Type =
Internet - Authentication =
NoAuthentication
- Name =
Choose New Property on the right and add the following property:
- CEP.HTML5contentprovider =
true
- CEP.HTML5contentprovider =
Select the Use default JDK truststore checkbox and choose Save.

Destination incident-management-rt Configuration Choose Check Connection. You get a message
Connection to "incident-management-rt" established. Response returned: "400: Bad Request".
Create a service binding in your Kyma cluster:
Navigate to your subaccount and choose Dashboard URL under the Kyma Environment tab to open Kyma dashboard.

Open Kyma dashboard Choose Namespaces on the left and choose incident-management.

Incident Management Choose Service Management → Service Bindings and choose Create.

Create Service Binding Button In the Name field, enter
incidents-runtime.In the Service Instance Name dropdown, choose
incident-management-html5-apps-repo-runtimeand choose Create.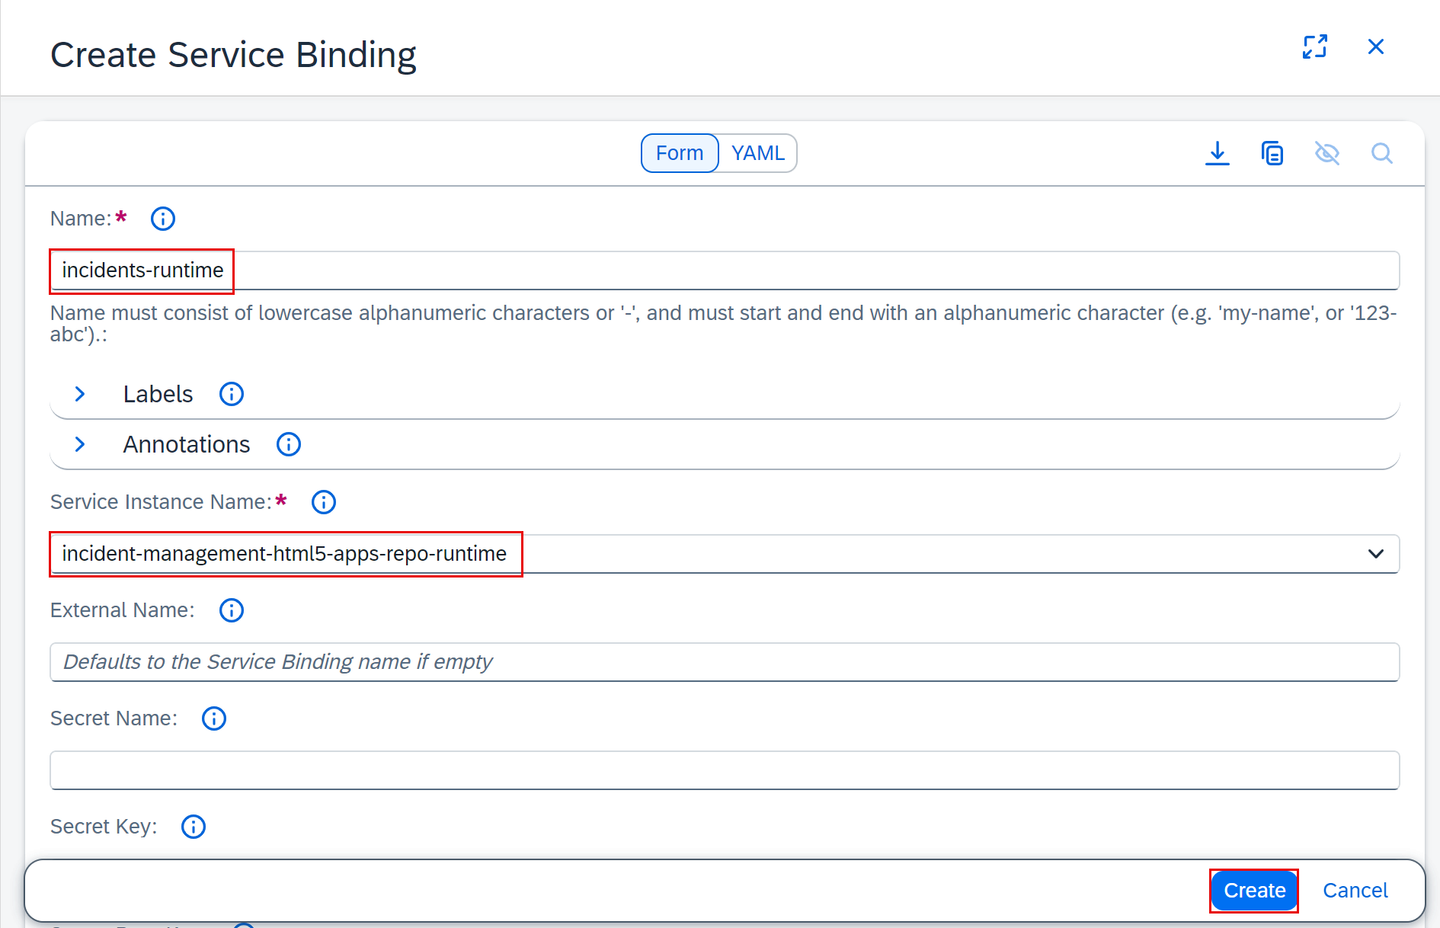
Create Service Binding When the status of the service binding changes to Provisioned, scroll to the Specification section and choose the Secret Name incidents-runtime.

Choose Secret Name In the incidents-runtime secret’s page, scroll to the Data section and choose Decode.

Decode Secret Keep the decoded details at hand, you need them in the next step.
Create design-time destination:
Navigate to your subaccount and choose Connectivity → Destinations on the left.
Choose Create Destination.
Enter the following values:
- Name =
incident-management_cdm - Type =
HTTP - URL =
https://html5-apps-repo-rt.cfapps.<subaccount-region>.hana.ondemand.com/applications/cdm/<cloud-service-name> - Proxy Type =
Internet - Authentication =
OAuth2ClientCredentials - Client ID =
<Client ID from decoded secret details> - Client Secret =
<Client Secret from decoded secret details> - Token Service URL =
<url from decoded secret details>+/oauth/token
You can find the value for
<cloud-service-name>in the app/incidents/webapp/manifest.json file.json[3]"sap.cloud": { "public": true, "service": "incidents" }- Name =
Choose New Property on the right and add the following properties:
- grant_type =
client_credentials - saasregistryenabled =
true - sap.cloud.service =
html5-apps-repo-rt - ServiceKeyName =
incidents-runtime - uri =
uri from decoded secret details - xsappname =
xsappname from decoded secret details
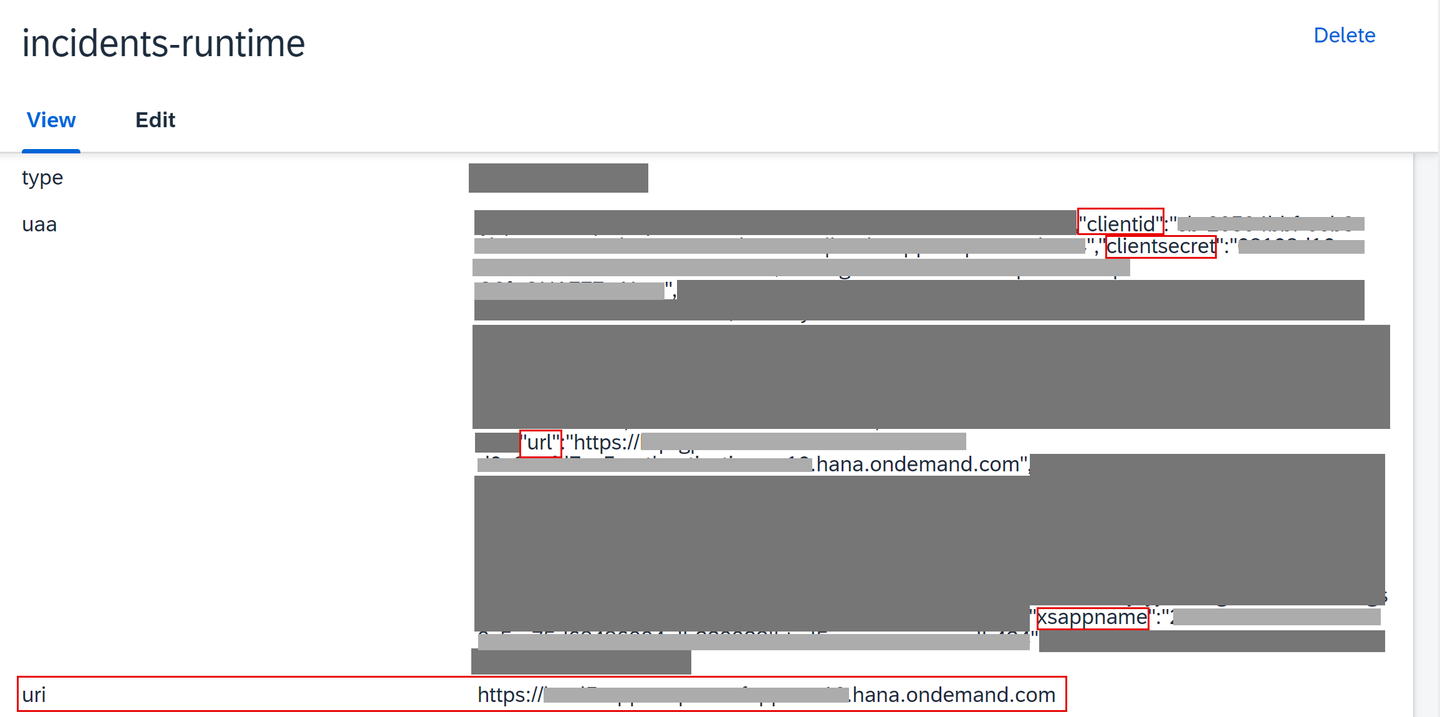
Decoded Secret Details - grant_type =
Select the Use default JDK truststore checkbox.
Save your settings.
Choose Check Connection. You get a message
Connection to "incident-management_cdm" established. Response returned: "401: Unauthorized".
Destination incident-management_cdm_ Configuration
Create a new content provider
Open your subaccount and navigate to Instances and Subscriptions.
Choose the application SAP Build Work Zone, standard edition.
WorkZone0 In the menu on the left side, choose the icon for Channel Manager.
Choose New → Content Provider on the right.

New Content Provider In the New Content Provider dialog:
Enter CDM in the Title field.
Choose incident-management_cdm from the dropdown in the Design-Time Destination field.
Choose incident-management-rt from the dropdown in the Runtime Destination field.
Choose Save.

New Content Provider dialog Choose the refresh icon to fetch the updated content from the CDM content provider.

New Content Provider fetch
Create site
Navigate to Site Directory and choose Create Site.
WorkZone7 In the Site Name field, enter Incident Management Site and choose Create.
WorkZone7 When you’re forwarded to your created site, choose Role Assignments and then choose Edit.

WorkZone7 In the Assignment status field, switch on Default Role for your site and choose Save.

WorkZone7
Assign CDM role collection
You need to assign your user to the ~cdm_defaultRole role collection, so you’re able to see the application tile when accessing the Incident Management Site in SAP Build Work Zone, standard edition later on.
Open your subaccount and navigate to Security → Users.
Choose your user.
Under Role Collections on the right, choose Assign Role Collection and assign the ~cdm_defaultRole role collection to your user.

Add CDM role You’ve assigned the ~cdm_defaultRole role collection to your user.
Log out and log in again to make sure your new role collection is considered.
Navigate to Site Directory and find your site.
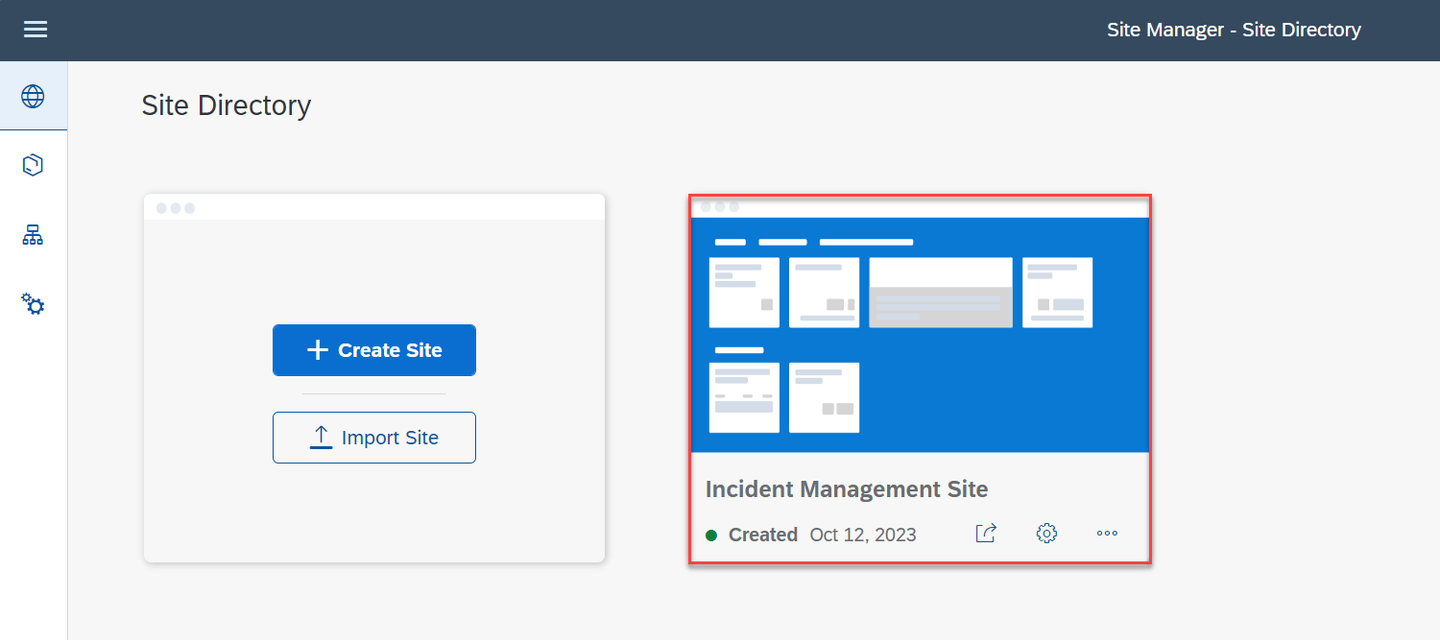
WorkZone8 Choose Go to site.
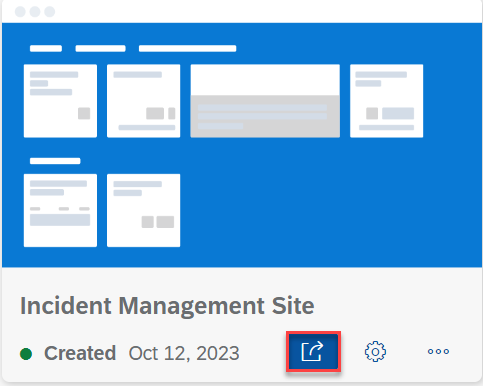
WorkZone9 Choose the Incident Management application from the launch page.

WorkZone10 You see the list report page.

WorkZone11
Congratulations! You now have finished the development of your application and you’ve integrated SAP Build Work Zone, standard edition to have one central entry point to show all of your SAP BTP applications.
Resources
Discussion
Share feedback on this tutorial or join the conversation in SAP Community.