Adapt Your App to the Needs of a MacOS Application
Embed your app flow in a Split View Controller for Mac Catalyst only, create a settings bundle to enable a preferences menu, and change the menu bar items to have a refresh menu ready to use.
✔How to implement a Split View Controller to support a sidebar on MacOS
✔How to change the Menu Bar items
✔How to create a settings bundle to enable a preferences menu [ACCORDION-BEGIN [Step 1: ](Implement a Split View)] In the last tutorial you made changes to your Xcode project settings to enable Mac Catalyst for your app project. This tutorial is about making some changes to the project to fit better on MacOS without changing the appearance on iPhone or iOS. You are going to cover the basics for Mac Catalyst and the SAP BTP SDK for iOS but using the previously mentioned documentation in combination with this tutorial series you should be well suited to build great business apps. In the beginning you want to change the app flow to have a split view in place when running on Mac Catalyst. The split view or Split View allows Mac Catalyst to display a sidebar similar to Apple’s Music or Stocks applications on MacOS. If you look at the current app structure the user will end up on the Overview screen right after finishing the onboarding process. On MacOS this is going to be the same way with the difference that the user will have a sidebar available where he or she can switch between Overview, Customer and Product list directly. To implement the new flow you can attach our current app flow in storyboard to a standard Split View Controller. 1. Open the Main.storyboard and select the Navigation Controller, open the Attributes Inspector to uncheck the Is Initial View Controller. This is necessary because the new main entry point is going to be the Split View Controller. !Split View Controller2. Use the Object Library to search for Split View Controller and drag + drop it next to the navigation controller. !Split View Controller3. With that in place you can connect the Split View Controller with our current app flow. Delete the View Controller Scene of the Split View Controller in Storyboard first. !Split View ControllerAfter deleting your storyboard should look like this now: !Split View Controller4. Drag the Navigation Controller of the app flow right next to the Split View Controller and create a storyboard segue between the Split View Controller and the Navigation Controller. As the segue type, select secondary view controller and safe. !Split View Controller5. Make the Main Split View Controller the initial view controller for the app by selecting the View controller and using the Attributes Inspector to check the box for Is Initial View Controller. !Split View ControllerLet’s quickly go over what you did here. First you added a new Split View Controller which is a standard Apple UI control. Then you added our app flow to the Split View Controller through a detail view controller segue. This allows the Split View Controller to automatically manage your Split View lifecycle. You leave the Navigation Controller in as you want to maintain our regular app flow. Because the Main View Controller is the new initial view controller you have to change the ApplicationUIManager code accordingly. To ensure that you will see the standard app flow while running on iOS and displaying the Split View when running on Mac Catalyst you can use environmental conditions to distinct different initialization code. Swift #if targetEnvironment(macCatalyst) #else 6. Open the ApplicationUIManager.swift file and locate the showApplicationScreen(completionHandler:) method. Right now you can see that you’re initializing the Navigation Controller as our initial screen but you have to change that to be adaptable to Mac Catalyst. Change the implement code to the following and read the inline comments carefully: Swift[12-25] func showApplicationScreen(completionHandler: @escaping (Error?) -> Void) { // Check if an application screen has already been presented guard isSplashPresented else { completionHandler(nil) return } // set rootViewController only once ie after onboarding when app screen is about to be shown // for restore, remove covering views previously added let appViewController: UIViewController if isOnboarding { #if targetEnvironment(macCatalyst) let splitViewController = UIStoryboard(name: "Main", bundle: Bundle.main).instantiateInitialViewController() as! UISplitViewController splitViewController.modalPresentationStyle = .currentContext splitViewController.preferredDisplayMode = .allVisible appViewController = splitViewController // If running on iOS show the OverviewTableViewController #else let overviewTVC = UIStoryboard(name: "Main", bundle: Bundle.main).instantiateViewController(withIdentifier: "OverviewTableViewController") as! OverviewTableViewController appViewController = overviewTVC #endif isOnboarding = false coveringViews.removeAll() // maintain this boolean since no splash screen is present now isSplashPresented = false window.rootViewController = appViewController } else { removeCoveringViews() } completionHandler(nil) } 7. Run the app on the My Mac scheme and you should see you app being in Split View now and you can see that beautiful empty sidebar. Also if you have noticed the system automatically knows that your app wants to receive Push Notifications and the Mac Catalyst makes sure that MacOS displays it accordingly. > In case you run into the issue “Apple Development Identity is Ambiguous. Multiple Certificates are found in your keychain for identity Apple Development”, you can follow this blog post for resolution of the problem Handling Ambiguous Apple Developer Identity. !Split View Controller[DONE] [ACCORDION-END] [ACCORDION-BEGIN [Step 2: ](Implement root view controller UI)] The Root View Controller represents the list you can see in the sidebar. This is a standard UI Table View Controller which allows you to have all the freedom you want to implement that. You’re going to display a list with three cells containing the navigation possibilities for the user including a nice system image using SF Symbols. 1. Create a new Table View Controller Cocoa Touch Class using the project navigator and make sure it inherits of UITableViewController and name it SidebarTableViewController. !Split View Controller2. Open the Main.storyboard and set the SidebarTableViewController as Custom Class on the Root View Controller. !Split View Controller3. Switch back to the SidebarTableViewController.swift file to implement the views logic. 4. First import the SAPFiori and SAPCommon frameworks, leave the UIKit statement: Swift import SAPFiori import SAPCommon 5. Next retrieve a new logger instance like you did before: Swift private let logger = Logger.shared(named: "SidebarTableViewController") 6. In the viewDidLoad() method register an FUIObjectTableViewCell to be used by the Table View: Swift[4] override func viewDidLoad() { super.viewDidLoad() tableView.register(FUIObjectTableViewCell.self, forCellReuseIdentifier: FUIObjectTableViewCell.reuseIdentifier) } This should all be familiar to you, you see building an app is really easy. 7. Now let’s implement the table view’s data source first add the numberOfSections(in:) method: Swift override func numberOfSections(in tableView: UITableView) -> Int { return 1 } You only need one section for this view so just return 1. 8. Directly below implement the tableView(_:numberOfRowsInSection:) method: Swift override func tableView(_ tableView: UITableView, numberOfRowsInSection section: Int) -> Int { return 3 } You’re going to display three cells for the Overview, the customer list and the product list. 9. Let’s not forget about the tableView(_:cellForRowAt:) method: Swift override func tableView(_ tableView: UITableView, cellForRowAt indexPath: IndexPath) -> UITableViewCell { let cell = tableView.dequeueReusableCell(withIdentifier: FUIObjectTableViewCell.reuseIdentifier) as! FUIObjectTableViewCell // Define a UIImage SymbolConfiguration with the scaling factor of small. This allows the system to scale the SF Symbol accordingly. let smallConfiguration = UIImage.SymbolConfiguration(scale: .small) // Switch Statement to go over the different rows. Set the headline text and the detail image using SF Symbols. switch indexPath.row { case 0: cell.headlineText = NSLocalizedString("Overview", comment: "") cell.detailImage = UIImage(systemName: "globe", withConfiguration: smallConfiguration) case 1: cell.headlineText = NSLocalizedString("Products", comment: "") cell.detailImage = UIImage(systemName: "tv", withConfiguration: smallConfiguration) case 2: cell.headlineText = NSLocalizedString("Customers", comment: "") cell.detailImage = UIImage(systemName: "person", withConfiguration: smallConfiguration) default: return UITableViewCell() } return cell } 10. If you run the app now you should see the cell being displayed in the sidebar. !Split View Controller[DONE] [ACCORDION-END] [ACCORDION-BEGIN [Step 3: ](Implement root view controller logic)] In order to let the user have interactions with the list items you have to write some code. 1. In the SidebarTableViewController add the following method below the data source methods. Read the inline comments carefully: Swift // CollectionType selection helper private func viewSelected(at indexPath: IndexPath) { // Load the EntityType specific ViewController from the specific storyboard" var viewController: UIViewController! let mainStoryboard = UIStoryboard(name: "Main", bundle: nil) // Decide which View Controller to instantiate. switch indexPath.row { case 0: viewController = mainStoryboard.instantiateViewController(identifier: "OverviewTableViewController") case 1: viewController = mainStoryboard.instantiateViewController(identifier: "ProductsTableViewController") case 2: viewController = mainStoryboard.instantiateViewController(identifier: "CustomersTableViewController") default: viewController = UIViewController() } // Load the NavigationController and present with the EntityType specific ViewController let rightNavigationController = mainStoryboard.instantiateViewController(withIdentifier: "SubNavigationController") as! UINavigationController rightNavigationController.viewControllers = [viewController] // Display the Detail View Controller splitViewController?.showDetailViewController(rightNavigationController, sender: nil) } 2. You have to make sure that the viewSelected(at:) method gets called as soon as the user clicks on a list item. Add the following table view delegate method directly below the data source methods: Swift override func tableView(_: UITableView, didSelectRowAt indexPath: IndexPath) { viewSelected(at: indexPath) } This will make sure that the correct index path gets passed into the viewSelected(at:) method. 3. Last step is to set those above implemented storyboard identifiers for the respective view controllers is necessary to instantiate the screens. Open the Main.storyboard and select the Overview Table View Controller. Open the Identity Inspector and set the Identity to OverviewTableViewController. !Menu Bar4. Repeat that procedure for the Products Table View Controller with ProductsTableViewController and Customers Table View Controller with CustomersTableViewController. !Menu Bar5. Important is that you set an identity for the original Navigation Controller. In the Main.storyboard, select the Navigation Controller which is the detail view controller for the split view controller. Change the Identity to SubNavigationController. !Storyboard IDAnd that’s it, you have a working split view controller with a sidebar and working navigation. 6. The last step you want to do is change the navigation item’s title from SidebarTableViewController to Navigation. Add the following line of code to the viewDidLoad() method: Swift navigationItem.title = NSLocalizedString("Navigation", comment: "") 7. Compile and run the app on My Mac and try your hard work. !Menu Bar[DONE] [ACCORDION-END] [ACCORDION-BEGIN [Step 4: ](Change the menu bar)] You have our basic layout but now it would be interesting what else you could do to be more MacOS conform. As mentioned in the last tutorial Mac Catalyst gives you a Menu Bar for free, but how do you access the menu bar and make changes to it? There is an API provided by Apple allowing us to modify the Menu Bar in the app delegate. You can create an extension swift file containing an AppDelegate extension containing a buildMenu(with:) override method. > This would be also the way to generically have the Table View Data Source implemented. 1. Use the Project Navigator to create a Swift file and name it AppDelegate+MenuBuilder. !Storyboard ID2. Open the AppDelegate+MenuBuilder.swift file and change the import statement from Foundation to UIKit: Swift import UIKit 3. The override buildMenu(with:) allows us to manipulate and create menu items for the menu bar. Implement the buildMenu(with:) method inside an extension and read the inline comments carefully: Swift extension AppDelegate { // MARK: - Mac Catalyst Menu Bar override func buildMenu(with builder: UIMenuBuilder) { super.buildMenu(with: builder) // Remove the Format menu because this is not needed for this app. builder.remove(menu: .format) // Create an menu item and give it a selector method from some class. In this case OverviewTableViewController. let reloadMenuItem = UIKeyCommand(title: NSLocalizedString("Synchronize...", comment: ""), action: #selector(OverviewTableViewController.loadData), input: "r", modifierFlags: .command) // Create a Menu and add it an identifier, also define that it should be shown in line. Give it the menu item as children. You could add far more items here if you wanted to. let reloadDataMenu = UIMenu(title: "", image: nil, identifier: UIMenu.Identifier("com.sap.example.MySampleAppCatalyst.Synchronize"), options: .displayInline, children: [reloadMenuItem]) // Tell the UIMenuBuilder where to insert the menu. builder.insertChild(reloadDataMenu, atEndOfMenu: .file) } } 4. Save the file and open the OverviewTableViewController.swift class and change the loadData() method declaration to internal and add the @objc attribute. The @objc allows to make method callable for the Objective-C runtime: Swift @objc func loadData() { ... } 5. Run the app on My Mac scheme. !Menu BarOf course you can add all sorts of menu entries as long as they make sense being there. Usually you want to have more global tasks in there. If you’re interested in more about the menu bar on MacOS visit the official documentation Adding Menus and Shortcuts to the Menu Bar and User Interface. [VALIDATE_4] [ACCORDION-END] [ACCORDION-BEGIN [Step 5: ](Create settings bundle)] Every Mac user expects a preferences menu in the menu bar so you should provide, if available, settings via a settings bundle. The reason for this is that using a settings bundle will give you the preferences menu for free. Here you’re going to implement some settings with help of the settings bundle. 1. Use the Project Navigator to open the context menu and click on New File…. In the search field of the upcoming dialog, search for Settings, select the Settings Bundle and click on Next and then Create. !PreferencesAs a result you will get a brand new settings.bundle file in the project navigator. 2. If you run the app now and open the app’s preferences you should see the preferences screen displayed below. !Preferences3. You can see that the Root.plist file contains all the settings for the displayed preferences. You can go and change the different preferences now. In the Root.plist locate the Title of Item 0 (Group - Group) and change it to Sales Assistant Preferences. Leave Item 1 (Text Field - Name) as is and delete the remaining items. !Preferences4. Run the app now and open the preferences you should see the title has changed and the other items are gone. !Preferences[DONE] [ACCORDION-END] [ACCORDION-BEGIN [Step 6: ](Change app title)] Maybe you have noticed that the app’s title is still TutorialApp, let’s change this now. 1. Open the TutorialApp.xcproj file and click on the General tab if not already there. 2. Change the Display Name in the Identity section to Sales Assistant. !App Title3. Of course you might want to change the bundle identifier as well to match the display name or create the whole project with the correct name in the beginning. As you’re extending the app created in the prerequisites, you just change the display name here. !App TitleThis is our finished app now. From here go ahead and look through different tutorials to maybe enhance this app more or go ahead and implement a detail screen for the products using the Human Interface Guideline of SAP Fiori for iOS. [DONE] [ACCORDION-END]
Development environment: Apple Mac running macOS Catalina or higher with Xcode 13 or higher
SAP BTP SDK for iOS: Version 7.0 or higher
Steps
Details
You will learn
How to implement a Split View Controller to support a sidebar on MacOS
How to change the Menu Bar items
How to create a settings bundle to enable a preferences menu
Step 1Implement a Split View
—
In the last tutorial you made changes to your Xcode project settings to enable Mac Catalyst for your app project.
This tutorial is about making some changes to the project to fit better on MacOS without changing the appearance on iPhone or iOS.
You are going to cover the basics for Mac Catalyst and the SAP BTP SDK for iOS but using the previously mentioned documentation in combination with this tutorial series you should be well suited to build great business apps.
In the beginning you want to change the app flow to have a split view in place when running on Mac Catalyst. The split view or Split View allows Mac Catalyst to display a sidebar similar to Apple’s Music or Stocks applications on MacOS.
If you look at the current app structure the user will end up on the Overview screen right after finishing the onboarding process. On MacOS this is going to be the same way with the difference that the user will have a sidebar available where he or she can switch between Overview, Customer and Product list directly.
To implement the new flow you can attach our current app flow in storyboard to a standard Split View Controller.
Open the Main.storyboard and select the Navigation Controller, open the Attributes Inspector to uncheck the Is Initial View Controller. This is necessary because the new main entry point is going to be the Split View Controller.
!Split View Controller
Use the Object Library to search for Split View Controller and drag + drop it next to the navigation controller.
!Split View Controller
With that in place you can connect the Split View Controller with our current app flow. Delete the View Controller Scene of the Split View Controller in Storyboard first.
!Split View Controller
After deleting your storyboard should look like this now:
!Split View Controller
Drag the Navigation Controller of the app flow right next to the Split View Controller and create a storyboard segue between the Split View Controller and the Navigation Controller. As the segue type, select secondary view controller and safe.
!Split View Controller
Make the Main Split View Controller the initial view controller for the app by selecting the View controller and using the Attributes Inspector to check the box for Is Initial View Controller.
!Split View Controller
Let’s quickly go over what you did here. First you added a new Split View Controller which is a standard Apple UI control. Then you added our app flow to the Split View Controller through a detail view controller segue. This allows the Split View Controller to automatically manage your Split View lifecycle. You leave the Navigation Controller in as you want to maintain our regular app flow.
Because the Main View Controller is the new initial view controller you have to change the ApplicationUIManager code accordingly.
To ensure that you will see the standard app flow while running on iOS and displaying the Split View when running on Mac Catalyst you can use environmental conditions to distinct different initialization code.
Swift
#iftargetEnvironment(macCatalyst)#else
Open the ApplicationUIManager.swift file and locate the showApplicationScreen(completionHandler:) method. Right now you can see that you’re initializing the Navigation Controller as our initial screen but you have to change that to be adaptable to Mac Catalyst. Change the implement code to the following and read the inline comments carefully:
Swift[12-25]
func showApplicationScreen(completionHandler: @escaping (Error?) -> Void) {
    // Check if an application screen has already been presented
    guard isSplashPresented else {
        completionHandler(nil)
        return
    }

    // set rootViewController only once ie after onboarding when app screen is about to be shown
    // for restore, remove covering views previously added
    let appViewController: UIViewController
    if isOnboarding {
       splitViewController.modalPresentationStyle = .currentContext
       splitViewController.preferredDisplayMode = .allVisible
       appViewController = splitViewController

       // If running on iOS show the OverviewTableViewController
       isOnboarding = false
       coveringViews.removeAll()

       // maintain this boolean since no splash screen is present now
       isSplashPresented = false
       window.rootViewController = appViewController
   } else {
       removeCoveringViews()
   }

   completionHandler(nil)
}
Code
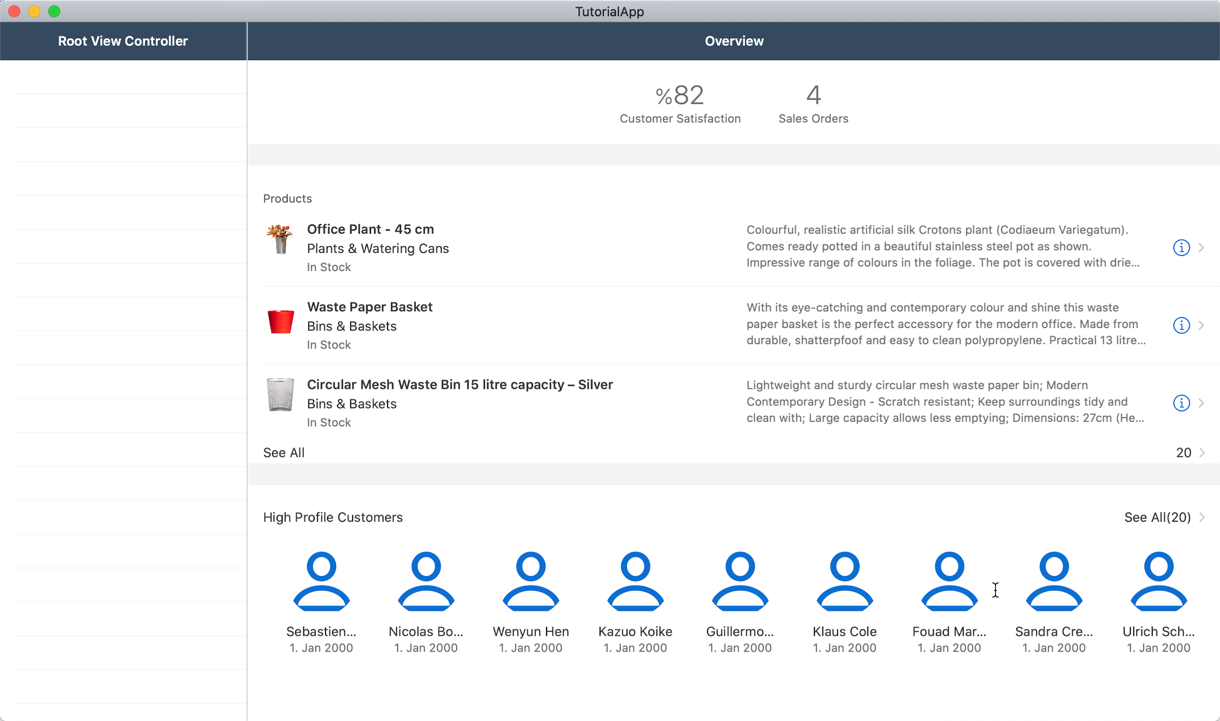
7. Run the app on the **My Mac** scheme and you should see you app being in Split View now and you can see that beautiful empty sidebar. Also if you have noticed the system automatically knows that your app wants to receive Push Notifications and the Mac Catalyst makes sure that MacOS displays it accordingly.
> In case you run into the issue "Apple Development Identity is Ambiguous. Multiple Certificates are found in your keychain for identity Apple Development", you can follow this blog post for resolution of the problem [Handling Ambiguous Apple Developer Identity](https://blogs.sap.com/2020/03/09/sdk-5.0-handling-ambiguous-apple-developer-identity/).
!
</div><div class="step-validation-mount"
data-step="1"></div>
<div class="step-actions">
<button class="fd-button fd-button--emphasized" data-action="mark-done" data-step="1">Done</button>
</div>
</div>
</div>
<div id="step-2" class="tutorial-step" data-step="2">
<div class="step-header" data-action="toggle-step">
<span class="step-check-circle"></span>
<div class="step-header-text">
<span class="step-label">Step 2</span>
<span class="step-title-text">Implement root view controller UI</span>
</div>
<span class="step-toggle-icon">+</span>
</div>
<div class="step-body" hidden>
<hr class="step-divider" />
<div class="step-content">
The Root View Controller represents the list you can see in the sidebar. This is a standard UI Table View Controller which allows you to have all the freedom you want to implement that.
You're going to display a list with three cells containing the navigation possibilities for the user including a nice system image using `SF Symbols`.
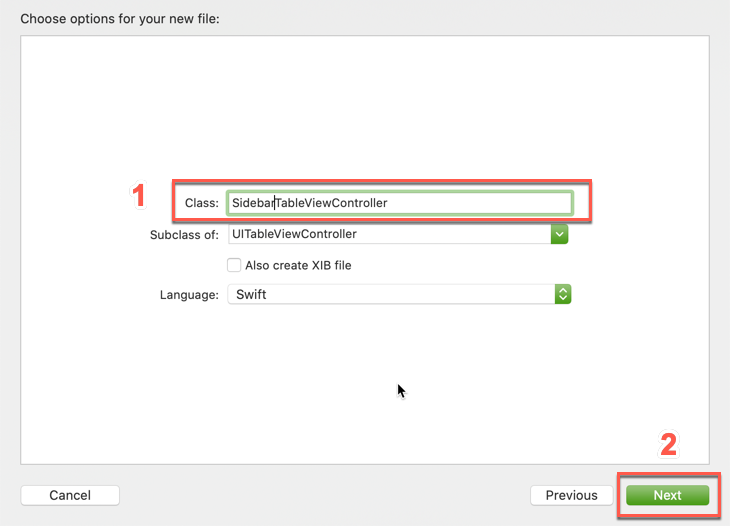
1. Create a new Table View Controller Cocoa Touch Class using the project navigator and make sure it inherits of `UITableViewController` and name it `SidebarTableViewController`.
!
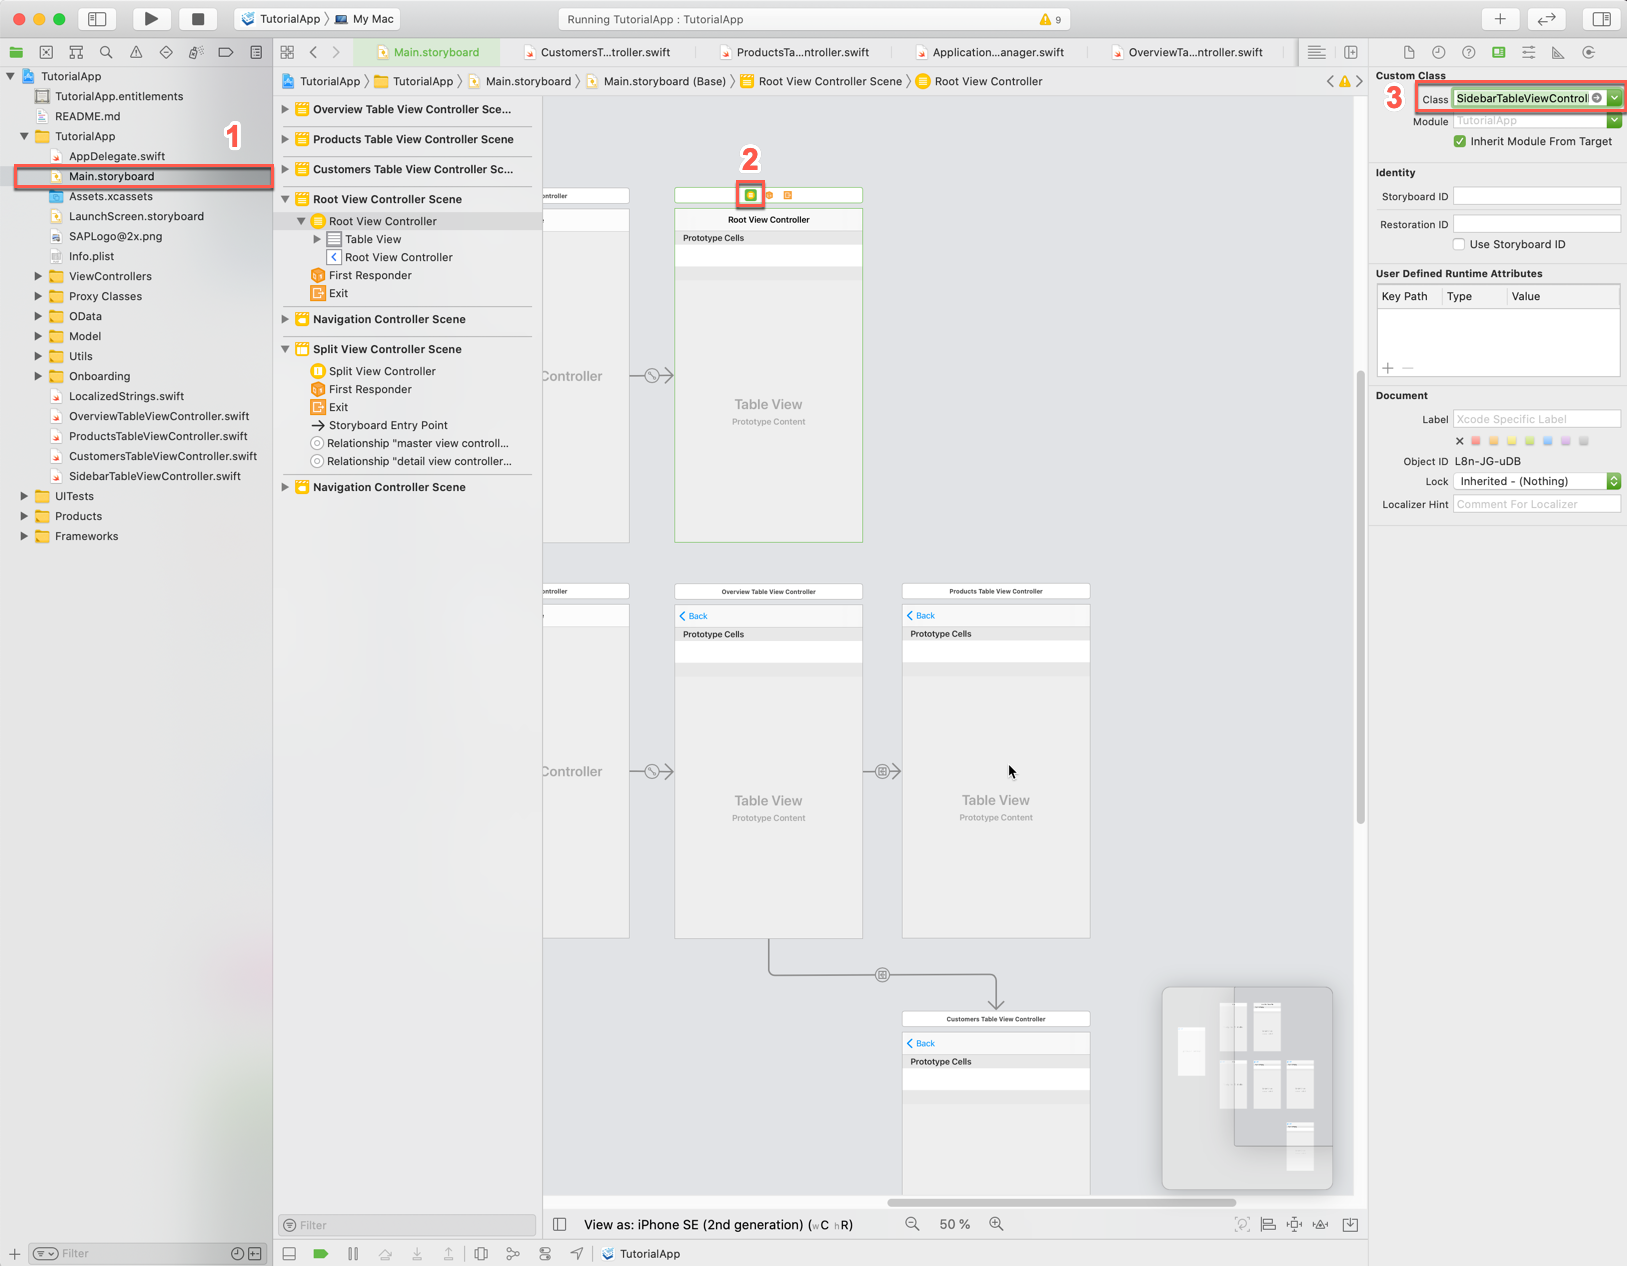
2. Open the `Main.storyboard` and set the `SidebarTableViewController` as **Custom Class** on the **`Root View Controller`**.
!
3. Switch back to the `SidebarTableViewController.swift` file to implement the views logic.
4. First import the `SAPFiori` and `SAPCommon` frameworks, leave the `UIKit` statement:
```Swift
import SAPFiori
import SAPCommon
Next retrieve a new logger instance like you did before:
You’re going to display three cells for the Overview, the customer list and the product list.
Let’s not forget about the tableView(_:cellForRowAt:) method:
Swift
overridefunctableView(_tableView:UITableView,cellForRowAtindexPath:IndexPath)->UITableViewCell{letcell=tableView.dequeueReusableCell(withIdentifier:FUIObjectTableViewCell.reuseIdentifier)as!FUIObjectTableViewCell// Define a UIImage SymbolConfiguration with the scaling factor of small. This allows the system to scale the SF Symbol accordingly.letsmallConfiguration=UIImage.SymbolConfiguration(scale:.small)// Switch Statement to go over the different rows. Set the headline text and the detail image using SF Symbols.switchindexPath.row{case0:cell.headlineText=NSLocalizedString("Overview",comment:"")cell.detailImage=UIImage(systemName:"globe",withConfiguration:smallConfiguration)case1:cell.headlineText=NSLocalizedString("Products",comment:"")cell.detailImage=UIImage(systemName:"tv",withConfiguration:smallConfiguration)case2:cell.headlineText=NSLocalizedString("Customers",comment:"")cell.detailImage=UIImage(systemName:"person",withConfiguration:smallConfiguration)default:returnUITableViewCell()}returncell}
If you run the app now you should see the cell being displayed in the sidebar.
!Split View Controller
Step 3Implement root view controller logic
+
In order to let the user have interactions with the list items you have to write some code.
In the SidebarTableViewController add the following method below the data source methods. Read the inline comments carefully:
Swift
// CollectionType selection helperprivatefuncviewSelected(atindexPath:IndexPath){// Load the EntityType specific ViewController from the specific storyboard"varviewController:UIViewController!letmainStoryboard=UIStoryboard(name:"Main",bundle:nil)// Decide which View Controller to instantiate.switchindexPath.row{case0:viewController=mainStoryboard.instantiateViewController(identifier:"OverviewTableViewController")case1:viewController=mainStoryboard.instantiateViewController(identifier:"ProductsTableViewController")case2:viewController=mainStoryboard.instantiateViewController(identifier:"CustomersTableViewController")default:viewController=UIViewController()}// Load the NavigationController and present with the EntityType specific ViewControllerletrightNavigationController=mainStoryboard.instantiateViewController(withIdentifier:"SubNavigationController")as!UINavigationControllerrightNavigationController.viewControllers=[viewController]// Display the Detail View ControllersplitViewController?.showDetailViewController(rightNavigationController,sender:nil)}
You have to make sure that the viewSelected(at:) method gets called as soon as the user clicks on a list item. Add the following table view delegate method directly below the data source methods:
This will make sure that the correct index path gets passed into the viewSelected(at:) method.
Last step is to set those above implemented storyboard identifiers for the respective view controllers is necessary to instantiate the screens.
Open the Main.storyboard and select the Overview Table View Controller. Open the Identity Inspector and set the Identity to OverviewTableViewController.
!Menu Bar
Repeat that procedure for the Products Table View Controller with ProductsTableViewController and Customers Table View Controller with CustomersTableViewController.
!Menu Bar
Important is that you set an identity for the original Navigation Controller. In the Main.storyboard, select the Navigation Controller which is the detail view controller for the split view controller. Change the Identity to SubNavigationController.
!Storyboard ID
And that’s it, you have a working split view controller with a sidebar and working navigation.
The last step you want to do is change the navigation item’s title from SidebarTableViewController to Navigation. Add the following line of code to the viewDidLoad() method:
Compile and run the app on My Mac and try your hard work.
!Menu Bar
Step 4Change the menu bar
+
You have our basic layout but now it would be interesting what else you could do to be more MacOS conform.
As mentioned in the last tutorial Mac Catalyst gives you a Menu Bar for free, but how do you access the menu bar and make changes to it?
There is an API provided by Apple allowing us to modify the Menu Bar in the app delegate.
You can create an extension swift file containing an AppDelegate extension containing a buildMenu(with:) override method.
This would be also the way to generically have the Table View Data Source implemented.
Use the Project Navigator to create a Swift file and name it AppDelegate+MenuBuilder.
!Storyboard ID
Open the AppDelegate+MenuBuilder.swift file and change the import statement from Foundation to UIKit:
Swift
importUIKit
The override buildMenu(with:) allows us to manipulate and create menu items for the menu bar. Implement the buildMenu(with:) method inside an extension and read the inline comments carefully:
Swift
extensionAppDelegate{// MARK: - Mac Catalyst Menu BaroverridefuncbuildMenu(withbuilder:UIMenuBuilder){super.buildMenu(with:builder)// Remove the Format menu because this is not needed for this app.builder.remove(menu:.format)// Create an menu item and give it a selector method from some class. In this case OverviewTableViewController.letreloadMenuItem=UIKeyCommand(title:NSLocalizedString("Synchronize...",comment:""),action:#selector(OverviewTableViewController.loadData),input:"r",modifierFlags:.command)// Create a Menu and add it an identifier, also define that it should be shown in line. Give it the menu item as children. You could add far more items here if you wanted to.letreloadDataMenu=UIMenu(title:"",image:nil,identifier:UIMenu.Identifier("com.sap.example.MySampleAppCatalyst.Synchronize"),options:.displayInline,children:[reloadMenuItem])// Tell the UIMenuBuilder where to insert the menu.builder.insertChild(reloadDataMenu,atEndOfMenu:.file)}}
Save the file and open the OverviewTableViewController.swift class and change the loadData() method declaration to internal and add the @objc attribute. The @objc allows to make method callable for the Objective-C runtime:
Swift
@objcfuncloadData(){...}
Run the app on My Mac scheme.
!Menu Bar
Of course you can add all sorts of menu entries as long as they make sense being there. Usually you want to have more global tasks in there. If you’re interested in more about the menu bar on MacOS visit the official documentation Adding Menus and Shortcuts to the Menu Bar and User Interface.
Step 5Create settings bundle
+
Every Mac user expects a preferences menu in the menu bar so you should provide, if available, settings via a settings bundle. The reason for this is that using a settings bundle will give you the preferences menu for free.
Here you’re going to implement some settings with help of the settings bundle.
Use the Project Navigator to open the context menu and click on New File…. In the search field of the upcoming dialog, search for Settings, select the Settings Bundle and click on Next and then Create.
!Preferences
As a result you will get a brand new settings.bundle file in the project navigator.
If you run the app now and open the app’s preferences you should see the preferences screen displayed below.
!Preferences
You can see that the Root.plist file contains all the settings for the displayed preferences. You can go and change the different preferences now.
In the Root.plist locate the Title of Item 0 (Group - Group) and change it to Sales Assistant Preferences.
Leave Item 1 (Text Field - Name) as is and delete the remaining items.
!Preferences
Run the app now and open the preferences you should see the title has changed and the other items are gone.
!Preferences
Step 6Change app title
+
Maybe you have noticed that the app’s title is still TutorialApp, let’s change this now.
Open the TutorialApp.xcproj file and click on the General tab if not already there.
Change the Display Name in the Identity section to Sales Assistant.
!App Title
Of course you might want to change the bundle identifier as well to match the display name or create the whole project with the correct name in the beginning. As you’re extending the app created in the prerequisites, you just change the display name here.
!App Title
This is our finished app now. From here go ahead and look through different tutorials to maybe enhance this app more or go ahead and implement a detail screen for the products using the Human Interface Guideline of SAP Fiori for iOS.
Share feedback on this tutorial or join the conversation in SAP Community.
Submit detailed feedbackDiscuss in Community
Steps
Step 1 of 6
1. Implement a Split View2. Implement root view controller UI3. Implement root view controller logic4. Change the menu bar5. Create settings bundle6. Change app title
Joule
AI Notice
Joule is an AI assistant. Generative AI may produce inaccurate, incomplete, or biased information. Always verify important details before acting on them.
Conversations are sent to SAP-hosted large language models for processing. Do not include personal data, credentials, or confidential information in your messages.
Joule's responses are based on the SAP tutorial catalog and may not reflect the latest product changes. For authoritative guidance, consult the linked tutorials and official SAP documentation.



