
Overview
You will learn
- How to reuse View Controller code [ACCORDION-BEGIN [Step 1: ](Create a customer list)] Because you already implemented a similar screen, the Product List, you can copy most of the code from the
ProductsTableViewController.swiftclass. 1. Before you do that, open theMain.storyboardand use the Object Library to create another Table View Controller and place it directly below the Products Table View Controller. !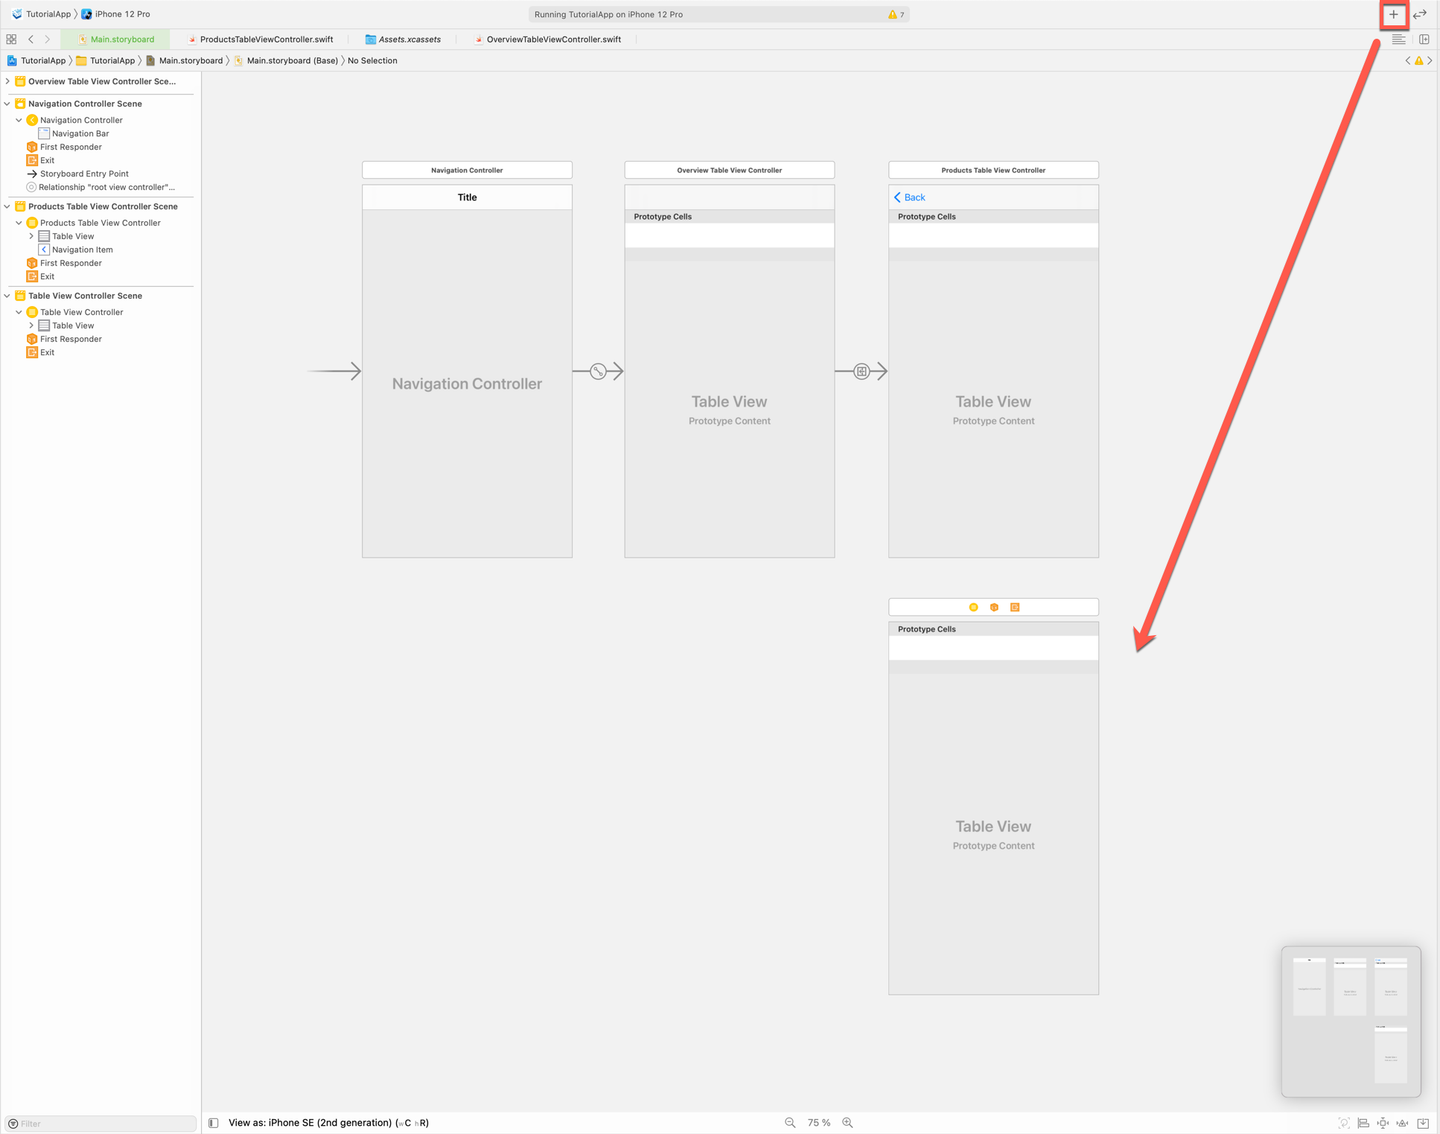
Main Storyboard Customer VC TutorialApp > New File ... > Cocoa Touch Class. Name the classCustomersTableViewController. !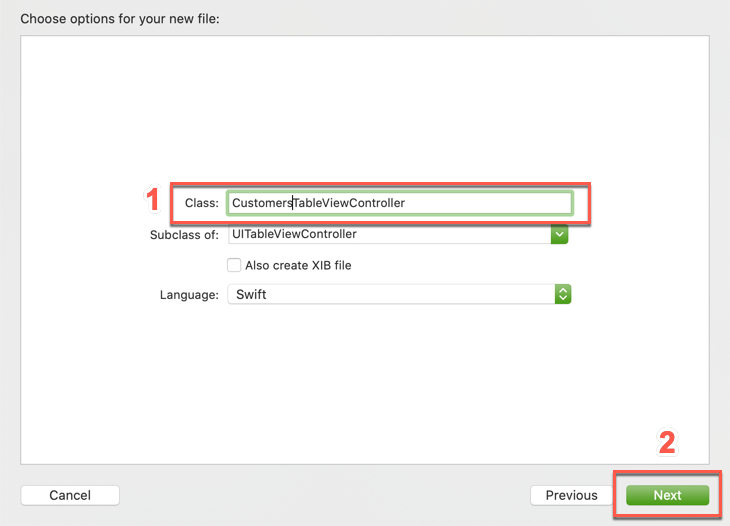
Main Storyboard Customer VC Main.storyboardand set the Custom Class of the newly added Table View Controller toCustomersTableViewController. !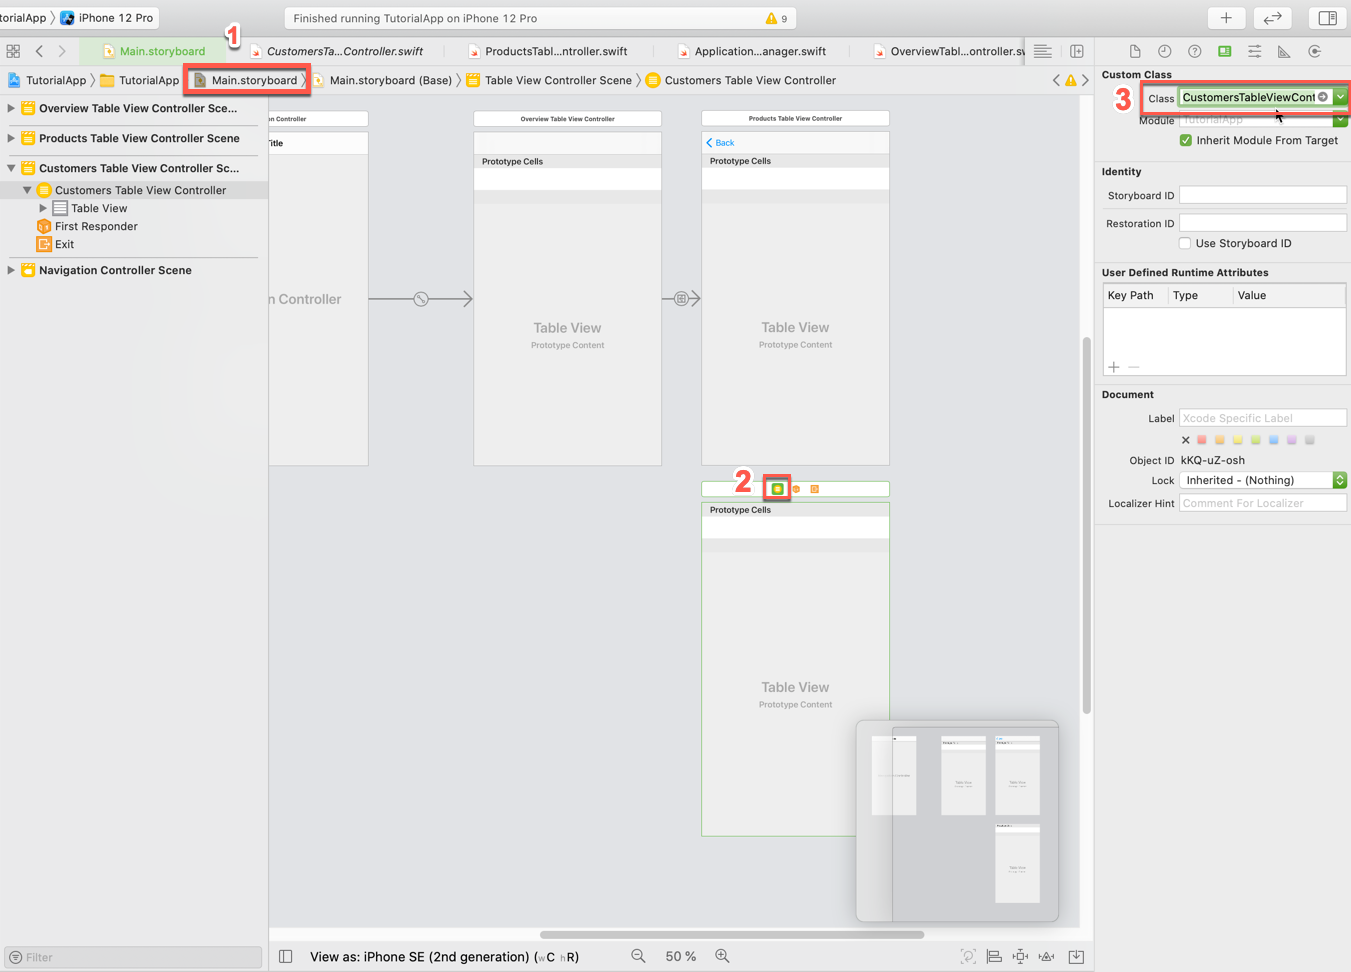
Main Storyboard Customer VC ProductsTableViewController.swiftcode into a new classCustomersTableViewController.swift. > Views like that which offer the same functionality and take different entities to display could be developed generically. For simplicity reasons you will just reuse code here. 2. You can reuse most of the code from theProductsTableViewController.swiftclass, to start open theCustomersTableViewController.swiftfile and add the needed import statements to the class:Swift import SAPFiori import SAPFoundation import SAPOData import SAPFioriFlows import SAPCommon import ESPMContainerFmwk import SharedFmwk3. Now you’re going to copy the code inside of the class definition of theProductsTableViewController.swiftclass to the class body of theCustomersTableViewController. Replace everything inside theCustomersTableViewControllerclass from:Swift class CustomersTableViewController: UITableViewController { override func viewDidLoad() { super.viewDidLoad() // Uncomment the following line to preserve selection between presentations // self.clearsSelectionOnViewWillAppear = false // Uncomment the following line to display an Edit button in the navigation bar for this view controller. // self.navigationItem.rightBarButtonItem = self.editButtonItem } // MARK: - Table view data source override func numberOfSections(in tableView: UITableView) -> Int { // #warning Incomplete implementation, return the number of sections return 0 } override func tableView(_ tableView: UITableView, numberOfRowsInSection section: Int) -> Int { // #warning Incomplete implementation, return the number of rows return 0 } /* override func tableView(_ tableView: UITableView, cellForRowAt indexPath: IndexPath) -> UITableViewCell { let cell = tableView.dequeueReusableCell(withIdentifier: "reuseIdentifier", for: indexPath) // Configure the cell... return cell } */ /* // Override to support conditional editing of the table view. override func tableView(_ tableView: UITableView, canEditRowAt indexPath: IndexPath) -> Bool { // Return false if you do not want the specified item to be editable. return true } */ /* // Override to support editing the table view. override func tableView(_ tableView: UITableView, commit editingStyle: UITableViewCell.EditingStyle, forRowAt indexPath: IndexPath) { if editingStyle == .delete { // Delete the row from the data source tableView.deleteRows(at: [indexPath], with: .fade) } else if editingStyle == .insert { // Create a new instance of the appropriate class, insert it into the array, and add a new row to the table view } } */ /* // Override to support rearranging the table view. override func tableView(_ tableView: UITableView, moveRowAt fromIndexPath: IndexPath, to: IndexPath) { } */ /* // Override to support conditional rearranging of the table view. override func tableView(_ tableView: UITableView, canMoveRowAt indexPath: IndexPath) -> Bool { // Return false if you do not want the item to be re-orderable. return true } */ /* // MARK: - Navigation // In a storyboard-based application, you will often want to do a little preparation before navigation override func prepare(for segue: UIStoryboardSegue, sender: Any?) { // Get the new view controller using segue.destination. // Pass the selected object to the new view controller. } */ }To:Swift // // CustomersTableViewController.swift // MySampleAppCatalyst // // Created by Muessig, Kevin on 3/12/20. // Copyright © 2020 SAP. All rights reserved. // import UIKit import SAPFiori import SAPFoundation import SAPOData import SAPOfflineOData import SAPFioriFlows import SAPCommon import ESPMContainerFmwk import SharedFmwk class CustomersTableViewController: UITableViewController, SAPFioriLoadingIndicator { var loadingIndicator: FUILoadingIndicatorView? let destinations = FileConfigurationProvider("AppParameters").provideConfiguration().configuration["Destinations"] as! NSDictionary var dataService: ESPMContainer<OfflineODataProvider>? { guard let odataController = OnboardingSessionManager.shared.onboardingSession?.odataControllers[ODataContainerType.eSPMContainer.description] as? ESPMContainerOfflineODataController, let dataService = odataController.dataService else { AlertHelper.displayAlert(with: "OData service is not reachable, please onboard again.", error: nil, viewController: self) return nil } return dataService } private let appDelegate = UIApplication.shared.delegate as! AppDelegate private let logger = Logger.shared(named: "ProductsTableViewController") private var customers = [Customer]() private var searchController: FUISearchController? private var searchedCustomers = [Customer]() override func viewDidLoad() { super.viewDidLoad() tableView.register(FUIObjectTableViewCell.self, forCellReuseIdentifier: FUIObjectTableViewCell.reuseIdentifier) tableView.estimatedRowHeight = 120 tableView.rowHeight = UITableView.automaticDimension loadData() setupSearchBar() } private func loadData() { showFioriLoadingIndicator() fetchCustomers { self.tableView.reloadData() self.hideFioriLoadingIndicator() } } private func fetchCustomers(completionHandler: @escaping () -> Void) { dataService?.fetchCustomers() { [weak self] result, error in if let error = error { AlertHelper.displayAlert(with: NSLocalizedString("Failed to load list of products!", comment: ""), error: error, viewController: self!) self?.logger.error("Failed to load list of products!", error: error) return } self?.customers = result! completionHandler() } } // MARK: - Table view data source override func numberOfSections(in tableView: UITableView) -> Int { return 1 } override func tableView(_ tableView: UITableView, numberOfRowsInSection section: Int) -> Int { return isSearching() ? searchedCustomers.count : customers.count } override func tableView(_ tableView: UITableView, cellForRowAt indexPath: IndexPath) -> UITableViewCell { let customer = isSearching() ? searchedCustomers[indexPath.row] : customers[indexPath.row] let customerCell = tableView.dequeueReusableCell(withIdentifier: FUIObjectTableViewCell.reuseIdentifier) as! FUIObjectTableViewCell customerCell.accessoryType = .none let customerName = "\(customer.firstName ?? "") \(customer.lastName ?? "")" customerCell.headlineText = customerName customerCell.detailImageView.image = FUIIconLibrary.system.me customerCell.detailImageView.isCircular = true if let customerDOB = customer.dateOfBirth { let dateFormatter = DateFormatter() dateFormatter.dateStyle = .medium customerCell.subheadlineText = "\(dateFormatter.string(from: customerDOB.utc() ?? Date()))" } return customerCell } // MARK: - Search Bar private func setupSearchBar() { // Search Controller setup searchController = FUISearchController(searchResultsController: nil) searchController!.searchResultsUpdater = self searchController!.hidesNavigationBarDuringPresentation = true searchController!.searchBar.placeholderText = NSLocalizedString("Search for customers...", comment: "") searchController!.searchBar.isBarcodeScannerEnabled = false self.tableView.tableHeaderView = searchController!.searchBar } // verify if the search text is empty or not private func searchTextIsEmpty() -> Bool { return searchController?.searchBar.text?.isEmpty ?? true } // actual search logic for finding the correct products for the term the user is searching for private func searchProducts(_ searchText: String) { searchedCustomers = customers.filter({( customer : Customer) -> Bool in let customerName = "\(customer.firstName ?? "") \(customer.lastName ?? "")" return customerName.lowercased().contains(searchText.lowercased()) }) tableView.reloadData() } // verify if the user is currently searching or not private func isSearching() -> Bool { return searchController?.isActive ?? false && !searchTextIsEmpty() } } // MARK: - UISearchResultsUpdating extension extension CustomersTableViewController: UISearchResultsUpdating { func updateSearchResults(for searchController: UISearchController) { if let searchText = searchController.searchBar.text { searchProducts(searchText) return } } }If you compile now, there shouldn’t be any compile time errors, if you get a compile time error for theodataControllerremember to make theimport SAPOfflineODataimport statement. You did use almost the same code as in theProductsTableViewController.swiftclass and modified it. You had to simply replace all the product definitions with customer and adjust thetableView(_:cellForRowAt:)method to use the product data similar to the Overview Screen. Also, theloadProductImages()method is not necessary anymore so you deleted that. [VALIDATE_2] [ACCORDION-END] [ACCORDION-BEGIN [Step 3: ](Create storyboard segue for the customer list)] 1. Open theMain.storyboard, there select theOverviewTableViewControllerandcontrol + dragto theCustomersTableViewController. !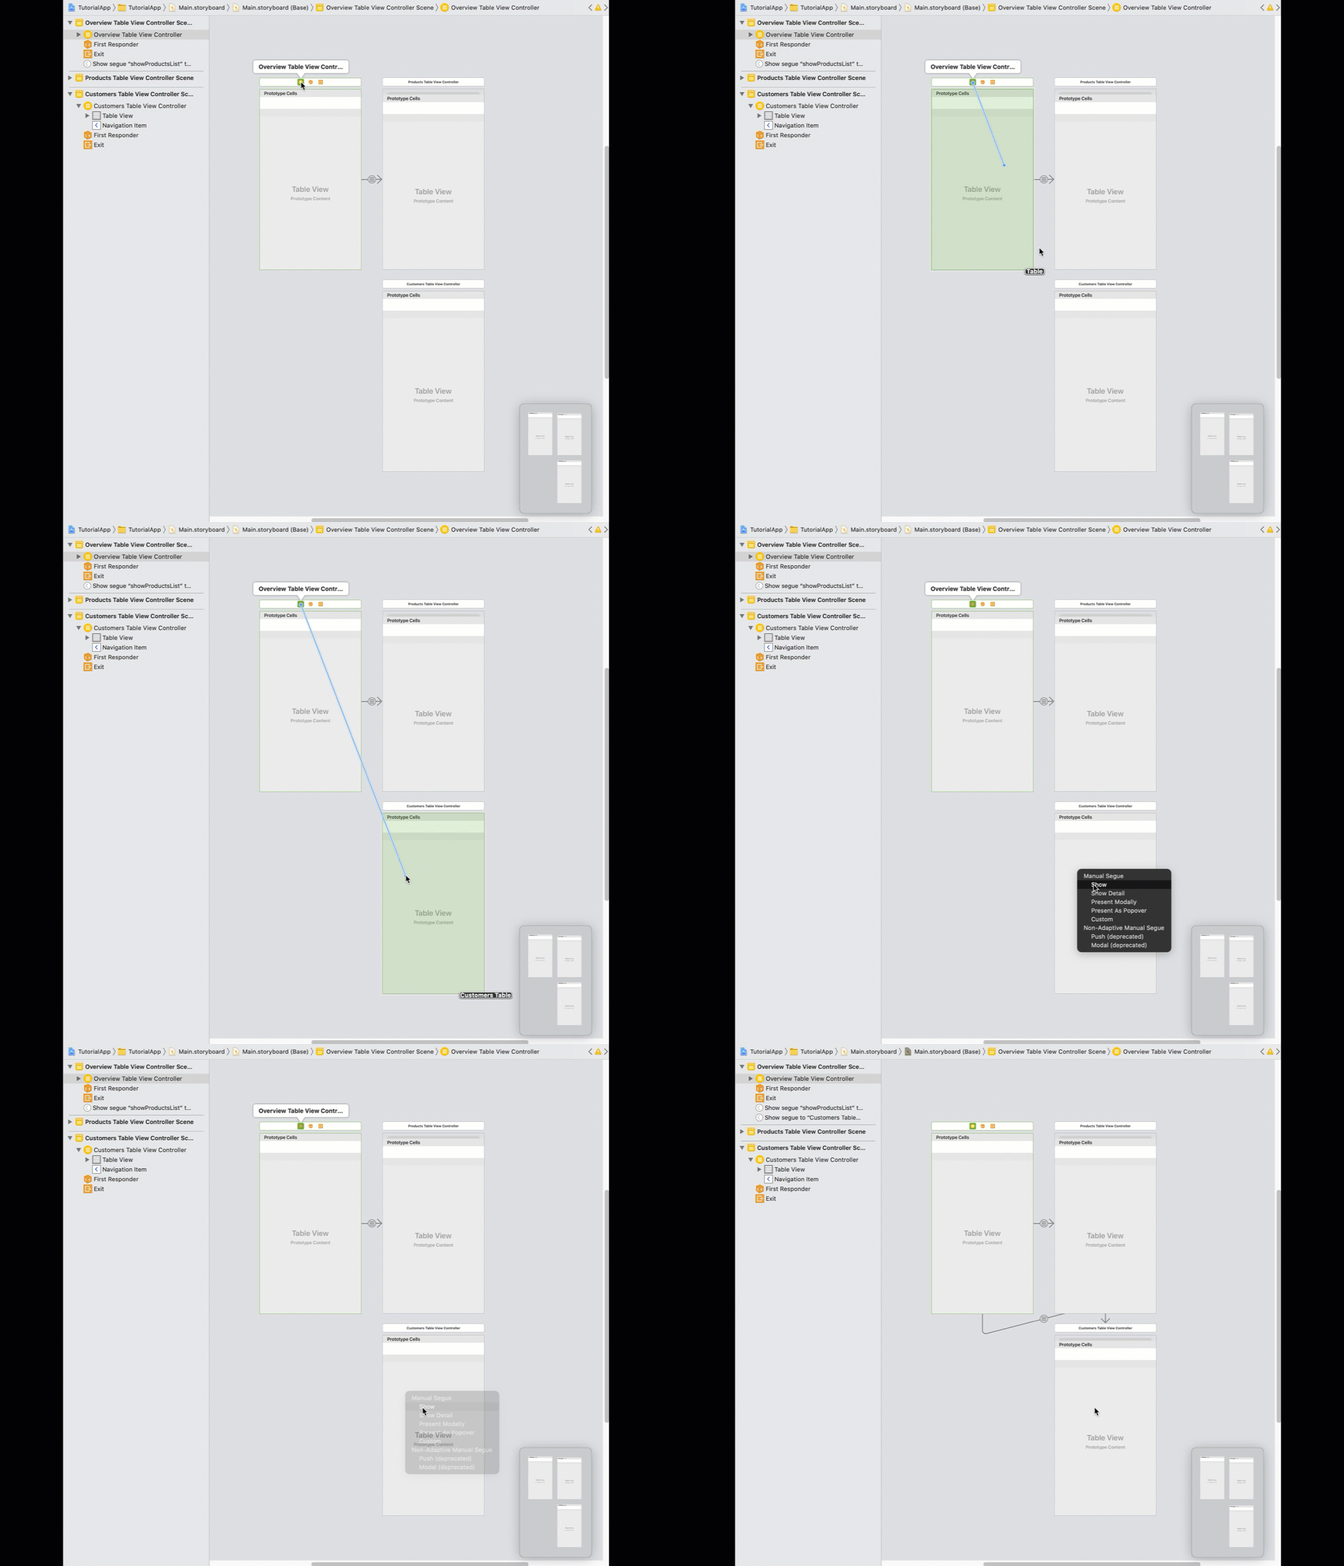
Main Storyboard Product List CustomersTableViewControllerhas a Navigation Item now allowing your user to navigate back to the Overview Screen. Select the segue in Interface Builder and click on the Attributes Inspector. As identifier entershowCustomersListand hit return. !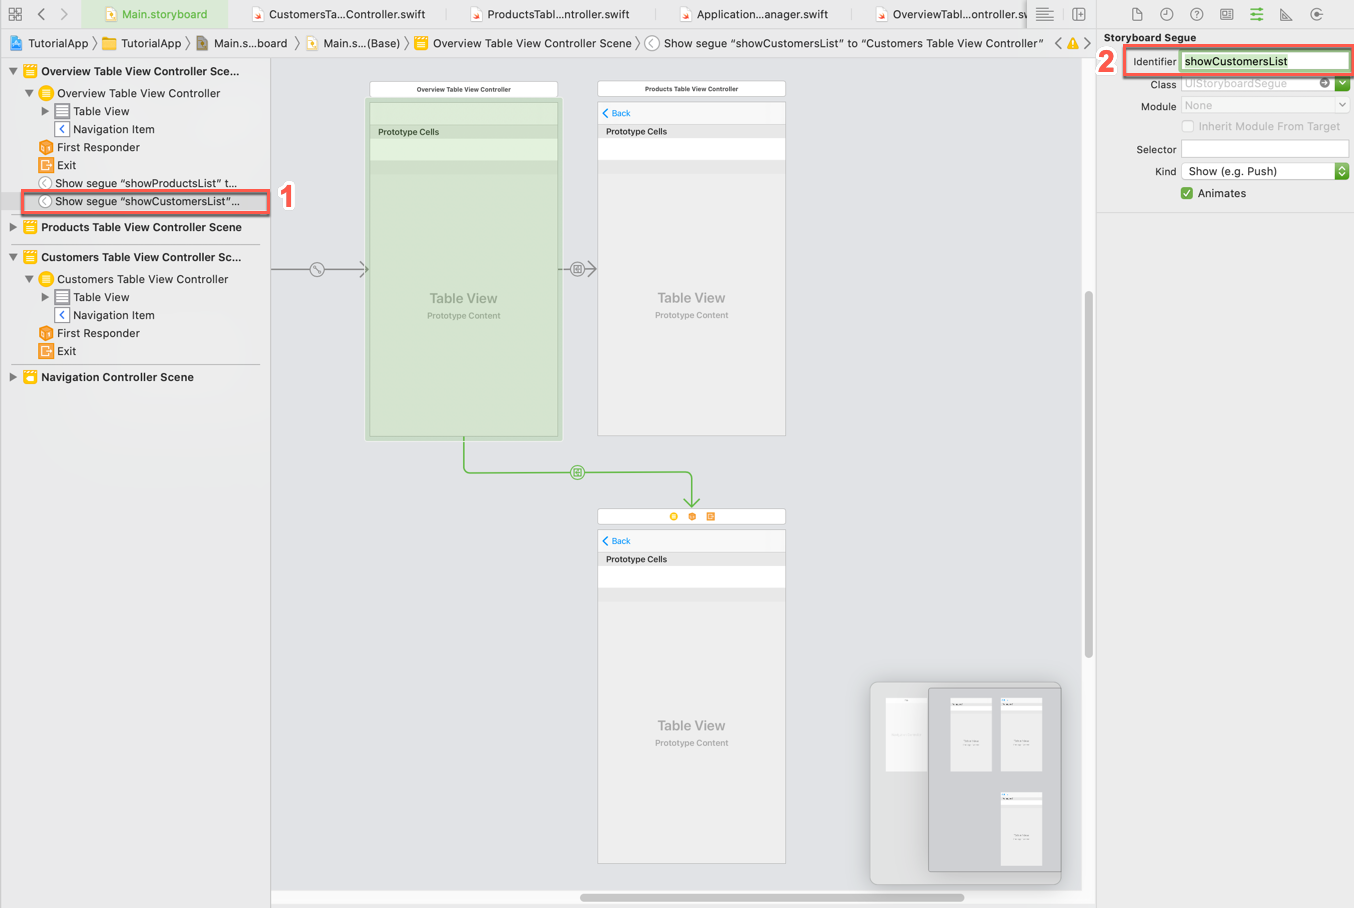
Main Storyboard Product List prepareForSegue(for:Sender:)method. 1. Open theOverviewTableViewController.swiftclass and add the following class property:Swift private let customerSegueIdentifier = "showCustomersList"2. Locate theprepareForSegue(for:Sender:)method and add another case statement for thecustomerSegueIdentifier. Replace the code with the following:Swift[6-8] override func prepare(for segue: UIStoryboardSegue, sender: Any?) { switch segue.identifier { case productSegueIdentifier: let productsTableVC = segue.destination as! ProductsTableViewController productsTableVC.navigationItem.title = NSLocalizedString("All Products (\(products.count))", comment: "") case customerSegueIdentifier: let customersTableVC = segue.destination as! CustomersTableViewController customersTableVC.navigationItem.title = NSLocalizedString("All Customers (\(customers.count))", comment: "") default: return } }3. The last change to make is to perform the segue out of thetableView(_:viewForHeaderInSection:)method for the customer list See All. Locate thetableView(_:viewForHeaderInSection:)method and change the code to call the needed method:Swift[15] override func tableView(_ tableView: UITableView, viewForHeaderInSection section: Int) -> UIView? { let headerFooterView = tableView.dequeueReusableHeaderFooterView(withIdentifier: FUITableViewHeaderFooterView.reuseIdentifier) as! FUITableViewHeaderFooterView switch section { case 1: headerFooterView.style = .title headerFooterView.titleLabel.text = NSLocalizedString("Products", comment: "") return headerFooterView case 3: headerFooterView.style = .attribute headerFooterView.titleLabel.text = NSLocalizedString("High Profile Customers", comment: "") headerFooterView.attributeLabel.text = NSLocalizedString("See All(\(customers.count))", comment: "") headerFooterView.didSelectHandler = { // Perform the segue to the customer list. self.performSegue(withIdentifier: self.customerSegueIdentifier, sender: self) } return headerFooterView default: let divider = UIView() divider.backgroundColor = .preferredFioriColor(forStyle: .line) return divider } }4. If you run the app now you can navigate between Overview Screen and Customer List Screen. !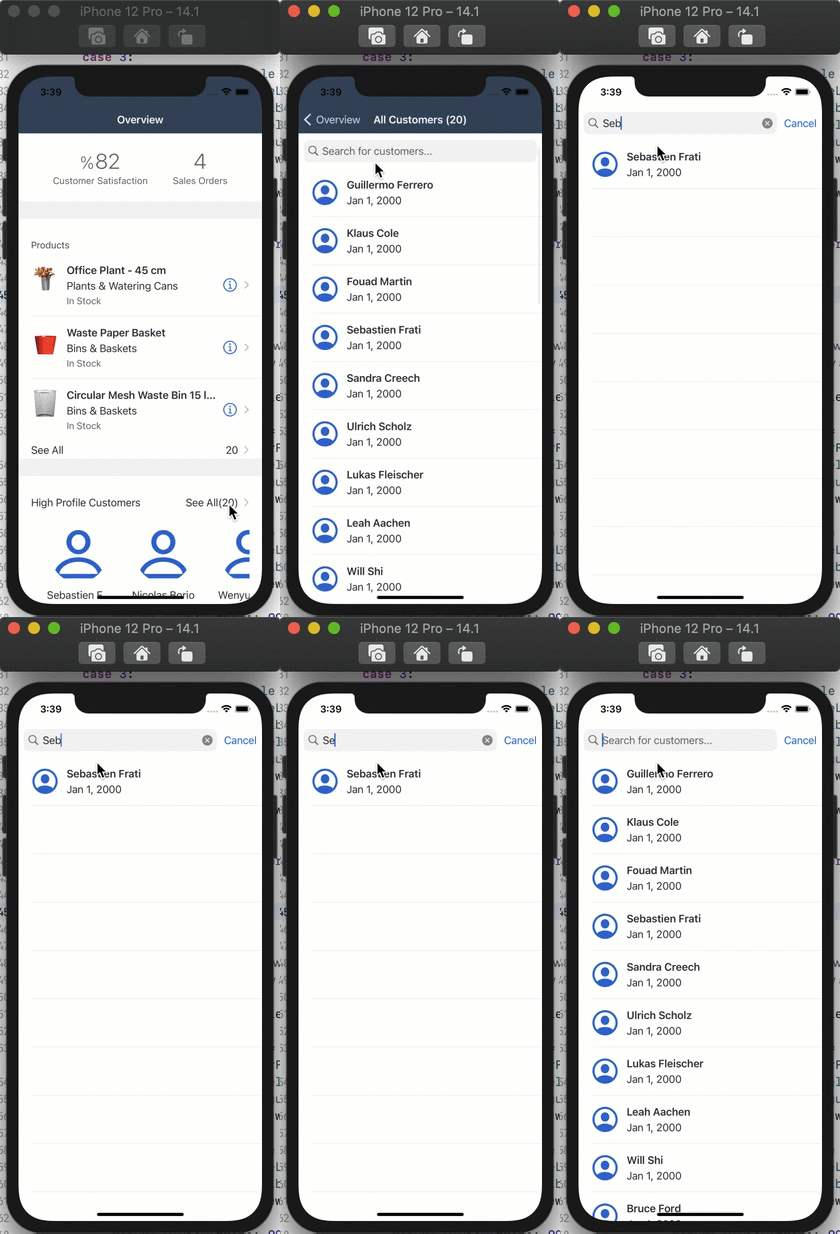
Main Storyboard Product List


Prerequisites
Prerequisites
- Development environment: Apple Mac running macOS Catalina or higher with Xcode 13 or higher
- SAP BTP SDK for iOS: Version 7.0 or higher
Steps
Details
You will learn
- How to reuse View Controller code
Because you already implemented a similar screen, the Product List, you can copy most of the code from the ProductsTableViewController.swift class.
Before you do that, open the
Main.storyboardand use the Object Library to create another Table View Controller and place it directly below the Products Table View Controller.!
Main Storyboard Customer VC Use the project navigator to create a new Table View Controller Cocoa Touch Class
TutorialApp > New File ... > Cocoa Touch Class. Name the classCustomersTableViewController.!
Main Storyboard Customer VC Open the
Main.storyboardand set the Custom Class of the newly added Table View Controller toCustomersTableViewController.!
Main Storyboard Customer VC
Next you’re going to simply copy the
ProductsTableViewController.swiftcode into a new classCustomersTableViewController.swift.Views like that which offer the same functionality and take different entities to display could be developed generically. For simplicity reasons you will just reuse code here.
You can reuse most of the code from the
ProductsTableViewController.swiftclass, to start open theCustomersTableViewController.swiftfile and add the needed import statements to the class:Swiftimport SAPFiori import SAPFoundation import SAPOData import SAPFioriFlows import SAPCommon import ESPMContainerFmwk import SharedFmwkNow you’re going to copy the code inside of the class definition of the
ProductsTableViewController.swiftclass to the class body of theCustomersTableViewController. Replace everything inside theCustomersTableViewControllerclass from:Swiftclass CustomersTableViewController: UITableViewController { override func viewDidLoad() { super.viewDidLoad() // Uncomment the following line to preserve selection between presentations // self.clearsSelectionOnViewWillAppear = false // Uncomment the following line to display an Edit button in the navigation bar for this view controller. // self.navigationItem.rightBarButtonItem = self.editButtonItem } // MARK: - Table view data source override func numberOfSections(in tableView: UITableView) -> Int { // #warning Incomplete implementation, return the number of sections return 0 } override func tableView(_ tableView: UITableView, numberOfRowsInSection section: Int) -> Int { // #warning Incomplete implementation, return the number of rows return 0 } /* override func tableView(_ tableView: UITableView, cellForRowAt indexPath: IndexPath) -> UITableViewCell { let cell = tableView.dequeueReusableCell(withIdentifier: "reuseIdentifier", for: indexPath) // Configure the cell... return cell } */ /* // Override to support conditional editing of the table view. override func tableView(_ tableView: UITableView, canEditRowAt indexPath: IndexPath) -> Bool { // Return false if you do not want the specified item to be editable. return true } */ /* // Override to support editing the table view. override func tableView(_ tableView: UITableView, commit editingStyle: UITableViewCell.EditingStyle, forRowAt indexPath: IndexPath) { if editingStyle == .delete { // Delete the row from the data source tableView.deleteRows(at: [indexPath], with: .fade) } else if editingStyle == .insert { // Create a new instance of the appropriate class, insert it into the array, and add a new row to the table view } } */ /* // Override to support rearranging the table view. override func tableView(_ tableView: UITableView, moveRowAt fromIndexPath: IndexPath, to: IndexPath) { } */ /* // Override to support conditional rearranging of the table view. override func tableView(_ tableView: UITableView, canMoveRowAt indexPath: IndexPath) -> Bool { // Return false if you do not want the item to be re-orderable. return true } */ /* // MARK: - Navigation // In a storyboard-based application, you will often want to do a little preparation before navigation override func prepare(for segue: UIStoryboardSegue, sender: Any?) { // Get the new view controller using segue.destination. // Pass the selected object to the new view controller. } */ }To:
Swift// // CustomersTableViewController.swift // MySampleAppCatalyst // // Created by Muessig, Kevin on 3/12/20. // Copyright © 2020 SAP. All rights reserved. // import UIKit import SAPFiori import SAPFoundation import SAPOData import SAPOfflineOData import SAPFioriFlows import SAPCommon import ESPMContainerFmwk import SharedFmwk class CustomersTableViewController: UITableViewController, SAPFioriLoadingIndicator { var loadingIndicator: FUILoadingIndicatorView? let destinations = FileConfigurationProvider("AppParameters").provideConfiguration().configuration["Destinations"] as! NSDictionary var dataService: ESPMContainer<OfflineODataProvider>? { guard let odataController = OnboardingSessionManager.shared.onboardingSession?.odataControllers[ODataContainerType.eSPMContainer.description] as? ESPMContainerOfflineODataController, let dataService = odataController.dataService else { AlertHelper.displayAlert(with: "OData service is not reachable, please onboard again.", error: nil, viewController: self) return nil } return dataService } private let appDelegate = UIApplication.shared.delegate as! AppDelegate private let logger = Logger.shared(named: "ProductsTableViewController") private var customers = [Customer]() private var searchController: FUISearchController? private var searchedCustomers = [Customer]() override func viewDidLoad() { super.viewDidLoad() tableView.register(FUIObjectTableViewCell.self, forCellReuseIdentifier: FUIObjectTableViewCell.reuseIdentifier) tableView.estimatedRowHeight = 120 tableView.rowHeight = UITableView.automaticDimension loadData() setupSearchBar() } private func loadData() { showFioriLoadingIndicator() fetchCustomers { self.tableView.reloadData() self.hideFioriLoadingIndicator() } } private func fetchCustomers(completionHandler: @escaping () -> Void) { dataService?.fetchCustomers() { [weak self] result, error in if let error = error { AlertHelper.displayAlert(with: NSLocalizedString("Failed to load list of products!", comment: ""), error: error, viewController: self!) self?.logger.error("Failed to load list of products!", error: error) return } self?.customers = result! completionHandler() } } // MARK: - Table view data source override func numberOfSections(in tableView: UITableView) -> Int { return 1 } override func tableView(_ tableView: UITableView, numberOfRowsInSection section: Int) -> Int { return isSearching() ? searchedCustomers.count : customers.count } override func tableView(_ tableView: UITableView, cellForRowAt indexPath: IndexPath) -> UITableViewCell { let customer = isSearching() ? searchedCustomers[indexPath.row] : customers[indexPath.row] let customerCell = tableView.dequeueReusableCell(withIdentifier: FUIObjectTableViewCell.reuseIdentifier) as! FUIObjectTableViewCell customerCell.accessoryType = .none let customerName = "\(customer.firstName ?? "") \(customer.lastName ?? "")" customerCell.headlineText = customerName customerCell.detailImageView.image = FUIIconLibrary.system.me customerCell.detailImageView.isCircular = true if let customerDOB = customer.dateOfBirth { let dateFormatter = DateFormatter() dateFormatter.dateStyle = .medium customerCell.subheadlineText = "\(dateFormatter.string(from: customerDOB.utc() ?? Date()))" } return customerCell } // MARK: - Search Bar private func setupSearchBar() { // Search Controller setup searchController = FUISearchController(searchResultsController: nil) searchController!.searchResultsUpdater = self searchController!.hidesNavigationBarDuringPresentation = true searchController!.searchBar.placeholderText = NSLocalizedString("Search for customers...", comment: "") searchController!.searchBar.isBarcodeScannerEnabled = false self.tableView.tableHeaderView = searchController!.searchBar } // verify if the search text is empty or not private func searchTextIsEmpty() -> Bool { return searchController?.searchBar.text?.isEmpty ?? true } // actual search logic for finding the correct products for the term the user is searching for private func searchProducts(_ searchText: String) { searchedCustomers = customers.filter({( customer : Customer) -> Bool in let customerName = "\(customer.firstName ?? "") \(customer.lastName ?? "")" return customerName.lowercased().contains(searchText.lowercased()) }) tableView.reloadData() } // verify if the user is currently searching or not private func isSearching() -> Bool { return searchController?.isActive ?? false && !searchTextIsEmpty() } } // MARK: - UISearchResultsUpdating extension extension CustomersTableViewController: UISearchResultsUpdating { func updateSearchResults(for searchController: UISearchController) { if let searchText = searchController.searchBar.text { searchProducts(searchText) return } } }If you compile now, there shouldn’t be any compile time errors, if you get a compile time error for the
odataControllerremember to make theimport SAPOfflineODataimport statement. You did use almost the same code as in theProductsTableViewController.swiftclass and modified it. You had to simply replace all the product definitions with customer and adjust thetableView(_:cellForRowAt:)method to use the product data similar to the Overview Screen.Also, the
loadProductImages()method is not necessary anymore so you deleted that.
Open the
Main.storyboard, there select theOverviewTableViewControllerandcontrol + dragto theCustomersTableViewController.!
Main Storyboard Product List If you look closely, you can see that the
CustomersTableViewControllerhas a Navigation Item now allowing your user to navigate back to the Overview Screen.Select the segue in Interface Builder and click on the Attributes Inspector. As identifier enter
showCustomersListand hit return.!
Main Storyboard Product List
For the customer list it is not necessary to pass any crucial data in, but you want to set the navigation item’s title before finishing up the navigation.
You can store the segue identifier in a class property for cleaner code and use it in the prepareForSegue(for:Sender:) method.
Open the
OverviewTableViewController.swiftclass and add the following class property:Swiftprivate let customerSegueIdentifier = "showCustomersList"Locate the
prepareForSegue(for:Sender:)method and add another case statement for thecustomerSegueIdentifier. Replace the code with the following:Swift[6-8]override func prepare(for segue: UIStoryboardSegue, sender: Any?) { switch segue.identifier { case productSegueIdentifier: let productsTableVC = segue.destination as! ProductsTableViewController productsTableVC.navigationItem.title = NSLocalizedString("All Products (\(products.count))", comment: "") case customerSegueIdentifier: let customersTableVC = segue.destination as! CustomersTableViewController customersTableVC.navigationItem.title = NSLocalizedString("All Customers (\(customers.count))", comment: "") default: return } }The last change to make is to perform the segue out of the
tableView(_:viewForHeaderInSection:)method for the customer list See All.Locate the
tableView(_:viewForHeaderInSection:)method and change the code to call the needed method:Swift[15]override func tableView(_ tableView: UITableView, viewForHeaderInSection section: Int) -> UIView? { let headerFooterView = tableView.dequeueReusableHeaderFooterView(withIdentifier: FUITableViewHeaderFooterView.reuseIdentifier) as! FUITableViewHeaderFooterView switch section { case 1: headerFooterView.style = .title headerFooterView.titleLabel.text = NSLocalizedString("Products", comment: "") return headerFooterView case 3: headerFooterView.style = .attribute headerFooterView.titleLabel.text = NSLocalizedString("High Profile Customers", comment: "") headerFooterView.attributeLabel.text = NSLocalizedString("See All(\(customers.count))", comment: "") headerFooterView.didSelectHandler = { // Perform the segue to the customer list. self.performSegue(withIdentifier: self.customerSegueIdentifier, sender: self) } return headerFooterView default: let divider = UIView() divider.backgroundColor = .preferredFioriColor(forStyle: .line) return divider } }If you run the app now you can navigate between Overview Screen and Customer List Screen.
!
Main Storyboard Product List
Resources
Discussion
Share feedback on this tutorial or join the conversation in SAP Community.