
Overview
You will learn
- How to deploy your CAP application in SAP BTP, Kyma runtime.


Prerequisites
Prerequisites
- You’ve configured the respective entitlements, enabled the Kyma runtime in your subaccount, and created an SAP HANA Cloud service instance in the SAP BTP cockpit. Follow the steps in the Prepare for Deployment in the SAP BTP, Kyma Runtime tutorial that is part of the Deploy a Full-Stack CAP Application in SAP BTP, Kyma Runtime Following SAP BTP Developer’s Guide tutorial group.
- You have an enterprise global account in SAP BTP. To use services for free, you can sign up for an SAP BTPEA (SAP BTP Enterprise Agreement) or a Pay-As-You-Go for SAP BTP global account and use the free tier services only. See Using Free Service Plans.
- You have a platform user. See User and Member Management.
- You’re an administrator of the global account in SAP BTP.
- You have a subaccount in SAP BTP to deploy the services and applications.
- You have a tenant of SAP Cloud Identity Services. See Get Your Tenant for details how to get a tenant of SAP Cloud Identity Services if you don’t have one yet.
- You’ve established trust between your tenant of SAP Cloud Identity Services and your SAP BTP account. This established trust allows you to use your SAP Cloud Identity Services tenant as an identity provider or a proxy to your own identity provider hosting your business users. See Establish Trust and Federation Between SAP Authorization and Trust Management Service and SAP Cloud Identity Services.
- You have one of the following browsers that are supported for working in SAP Business Application Studio:
- Mozilla Firefox
- Google Chrome
- Microsoft Edge
- For Windows, you need Chocolatey. Chocolatey is a package manager that speeds up and eases installation of the tools in this tutorial. See how to install Chocolatey in Setup/Install.
- You’ve prepared a container registry and you’ve logged in to the container registry through your CLI. A container registry is a repo where you can push your Docker images. SAP BTP doesn’t currently provide a container registry. You can use any container registry offering as long as it can be reached from the public Internet.
This tutorial follows the guidance provided in the SAP BTP Developer’s Guide.
Steps
SAP BTP, Kyma runtime is a cloud-native application runtime that combines the power of Kubernetes with a set of best-in-class tools and open-source components that empower you to develop, run, and operate secure and scalable cloud-native applications. Detailed information is available at Kyma Environment.
The files of the SAP BTP, Kyma runtime are provided as a container image. In addition, since the containers run on Kubernetes, their configuration is described by Kubernetes resources.
Hence, you need two kinds of artifacts to run applications on Kubernetes:
- Container images
- Kubernetes resources
You start by building your project as container images and push those images to a container registry of your choice. Then, you add a CAP Helm chart to your project. As a last step, you deploy the Helm chart to your Kyma resources, where service instances of SAP BTP services are created and pods pull the previously created container images from the container registry.
Choose
KubeconfigURLunder the Kyma Environment tab in your subaccount.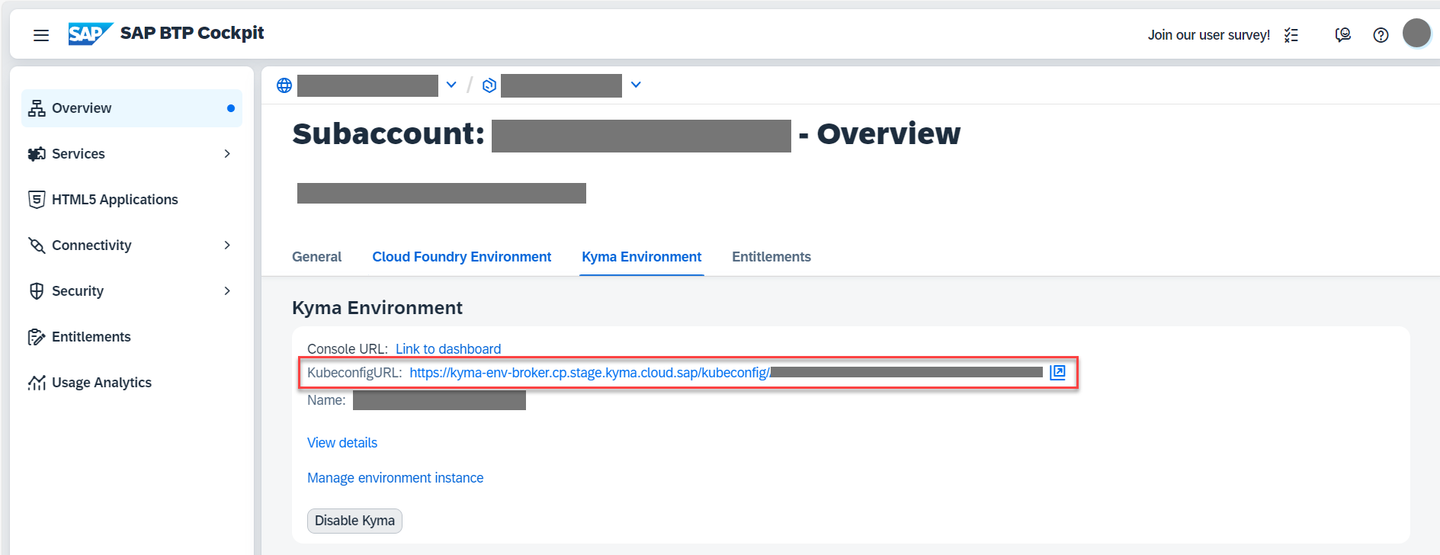
Kubeconfig URL A file
kubeconfig.yamlis downloaded.
Kubeconfig yaml Copy the
kubeconfig.yamlfile to the~/.kube/directory and rename it toconfig. Replace or rename any existing file with the same name.
There are two additional steps for Windows users only:
Go to
C:\ProgramData\chocolatey\bin.Rename
kubelogin.exetokubectl-oidc_login.exe.
Kyma runs on containers. Hence, for this tutorial, you need an application that enables you to manage (build, push, pull, and run) container images on your desktop and a docker-compatible command-line interface. We provide two examples - Docker Desktop and Rancher Desktop. You can pick one of them or any other app suitable for the purpose.
macOS: Download the installer from Install Docker Desktop on Mac and follow the instructions to install and set up Docker Desktop.
Windows: Download the installer from Install Docker Desktop on Windows and follow the instructions to install and set up Docker Desktop.
Kyma runs on containers. Hence, for this tutorial, you need an application that enables you to manage (build, push, pull, and run) container images on your desktop and a docker-compatible command-line interface. We provide two examples - Docker Desktop and Rancher Desktop. You can pick one of them or any other app suitable for the purpose.
macOS:
Go to the releases page.
Download the Rancher Desktop installer for macOS.
The macOS installer is called
Rancher.Desktop-<version.architecture>.dmg. Here’s an example with the current latest version:Rancher.Desktop-1.2.1.x86_64.dmg.Run the installer. When the installation is complete, drag the Rancher Desktop icon to the Applications folder.
You can find details about installation requirements and install/uninstall steps in macOS.
Windows:
Go to the releases page.
Download the Rancher Desktop installer for Windows.
The Windows installer is called
Rancher.Desktop.Setup.<version>.exe. Here’s an example with the current latest version:Rancher.Desktop.Setup.1.2.1.exe.Run the installer. When the installation is complete, choose Finish.
You can find details about installation requirements and install/uninstall steps in Windows.
Linux: There are several different ways to install Rancher Desktop on Linux. You can find details about installation requirements and steps to install or uninstall steps in Linux.
Skip this step if you cloned the application from the Incident Management application GitHub repository without going through the application development steps. Perform this step only in case you’ve developed the application from the start following the Develop a Full-Stack CAP Application Following the SAP BTP Developer’s Guide mission in the SAP Discovery Center.
In SAP Business Application Studio, choose the icon to download dev space content.
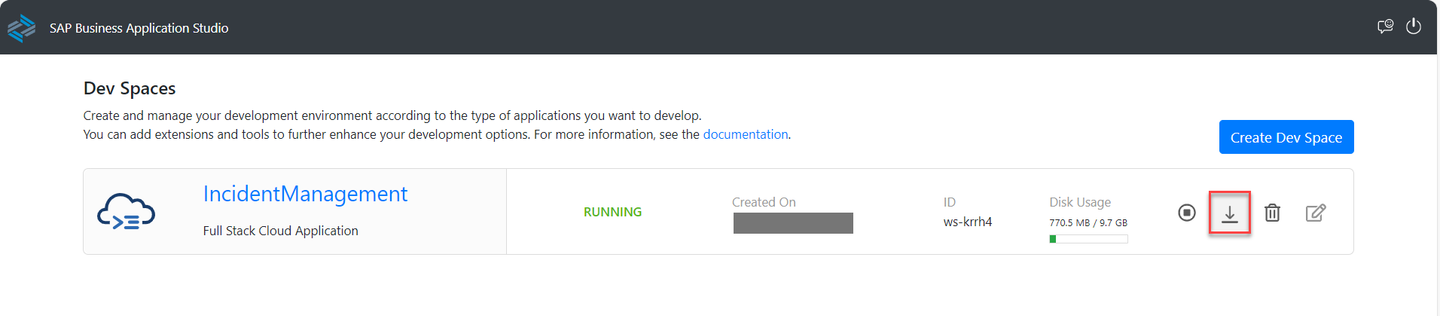
Download dev space content Make sure the IncidentManagement dev space is in status RUNNING.
Extract the incident-management folder from the downloaded archive.
Open a command-line window in the folder where your application resides (for example, incident-management if developed from the start or incidents-app if cloned from GitHub) and run the following command to open the project in VS Code:
Shellcode .
Make sure you’re logged in to your container registry.
In VS Code, choose Terminal → New Terminal and run the following command:
Shellnpm installThis command installs the required dependencies and updates the package-lock.json file of your project.
In your terminal, run the following command:
Shellcds add workzoneProvide a Helm chart:
Shellcds add kymaConfigure
containerize.yamlat the root of your project:Note: Set
BP_NODE_VERSION: "20"to pin Node.js to version 20 LTS. Without it, the Paketo buildpack selects Node.js 26, which requireslibatomic.so.1— a library not present in thepaketobuildpacks/run-jammy-baseruntime image, causing the container to crash on startup.YAML_schema-version: '1.0' repository: <your-dockerhub-username> tag: <image-version> modules: - name: incident-management-srv build-parameters: buildpack: type: nodejs builder: builder-jammy-base path: gen/srv env: BP_NODE_VERSION: "20" - name: incident-management-hana-deployer build-parameters: buildpack: type: nodejs builder: builder-jammy-base path: gen/db env: BP_NODE_VERSION: "20" - name: incident-management-html5-deployer build-parameters: buildpack: type: nodejs builder: builder-jammy-base path: app/html5-deployer env: BP_NODE_VERSION: "20"
Make sure you’re logged in to your container registry.
In VS Code, choose Terminal → New Terminal and run the following command:
Shellnpm installThis command installs the required dependencies and updates the package-lock.json file of your project.
Add configuration for the managed App Router:
Shellcds add workzoneProvide a Helm chart:
Shellcds add kymaProvide your container registry name when prompted.
In the VS Code terminal, navigate to the app/incidents folder and run the following command:
Shellnpm install && npm run build
Run the following command to create a namespace:
Shellkubectl create namespace incident-management kubectl label namespace incident-management istio-injection=enabledMake sure that your SAP HANA Cloud instance is running. Free tier HANA instances are stopped overnight.
Your SAP HANA Cloud service instance is automatically stopped overnight, according to the time zone of the region where the server is located. That means you need to restart your instance every day before you start working with it.
You can either use the SAP BTP cockpit or the terminal in the SAP Business Application Studio to restart the stopped instance:
Shellcf update-service incident-management -c '{"data":{"serviceStopped":false}}'Deploy using the
cds upcommand:Shellcds up -2 k8s --namespace incident-managementYou may be asked to create your Docker imagePullSecret. If so, follow the provided instructions.
The
cds up -2 k8s --namespace incident-managementcommand installs the Helm chart from the chart folder with the release name incident-management in the namespace incident-management.The outcome of the installation looks like this:

Deployed app
In the next tutorial, you can access your UIs from SAP Build Work Zone, standard edition. The SAP Build Work Zone, standard edition triggers the authentication flow to provide the required token to access the service.
Resources
Discussion
Share feedback on this tutorial or join the conversation in SAP Community.