
Create a Content Package with Your UI Integration Card
Create a content package that includes a UI integration card with it's associated role.
Overview
You will learn
- How to create a content package that includes a UI integration card


Prerequisites
Prerequisites
- You’ve created a UI integration card using this tutorial: Create a UI5 Integration Card that Displays Data from the Gateway Demo System. You can decide to skip this tutorial - in this case you will copy and paste the
manifest.jsonfile from this tutorial and insert it in the relevant step below. - You have a subscription to SAP Business Application Studio
- You’ve created a Dev Space in SAP Business Application Studio. For more information, see Create a Dev Space for SAP Fiori Apps
Steps
Intro
A content package is a collection of content items such as cards, roles, pages, and spaces that are bundled together in a ZIP file that can easily be uploaded and used in your site.
In this tutorial, you’ll learn how to create a content package in SAP Business Application Studio. The content package will include a UI integration card as well as the role that the card is assigned to.
In SAP Business Application Studio, stop the dev space if it’s not already stopped.
Click the Edit button.

Image depicting SAP Business Application Studio with configured dev spaces – click on Edit button Ensure that the Development Tools for SAP Build Work Zone extension is checked, and save the changes if necessary.

Image depicting SAP BAS with Development Tools for SAP Build Work Zone extension selected
Start the dev space.
When the dev space is running, select New Project from Template.

New project If you don’t get to the opening screen you can create a new project from template directly from the workspace.

New project When the templates are loaded, scroll down and select the Content Package template, and then click the Start button.

Content package template Enter the project details as follows and then click Finish:
Field Value Project Name cp_erpNamespace nsTitle CPwithUICardSubtitle cpInclude Content Samples True
Project details
A workspace is created for your new project and the structure will look like this:

Edit your content package and add a card, a role, and a Common Data Model descriptor to it
The Common Data Model (CDM) includes business content from various SAP products all integrated in a unified manner in one site. It contains definitions of entities such as roles, spaces, apps, pages, groups, and catalogs and their relationships. For this tutorial we will be using the role and card entities.
Click on the
manifest.jsonfile. Everything needed to render the content package is described in this file. Copy the following code snippet and add it to the manifest.json file:JSON"i18n": "i18n/i18n.properties", "icon": "sap-icon://accept", "title": "{{PACKAGE_TITLE}}", "subTitle": "{{PACKAGE_SUBTITLE}}", "shortTitle": "{{PACKAGE_SHORTTITLE}}", "info": "{{PACKAGE_INFO}}", "description": "{{PACKAGE_DESCRIPTION}}",A content package must contain at least one role as well as the card that it will be assigned to so that it can be deployed to SAP Build Work Zone, standard edition.
We will first add a descriptor (in the Common Data Model format) that describes the content of this content package - in this case the content is the card and the role. We will later add a card and a role to the Content Package. In the
content.jsonfile, replace the existing code with the following code:JSON{ "sample-role1": { "type": "role", "src": { "from": "./demo/src", "content": "role.json" } }, "card-sample": { "type": "card", "src": { "from": "./demo/src", "path": "./", "build": "", "package": "", "manifest": "src/manifest.json" } } }We’ve added a descriptor of the role and card. Now we’ll create the respective card and role files in our content package.
Create a new folder under the workspace by right clicking on the project
cp_erpand select New Folder.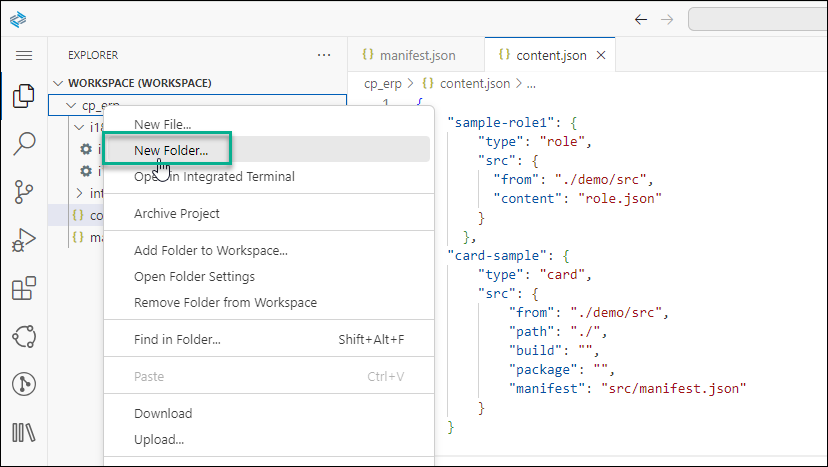
New folder Name the new folder
demo. This folder will contain the necessary role and UI integration card code.Right click on the
demofolder and then select New Folder and name the new foldersrc.
src folder Right click on the
scrfolder and select New File - name itrole.json. This file will contain the role. Do this again and call the second filemanifest.json. Themanifest.jsonfile will contain the code of the card.
Create files Note that this
manifest.jsonfile is for the card. The othermanifest.jsonfile at the bottom of the structure is for the content package.Last, copy the i18n (Internationalization) folder into the
srcfolder, otherwise the build will fail.The folder structure should now look like this:

Demo folder The workspace structure is ready, and now you can populate the json files.
Copy and paste the following code into the
role.jsonfile:JSON{ "_version": "3.2.0", "identification": { "id": "ns.cp_erp_ns.mycontentpackage.sm", "title": "ContentPackageRole", "entityType": "role" }, "payload": { "apps": [ { "id": "ns.products_by_category_card.app" } ] } }Now copy and paste the UI integration card code that you created in this tutorial: Create a UI5 Integration Card that Displays Data from the SAP Gateway Demo System into the
manifest.jsonfile
Note if you chose to skip doing the above tutorial, you can simply copy the code from the end of Step 5. Under Results after Step 5, in the first sentence, there’s a link to the
manifest.jsonfile that you need to copy and paste it here.
As a final step, build the content package as follows:
Right click on the
manifest.jsonfile of the content package and select Content Package: Package to start the build process.
Folder Structure When the build is done, you’ll have a
package.zipfile that you can download as follows. The content package is available in the Downloads folder in your file system.
Download zip file
In the next tutorial you’ll integrate the zip file with the card into your site.
Resources
Discussion
Share feedback on this tutorial or join the conversation in SAP Community.