
Overview
You will learn
- How to define an event on user switching
- How to configure multi-user settings in mobile service admin UI
- How to create an offline enabled MDK application that supports multiple users on the same device


Prerequisites
Prerequisites
- Tutorial: Set Up for the Mobile Development Kit (MDK)
- Install SAP Mobile Services Client on your Android device or iOS
 Android |  iOS |
- Download the latest version of mobile development kit SDK if you want to enable multi-user mode in MDK custom client either from the SAP community trial download or SAP Software Center if you are a SAP Mobile Services customer. This is required you to build a branded client.
Steps
Intro
You may clone an existing metadata project from the MDK Tutorial GitHub repository and start directly with step 3 in this tutorial.
Multiple user mode is designed for enterprise scenarios where, for example, an employee uses a shared device during their shift. They may go offline while working in the field and return the device at the end of their shift. The next day, the employee might use a different device, while the device used previously could be assigned to another user. This is why it is called multiple user mode. In offline scenarios, multiple user mode ensures that the initial user’s data, stored offline, is synchronized with the server before the second user logs in. This process preserves the previous user’s changes to the data.


This step includes creating a mobile project in SAP Build Lobby.
In the SAP Build Lobby, click Create > Create to start the creation process.

SAP Build Lobby Create Button Click the Application tile and choose Next.

Application Tile Selection Select the Mobile category and choose Next.

Mobile Category Selection Select the Mobile Application to develop your mobile project in SAP Business Application Studio and choose Next.

Mobile Application Option Selected Enter the project name
multiuserapp(used for this tutorial) , add a description (optional), and click Review.
Project Name And Description Entry SAP Build recommends the dev space it deems most suitable, and it will automatically create a new one for you if you don’t already have one. If you have other dev spaces of the Mobile Application type, you can select between them. If you want to create a different dev space, go to the Dev Space Manager. See Working in the Dev Space Manager.
Review the inputs under the Summary tab. If everything looks correct, click Create to proceed with creating your project.

Project Summary Review Screen Your project is being created in the Project table of the lobby. The creation of the project may take a few moments. After the project has been created successfully, click the project to open it.

Project Created In Build Lobby The project opens in SAP Business Application Studio.

SAP BAS Workspace Opened When you open the SAP Business Application Studio for the first time, a consent window may appear asking for permission to track your usage. Please review and provide your consent accordingly before proceeding.

SAP BAS Usage Consent Window
The Storyboard provides a graphical view of the application’s runtime resources, external resources, UI of the application, and the connections between them. This allows for a quick understanding of the application’s structure and components.
- Runtime Resources: In the Runtime Resources section, you can see the mobile services application and mobile destination used in the project, with a dotted-line connected to the External Resources.
- External Resources: In the External Resources section, you can see the external services used in the project, with a dotted-line connection to the Runtime Resource or the UI app.
- UI Application: In the UI Applications section, you can see the mobile applications.
Click on + button in the Runtime Resources column to add a mobile services app to your project.

Runtime Resources Add Button This screen will only show up when your CF login session has expired. Use either
CredentialsORSSO Passcodeoption for authentication. After successful signed in to Cloud Foundry, select your Cloud Foundry Organization and Space where you have set up the initial configuration for your MDK app and click Apply.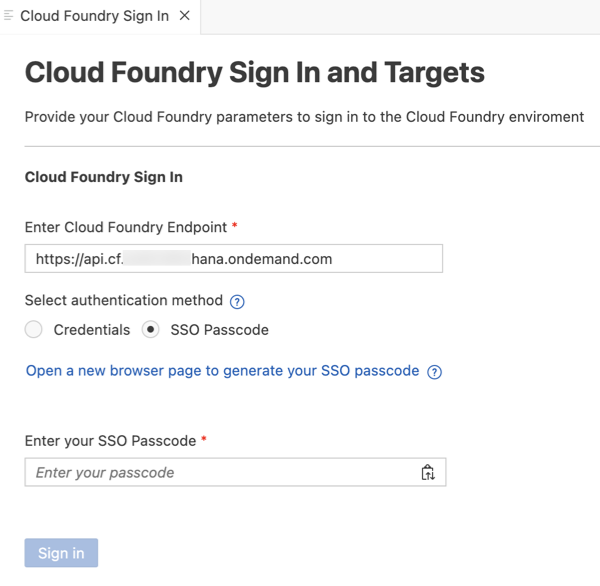
CF Login Credentials Dialog Choose
myapp.mdk.demofrom the applications list in the Mobile Application Services editor.
Mobile Services Application Selection Select
com.sap.edm.sampleservice.v4from the destinations list and click Add App to Project.
Destination Selection Add App To Project You can access the mobile services admin UI by clicking on the Mobile Services option on the right hand side.
In the storyboard window, the app and mobile destination will be added under the Runtime Resources column. The mobile destination will also be added under the External Resources with a dotted-line connection to the Runtime Resource. The External Resource will be used to create the UI application.

Storyboard With Runtime Resources Added Click the + button in the UI application column header to add mobile UI for your project.

UI Application Column Add Button In the Basic Information step, provide the below information and click Next. You will modify the generated project in next step and will deploy it later.
Field Value MDK Template TypeCRUDEnable Auto-Deployment to Mobile Services After Project CreationSelect No
Basic Information CRUD Template Settings The
CRUDtemplate generates the offline or online actions, rules, messages and pages to view, update, and manage records. More details on MDK template is available in help documentation.In the Data Collections step, provide the below information and click Finish. Data Collections step retrieves the entity sets information for the selected destination.
Field Value Enter a path to service (e.g. /sap/opu/odata/sap/SERVICE_NAME)Leave it as it is Select the Service TypeLeave the default value as ODataEnable OfflineIt’s enabled by default Select all data collectionsLeave it as it is What types of data will your application contain?Select CustomersandProducts
Data Collections Step Configuration Regardless of whether you are creating an online or offline application, this step is needed for app to connect to an OData service. When building an MDK Mobile application, it assumes the OData service created and the destination that points to this service is set up in Mobile Services. For MDK Web application, destination is set up in SAP BTP admin UI.
Since you have Enable Offline set to Yes, the generated application will be offline enabled in the MDK Mobile client and will run as online in Web environment.
Data Collections step retrieves the entity sets information for the selected destination.
After clicking Finish, the storyboard is updated displaying the UI component. The MDK project is generated in the project explorer based on your selections.

Storyboard Updated With UI Component
MDK provides an OnUserSwitch event that is called when the user is switched when the client is operating in Multi-User mode. This event is triggered after any pending Offline OData transactions from previous user are successfully synced.
The purpose of the OnUserSwitch event is to inform the application that a user switch has taken place. Upon receiving this event, the application can execute any necessary actions to handle the user switch. At a minimum, this would involve running a Download action to update the offline store with the new user-specific data, while removing the data associated with the previous user.
Since the underlying offline database is shared, it is the responsibility of the application developer to ensure that all necessary steps are taken to reinitialize the application for the new user to continue functioning properly.
Click the Application.app to open it in MDK Application Editor and then and select the link icon for the
OnUserSwitchevent.
Application Editor OnUserSwitch Event Bind it to the
SyncStartedMessage.action.
OnUserSwitch Bound To SyncStartedMessage Action For this tutorial, since we are using the Sample Service, which does not contain any user-specific data, we will simply trigger a sync to demonstrate that the event has been triggered.
Now that the MDK application is created, you will Deploy the Project definitions to Mobile Services to use in the Mobile client.
Switch to the
Application.apptab, click the Deploy option in the editor’s header area, and then choose the deployment target as Mobile Services.
Deploy Option In Application Editor Select deploy target as Mobile Services.

Mobile Services Deploy Target Selected If you want to enable source for debugging the deployed bundle, then choose Yes.

Enable Source For Debugging Prompt You should see Deploy to Mobile Services successfully! message.

Deploy To Mobile Services Success Message
Open SAP Mobile Services UI, click Mobile Applications → Native/MDK → click
myapp.mdk.demoapp.
Mobile Services Native MDK App List Under Assigned Features, click Client Settings.

Client Settings Assigned Features Scroll through the page and enable the Allow Upload of Pending Changes from Previous User (Enable Multiple User Mode) checkbox under the Shared Devices section. This flag ensures that any pending offline changes from previous user are securely uploaded to the OData service. This is especially vital when the previous user has not uploaded the offline changes, and the app is being switched to a new user.

Multi-User Mode Checkbox Enabled As the Multiple user mode is enabled, you must configure Passcode Policy, if not done before.

Passcode Policy Configuration Required Once the passcode policy is set, click Save.
In a Multi-user scenario the client will automatically upload any pending transactions from the previous user before completing the user switch. In order for Mobile Services to perform this upload it needs to get a token for the previous user. To do this XSUAA needs to trust Mobile Services. This is done by importing the Mobile Services key to the Trust Configuration in the BTP subaccount.
In SAP Mobile Services admin UI, click Settings → Security.

Mobile Services Security Settings Click Metadata Download.

Metadata Download Button Define the metadata expiration date up to ten years, or you can accept the one-year default date. Click Download.

Metadata Expiration Date And Download In case the metadata has been expired, end user may encounter an error while switching. You need to re-download the Mobile Services key and import it to the Trust Configuration in the BTP subaccount again.
Save the
SAMLMetadata.xmlfile locally on your machine.Navigate to your sub account on SAP BTP. In the Side navigation bar, click Security → Trust Configuration and click
New SAML Trust Configuration.
BTP Trust Configuration New SAML Entry Click Upload, and select the XML file downloaded in the previous step, as a trusted identity provider. Enter a name, disable the Available for User Login checkbox and then click Save.

SAML Trust Configuration Upload And Save The trusted Identity Provider is not a real identity provider and cannot be used for user login. Disabling the Available for User Login checkbox ensures the identity provider does not appear on the XSUAA login page. For more information, see documentation.
Find out, if the metadata has been established successfully as a trusted provider.
Switch to the SAP Mobile Services UI. Click Settings → Security → Test .

You should see a success message.

If the trust configuration is not established correctly, you may see a message like SAML metadata might not have been imported as trusted identity provider and the multi-user functionality in MDK client will not work.
If you are using SAP Mobile Services Client (public store) to test the multi-user functionality, you can skip this step.
Follow steps 1 to 3 from Build Your Mobile Development Kit Client Using MDK SDK and make sure to set the
MultiUserEnabledproperty totrue.
MultiUserEnabled Property Set To True Create your MDK client either using MDK SDK by following the step 4 from Build Your Mobile Development Kit Client Using MDK SDK tutorial OR using SAP Cloud Build Service by following Build Your Mobile Development Kit Client Using Cloud Build Service tutorial.
Choose an option above based on whether you are testing multi-user functionality in the SAP Mobile Services Client (public store) or in a branded client built using MDK SDK or Cloud Build service.
For an existing single user app it is required to reset the client and re-login before multi-user capability can be enabled.
Switch to the SAP Business Application Studio UI. SAP Business Application Studio has a feature to display the QR code for onboarding in the Mobile client. Open the
Application.appand click the Application QR Code icon in the editor’s header area.
Application QR Code Icon In Editor The Onboarding QR code is now displayed. You will notice that the
multiUserparameter in the generated QR code is set to true. This is due to the flag Allow Upload of Pending Changes from Previous User being set in step 3 mobile services admin UI. The MDK client will set the user mode based on the scanned QR code.
Onboarding QR Code With multiUser Enabled Alternatively, you can scan the QR code generated under APIs > In-app Scanning Code in the mobile services admin UI.
Make sure you have downloaded the SAP Mobile Services Client on your device from the App Store or Google Play as covered in the pre-requisites.
Onboard to the application. If you are using an Android device, follow these steps or if you are using an iOS device, follow these steps.
For an existing single user app it is required to rebuild the client with above mentioned setting if the client doesn’t allow scanning a QR to onboard. Once the client on a device is updated the user will have to reset the client and re-login before multi-user capability can be enabled.
Follow step 4 from Build Your Mobile Development Kit Client Using MDK SDK to run and on-board your branded client on your device.
Ensure that you choose the correct device platform tab above.
After accepting the app update, you will see a list of entities on the Main page, along with a user menu that includes options such as syncing changes, accessing support, checking for updates, and resetting the app. An offline store will be initialized. By tapping any entity, you will navigate to a list page. If you select one of the items, the detail page will be displayed, allowing you to create, update, or delete the record. This record will be saved to the offline request queue database. You can navigate back to the main page and press the Sync Changes option in the user menu to upload any local changes to the backend. Once the upload is successful, the app will also download data from the backend to the offline store, ensuring both sides have the same dataset.

Android Main Page Entity List Make any change in your app. For example, tap Customers → tap any record → edit and save the changes.

Android Customer Record Edit Changes Navigate back to the main page. The logged in user should ideally sync the local changes before logging out. Let’s assume that user has forgotten to sync the changes and has logged out from the app. Tap on the Logout option in the user menu on the main page.

Android User Menu Logout Option In the Sign-In screen, tap on the Switch or add user option.
Sign-In Screen Switch Or Add User This screen also appears when you send the app in the background and bring it in foreground or swipe to close and relaunch it.
When switching users, the device needs to be connected to the network. Click on the highlighted icon to add a new user.
Add New User Icon Highlighted Ensure all users being onboarded have access to the BTP account. You can configure this in the users section under security on your SAP BTP sub-account.
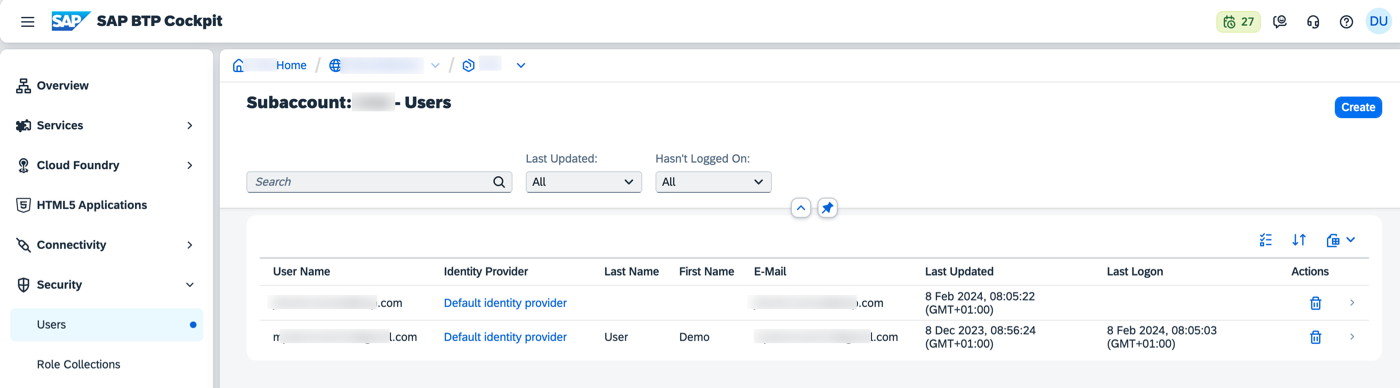
BTP Sub-Account User Access Settings Follow the onboarding flow for the second user. To protect your data from being accessed by another user, do not use the same passcode.
After confirming the passcode screen, you will notice a Sync in Progress screen. This ensures that any local changes made by the previous user are not lost if they forgot to upload their work at the end of the shift and the device is picked up by another user.

Sync In Progress Screen Android After a successful sync, the
OnUserSwitchevent has triggered.
OnUserSwitch Event Triggered Android Android Main Page After User Switch Navigate to the customer record when previous user made changes. You should notice the updated data.
Ensure that you choose the correct device platform tab above.
After accepting the app update, you will see a list of entities on the Main page, along with a user menu that includes options such as syncing changes, accessing support, checking for updates, and resetting the app. An offline store will be initialized. By tapping any entity, you will navigate to a list page. If you select one of the items, the detail page will be displayed, allowing you to create, update, or delete the record. This record will be saved to the offline request queue database. You can navigate back to the main page and press the Sync Changes option in the user menu to upload any local changes to the backend. Once the upload is successful, the app will also download data from the backend to the offline store, ensuring both sides have the same dataset.

iOS Main Page Entity List Make any change in your app. For example, tap Customers → tap any record → edit and save the changes.

iOS Customer Record Edit Changes Navigate back to the main page. The logged in user should ideally sync the local changes before logging out. Let’s assume that user has forgotten to sync the changes and has logged out from the app. Tap on the Logout option in the user menu on the main page.

iOS User Menu Logout Option In the Sign-In screen, tap on the Switch or add user option.

iOS Sign-In Switch Or Add User This screen also appears when you send the app in the background and bring it in foreground or swipe to close and relaunch it.
When switching users, the device needs to be connected to the network. Click on the highlighted icon to add a new user.

iOS Add New User Icon Highlighted Ensure all users being onboarded have access to the BTP account. You can configure this in the users section under security on your SAP BTP sub-account.
BTP Sub-Account User Access Settings Follow the onboarding flow for the second user. To protect your data from being accessed by another user, do not use the same passcode.
After confirming the passcode screen, you will notice a Sync in Progress screen. This ensures that any local changes made by the previous user are not lost if they forgot to upload their work at the end of the shift and the device is picked up by another user.

iOS Sync In Progress Screen After a successful sync, the
OnUserSwitchevent has triggered.
iOS OnUserSwitch Event Triggered iOS Main Page After User Switch Navigate to the customer record when previous user made changes. You should notice the updated data.
You have learned how to enable an mobile development kit Client to support multi-user login capability. This means a mobile development kit Client app on a device can now securely be shared across multiple users. Features such as adding a new user, switching between user sessions, searching for a particular user are supported by the client. Find more information about Multi User in MDK in help documentation.
Resources
Discussion
Share feedback on this tutorial or join the conversation in SAP Community.