
Reconfigure Trust Relationships on SAP HANA XS Systems
Reconfigure a SAML trust relationship on your SAP HANA XS database system from the file system to the in-memory store.
Overview
You will learn
- How to register the service provider and the identity provider certificates in the SAP HANA in-memory store
- How to reconfigure the trust relationship between your identity provider and your SAP HANA database system


Prerequisites
Prerequisites
- You have installed an SAP HANA XS system in the SAP BTP, Neo environment that you’d like to convert to an SAP HANA MDC system. For more information, see SAP Note 2960608.
- You have configured a trust relationship between your identity provider and your SAP HANA XS system using SAML on the file system.
- You have access to your identity provider and the required roles to configure SAML trust relationships.
- You have installed openSSL or another certification tool.
Steps
Intro
This tutorial assumes that you want to convert your SAP HANA XS system to an MDC system and, therefore, want to reconfigure your SAML setup to prepare for the conversion. For more information, see SAP Note 2960608.
It also assumes that you have already configured a trust relationship between your SAP HANA database system and your identity provider. If you do not use SAML-based authentication, you can ignore this tutorial.
When you configured the SAML trust relationship, the setup consisted of the following steps:

The service provider certificates were automatically created during the installation of the SAP HANA database and stored in the file system (in the sapsrv.pse file).
TIP: The public certificate stored in the file system can be viewed in the Trust Manager tab of the XS Admin Tool.
You configured a trust relationship to the SAP HANA system to an identity provider by exporting the service metadata and registering it in the identity provider.
You configured a trust relationship to the identity provider in the SAP HANA system, by exporting the identity provider SAML metadata and importing it into the SAP HANA system.
You configured the application for SAML authentication.
Converting your SAP HANA XS system to an SAP HANA MDC system now requires you to reconfigure the SAML trust relationship to store the certificates in the in-memory store. To do so, you will have to repeat some of the already completed steps:

You will regenerate the service provider certificates (step 2).
You store the service provider and the identity provider certificates in the in-memory store of the SAP HANA system (steps 3-6).
You will reconfigure the trust relationship in the identity provider based on the updated service provider certificates (step 7).
But before we start, we have to make sure that your database user has been assigned the required roles.
Open the SAP HANA Web-based Development Workbench on the SAP HANA XS system.
You can do so by appending
/sap/hana/ideto the URL of the database system, or you can access it from the SAP BTP cockpit.
Accessing the Web-based Development Workbench Go to Security and open your database user.
Check that the user has been assigned at least the following roles:
sap.hana.security.base.roles::HANACertificateAdminsap.hana.security.cockpit.roles::DisplayCertificateStoresap.hana.security.cockpit.roles::EditCertificateStoresap.hana.security.cockpit.roles::MaintainCertificateCollectionssap.hana.security.cockpit.roles::MaintainCertificatessap.hana.xs.admin.roles::SAMLAdministratorsap.hana.xs.admin.roles::TrustStoreAdministrator
For more information on how to create database user and assign roles on SAP HANA XS database systems, see Create a Database Administration User for SAP HANA XS Databases.
When you initially established trust, the service provider certificates had been automatically created and stored in the file system. You now have to re-create these certificates to store them in the in-memory store. The SAP HANA database system uses the service provider certificates to sign SAML documents that are exchanged with the identity provider.
In this example, we’ll use a self-signed certificate that we create via openSSL, but for productive scenarios, we recommend using only a trusted certificate signed by an official authority. Additionally, we only use example parameters in the command below. Do not use these parameters in productive scenarios, and align them with your Security Office.
To create a self-signed certificate using openSSL, run the following command in a command line shell:
openssl req -x509 -sha256 -newkey rsa:2048 -keyout certificate.key -out certificate.crt -days 1024 -nodes -subj "//CN=example"You have now generated your service provider certificate consisting of the following two files:
certificate.key - the private key
certificate.crt - the public key
Create the certificate collection in which you will store the service provider and the identity provider certificates.
What is a certificate collection?
A certificate collection (also referred to as a personal security environment or PSE) is a secure location where the public information (public-key certificates) and private information (private keys) of the SAP HANA server are stored. A certificate collection may also contain the public information (public-key certificates) of trusted communication partners or root certificates from trusted Certification Authorities. For more information, see Certificate Collections.
Open the SAP HANA cockpit on your SAP HANA XS database system.
You can do so by appending
/sap/hana/admin/cockpitto the URL of the database system, or you can access it from the SAP BTP cockpit.
Accessing the SAP HANA cockpit Open the Configure Certificate Collections application.

Accessing the Certificate Collections application Create a new collection. To do so, choose + and enter a name for the collection.

Create a certificate collection Edit the collection and set its purpose to SAML.

Set the collection purpose to SAML
You have now created a PSE store that we’ll use to store the “own” certificate and the identity provider certificate.
Prepare the upload of the service provider certificates by copying the values from the files you previously created into a new file:
Copy the values between the Begin/End Certificate tags from the certificate.crt file.
Copy the values between the Begin/End Private RSA Key tags from the certificate.key file.
Code-----BEGIN CERTIFICATE----- MIIDBTCCAe2gAwIBAgIUMQ0cJjTV5k0UAWqTSPN92LcqBbwwDQYJKoZIhvcNAQEL BQAwEjEQMA4GA1UEAwwHZXhhbXBsZTAeFw0yMDEwMDUxNDM3MDlaFw0yMzA3MjYx NDM3MDlaMBIxEDAOBgNVBAMMB2V4YW1wbGUwggEiMA0GCSqGSIb3DQEBAQUAA4IB DwAwggEKAoIBAQDTJwrq4VZsvPbWg5xQTqU3SloIziYQY9KSOKQ+KbBs+Fl3nWx5 nHeXDLxi3KH5fn5QVY/3s0V60PrVF3lhCa9QvRRytDWCYBAoGstuAMLlyu6NE6rR 5i6GPNC5hvEhWaGDmCWG+ZJx9xinNDBox1jmbjRBuL/taDLqmdRGJGi9WxbtWgAG 3TFXbiEX0apf/35oGtM8R57PTSn3F0TztdHCK37sH3azFYUTv1OMhv9UXpcXV26+ QF0ISjlX+oIJ2kTUcnan7XmxB8f0/VfX4/WPWiHtrqaC8QORGfksn+nLnVttHaam zrXuYpf7Io7K00kbGkSqywK8+eiSdrjoIBvnAgMBAAGjUzBRMB0GA1UdDgQWBBSY t74eEI/jXeG89jagMaF8bDji5DAfBgNVHSMEGDAWgBSYt74eEI/jXeG89jagMaF8 bDji5DAPBgNVHRMBAf8EBTADAQH/MA0GCSqGSIb3DQEBCwUAA4IBAQA32/k3Q3BH rf8jEai/Hl+P3LEZcIvZjq/1I3dZjTrMKUEeFLC0HCHdbHxmOj4woHaF8yyq8Kas hxfEvPV6as2oYzZP/zjp3Os0rAWSgd3Gkc/a2FTWY86VDA/Co11prz3KGxM9zNiP KXu+b1KTTboqisbKPbkWgfRcq2CCKDWq8z9WbVK2GmLRvKwuTpQd4qEVkmk+BNKx mXcLxR71tjaYH9qT343peLuQH621plBewlErVpf4F298QcBae9tRmWpKgIZHfLGv 4+jh3/DgB9orHIMlh+nVN6P3JiMWk8gUTEpYBStPZlBqJZdtgd4kvi6j+1x7oxxN QKshzGHvi3y4 -----END CERTIFICATE----- -----BEGIN RSA PRIVATE KEY----- MIIEvgIBADANBgkqhkiG9w0BAQEFAASCBKgwggSkAgEAAoIBAQDTJwrq4VZsvPbW g5xQTqU3SloIziYQY9KSOKQ+KbBs+Fl3nWx5nHeXDLxi3KH5fn5QVY/3s0V60PrV F3lhCa9QvRRytDWCYBAoGstuAMLlyu6NE6rR5i6GPNC5hvEhWaGDmCWG+ZJx9xin NDBox1jmbjRBuL/taDLqmdRGJGi9WxbtWgAG3TFXbiEX0apf/35oGtM8R57PTSn3 F0TztdHCK37sH3azFYUTv1OMhv9UXpcXV26+QF0ISjlX+oIJ2kTUcnan7XmxB8f0 /VfX4/WPWiHtrqaC8QORGfksn+nLnVttHaamzrXuYpf7Io7K00kbGkSqywK8+eiS drjoIBvnAgMBAAECggEBAJThRXhhU++tuRl9iLyzBxkaCquEtx/9Ul6ZI21VNblP zr1hOTfyE/xkFXxbdrWU8/kuqykKtSWorgOL3qCGFKAIAZ/y4nu/wgSVB/TTApjF 4jeEs3/2Hb22qbD2rZRHP3Oq1mL6G8DRageS68MlM9CdyajBXEpHmwcBWcPvLg68 Hzf3WnjvXLFiShsmiY/MZddUZLwl14pZcNnq9SLqNE9MKWYq46sH4vDl+WizrRRV xPdlTNrhMa5iZNJe+n4rTHUKmXtij8bImMOYcEq+3RG9gPY0l317Yyo/C7XSvBq9 UujVxnT/erJDsHFtW6BvgqwA6MNzPiK5BhRfr662mGECgYEA/Ukjg4z+VojNtpcA 3vlNyHU0xioxgFtxTyP9mGi/YLaRZvOW0Oo8L8+1yVRdmIiPL6LfSFDJ8n+NxSfL Eg2OsBSFGlrXIavEyFIPH8wT1xmR3BwXAS4oVLtAU2e3IXzoCVIdaKkQLIJZgVSo UOlZN1Bqmofr4oAEGJiZV5tgzfcCgYEA1WpQ8WzCFlpblt2Nawe6GEZrSISUT9Xi bgFJ6S9UEpnzaAoPlmDNxtUWVIbskUheLMvI1ukJ31ksp8AwV1qJwlH8Em+OpSFr cYQ+PARwNIc9yjMiBXCDNQoaTNR623Tupqxj32sWqfziJ5dTmup5HbMy3uziQLg4 RZsK6dT/ZZECgYBBktjd6vfB4YMYnXl9QJ/xoN5721qbd5EbQx8ZgSzi1gFI3RGT nsDcQ/M1X2En51rio1EZQMk3vewvOcEqOFZTocxf6Vq+/eBhWFVQDx6n1pfbm24d QRzx6tSZg0V3JwZPu3Gfsf1c+JZBlHBLGk6dsnUW8s+QAUKON5ujgbeLOwKBgQCN MdSxlbHnFgroilYIzMjrTJOoG8b/9tLi0slylFR8Jgyq9ZUQeaVK+inW7JlRGV7t JjoPLYjRku7/YSDaelUQEivCiroGOFEcflCqZolRx3Qy9Zd5n9G+4ps5344U6Y0H CqDc7L3G4z9A0FaI9L4Cz09Fu9WI2hiovIYA5GHAcQKBgFeemWeiwFPWfN0unQiI lFP3z7gjdvOugpzsj7s3bvbTudx4RYPiWe77XGO1WUnh0CiasvF0kn92/0e29VS5 RFGWslZ38oZPWdZSqHB7KrbWLJ5O2RAtllEoIgEkaSQ2MRub50MYxt2+W5TAkdBH S9gO7JxUfif8owON4XCu2KXw -----END RSA PRIVATE KEY-----In the newly created certificate collection, choose Set Own Certificate.
Select Paste Content and paste the prepared content into the text field.

Paste Content Choose OK.
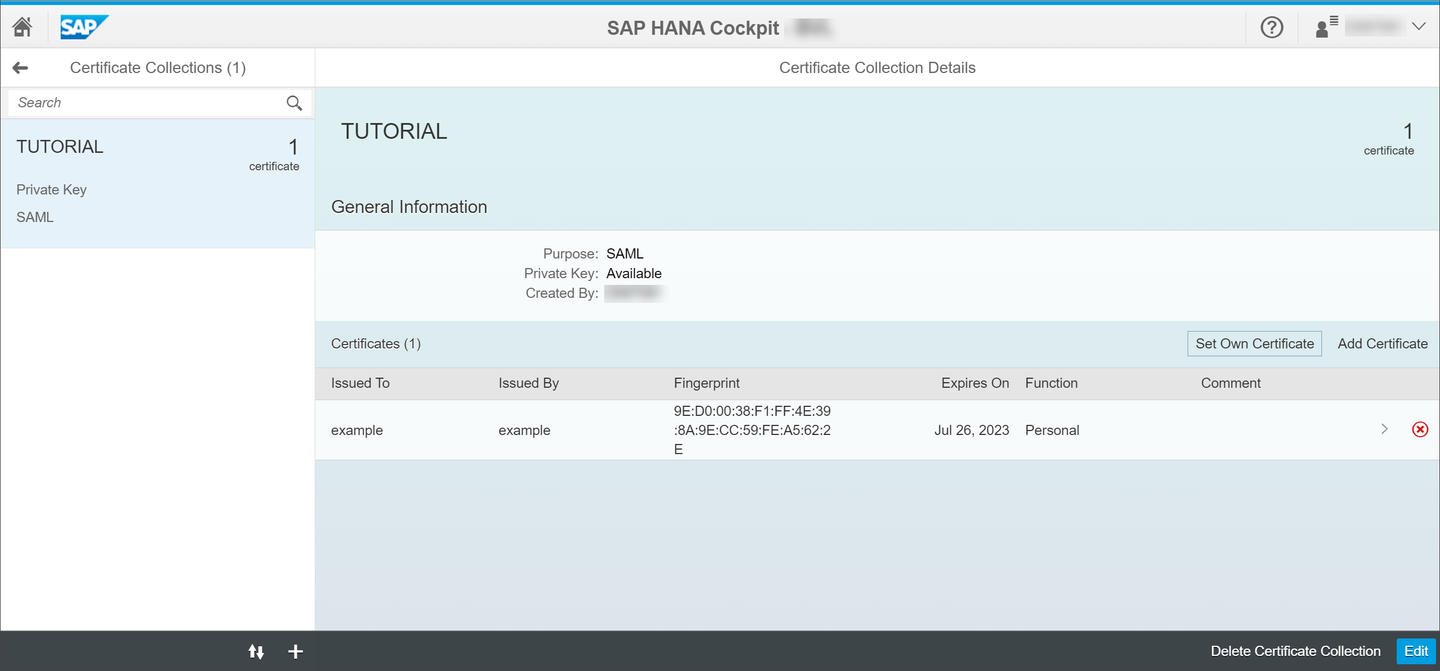
Successful Upload You have now uploaded the own certificate into your certificate collection.
In this example, we’ll use SAP Identity Authentication service as an identity provider, but you complete this step with your own identity provider.
To download the metadata from the IDP provider, we’ll do the following:
In the SAP Identity Authentication Administration console, go to Tenant Settings > SAML 2.0 Configuration. At the bottom of the page, you find the signing certificate.
Copy the certificate from the Insert as Text field.

Copy the IDP certificate Paste it into a local text file.
Add the BEGIN and END tags to the SAML certificate.
Code-----BEGIN CERTIFICATE----- MIIDIjCCAgqgAwIBAQIGAUjG8PFJMA0GCSqGSIb3DQEBBQUAMFAxCzAJBgNVB... -----END CERTIFICATE-----
In the SAP HANA cockpit, open the Certificate Store application.

Open the certificate store application Choose Import.
Select Paste Content and paste the prepared content into the text field.
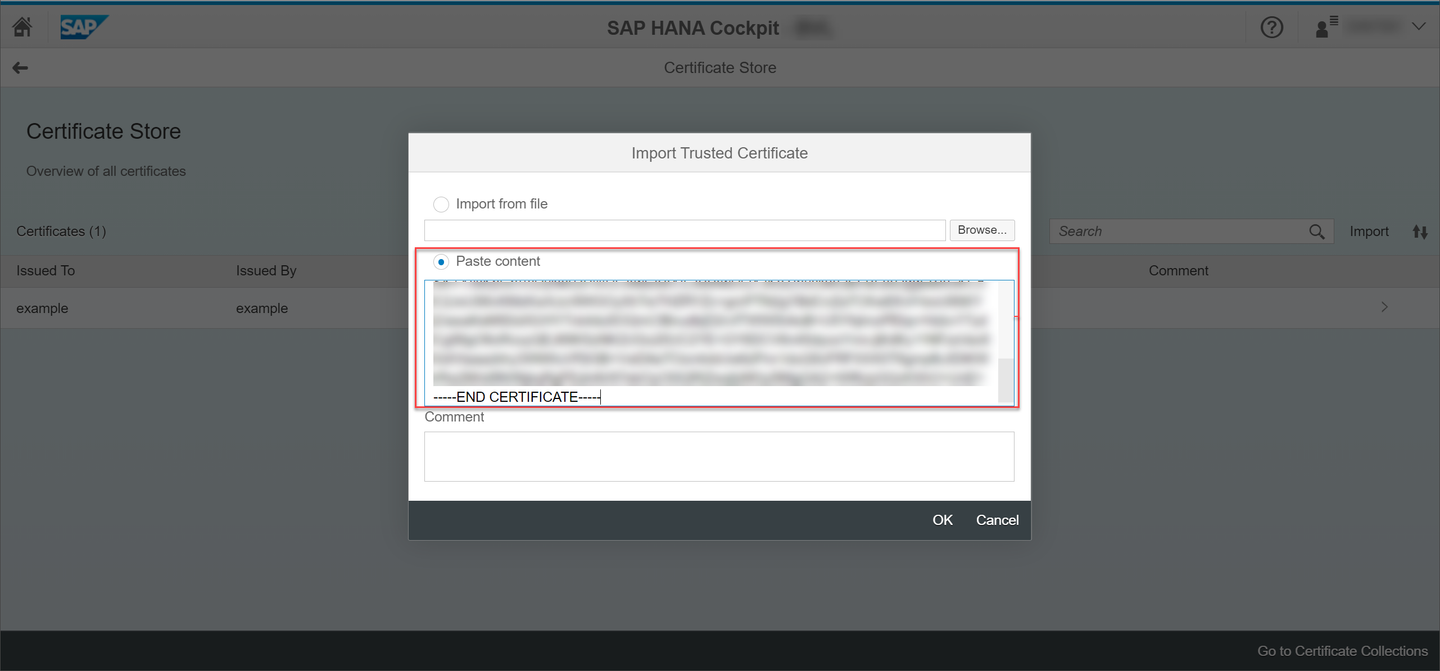
Paste Content Choose OK.

Paste Content You have now uploaded the own certificate into your certificate collection, but as you can see, it hasn’t been assigned to a certificate collection yet.
Go back to the Certificate Collections application.
In the collection you’ve created previously, choose Add Certificate.
Select the identity provider certificate and choose OK.

Assign the IDP certificate to the collection
You have now added the identity provider certificate to the certificate collection as **Trust** validation.
To make your identity provider trust your SAP HANA database system again as the service provider, we’ll export the certificate from the SAP HANA system and register it as the service provider in the identity provider.
In this example, we’ll use SAP Identity Authentication service as an identity provider, but you complete this step with your own identity provider.
Open the XS Admin Tool on your SAP HANA database system.
You can do so by appending
/sap/hana/xs/admin/#samlspto the URL of the database system.From the Metadata tab of the SAML Service Provider tab, copy the complete XML content into a local file.
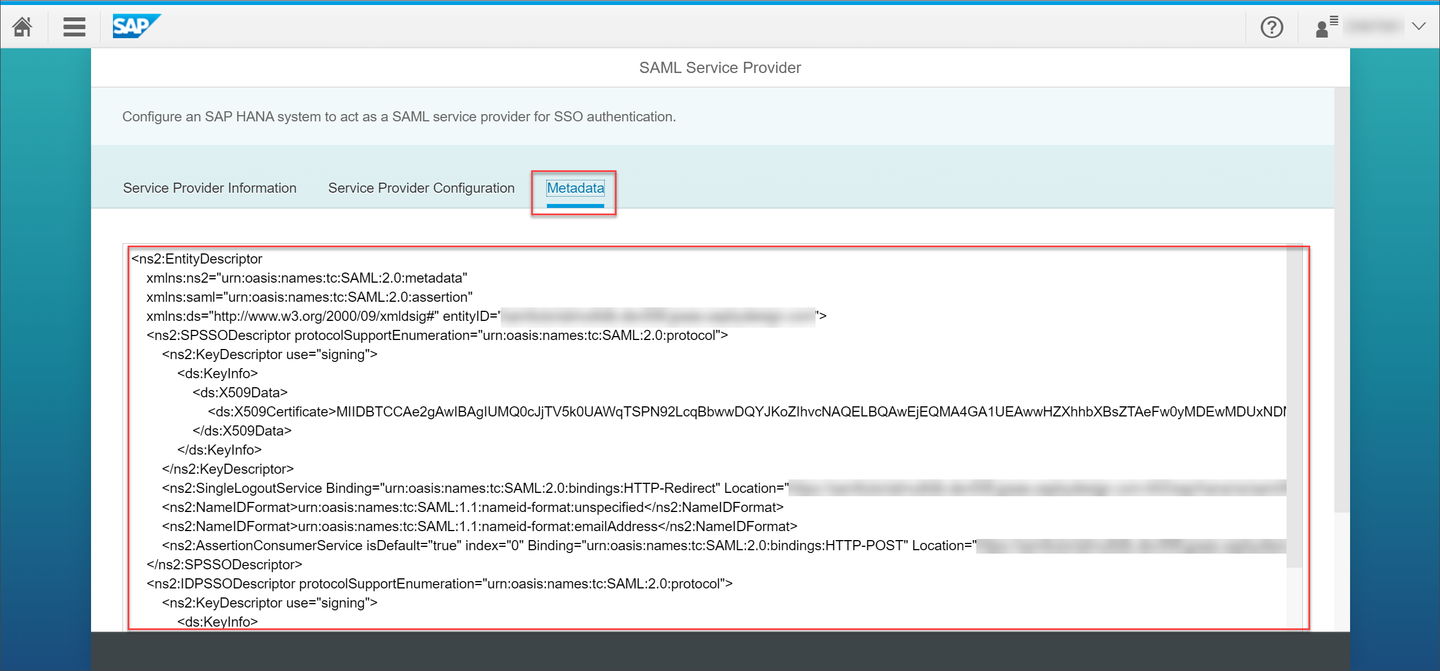
Save the metadata as XML Save it with the ending
.xml.You have no exported the service provider metadata from the SAP HANA system.
Register the service provider metadata in your identity provider.
In this example, in the SAP Identity Authentication administration console, we’ll do the following:
Choose Applications and open your application.
Choose SAML 2.0 Configuration.
In the Define from Metadata section, choose Browse….
Select the file you previously downloaded from the SAP HANA system.
Choose Save.
Your certificates are now stored in the in-memory store and you have reconfigured the SAML trust relationship between the SAP HANA XS database system and the identity provider.
Resources
Discussion
Share feedback on this tutorial or join the conversation in SAP Community.