
Overview
You will learn
- How to create system tests with UIVeri5 using the UI5 Test Recorder
- How to create a CI/CD pipeline with project “Piper”
- How to add system tests as automated steps to your CI/CD pipeline


Prerequisites
Prerequisites
- You use SAPUI5 in version 1.74 or higher.
- You have installed Node JS in version 8.0 or higher.
- You have installed Visual Studio Code.
- You have installed UIVeri5 using the following command:
npm install @ui5/uiveri5 -g- You have installed Yeoman and generator-easy-ui5 using the following command:
npm install -g yo generator-easy-ui5- Your Google Chrome version is up to date. See Update Google Chrome.
- You have a Jenkins instance that is preconfigured for using project “Piper”. See Configuration.
- You have an account and a repository in GitHub.
Steps
Note
Please note that UIVeri5 is deprecated and will be removed or replaced soon. Even though existing tests will continue to work, we recommend that you remove the deprecated configurations. For more details, see GitHub.
What Is This Tutorial About?
In this tutorial, you’ll create and run automated system tests with UIVeri5 against a simple shopping app for electronic devices. Your test application has basic functions such as a product catalog sorted by categories, a search option, and an add to cart function.
Intro
The tutorial consists of three main stages:

Set up your project and manually go through your test scenario before starting to code it.
Create and run system tests with UIVeri5 to check the home screen of your application, its product search, and the navigation to a product.
Automate your system tests by integrating them into a CI/CD pipeline.
About System Tests with UIVeri5
UIVeri5 is an SAP open-source JavaScript testing framework for SAPUI5 applications. It drives a real browser for your deployed app and simulates authentic user scenarios. System tests check both front-end and back-end and make sure that all pieces of an application work well together.
The following graphic shows the positioning of system tests with UIVeri5 compared to other testing methods and tools. The arrow shape illustrates the granularity of the methods: Compared to unit, component, or integration tests, system tests examine less details and focus on crucial workflows, instead.

For more information about testing with UIVeri5, have a look at these blogs:
About the SAPUI5 Test Recorder
The SAPUI5 Test Recorder is a tool that helps you create integration and system tests. You can use it in any SAPUI5 application to inspect its user interface, view the control properties, and get code snippets for OPA5 and UIVeri5 tests. As of version 1.74, it is part of the SAPUI5 framework.
For more information about the SAPUI5 Test Recorder, see Test Recorder.
About the Yeoman Generator for UIVeri5
Yeoman is a popular open-source command-line tool to create a scaffolding for either a complete project or parts of it. As of version 2.3.0., the UIVeri5 Yeoman generator is a sub-generator of the project generator-easy-ui5. It helps you kickstart your test suite and quickly write new tests with your own action and assertion logic for scenarios that are relevant for your use case.
For more information, see Yeoman generators for OPA5 and UIVeri5.
About CI/CD with Project “Piper”
Project “Piper” is one of SAP’s solutions for continuous integration and delivery. It provides pre-configured Jenkins pipelines, which you can use in your own Jenkins master infrastructure and adapt according your needs. Project “Piper” consists of two different parts:
- A shared library, which contains the description of steps, scenarios, and utilities that are required to use Jenkins pipelines
- A set of Docker images that can be used to implement best practice processes
For more information about SAP solutions for CI/CD, see:
In Visual Studio Code, set up your UIVeri5 test project.
In Visual Studio Code, open a new terminal.
Navigate to the folder to which you want to add your UIVeri5 project.
Use the following command to call the generator for UIVeri5 tests:
Shell/Bashyo easy-ui5 project uiveri5Now, you’re asked a couple of questions that help the generator create your test structure.
Answer the questions as follows:
Question Answer Please enter the name of your project uiveri5URL to the app under test https://sapui5.hana.ondemand.com/test-resources/sap/m/demokit/cart/webapp/index.htmlChoose authentication noneChoose additional reporters JUNITDo you want to add a page object YDo you want to add a spec YPage object name HomeAdd action with name Press Enter to skip Add assertion with name Press Enter to skip Name for the suite (describe block) techedName for the spec (it block) Should validate the home screenPress Enter. Now, your project structure is generated.
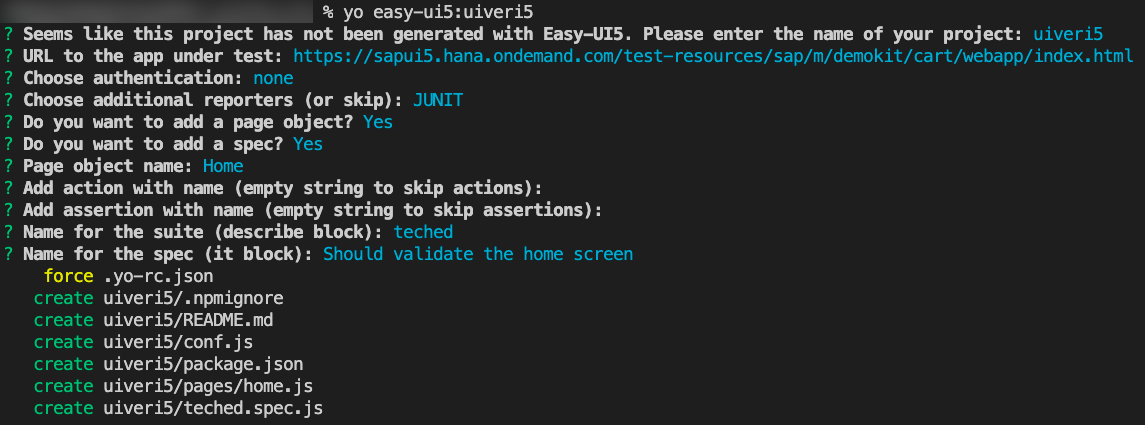
Questions for generating the project structure In Visual Studio Code, open the folder
uiveri5. As a result, the projectuiveri5is loaded into the EXPLORER pane and you can see its resources in the outline:
Resources in the EXPLORER pane Like all system tests with UIVeri5, you’ll define your tests through different files:
(a) The
conf.jsfile:In this file, you can define, for example, the browser and reporter that are used, the base URL, and the credentials for your login dialog.
(b) The
spec.jsfile (in this case, it’s calledteched.spec.js):In this file, you’ll define your test scenario, which comprises steps that are triggered one after the other. Within the test scenario, you’ll refer to your page objects.
(c) Page objects (in this case, you have
home.jsfor the home screen andproduct.jsfor the detail view of a product):Page objects are design patterns that represent a significant part of an app, for example, a view. They group two kinds of elements:
- Actions, for example, entering a specific text in a search field and triggering the search
- Assertions, for example, getting a search result that matches the previously entered text
Page objects use locators to identify specific elements on the screen. Thereby, they allow test runners to see and do anything a real user would. Page objects reside in the
pagesfolder of your project.If you want to set up a project for an application that is protected by credentials, you need to add authentication configurations. See Authentication.
To check if the test execution works, choose Terminal → New Terminal in the root folder of your project, and enter the following command:
Shell/BashuiVeri5As a result, the browser briefly opens to execute the tests. However, as you haven’t defined any tests, yet, the application doesn’t load.
In the terminal response, check if the test execution has been successful:

Terminal Response: Successful
Manually, familiarize yourself with your test scenario before starting to code it. Later, you’ll automate the following steps so that they are automatically executed during your system tests.
In Google Chrome, use the following URL to access the home screen of your shopping application:
Codehttps://sapui5.hana.ondemand.com/test-resources/sap/m/demokit/cart/webapp/index.htmlCheck how many product categories are shown in the Product Catalog:

Product Categories in the Product Catalog In the Product Catalog, search for
Watchand check if the displayed results match your request: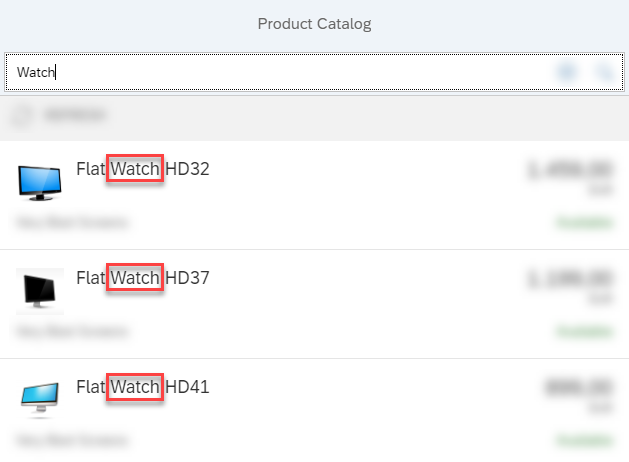
Comparison between Search Term and Search Result Choose Flat Watch HD32 and check if the product appears in the detailed view:

Detail View of Flat Watch HD32 Check if at the bottom right of the detailed view, there is an Add to Cart button:
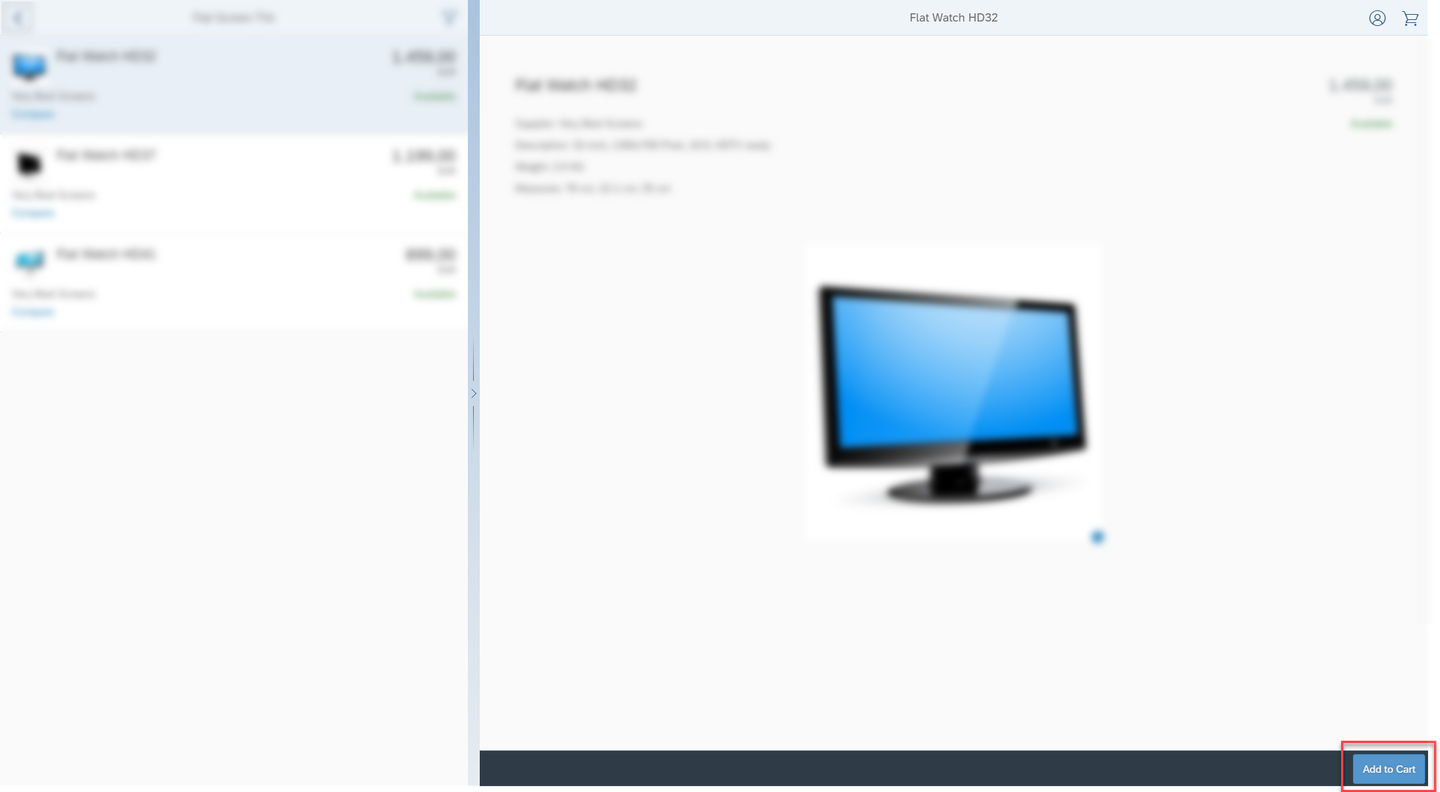
Add to Cart Button
Implement a test that checks if in the product catalog on the home screen of your application, all categories are shown. To verify this, the expected number of product categories are compared with the displayed ones.
From the EXPLORER pane in Visual Studio Code, open
teched.spec.js.In this file, you’ll define the steps of your test scenario and within them, refer to your page objects.
Implement the
itfunction by adding the skeleton of the home screen test:Codeit("Should validate the home screen", function () { });Your code should now look as follows:

Skeleton of Home Screen Test To specify what you want to check, add the following line to the test skeleton:
CodeThen.onTheHomePage.iShouldSeeAllCategories();iShouldSeeAllCategoriesis a reference to the test function that you’ll define in the following.Now, your first test scenario is complete. Make sure that it looks as follows and choose File → Save.

First Scenario of Home Screen Test From the EXPLORER pane, open
pages→home.js.This file represents the page object for your home screen. In page objects, you can define actions that are performed during a test and make assertions. In this specific case, however, you won’t implement an action that is executed during the test but only check the home screen. Therefore, leave the
actionsfunction empty and only make assertions: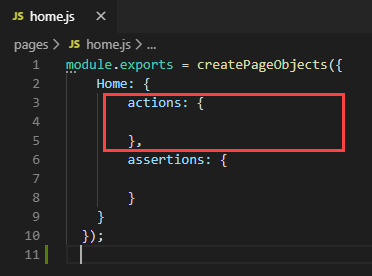
Empty Actions Section in Home Screen Test In the Shopping Cart application in Google Chrome, press CTRL + SHIFT + ALT + T (if you use a Windows system) or SHIFT + CTRL + OPTION + T (if you use a Mac system) to open the Test Recorder in a new browser window.
In your sample application, right-click the first entry of the Categories list and choose Highlight. As a result, the Test Recorder highlights the entry to indicate its activity:

Highlighting of First Category Now, the Test Recorder provides a code snippet for your test:
Please make sure that the dialect UIVeri5 is selected.

Code Snippet for List Item Copy this code snippet into the assertions section of your
home.jspage object.To identify all elements, remove the
bindingPathandinteraction: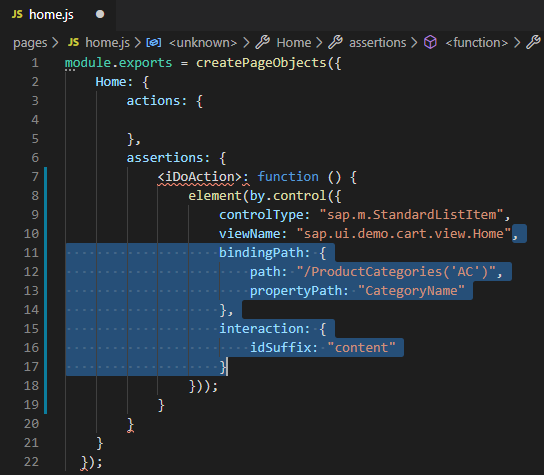
Remove Binding Path and Interaction Add a suitable name for your assertion and the following code snippets:

Add Name and Additional Code Snippets for iShouldSeeAllCategories Now, the page object for your home screen is ready. Make sure that your code looks as follows and choose File → Save.

Page Object for Home Screen Test To run the test, execute the following command in the terminal:
uiveri5As a result, the browser opens and the home screen is loaded.
In the terminal response, check if the test has been passed successfully:
Status: Passed
Implement a test that checks if when you search for a product, the search results are displayed accordingly. To verify this, the entered search term is compared with the search result.
From the EXPLORER pane in Visual Studio Code, open
teched.spec.js.Into the
describefunction, add the skeleton of the product search test:Codeit("Should search for a product", function () { });Your code should now look as follows:
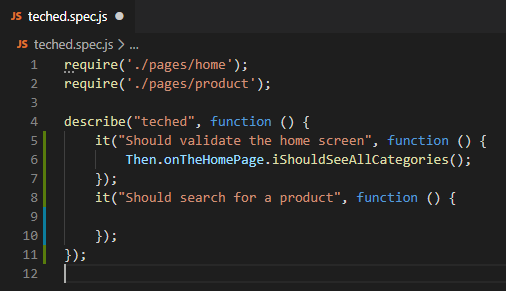
Skeleton of Product Search Test Within the test skeleton, add the following interaction, which will be defined later:
CodeWhen.onTheHomePage.iSearchForProduct();Then, add the expected behavior, namely that the product list is filtered:
CodeThen.onTheHomePage.theProductListShouldBeFiltered();Now, your test is complete. Make sure that it looks as follows and choose File → Save.
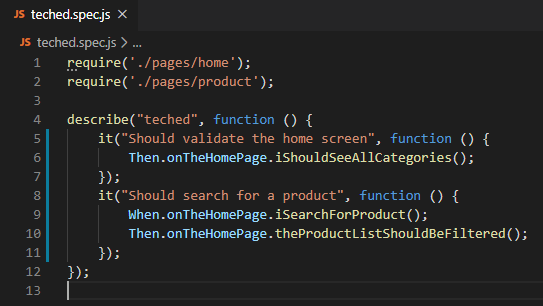
Product Search Test From the EXPLORER pane, open
pages→home.js.In the Shopping Cart application in Google Chrome, press CTRL + SHIFT + ALT + T (if you use a Windows system) or SHIFT + CTRL + OPTION + T (if you use a Mac system) to open the Test Recorder in a new browser window.
In your sample application, right-click the search field and choose Enter Text. As a result, the Test Recorder highlights the search field to indicate its activity:
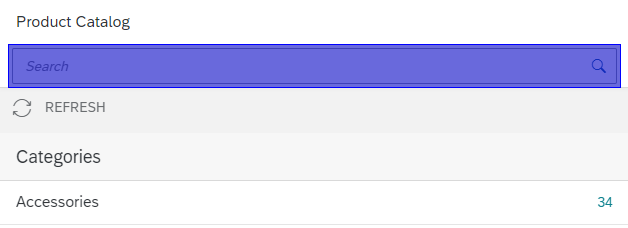
Highlighted Search Field Now, the Test Recorder provides a code snippet for your test:
Please make sure that the dialect UIVeri5 is selected.
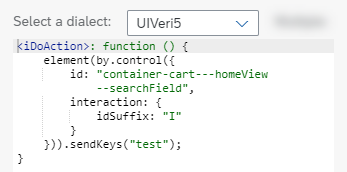
Code Snippet for Search Field Copy this code snippet into the
actionssection of yourhome.jspage object.Add a suitable name for your assertion and define that during your test, the test runner should search for
Watch:
Name and Additional Snippets for iSearchForProduct Next, make an assertion about the title of the product that is displayed first in the filtered catalog.
After your first assertion, add a comma.
In the search field of your sample application, enter
Watch.Right-click the first product in the filtered catalog and choose Highlight. As a result, the Test Recorder highlights the list entry to indicate its activity:

Highlighted List Entry Now, the Test Recorder provides a code snippet for your test:
Please make sure that the dialect UIVeri5 is selected.
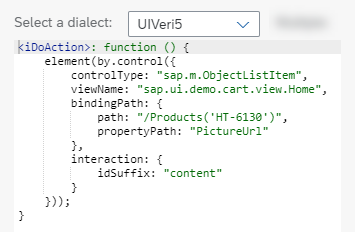
Code Snippet for List Entry Copy this code snippet into the
assertionssection of yourhome.js.Remove the
bindingPathandinteraction:
Remove Binding Path and Interaction Add a suitable name for your assertion and the following code snippets:
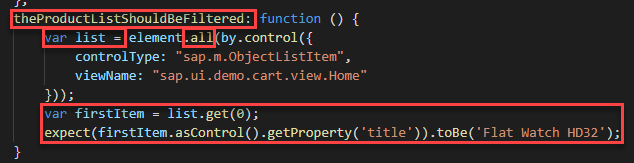
Page Object for List Entry Test Now, the page object for your home screen is ready. Make sure that your code looks as follows and choose File → Save.
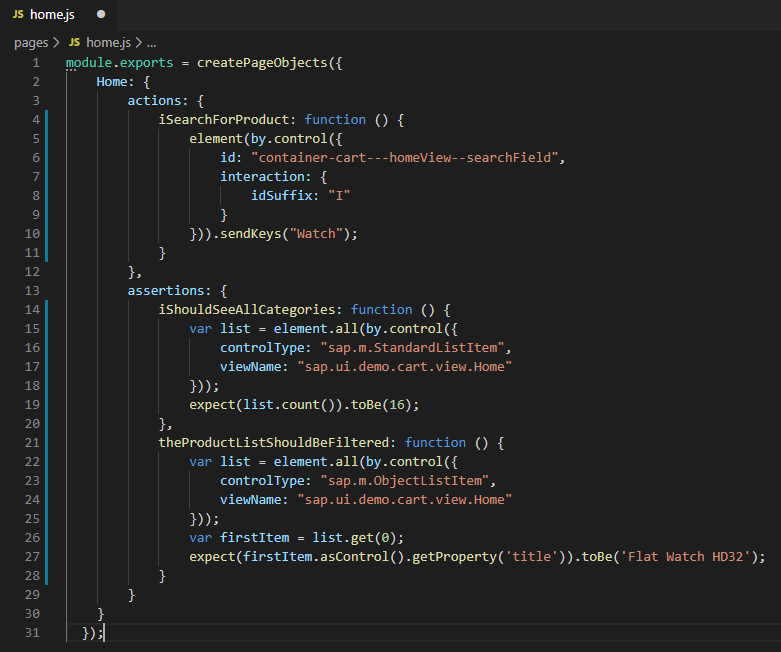
Added Code Snippets To run the test, execute the following command in the terminal:
uiveri5As a result, the browser opens and you can watch the automated test software execute the actions you have defined.
In the terminal response, check if the test has been passed successfully:
Status: Passed
Check if the following two statements are true:
- When you select a product from the filtered catalog, it is shown in the detailed view. To verify this, compare the selected product title with the title in the detailed view.
- In the detailed view, there is an Add to cart button.
From the EXPLORER pane in Visual Studio Code, open
teched.spec.js.Into the
describefunction, add the skeleton of the product search test:Codeit("Should navigate to the product", function () { });Your code should now look as follows:

Skeleton of Product Search Test Within the test skeleton, add the following interaction with reference to your
home.js:CodeWhen.onTheHomePage.iSelectTheFirstProduct();Then, add the first behavior you expect, namely that the product title appears in the detail view:
CodeThen.onTheProductPage.theProductTitleIsShown();Next, add your second expectation, which is that the Add to cart button appears:
CodeThen.onTheProductPage.theProductCouldBeOrdered();Now, your test is complete. Make sure that it looks as follows and choose File → Save.

Product Search Test From the EXPLORER pane, open
pages→home.js.Add a comma after the close bracket of the first action.
In the Shopping Cart application in Google Chrome, press CTRL + SHIFT + ALT + T (if you use a Windows system) or SHIFT + CTRL + OPTION + T (if you use a Mac system) to open the SAPUI5 Test Recorder in a new browser window.
In your sample application, right-click the title of the first search result and choose Press. As a result, the Test Recorder highlights the title to indicate its activity:

Highlighted Title Now, the Test Recorder provides a code snippet for your test:
Please make sure that the dialect UIVeri5 is selected.

Code Snippet for Title Copy this code snippet into the
actionssection of yourhome.js.Adapt the name of the action. With this action, you define that during your test, the test runner clicks on the first search result:

Name for Product Selection Test Now, the page object for your home screen is ready. Make sure that it looks as follows and choose File → Save.

Page Object for Home Screenshot Next, add an assertion that is related to the product details.
As you don’t have a page object for the detailed view, yet, use the yeoman sub-generator to generate its scaffolding. The generator
yo easy-ui5:newuiveri5pocreates a new page object and adds it to the existing specs.In the terminal in Visual Studio Code, make sure that you’re in the
uiveri5root folder.Enter the following command:
yo easy-ui5 project newuiveri5poAnswer the questions that help the generator create your new page object as follows:
Question Answer Page object name ProductAdd action with name Press Enter to skip Add assertion with name Press Enter to skip Now, your page object is created.

Page object creation by generator From the Explorer pane, open
pages→product.js.This file represents the page object for the detail view of your selected product.
In the Shopping Cart application in Google Chrome, right-click the header of the detail view and choose Highlight. As a result, the Test Recorder highlights the header to indicate its activity:

Highlighted Header Now, the Test Recorder provides a code snippet for your test:
Please make sure that the dialect UIVeri5 is selected.

Code Snippet for Header Copy this code snippet into the
assertionssection of yourproduct.js.Add a suitable name for your action and the following code snippets:

Added Name and Code Snippets Now, your page object should look as follows:

Page Object for Product Navigation To verify if there is an Add to Cart button in the detail view of your selected product, add another assertion.
Add a comma after your last assertion.
In the Shopping Cart application in Google Chrome, right-click the Add to Cart button and choose Highlight. As a result, the Test Recorder highlights the button to indicate its activity:

Highlighted Button Now, the Test Recorder provides a code snippet for your test:
Please make sure that the dialect UIVeri5 is selected.

Code Snippet for Button Copy this code snippet into the
assertionssection of yourproduct.js.Add a suitable name for your assertion and add the following code snippet to define that you expect the Add to Cart button to be displayed:

Added Name and Code Snippets Now, the page object for the detail view of your selected product is ready. Make sure that it looks as follows and choose File → Save.

Page Object with Button Test To run the test, execute the following command in the terminal:
uiveri5In the terminal response, check if the test has been passed successfully:
Status: Passed
Automate your system tests by integrating them into a CI/CD pipeline.
Execute a Git commit and push the content of your local
TECHED2019-UIVERI5project into your GitHub repository.In Google Chrome, open and sign in to your Jenkins instance.
To create a new Jenkins pipeline, choose New Item.
As item name, enter
UI-Testing(or any other name you like), select Pipeline, and choose OK.Switch to the Pipeline tab.
For your CI/CD pipeline, you’ll use the library of project “Piper”. It contains all steps you need to automate the tests you have implemented.
In the Script area, add the skeleton of your pipeline with reference to the project “Piper” library:
Code#!/usr/bin/env groovy @Library(['piper-lib-os']) _ //Setup the skeleton for Jenkins based Runs node { stage('System Tests') { } }Make sure that your script looks as follows and choose Save:

Screenshot Pipeline Skeleton in Jenkins To run your newly created pipeline, choose Build Now.
As a result, your build is scheduled.
In the Build History, choose #1 to check the results of your first pipeline run.
To check the log for failures due to syntax issues, choose Console Output. Make sure that the (empty) pipeline has run successfully:

Console Output in Jenkins: Successful Next, implement a pipeline stage for your system tests with UIVeri5.
From the sidebar, choose Back to Project.
Choose Configure and switch to the Pipeline tab.
Add the following content to your
System Testsstage:
deleteDir()

// Clone code from the system test repository
git '<YOUR GITHUB REPOSITORY>'

// checkout the master branch
sh 'git checkout master'

// With this next step UIVeri5 tests can be executed.
uiVeri5ExecuteTests script: this

// HTML Publisher plugin
// Publish HTML reports
// Publish Test Report for UIveri5 on Jenkins
publishHTML target: [
    allowMissing: true,
    alwaysLinkToLastBuild: true,
    keepAll: true,
    reportDir: 'target/report/screenshots/',
    reportFiles: "report.html",
    reportName: "UIVeri5 Test Report"
]- In the script, exchange
<YOUR GITHUB REPOSITORY>with the URL of the GitHub repository into which you have pushed your localTECHED2019-UIVERI5project.
Make sure that your script looks as follows and choose Save:


To run your pipeline, choose Build Now.
As a result, your build is scheduled.
The pipeline run might take a few minutes.
Choose #2 to view the results of your second pipeline run. Make sure that it has run successfully:
Console Output in Jenkins: Successful From the sidebar, choose UIVeri5 Test Report.
Here, you get an overview of all test results together with screenshots from their execution:

UIVeri5 Test Report
Congratulations!
You have successfully created different system tests with UIVeri5 and integrated them into a continuous integration and delivery pipeline.
Resources
Discussion
Share feedback on this tutorial or join the conversation in SAP Community.