
Overview
You will learn
- How to develop a sample business service using CAP and
Node.js - How to define a simple data model and a service that exposes the entities you created in your data model
- How to run your service locally
- How to deploy the data model to an
SQLitedatabase - How to add custom handlers to serve requests that aren’t handled automatically


Prerequisites
Prerequisites
- You’ve installed Node.js. Make sure you run the latest long-term support (LTS) version of Node.js with an even number like 20. Refrain from using odd versions, for which some modules with native parts will have no support and thus might even fail to install. In case of problems, see the Troubleshooting guide for CAP.
- You’ve installed the latest version of Visual Studio Code (VS Code).
- (Windows only) You’ve installed the SQLite tools for Windows. Find the steps how to install it in the How Do I Install SQLite section of the CAP documentation.
- Install the cds command line tool as described on Capire
- Install the VS-Code extensions as described on Capire
- You’ve installed an HTTP client, for example, REST client.
- If you don’t have a Cloud Foundry Trial subaccount and dev space on SAP BTP yet, create your Cloud Foundry Trial Account with US East (VA) as region and, if necessary Manage Entitlements. You need this to continue after this tutorial.
Steps
Intro
Before you start, complete the prerequisites and select your OS so that your see the correct instructions for your setup.
After initializing the project, you should see the following empty folders:
app: for UI artifactsdb: for the database level schema modelsrv: for the service definition layer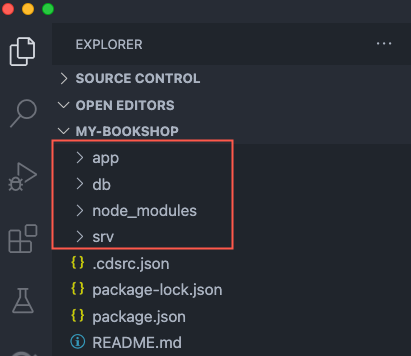
Folder structure
Add normalized entity definitions into a data model and have your services expose potentially de-normalized views on those entities.
In the
dbfolder choose the New File icon in VS Code and create a new file calledschema.cds.Add the following code to the file
schema.cds:CDSnamespace bookshop; entity Books { key ID : Integer; title : String; author : Association to Authors; stock : Integer; } entity Authors { key ID : Integer; name : String; books : Association to many Books on books.author = $self; } entity Orders { key ID : Integer; book : Association to Books; amount : Integer; }Remember to save your files choosing Ctrl + S.
Let’s feed it by adding a simple domain model. In the
srvfolder choose the New File icon in VS Code and create a new file calledcat-service.cds.Open the file
cat-service.cdsand replace the existing code with:CDSusing {bookshop} from '../db/schema'; service CatalogService { entity Books as projection on bookshop.Books; entity Authors as projection on bookshop.Authors; entity Orders as projection on bookshop.Orders; }The syntax highlighting in your editor is provided by the extension. Learn more about it’s features in this short demo and see the features and commands in the CAP documentation.
As soon as you’ve saved your file, the still running
cds watchreacts immediately with some new output as shown below:Shell/Bash[cds] - loaded model from 2 file(s): srv/cat-service.cds db/schema.cds [cds] - using bindings from: { registry: '~/.cds-services.json' } [cds] - connect to db > sqlite { database: ':memory:' } /> successfully deployed to in-memory database. [cds] - using auth strategy { kind: 'mocked' } [cds] - serving CatalogService { at: [ '/odata/v4/catalog' ], decl: 'srv/cat-service.cds:3' } [cds] - server listening on { url: 'http://localhost:4004' } [cds] - server v10.0.5 launched in 800 ms [cds] - [ terminate with ^C ]This means,
cds watchdetected the changes insrv/cat-service.cdsand automatically bootstrapped an in-memory SQLite database when restarting the server process.To test your service, go to: http://localhost:4004

Generated index page which shows service endpoints served for the entities in the schems.cds file. You won’t see data, because you haven’t added a data model yet. Click on the available links to see the service is running.
- You will add plain CSV files in folder
db/datato fill your database tables with initial data. In a new command line window execute the following:
cds add data -n 10This adds csv files with a header line and 10 rows of mock data for all entities to the db/data/ folder. The name of the files matches the entities’ namespace and name, separated by -.
After you added these files,
cds watchrestarts the server with an output, telling that the files have been detected and their content been loaded into the database automatically:
[cds] - loaded model from 2 file(s):

  srv/cat-service.cds
  db/schema.cds

[cds] - using bindings from: { registry: '~/.cds-services.json' }
[cds] - connect to db > sqlite { database: ':memory:' }
  > init from db/data/bookshop-Orders.csv
  > init from db/data/bookshop-Books.csv
  > init from db/data/bookshop-Authors.csv
/> successfully deployed to in-memory database.

[cds] - using auth strategy { kind: 'mocked' }
[cds] - serving CatalogService {
  at: [ '/odata/v4/catalog' ],
  decl: 'srv/cat-service.cds:3'
}
[cds] - server listening on { url: 'http://localhost:4004' }
[cds] - server v10.0.5 launched in 2708 ms
[cds] - [ terminate with ^C ]
To test your service, open a web browser and go to:
http://localhost:4004/odata/v4/catalog/Books
http://localhost:4004/odata/v4/catalog/Authors
As you now have a fully capable SQL database with some initial data, you can send complex OData queries, served by the built-in generic providers.
http://localhost:4004/odata/v4/catalog/Authors?$expand=books($select=ID,title)
You should see a book titled Jane Eyre. If not, make sure you’ve removed the mock data from
cat-service.js.
You can now see the generic handlers shipped with CAP in action.
Run the command to add http test files
cds add httpThe command creates a test file called CatalogService.http in the (newly created) test/http folder. The file has tests for each service definition and entity. This file can be used with the REST client to make requests against your service. The generic handlers CAP provides sent the responses to your requests.
Click on Send Request, to execute requests against your service.

This
Send Requestbutton is provided by the REST client. It appears for every single request. This is important for the following step, when you execute, for example, theOrder a Bookrequest.
The REST client gives you the response of your service and you see immediately if the request was successful. You can see the response with details about the books, like the ID and the title:
{"ID": 1799910, "title": "title-1799910"}Note, when you stop and run
cds watchagain it only loads the generated CSV data to the in-memory database which is ideal for development. To preserve any changes you make, use a persistent database.
In the
srvfolder, create a new file calledcat-service.js.Add the following code to the file
cat-service.js:JavaScriptconst cds = require('@sap/cds') class CatalogService extends cds.ApplicationService { init() { const { Books, Orders } = this.entities this.after("CREATE", Orders, async (_, req) => { let { ID, amount, book_ID } = req.data let result = await UPDATE(Books, book_ID) .with ({ stock: {'-': amount}}) }) return super.init() } } module.exports = CatalogServiceJavaScriptimport cds from '@sap/cds'; export default class CatalogService extends cds.ApplicationService { init() { const { Books, Orders } = this.entities this.after("CREATE", Orders, async (_, req) => { let { amount, book_ID } = req.data let result = await UPDATE(Books, book_ID) .with ({ stock: {'-': amount}}) }) return super.init() } }Remember to save your files choosing Ctrl + S.
Whenever orders are created, this code is triggered. It updates the book stock by the given amount.
In the
CatalogService.httpfile, execute theBrowse Booksrequest.Look at the stock of book and note it’s ID, for example,
1799910.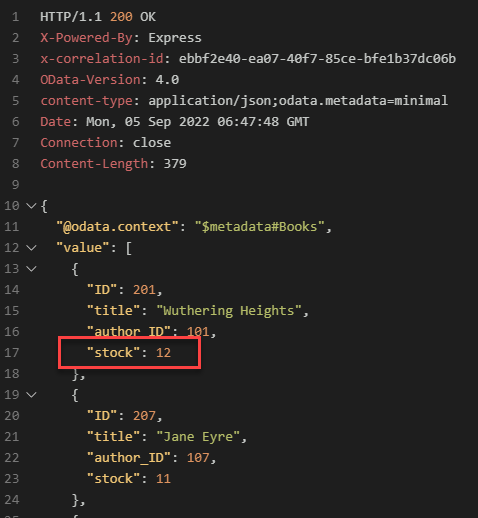
Test the request Update the ID of the book with the ID from the last step and execute the
Orders_POSTrequest.This triggers the logic above and reduces the stock.
Execute the
Browse Booksrequest again.The stock of book
1799910is lower than before.
As an optional exercise, add a handler to make sure that there’s enough stock for the order being created.
You can extend the CDS model using Expressions as well, to see this in action replace the projection on the Books entity in srv/cat-service.cds as shown here:
using {bookshop} from '../db/schema';

service CatalogService {
entity Books as
    select from bookshop.Books {
        *,
        stock > 50 ? title : title || ' - 10% discount' as displayTitle : String
    }

    entity Authors as projection on bookshop.Authors;
    entity Orders  as projection on bookshop.Orders;

}
Now when you run the Browse Books Requests again you will see that the books with stock greater than 50 will have a 10% discount in the title.
Learn more about the CDS Expression Language (CXL)
As an other optional exercise, update the handler to apply the discount if the order is eligible for it.
Resources
Discussion
Share feedback on this tutorial or join the conversation in SAP Community.