
Overview
You will learn
- How to call and test Business Entity Recognition
- How to access and use the Business Entity Recognition Swagger UI (User Interface)
- How to create a dataset, upload training data and submit a training job


Prerequisites
Steps
Intro
The core functionality of Business Entity Recognition is to automatically detect and highlight any given type of named entity in unstructured text and classify it in accordance with predefined categories.
In this tutorial, you will learn how to use the service APIs to create a dataset, upload training data, and submit a training job to finally create your own custom machine learning model to classify any given type of named entity, such as mobile number, first name, last name and address, in the texts you will submit to the service in the next tutorial: Deploy Model and Get Prediction Results.
Check out the tutorial group Use Pre-Trained Machine Learning Models to Process Unstructured Text to try out the Business Entity Recognition pre-trained machine learning models.
You will use Swagger UI, via any web browser, to call the Business Entity Recognition service APIs. Swagger UI allows developers to effortlessly interact and try out every single operation an API exposes for easy consumption. For more information, see Swagger UI.
In the service key you created for Business Entity Recognition in the previous tutorial: Create Service Instance for Business Entity Recognition, you should find (outside the uaa section of the service key) an entry called url (as highlighted in the image below).
To access the Business Entity Recognition Swagger UI, add
/api/v1to theurlvalue, paste it into any web browser and press Enter.
BER To be able to use the Swagger UI endpoints, you need to authorize yourself. In the top right corner, click Authorize.

BER Get the
access_tokenvalue created in the previous tutorial: Get OAuth Access Token for Business Entity Recognition Using Any Web Browser, then add bearer in front of it, and enter in the Value field.Codebearer <access_token>
BER Click Authorize and then click Close.

BER
Use the POST /datasets endpoint to create a dataset that will be used to train a custom model to extract entities from unstructured text.
Click the endpoint name to expand it.
Click Try it out.

BER In payload, enter a
descriptionfor your dataset,"Tutorial dataset", for example.Click Execute.

BER Copy the
datasetIdfrom the Response body.
BER
To see the details of your newly created dataset, use the GET /datasets/{datasetId} endpoint.
Click the endpoint name to expand it.
Click Try it out.
Enter the
datasetIdobtained in the previous step and click Execute.
BER You should receive a response like below. Among the
datasetIdand thedescription, you see thedocumentCount. The number of documents include the training data files that you’ll upload in the next step.
BER
To upload training documents to your dataset, use the POST /datasets/{datasetId}/documents. You may repeat this step to upload multiple documents.
Please bear in mind that Business Entity Recognition requires your data to be in a specific format to train a model. See data format prerequisites in Training Data Format.
As an alternative to uploading your own JSON file to the service, you can use the following sample files (right click on the link, then click Save link as to download the files locally):
Please repeat this step twice and upload one document each time. The more data is available the better predictions the model can give you.
To upload documents, do the following:
Click the POST /datasets/{
datasetId}/documents endpoint name to expand it.Click Try it out.
Enter the
datasetIdobtained in step 2 and select one training document for the upload.Click Execute.

BER Copy the
documentIdfrom the Response body.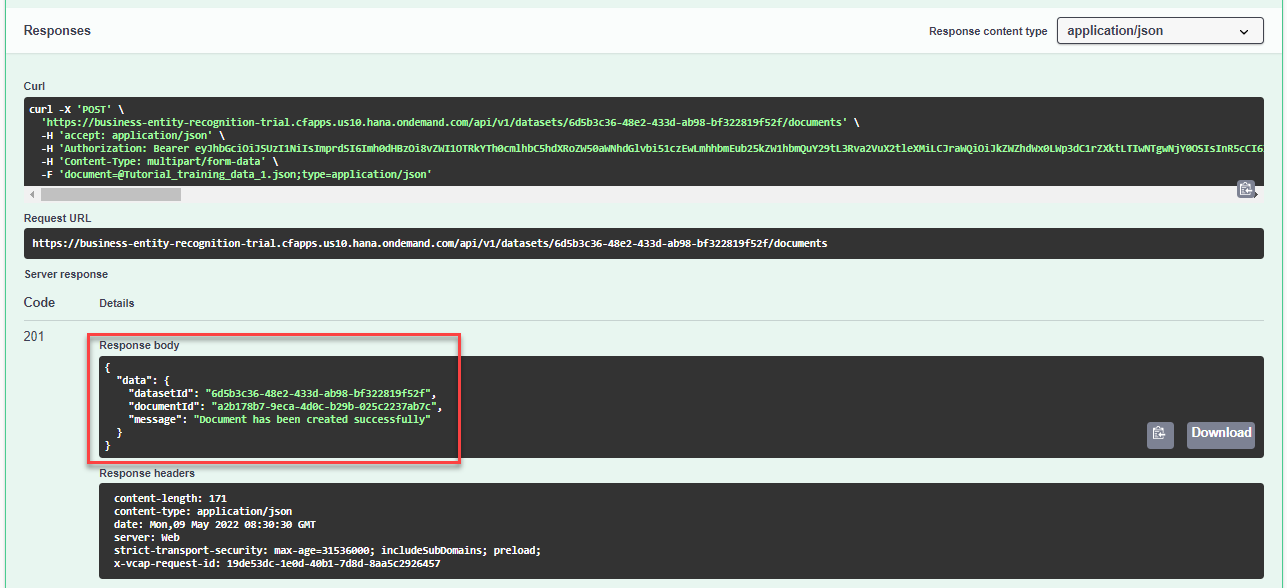
BER
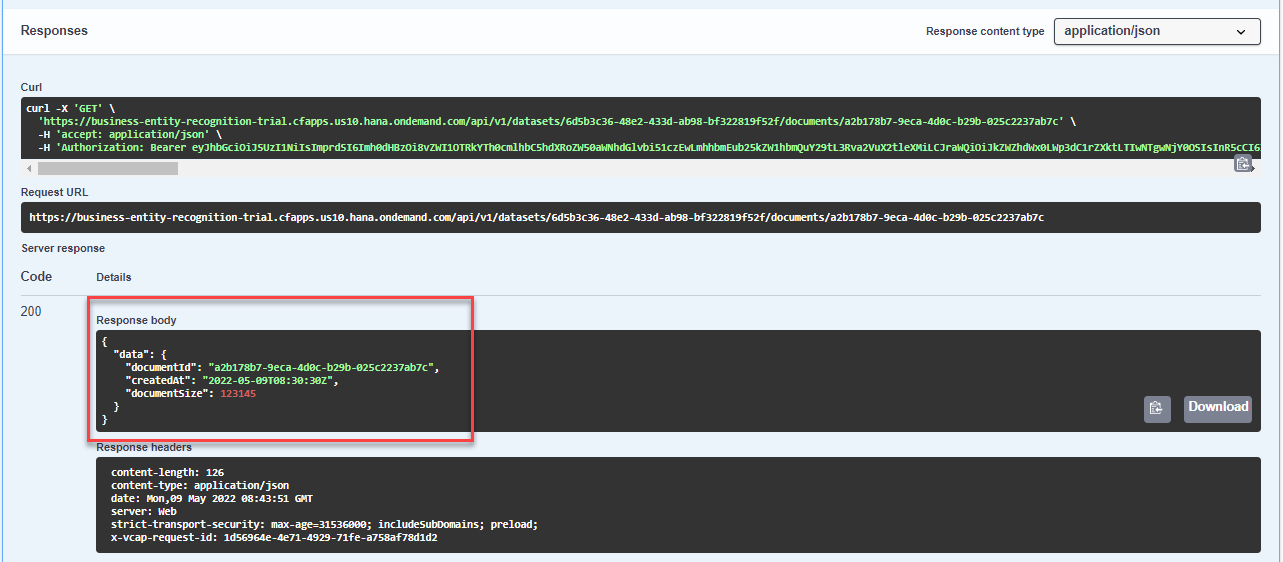
Using the datasetId obtained in the previous step, you can obtain the details of your training documents using the GET /datasets/{datasetId}/documents/{documentId} endpoint.
Click the endpoint name to expand it.
Click Try it out.
Enter the
datasetIdobtained in step 2.Enter the
documentIdobtained in step 4.Click Execute.

BER You should receive a response, with the document details, like below. This shows you the size of the document in bytes.
BER
Once the training documents are uploaded, you can submit a training job. This triggers the training of a machine learning model based on your uploaded data. For that, use the POST /training/jobs endpoint.
Click the endpoint name to expand it.
Click Try it out.
In payload, enter a
modelNamefor your custom model,"Tutorial_custom_model", for example, and thedatasetIdobtained in step 2.CAUTION:
Be aware of the following
modelNameguidelines:- You cannot use the same name as one of the Business Entity Recognition pre-trained models (see Extracted Entities by Pre-trained Model)
- You cannot use
"sap_"as a prefix
- Start with an alphanumeric character
- You can include the special characters
"-"and"_"
- You can use a maximum of 64 characters
Click Execute.

BER Copy the
jobIdfrom the Response body. This allows you to check the status of the training.
BER This indicates that your training job has been successfully submitted.
To check whether your training already succeeded, you can use the GET /training/jobs/{jobId} endpoint to see the current status of the job.
CAUTION:
In the free tier version of the service, only one training job with
SUCCEEDEDstatus is allowed. See Free Tier Option Technical Constraints. Use the endpoint DELETE /training/jobs/{jobId} to delete a training job before its status changes toSUCCEEDED.
Click the endpoint name to expand it.
Click Try it out.
Enter the
jobIdobtained in step 6.Click Execute.

BER You should receive a response like below. The status
RUNNINGindicates that the training is still in progress. In case the status isPENDING, then the training has not started yet.
BER You may check the status now and then. Please note that the training may take up to 5 hours. Afterwards, the training status changes to
SUCCEEDED. Along with that, you receive all the capabilities of the model, that are the entities the model can recognize.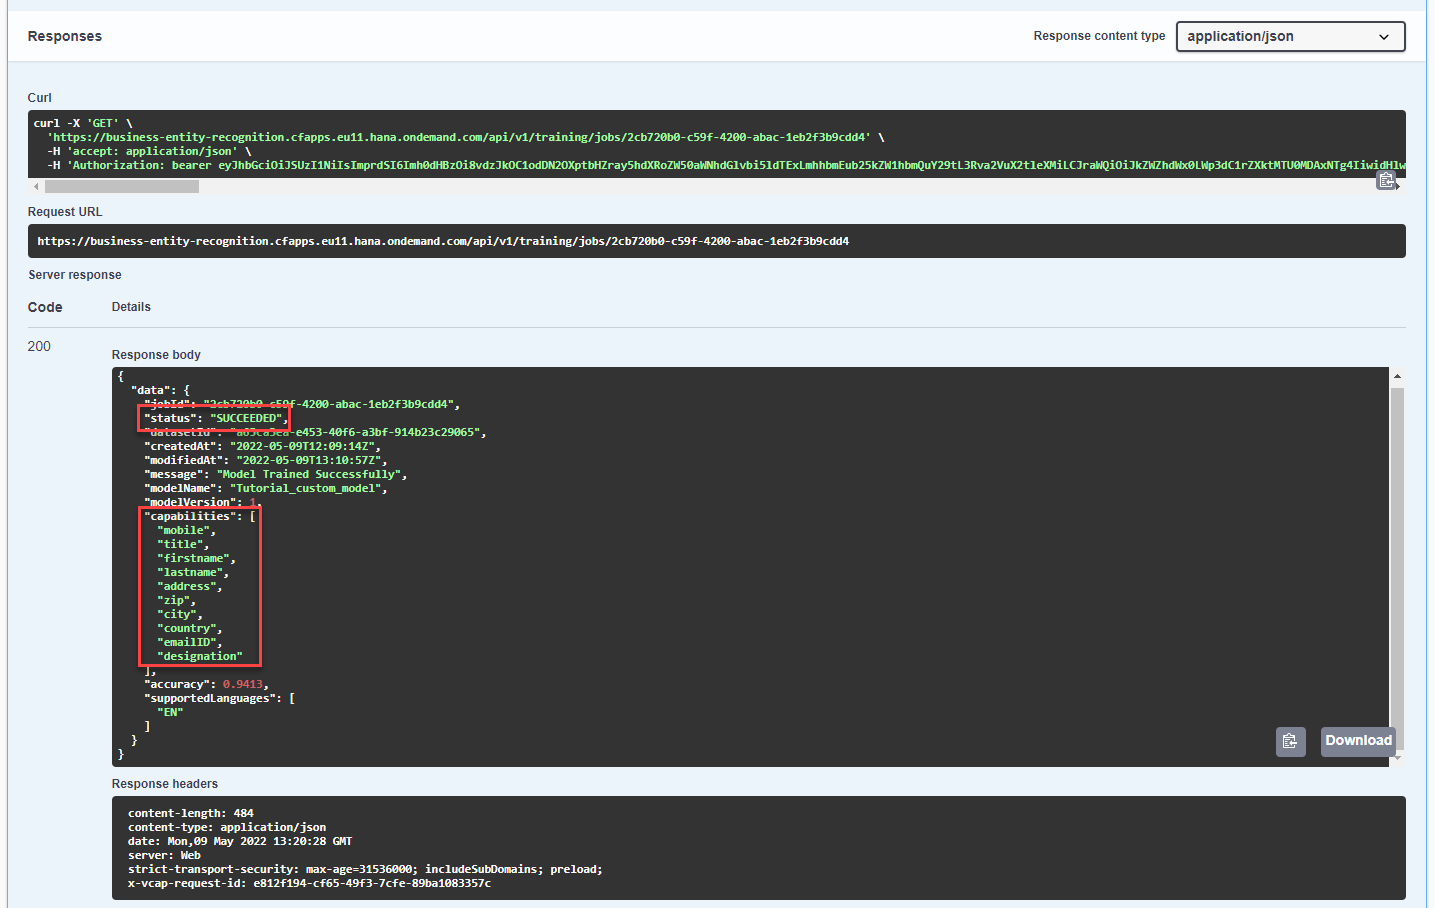
BER
Resources
Discussion
Share feedback on this tutorial or join the conversation in SAP Community.