
Overview
You will learn
- How to access SAP Business Application Studio
- How to login to Cloud Foundry
- How to create your CAP project using
cds init - Understand the project structure


Prerequisites
Prerequisites
- Complete the tutorial: Prepare to Develop the SAP SuccessFactors Extension
Steps
You are going to start the journey by accessing the selected IDE for development (in this case, SAP Business Application Studio). To proceed with these instructions you must have first completed the prerequisites detailed in the tutorial: Prepare to Develop the SAP SuccessFactors Extension.
Access your trial subaccount

On the left-hand side expand Services and click on Instances and Subscriptions

On the right, under Subscriptions, click on the small icon next to the SAP Business Application Studio subscription to go to the application

Start your previously created Dev Space by clicking on the Start Icon on the right

After the Dev Space has started (status RUNNING), go into it by clicking on the Space Name

Before starting the development, you need to make sure to be properly logged in to the Cloud Foundry environment on your BTP subaccount.
From the top menu, click on View and select Find Command…

In the Find Command dropdown, search for CF: Login to Cloud Foundry and select it

Confirm the Cloud Foundry endpoint, by pressing Enter

Enter the e-mail address you have used to create your trial account and press Enter

Enter the password you have used to create your trial account and press Enter

Select your trial organization and press Enter

Select your Cloud Foundry dev space and press Enter

Click on the small notifications icon in the bottom right corner to view the login notifications to make sure the login has been successful

Now it’s time to create the CAP Project and understand it’s structure.
From the top menu, click on Terminal and select New Terminal

In the terminal window at the bottom, type cd projects and press Enter. The terminal should look like this:

Now type cds init sfsf-projman and press Enter. The output should look like this:
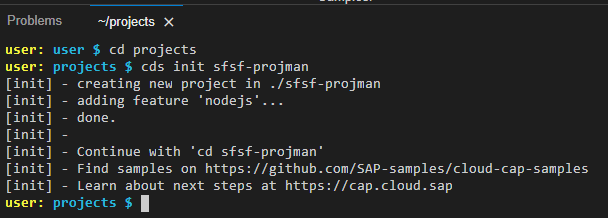
Notice that sfsf-projman is the project and application name and also the project folder name. Now, open the project as a workspace.
From the top menu, click on File and select Open Folder… and, in the textbox, select the sfsf-projman folder under projects (/home/user/projects/sfsf-projman/) and click OK.
SAP Business Application Studio will restart and, after a few seconds, you should see the following structure at the bottom of the left-hand side pane:

You can see that, under the project folder, cds has created three folders: app, db and srv and three files: cdsrc.json, package.json and README.md. Let’s quickly understand the purpose of each one of them:
app– is the folder where you are going to create the HTML5 application for the UI (in your case, it’s going to be an SAP Fiori Elements HTML5 application).db– is the folder into which you will create the files to define the application data model (CDS data model) and also put some initial data in CSV format to test the application (under a subfolder nameddata).srv– is the folder where you place the files of your service definition and business logic.cdsrc.json– this file is created to specify settings to be used commonly across several projects or to alternatively hold static project settings additionally to the package.json. You can find more information about the usage of this file here.package.json– this file holds project specific settings following the common node.js standard.README.md– is used for project documentation.
Resources
Discussion
Share feedback on this tutorial or join the conversation in SAP Community.