
Overview
You will learn
- How to create a subaccount in an SAP BTP global account
- How to configure entitlements to SAP Cloud Transport Management service
- How to subscribe to SAP Cloud Transport Management service
- How to set up role collections required for SAP Cloud Transport Management service
- How to create a service instance of SAP Cloud Transport Management service and a service key


Prerequisites
Prerequisites
- If you are new to SAP BTP, follow the tutorial View the SAP BTP from 10,000 Meters.
- If you do not have an SAP BTP account, follow the tutorial Get an Account on SAP BTP Trial.
Steps
Intro
Please note that it involves a significant amount of manual work to migrate an SAP Cloud Transport Management landscape from a trial account to a standard instance (for productive use). In contrast, it is very easy to switch a free instance of SAP Cloud Transport Management to a standard instance, keeping all your configuration intact. We therefore recommend to use a subaccount in a CPEA-enabled global account if available to you. To do this, follow the steps under Enterprise Account.
For more information about SAP Cloud Transport Management service, see the SAP Help Portal at SAP Cloud Transport Management Service.
To access BTP Cockpit of your trial account, go to your SAP BTP Trial landing page and choose Go To Your Trial Account. (The name of the button may vary.)
In your global trial account, you have the default trial subaccount.
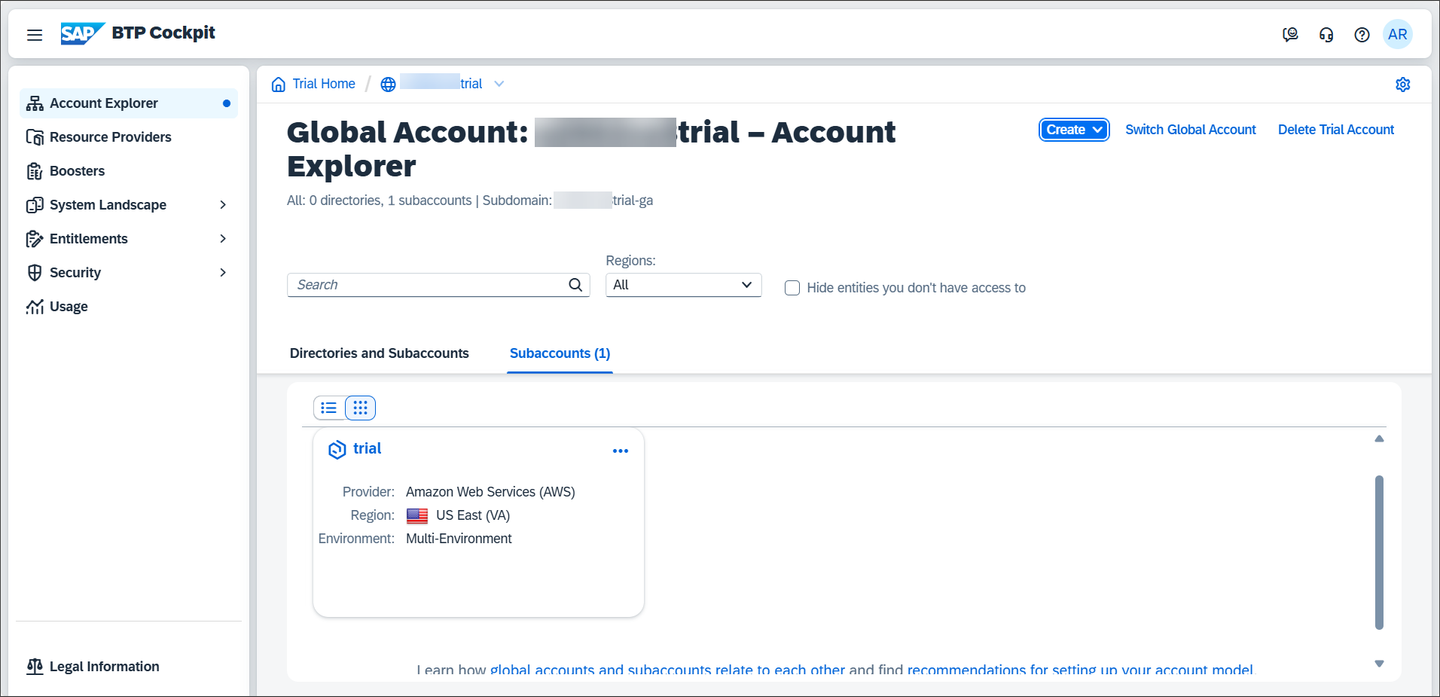
Create CS Subaccount 00 SAP recommends using SAP Cloud Transport Management in a separate administrative subaccount to facilitate access control and separation of concerns. Therefore, you need a separate subaccount where you subscribe to SAP Cloud Transport Management and create a service instance and key for API access to the service.
To create that new subaccount for SAP Cloud Transport Management service, in the Account Explorer of your global account, choose Create > Subaccount.
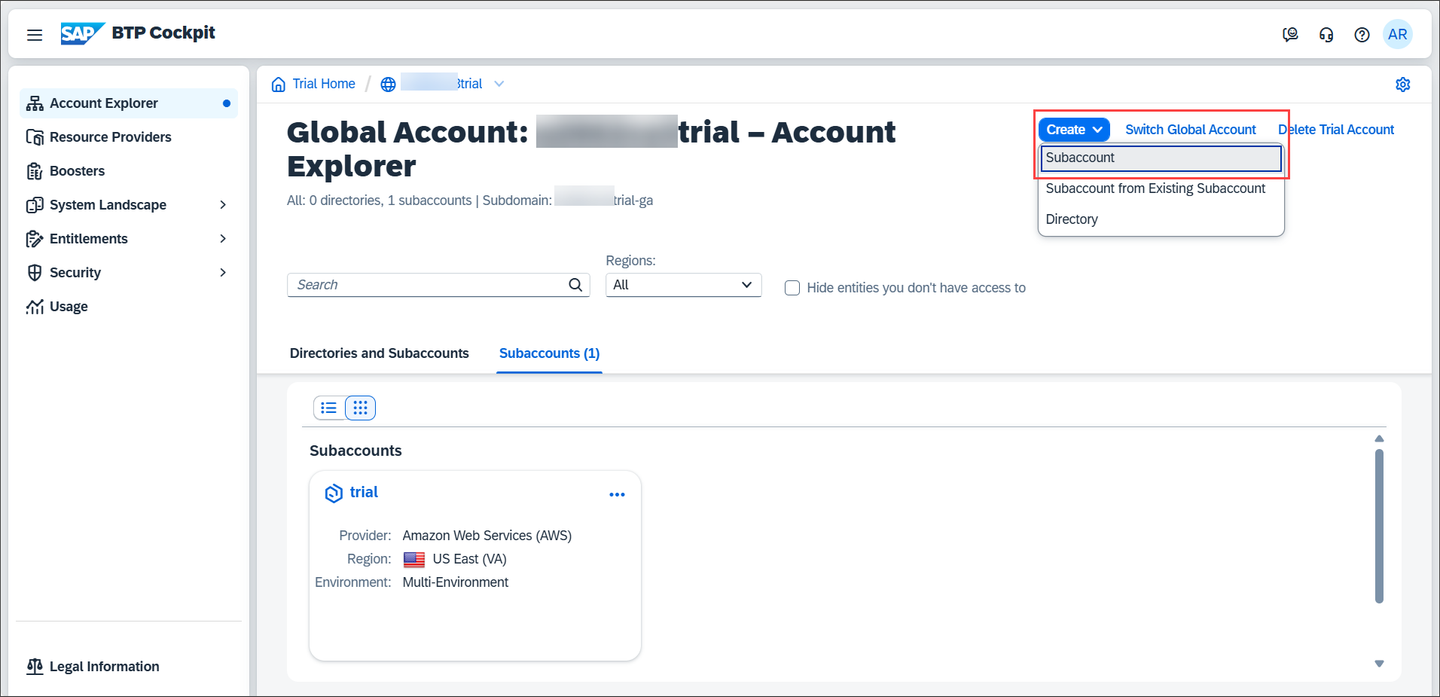
Create CS Subaccount 01 Enter a Display Name (1), here
Central Servicesand select a Region (2). Choose Create (3).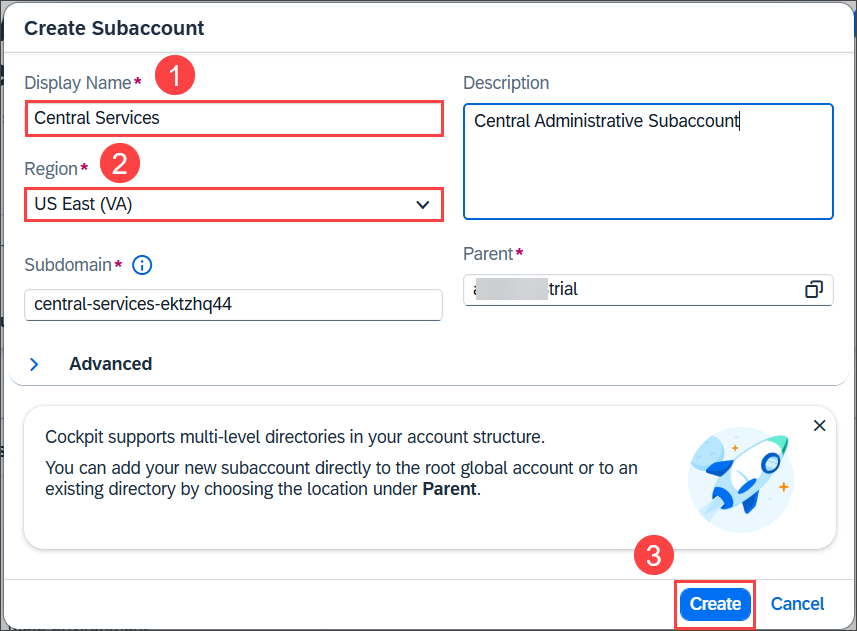
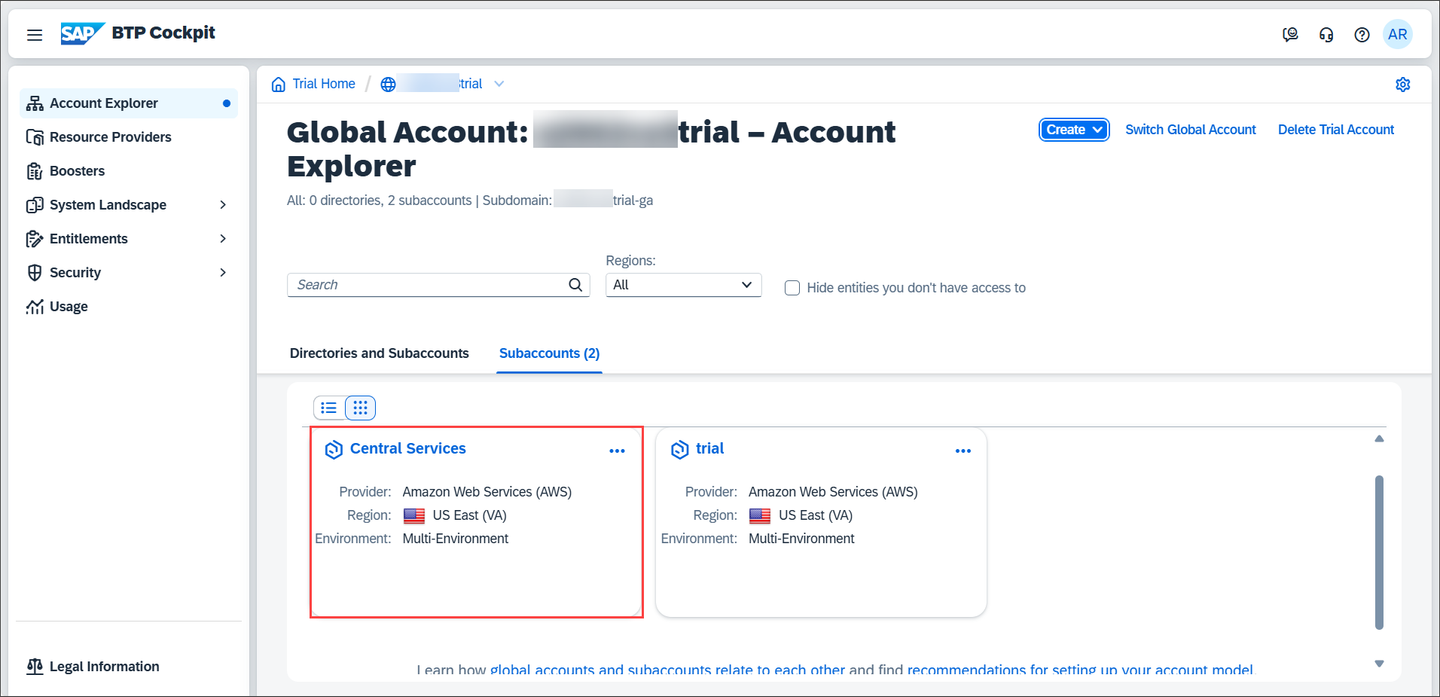
Create CS Subaccount 02 The new subaccount is created.
Click on the Central Services tile.
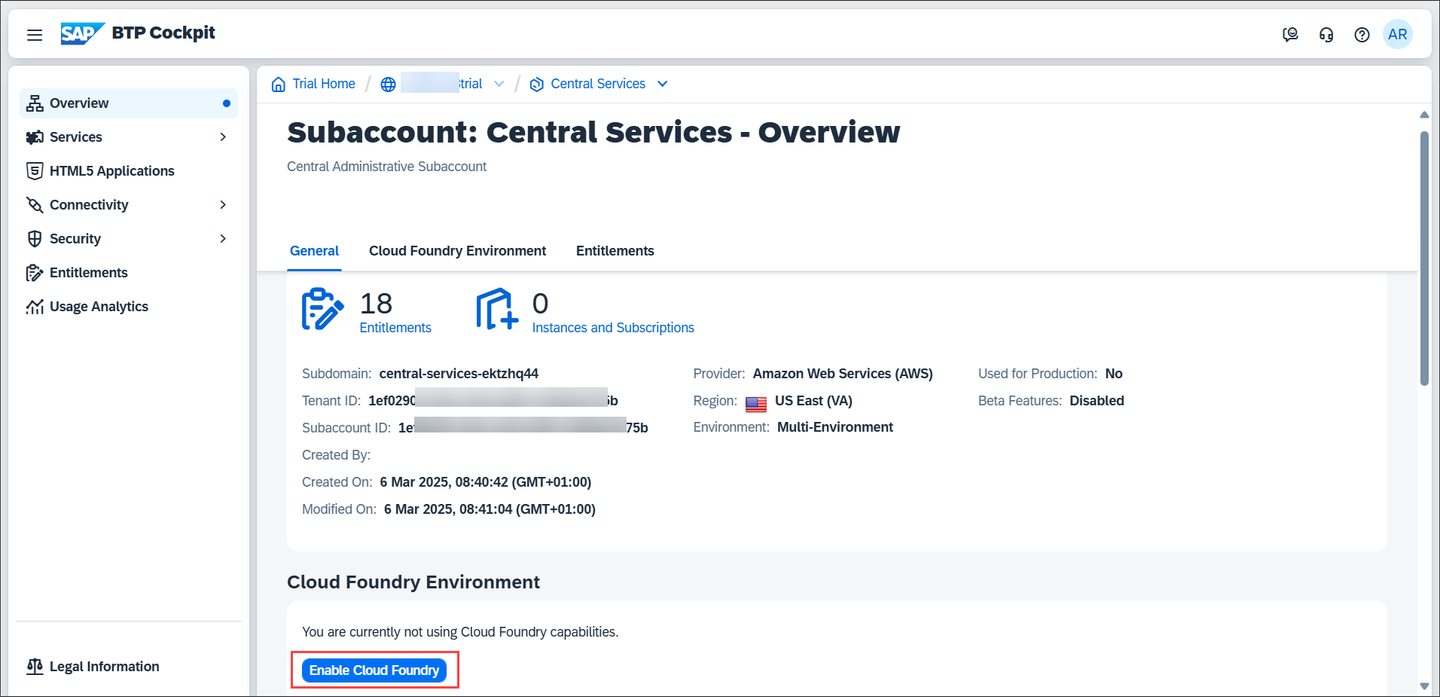
Create CS Subaccount 04 You’re in the overview of the Central Services subaccount. You need to enable Cloud Foundry in the subaccount to create a Cloud Foundry org in which you can create a space. To do this, choose Enable Cloud Foundry.
Create CS Subaccount 05 Keep the suggested values unchanged, and choose Create.
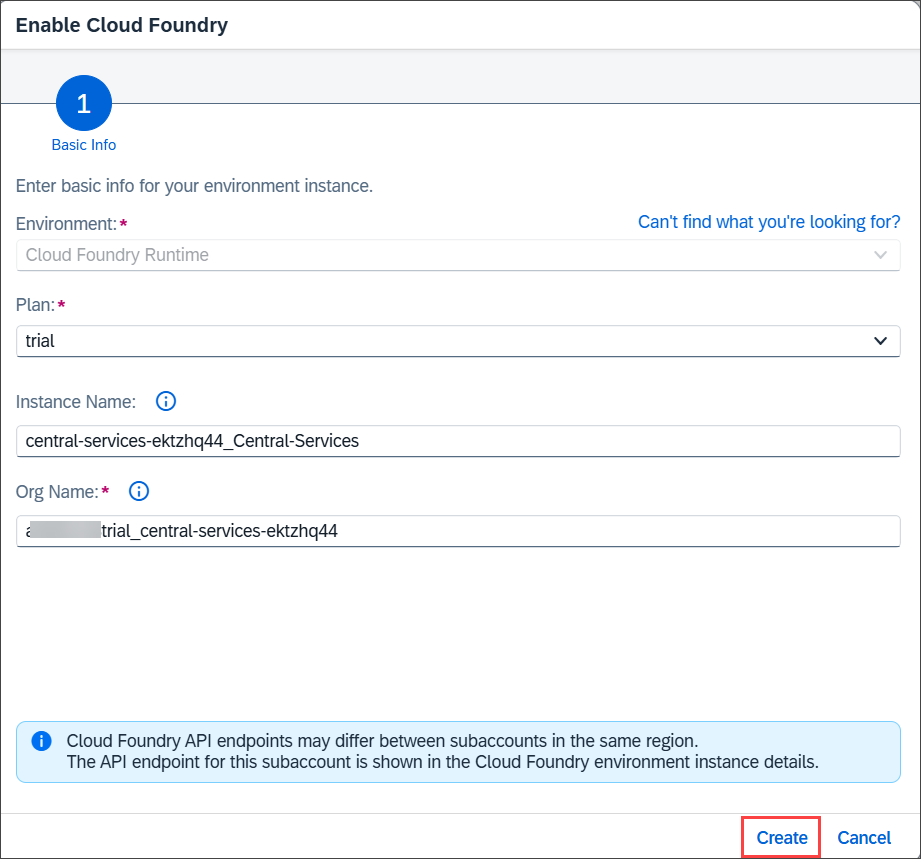
Create CS Subaccount 06 The Cloud Foundry org is created.
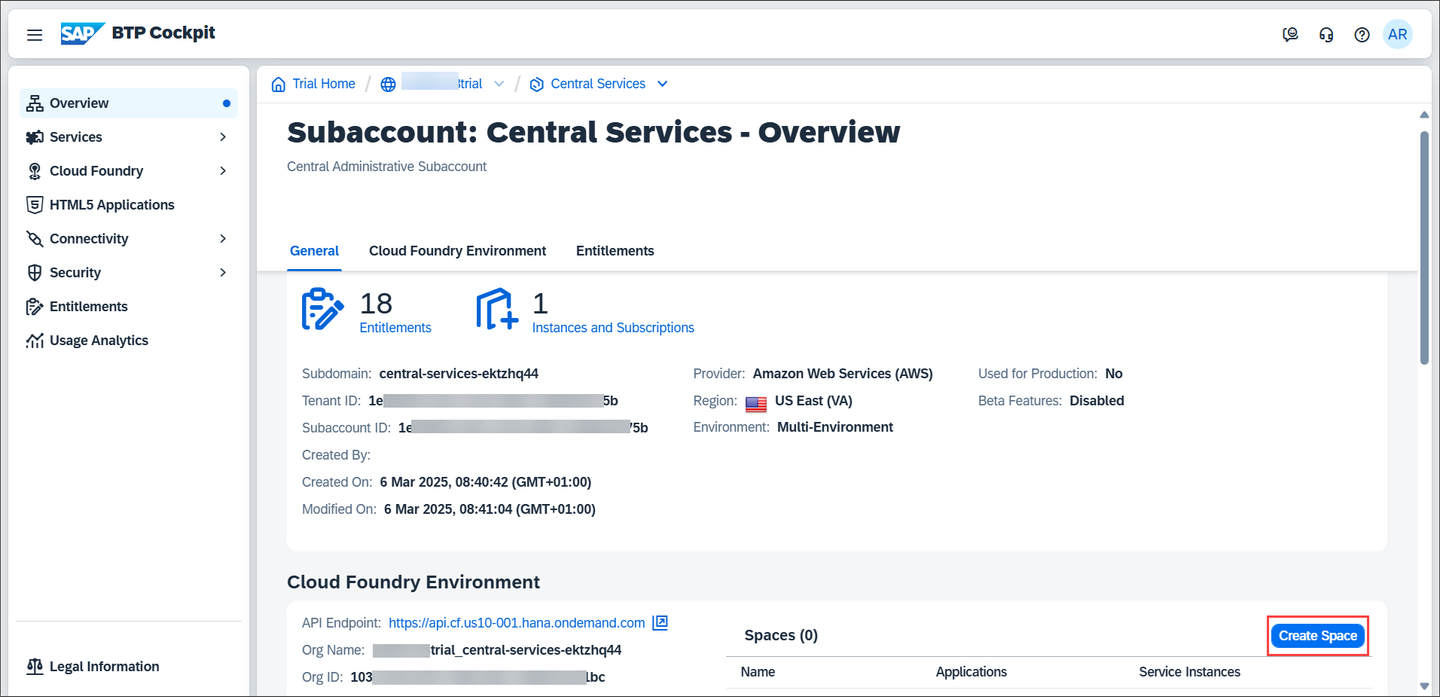
As a next step, create a space in the org. A space is a shared location on the platform in which you can deploy and maintain applications, and connect them to services. You can create multiple spaces within one org.
To create a space in this org, choose Create Space.
Create CS Subaccount 07 Enter a space name, here
cTMS(1), keep the default space roles unchanged, and choose Create (2).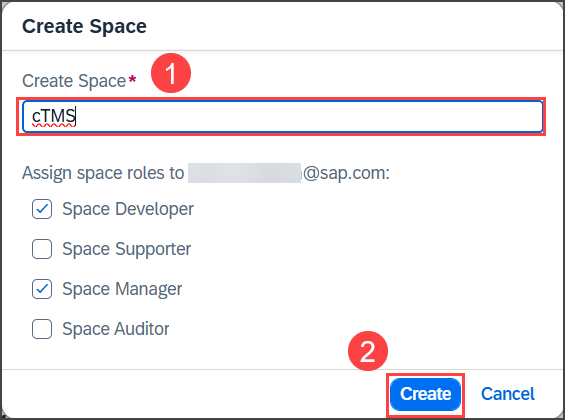
Create CS Subaccount 08 The new cTMS space is displayed in the list of spaces.
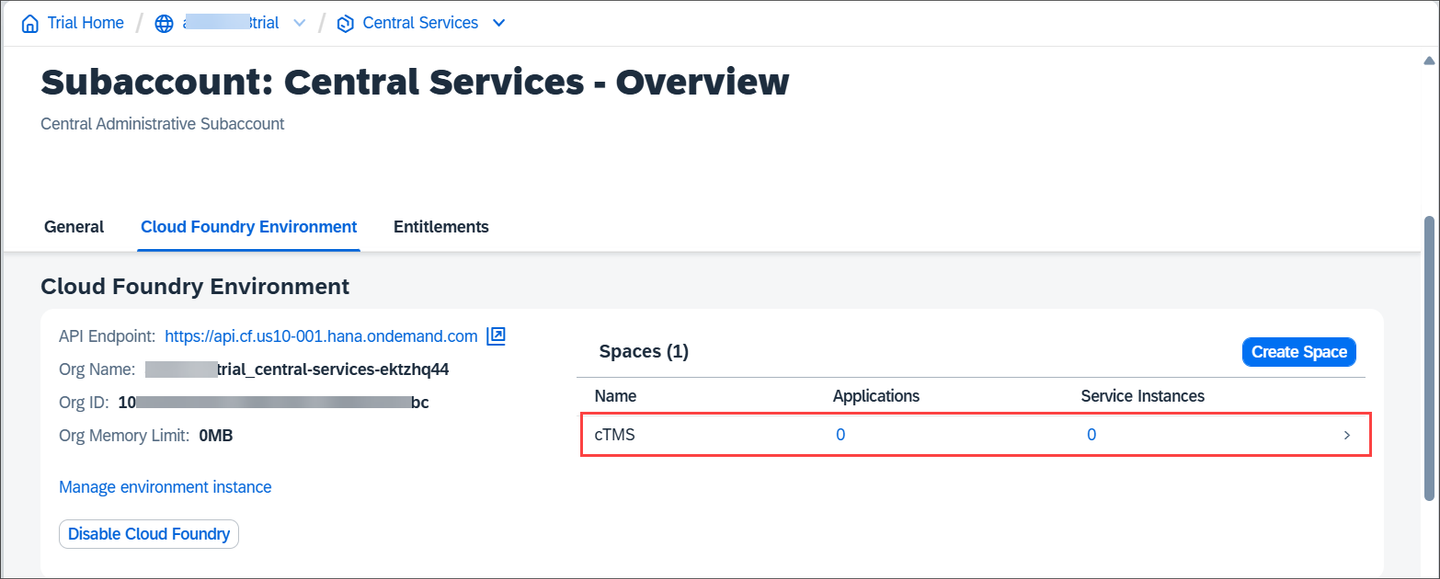
Create CS Subaccount 09
The following steps are required in SAP BTP trial, because the default trial subaccount has default entitlements for SAP Cloud Transport Management that you’ll need in the Central Services subaccount. Entitlements are the service plans that you’re entitled to use. To use the entitlements in the Central Services subaccount, remove them from trial first.
In your global account in SAP BTP trial, click on the trial tile.
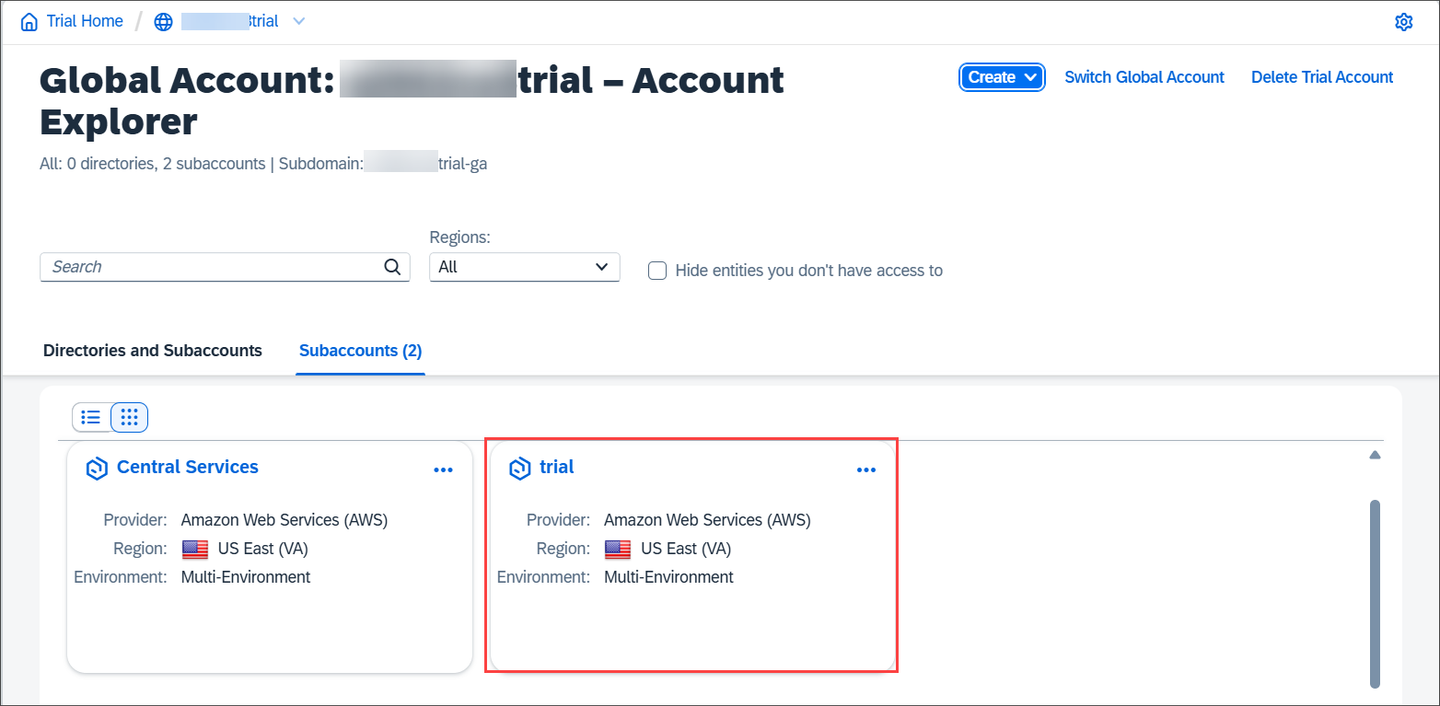
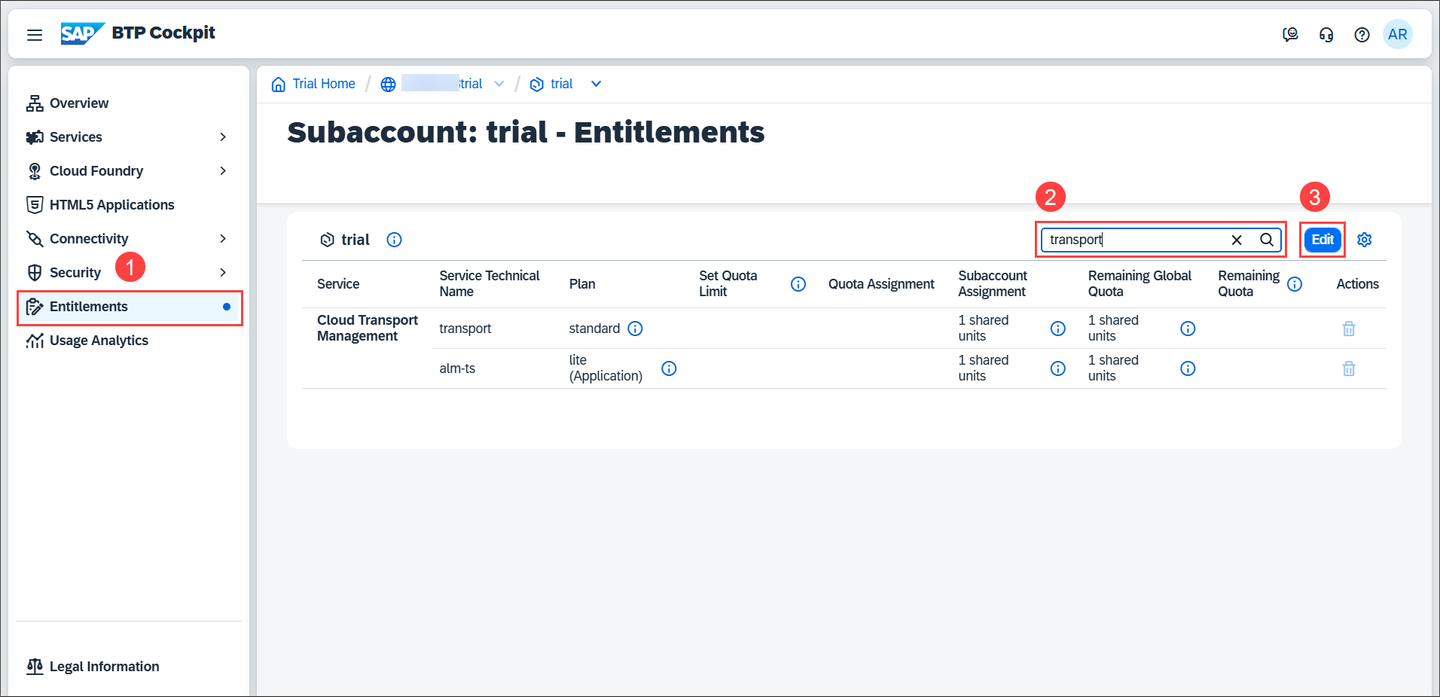
Create CS Subaccount 10 Choose Entitlements from the navigation on the left (1), filter the entries for transport (2), and choose Edit (3).
Create CS Subaccount 11 To remove the entitlements for Cloud Transport Management from trial, click on the trash bin icons at the end of the row.
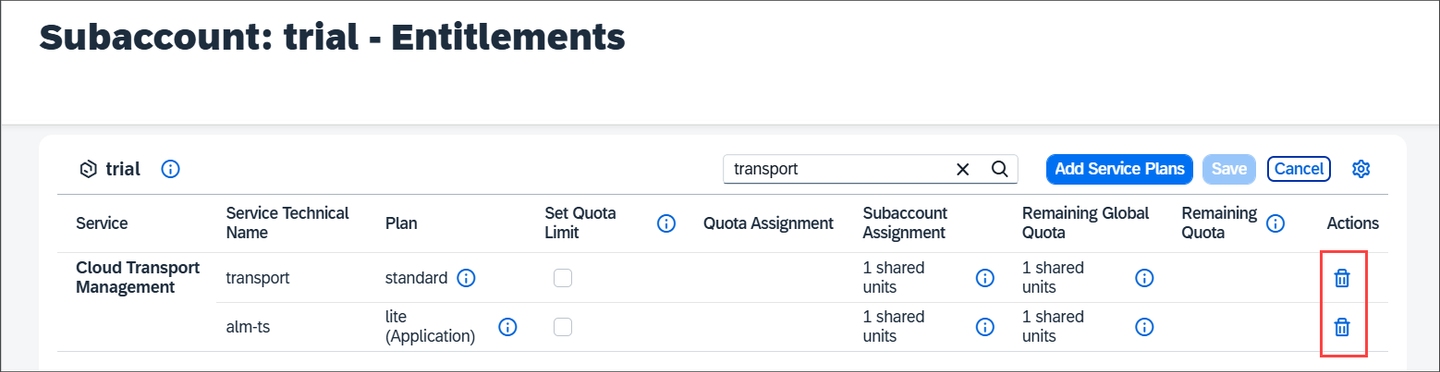
Create CS Subaccount 12 Save your changes.
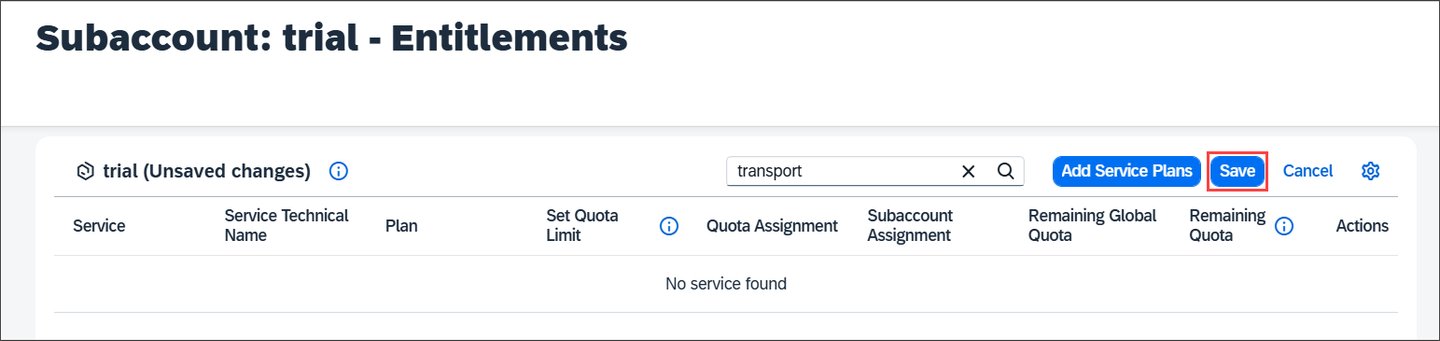
Create CS Subaccount 13 The entitlements for Cloud Transport Management were removed from the trial subaccount.
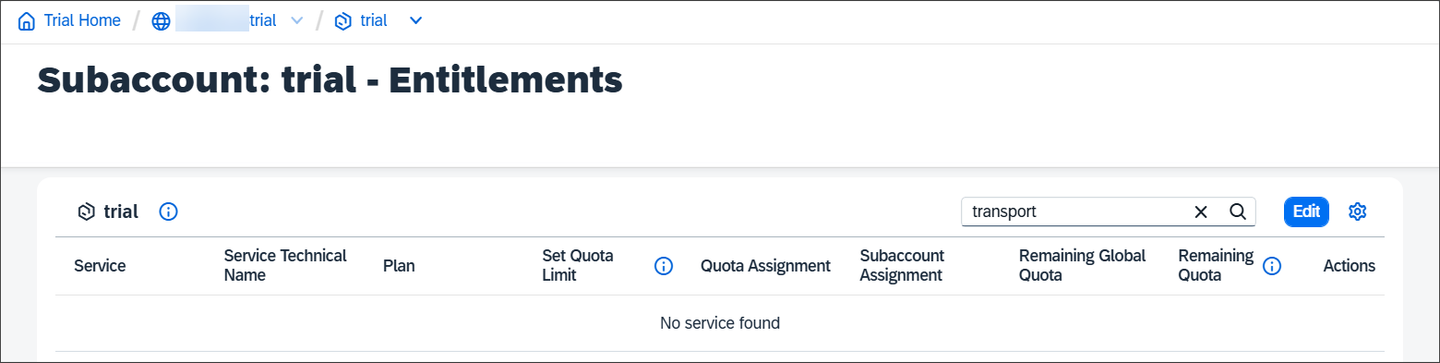
Create CS Subaccount 14
See also on SAP Help Portal: Managing Subaccounts Using the Cockpit, Org Administration Using the Cockpit
To access SAP BTP Cockpit of your enterprise account, choose https://cockpit.btp.cloud.sap. Depending on your own geo location, this URL will redirect you to the closest regional SAP BTP Cockpit URL.
In your global account, navigate to the subaccount in which you want to use SAP Cloud Transport Management. You might also want to create a new subaccount for this tutorial, if you have the necessary authorizations.

Subaccounts If Cloud Foundry is not yet configured in your subaccount, you have to do it now. For that, click on Enable Cloud Foundry in your subaccount overview.

EnableCloudFoundry In the dialog window, stay with the defaults and potentially adapt (shorten) the Org Name, which still has to be unique. Click on Create

EnableCloudFoundry2 You need to create a space in your Cloud Foundry environment. For this, click on Create Space in your subaccount overview.

CreateSpace In the dialog window, provide a Space Name, leave the selected roles unchanged, and click on Create.

CreateSpace2 Your subaccount overview should look like this:

SubaccountConfiguredWithCF
See also on SAP Help Portal: Initial Setup
In general, entitlements are required to define access of a subaccount to a service.
Since you’ve removed the entitlements for SAP Cloud Transport Management service from the trial subaccount in the previous step, the entitlements are available in the Central Services subaccount.
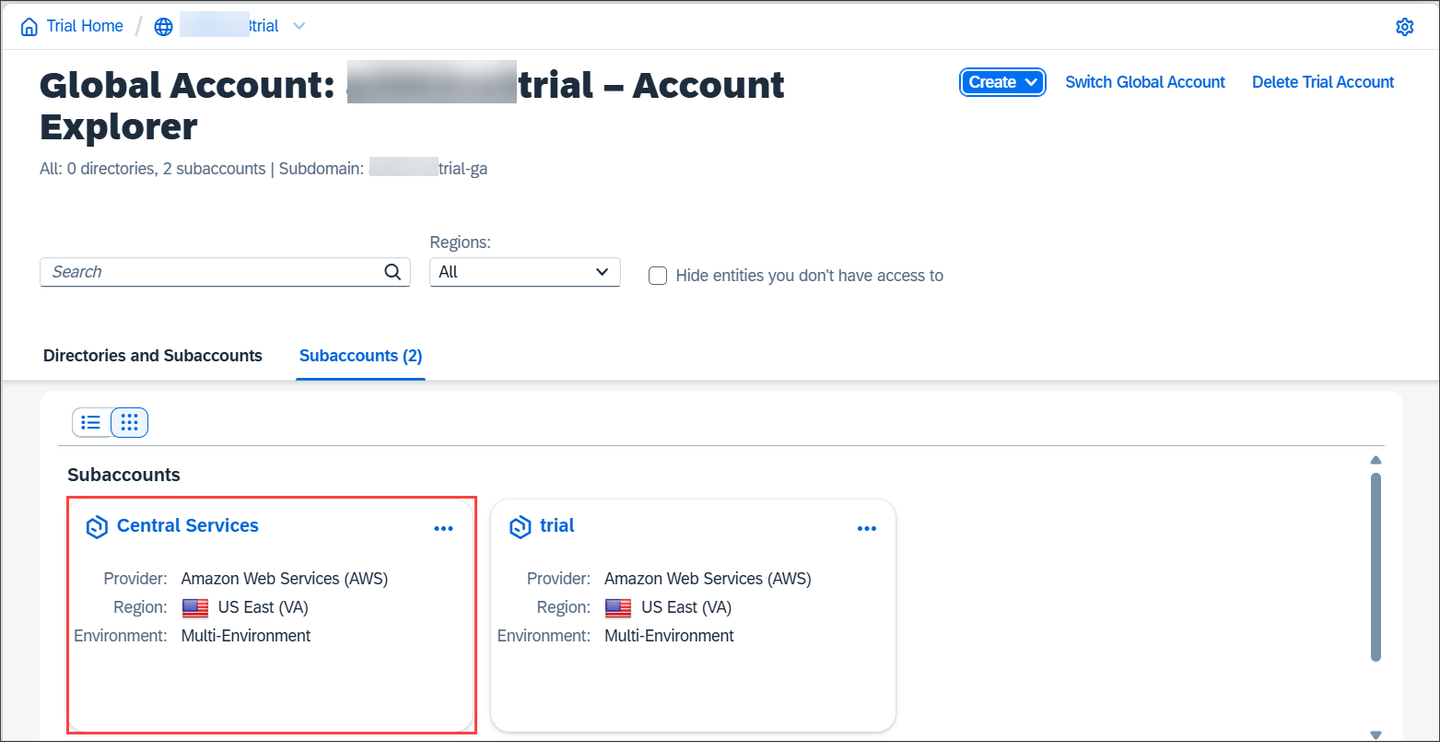
In the Account Explorer of the global account, click on the Central Services tile.
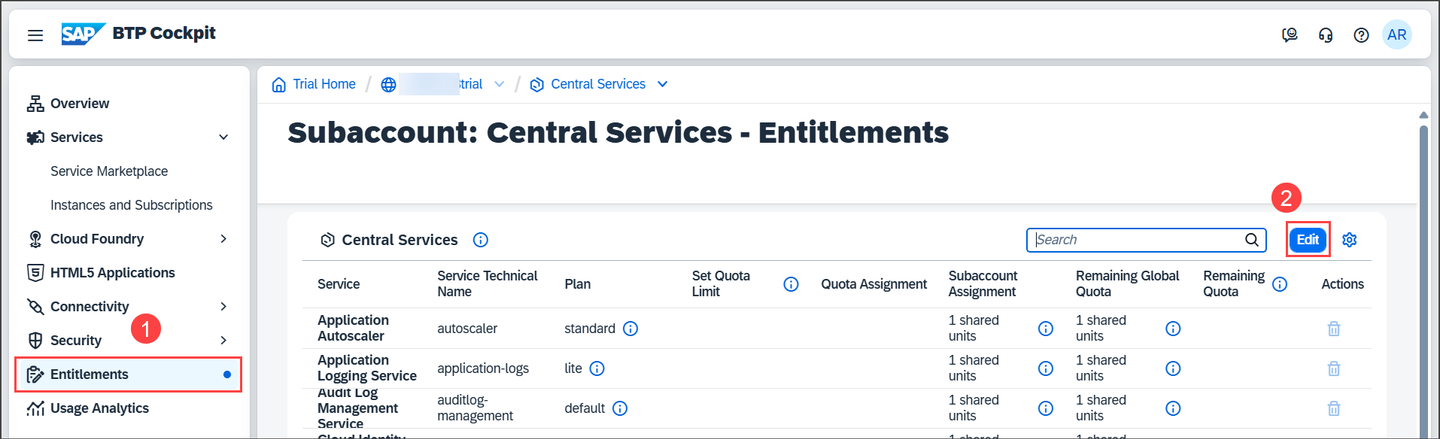
Move Entitlements 15 In the subaccount overview, choose Entitlements from the navigation on the left (1), and choose Edit (2).
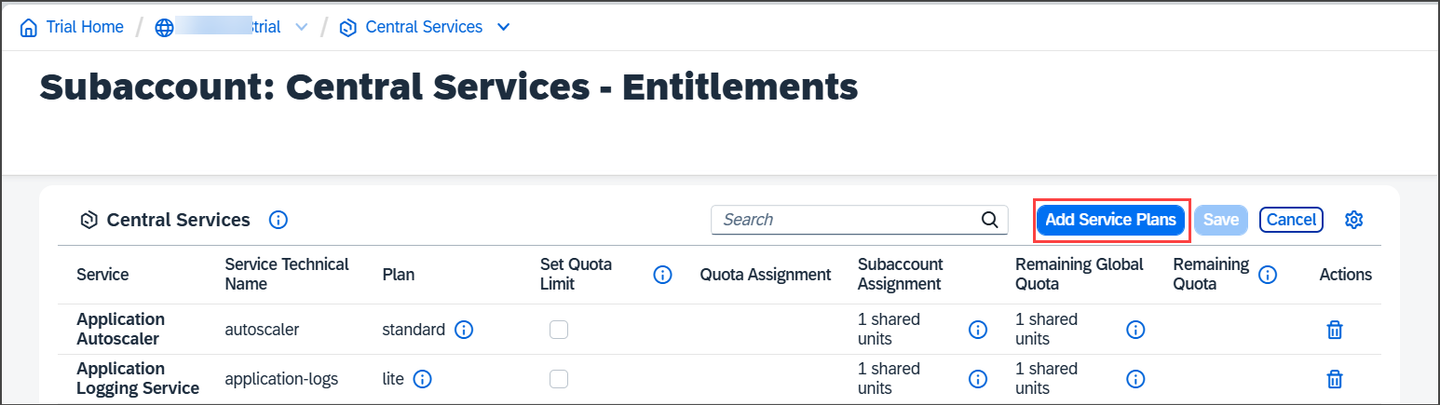
Move Entitlements 16 To add entitlements, choose Add Service Plans.
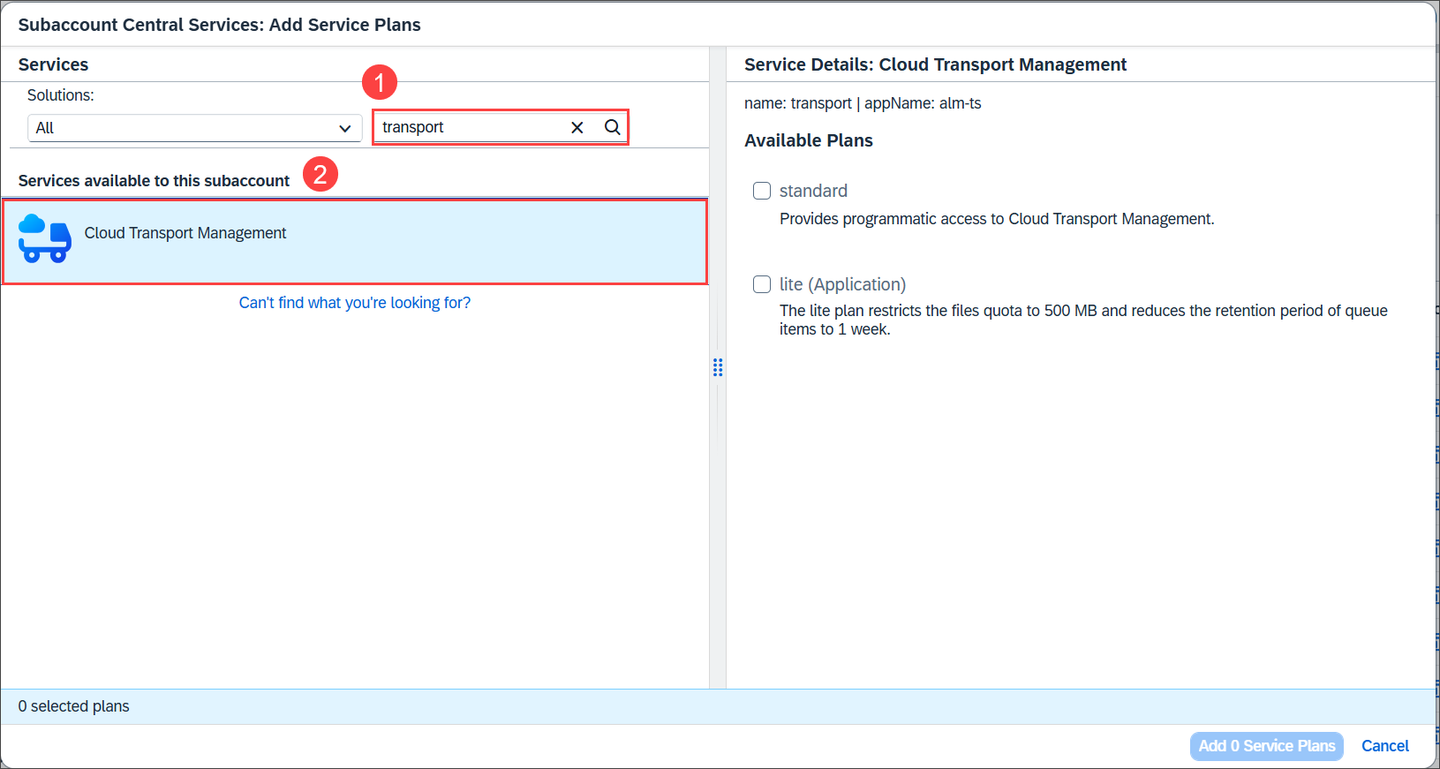
Move Entitlements 17 In the search field, filter for transport (1) and select Cloud Transport Management (2).
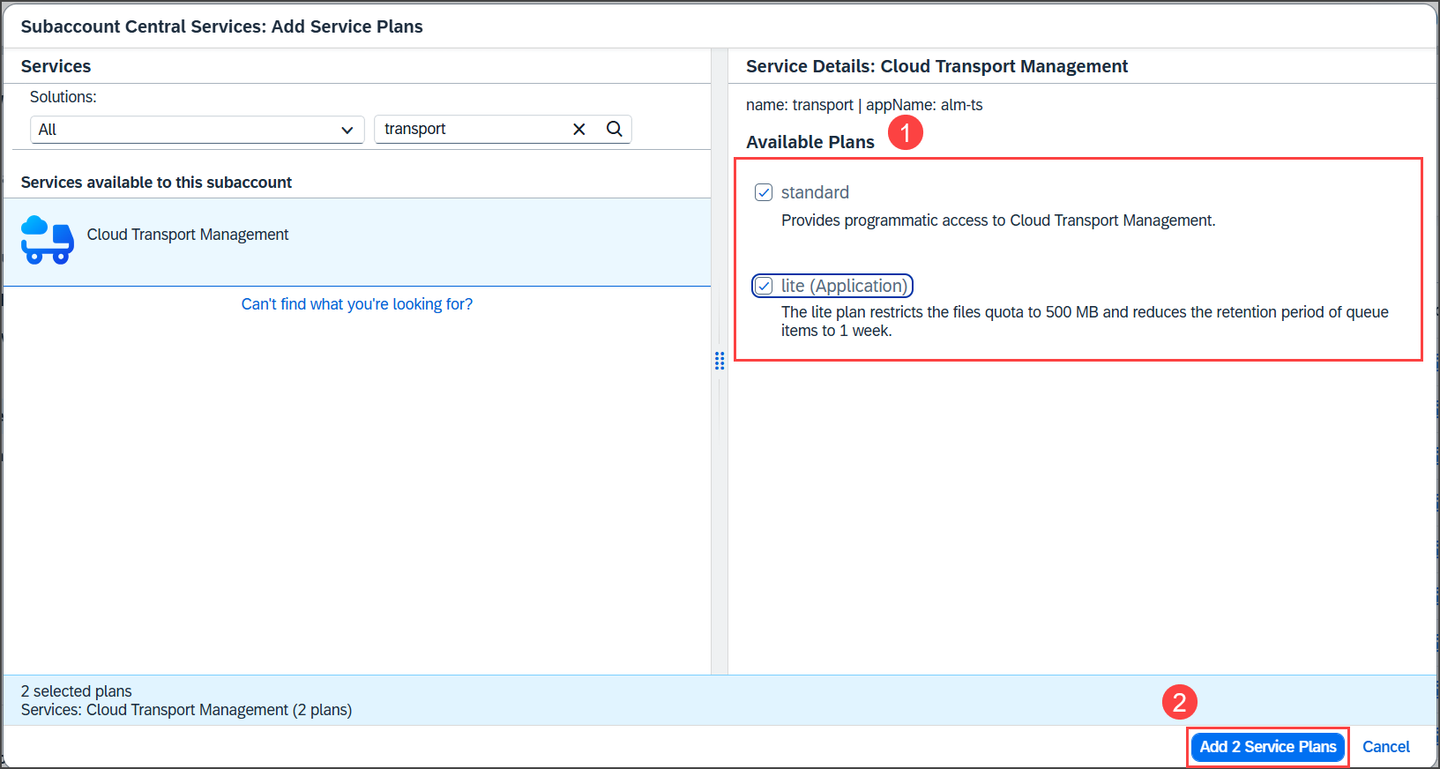
Move Entitlements 18 Select both plans (1) - standard for API access to Cloud Transport Management, and lite (Application) for access to the user interface - and choose Add 2 Service Plans (2).
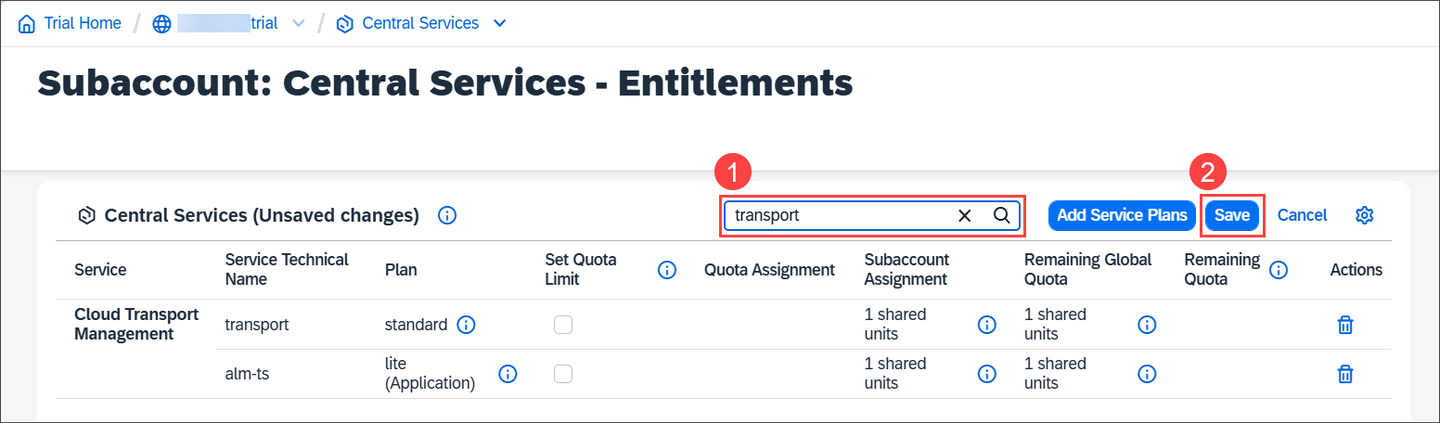
Move Entitlements 19 Filter for transport (1) to see the assigned plans for SAP Cloud Transport Management service. Save your changes (2).
Move Entitlements 20
To display the existing entitlements for SAP Cloud Transport Management, select the Entitlements link on your subaccount’s overview screen. In a new subaccount (or in a subaccount that hasn’t been used for SAP Cloud Transport Management), you will normally not find entitlements for SAP Cloud Transport Manangement.

ExistingEntitlements To change the entitlement settings, click on Edit.

EditEntitlements To add the missing entitlements, click on Add Service Plans.

AddServicePlans In the dialog window, search for Cloud Transport Management (for example by entering trans). Click on the entry Cloud Transport Management. From the Available Plans, select standard (without Application) and free (Application). Click on Add 2 Service Plans.

SelectServicePlans Choose Save.

SaveServicePlans
See also on SAP Help Portal: Configuring Entitlements to SAP Cloud Transport Management
To enable the usage of the user interface of SAP Cloud Transport Management service, subscribe to the Cloud Transport Management application.
In your subaccount, go to Services > Service Marketplace (1). Filter for transport (2). The Cloud Transport Management tile is displayed (3).
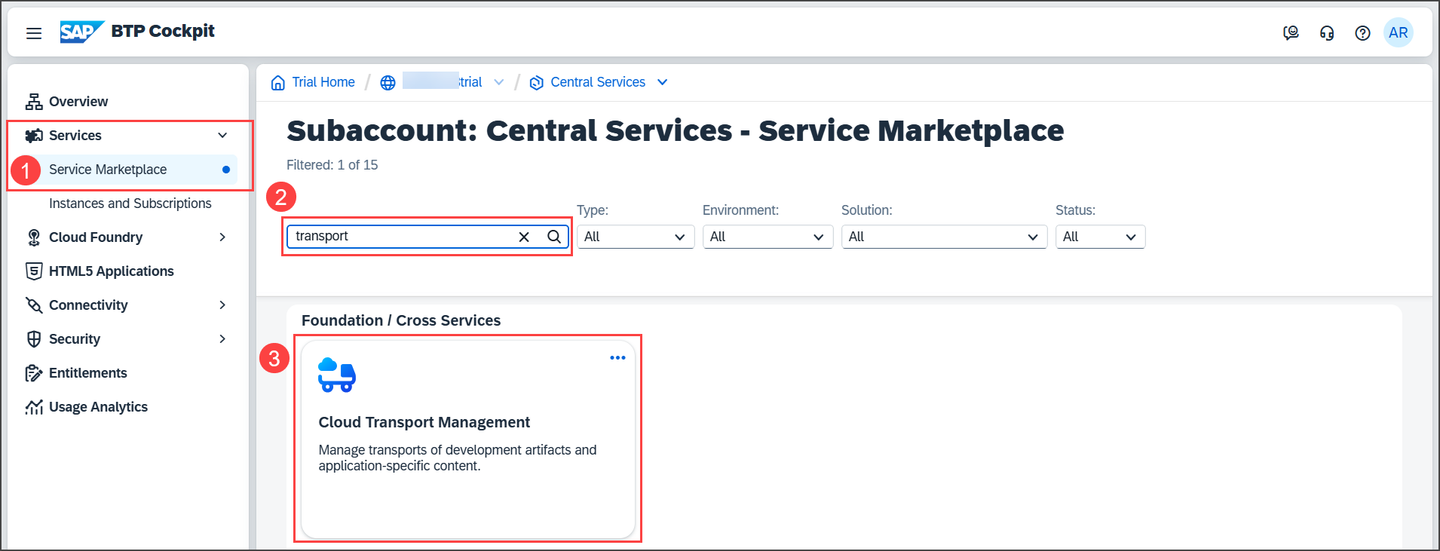
Subscription1 Select the three dots (…) on the tile, and choose Create.

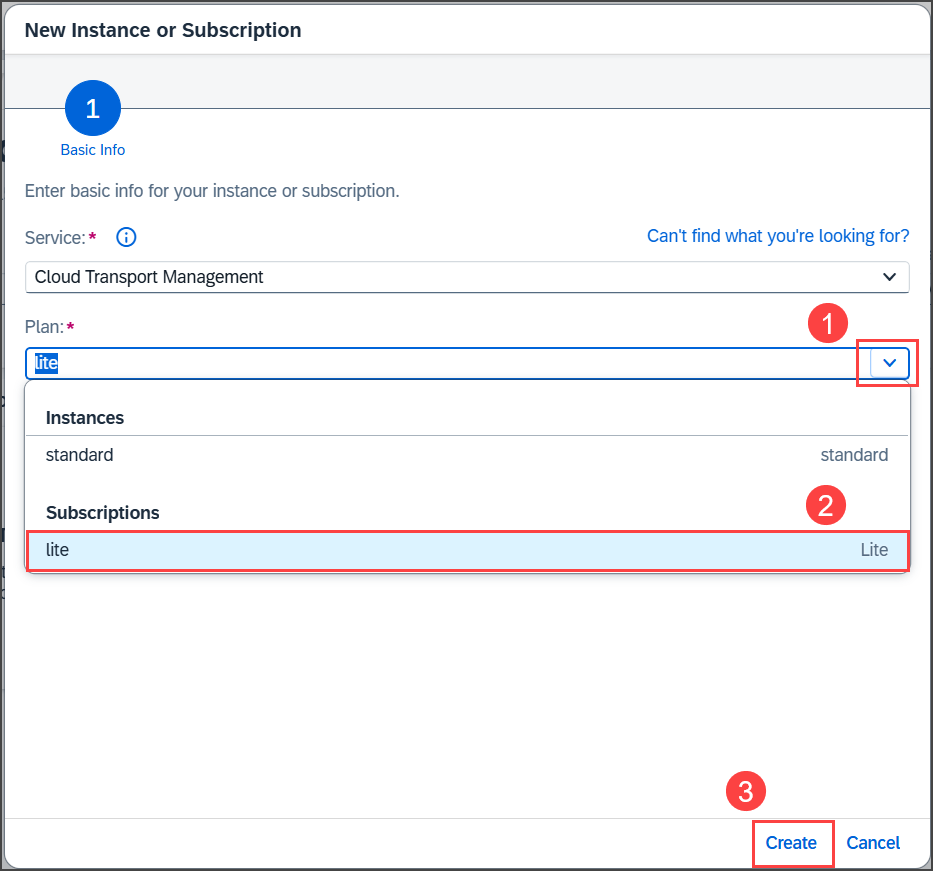
Subscription2 On the New Instance or Subscription dialog, from the Plan dropdown box (1), select lite (2) and choose Create (3).
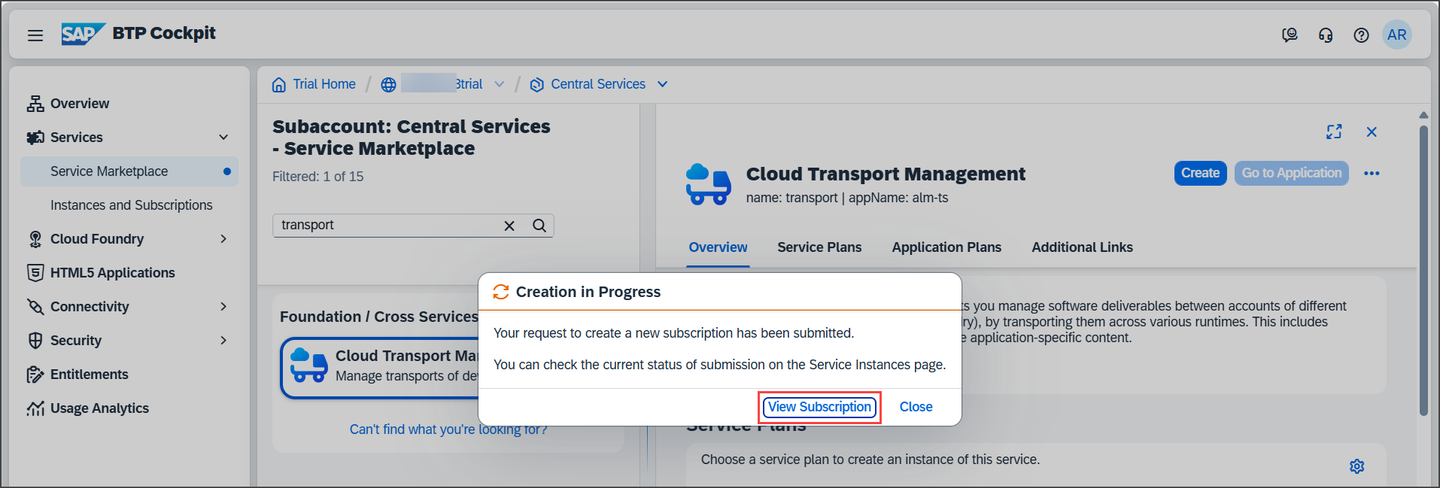
Subscription3 On the Creation in Progress dialog, choose View Subscription.
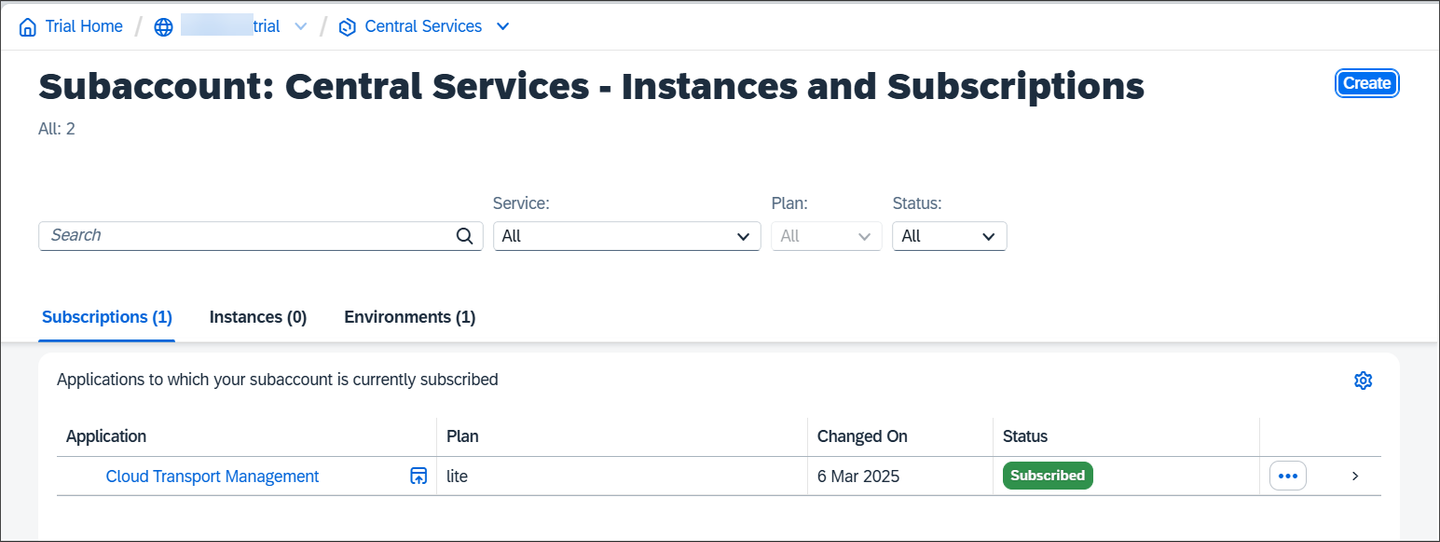
Subscription4 You’ve subscribed to the Cloud Transport Management application.
Subscription5
In your subaccount, go to Services > Service Marketplace. Use the Search field to filter for transport management. The Cloud Transport Management tile is displayed. Click on it.

ServiceMarketplace To create a subscription, choose Create.

CreateSubscription1 Select the free subscription plan. If you have access to a paid subscription, this would show as standard in the subscription plan list, in addition to the standard entry in the instance list.

SelectSubscriptionPlan Click on Create.

CreateSubscrition2 The subscription is in progress. Choose View Subscription.

ViewSubscription You’ve subscribed to the Cloud Transport Management application.

SubscriptionEstablished
See also on SAP Help Portal: Subscribing to Cloud Transport Management
After successful subscription, you need to configure user access to the SAP Cloud Transport Management application. You create different role collections for the different SAP Cloud Transport Management roles, and assign roles to the role collections based on the application templates. Afterwards, you assign the role collections to users or user groups.
Although the screenshots show the steps in the trial account, they are identical and therefore also valid for an enterprise account.
Before you can use the user interface of SAP Cloud Transport Management, you’ll need to set up role collections and assign roles and permissions to your user, which you will do in this step. To create role collections for the roles that you want to use for the service, choose Security > Role Collections from the navigation on the left (1). Filter for role collections called TMS (2). The delivered role collections are displayed. To create a new role collection, choose Create (3).

Roles2 To create a role collection for administrative tasks, enter a name, here
TMS Admin(1), a description (optional), and choose Create (2).
Roles3 The role collection was created.

Roles4 To assign the SAP Cloud Transport Management Administrator role to the new role collection, go to the Roles tab of the subscription details. To do this, choose Services > Instances and Subscriptions from the navigation on the left (1), and select the arrow at the end of the Cloud Transport Management row (2).

Roles3a Select the Roles tab.
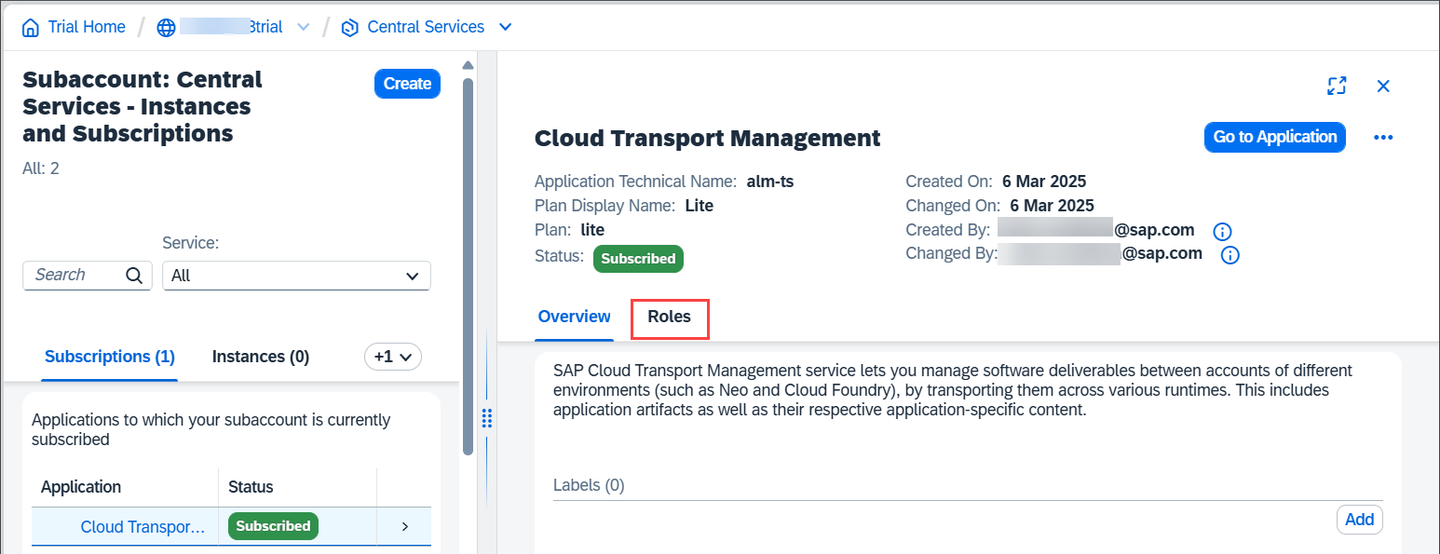
Subscription6 On the Roles tab, the default role templates for SAP Cloud Transport Management are displayed. In the row of the Administrator role template, choose the + button.

Roles5 On the Add to Role Collection dialog box, select the TMS Admin role collection (1), and choose Add (2).

Roles6 The role collection was added to the Administrator role template.

Roles7 You can now add users to the new role collection. To do this, choose Security > Role Collections from the navigation on the left (1). Filter for the TMS role collections (2). Select the arrow at the end of the TMS Admin row (3).

Roles8 In the details of the TMS Admin role collection, choose Edit.

Roles9 You can add individual users or user groups to the role collection. In the tutorial, add an individual user. To do this, select the identity provider (here: Default identity provider). In the ID field, enter an existing e-mail address and choose
Enter(1). The E-Mail field is automatically filled with the selected e-mail address. Save your changes (2).
Roles10 The role collection was added to the selected user. You see that 1 user is displayed.

Roles11
If you want to create other role collections for other tasks, such as the Import Operator for import tasks, you can repeat the steps. However, this is not required for the tutorial.
See also on SAP Help Portal: Setting Up Role Collections
A service instance is required to enable the usage of SAP Cloud Transport Management service using programmatic access (using API Remote Call), for example if you want to use the service to export content directly in your application. To create a destination to SAP Cloud Transport Management service, you need to provide a service key.
Although the screenshots show the steps in the trial account, they are identical and therefore also valid for an enterprise account.
In your subaccount, choose Services > Instances and Subscriptions (1). Choose Create (2).
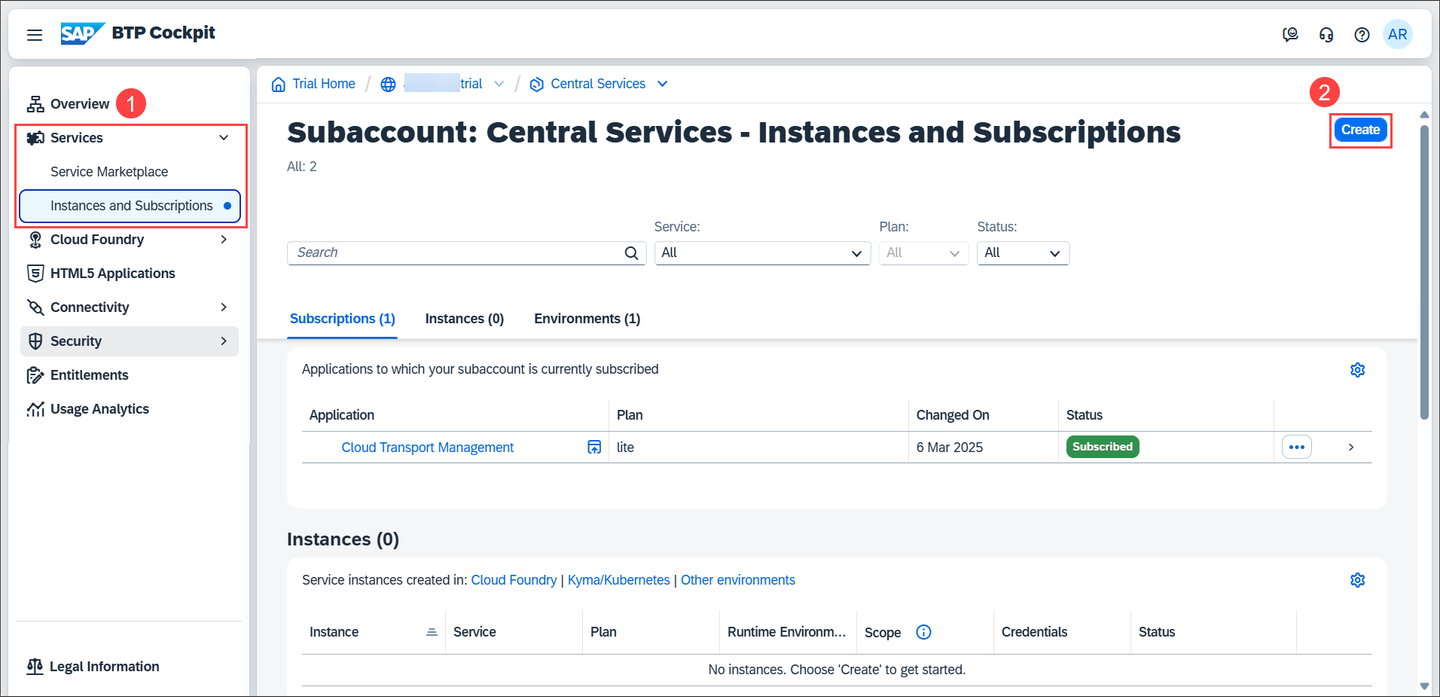
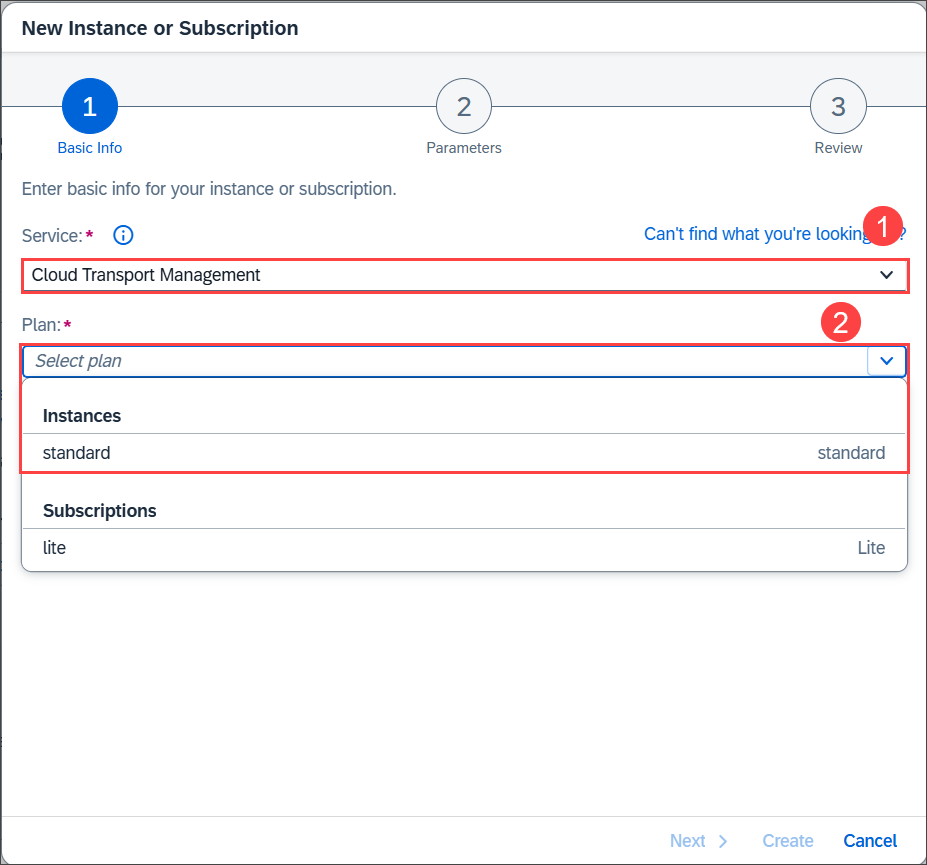
ServiceInstance1 From the Services dropdown menu, select Cloud Transport Management (1). From the Plan dropdown menu, select the standard plan of the Instances type (2).
ServiceInstance3 Enter an Instance Name (1), and choose Create (2).
You don’t have to choose Next, because the next step isn’t necessary for SAP Cloud Transport Management. It’s a default step when creating service instances, allowing you to enter JSON parameters, but SAP Cloud Transport Management doesn’t support JSON parameters.

ServiceInstance4 The service instance is being created.

ServiceInstance5 When the instance is created, you can create the service key. Select the three dots (…) at the end of the row and choose Create Service Key.

ServiceInstance7 On the New Service Key dialog, enter a name for the service key (1), here
cTMS1-key, and choose Create (2).
ServiceInstance8 The service key is created. To display it, select the three dots (…) at the end of the row and choose View.

ServiceInstance9 The service key looks as follows. For the destination to SAP Cloud Transport Management service, you need, for example, the values of
clientid,clientsecret, andurlin theuaasection.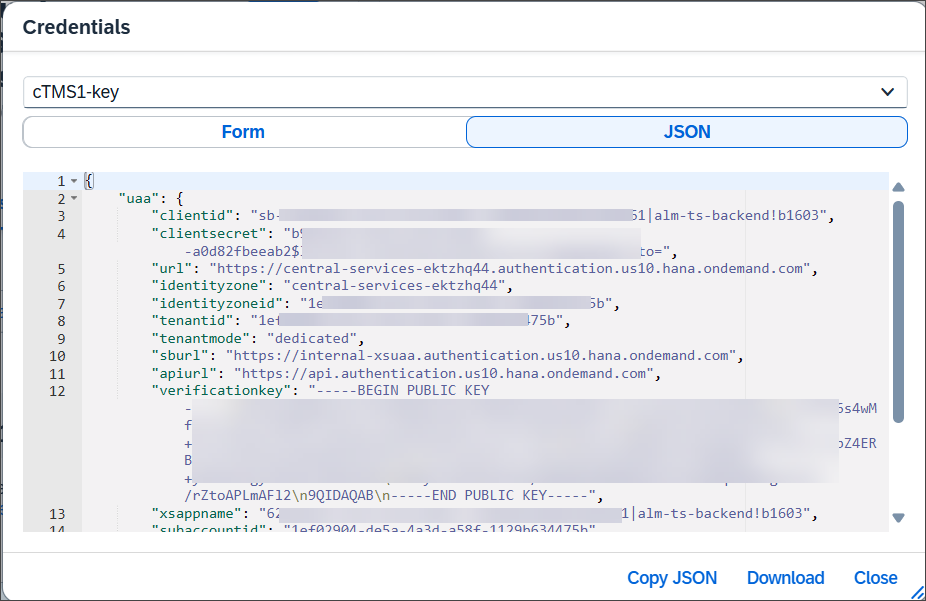
ServiceInstance10
See also on SAP Help Portal: Creating a Service Instance and a Service Key
You should now be able to access the user interface of SAP Cloud Transport Management service.
To check this, in your subaccount, choose Services > Instances and Subscriptions (1). In the Subscriptions section, choose the Cloud Transport Management link or the Go to Application icon to the right of it (2).
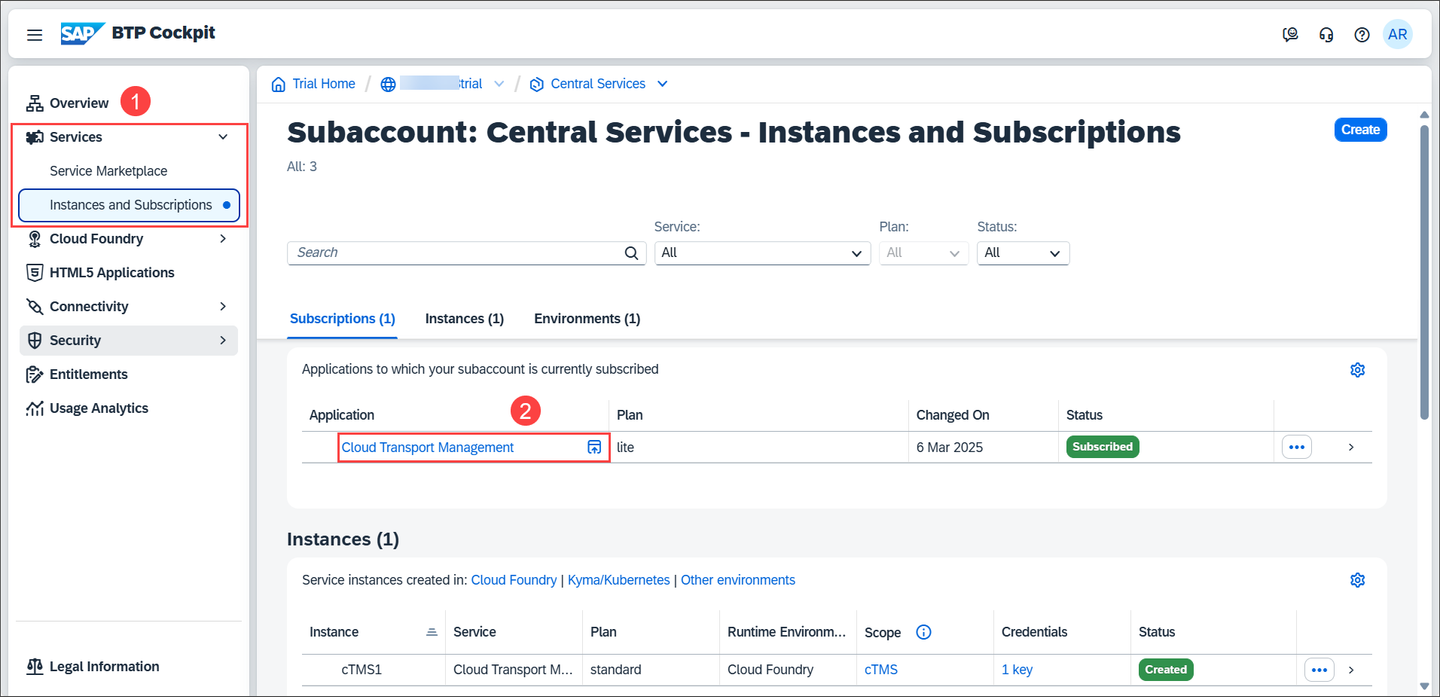
OpencTMSUI In a new tab, you should now see the Overview page of your SAP Cloud Transport Management service instance. Currently, it looks quite empty which is expected from a new instance.

cTMSUIAccessSuccessful
This concludes the tutorial. Congratulations!
For more information, see the SAP Cloud Transport Management documentation on SAP Help Portal.
Resources
Discussion
Share feedback on this tutorial or join the conversation in SAP Community.