
Overview
You will learn
- All configuration steps required to transport SAP Integration suite content from a source subaccount to a target subaccount using the SAP Content Agent UI on the source subaccount to start the transport.


Prerequisites
Prerequisites
- You’ve completed the tutorials:
- Transport SAP Integration Suite Content using SAP Cloud Transport Management service and SAP Content Agent service
- Set Up the SAP Integration Suite Source Subaccount with the following exceptions: You can omit Step 3: Create a Service Instance for SAP Content Agent, Step 4: Create a Service Key for the SAP Content Agent Instance, and Step 5: Create an SAP Content Agent Destination in the SAP BTP Source Account. Instead, you subscribe to SAP Content Agent. The subscription process is part of the current tutorial.
- Set Up the SAP Integration Suite Target Subaccount
- Create a Transport Destination and Configure the SAP Integration Suite Transport Landscape
- Establish an Export Connection from SAP Content Agent Service in the Source Subaccount to SAP Cloud Transport Management Service
Steps
Scenario Overview
This tutorial outlines the steps to start the transport of SAP Integration Suite content using the SAP Content Agent UI. Instead of creating an SAP Content Agent instance, service key, and a destination to SAP Content Agent on the source subaccount, you need a subscription to SAP Content Agent and the appropriate role collection assigned to start the UI. You don’t need to enable the transport in SAP Integration Suite.
Since you manage the content transport using the SAP Content Agent UI, SAP Integration Suite doesn’t need to notify SAP Content Agent about new transport candidates. Content suitable for transport is directly accessed through the CloudIntegration destination that was previously set up. As a result, the ContentAssemblyService destination isn’t needed.
If you’ve already configured the entities in the previous tutorials, you can leave them as they are. They won’t interfere with the setup for using the UI.

Additional resources about using the SAP Content Agent UI:
- Supported Transport Scenarios in the SAP Content Agent documentation on SAP Help Portal
- Blog post Transport selected artefact to Cloud Transport Management service using Content Agent UI
This step assumes that you’re running the tutorial in the SAP BTP Trial account. If you have an enterprise account, open SAP BTP Cockpit in your enterprise account. In this tutorial, you need access to both the SAP BTP source and target accounts.
To access SAP BTP Cockpit of the source SAP BTP trial account, go to your SAP BTP Trial landing page and choose Go To Your Trial Account. (The name of the button may vary.)
You will use the trial subaccount to open SAP Content Agent UI and start the transport.
You will use the Central Services subaccount to go to the SAP Transport Management service UI and start the import of the integration content.
To access SAP BTP Cockpit of the target SAP BTP trial account, ask your colleague to log on to their SAP BTP account.
You or your colleague will use the trial subaccount to go to the SAP Integration Suite UI. You’ll verify before the transport that the integration content doesn’t exist in the Design section. After the transport, you’ll verify that it was imported there.
In the SAP Integration Suite source subaccount trial, choose Services > Service Marketplace from the navigation on the left (1). In the search field, filter for Content Agent Service (2). On the Content Agent Service tile, select the three dots …, and choose Create (3).

Subscribe to CAS 1 Select the free subscription plan from the Plan dropdown menu of Content Agent Service (1), and choose Create (2).

Subscribe to CAS 2 When the subscription has completed, it gets the green Subscribed status.

Subscribe to CAS 3
See also on SAP Help Portal: Subscribe to Content Agent User Interface
To use the UI of SAP Content Agent, assign a role collection.
In the SAP Integration Suite source subaccount trial, choose Security > Users from the navigation on the left (1). Select your user (2).

Assign CAS role coll 1 In the details of your user, select the Role Collections tab (1), and choose Assign Role Collection (2).

Assign CAS role coll 2 In the Assign Role Collection dialog, filter for Content Agent (1). Select the Content Agent Admin role (2), and choose Assign Role Collection (3).

Assign CAS role coll 3 The Content Agent Admin role was added to your user.

Assign CAS role coll 4
You’ve completed all configuration steps required to transport integration content from your source subaccount to your target subaccount using the SAP Content Agent UI.
See also on SAP Help Portal: Assign User Roles and Permissions
You can now run a test transport to learn how to start the transport in the SAP Content Agent UI. As a next step, select some standard SAP Integration Suite content that you want to transport.
If you already have integration content to transport, you can skip this step.
You can use any standard content from the Discover section in SAP Integration Suite, and copy it to the Design section. This content will be available for transport in SAP Content Agent.
In the trial source subaccount, choose Services > Instances and Subscriptions from the navigation on the left (1). Open the UI of SAP Integration Suite by clicking on the link or the icon (2).

Integration Suite Select Content 1 The UI of SAP Integration Suite opens in a new tab or window.
In the SAP Integration Suite UI, choose Discover > Integrations (1). In the Discover section, select any content, here SAP S/4HANA Integration with SAP Digital Manufacturing (2).
If you don’t see the Discover section, assign the
PI_Integration_Developerrole to your user (see also step 2 of tutorial Set Up the SAP Integration Suite Source Subaccount).
Integration Suite Select Content 2 In the detail view of the integration package, choose Copy.

Integration Suite Select Content 3 Choose Design > Integrations and APIs (1). The SAP S/4HANA Integration with SAP Digital Manufacturing is now available in the Design section.

Integration Suite Select Content 4
In the trial source subaccount, choose Services > Instances and Subscriptions from the navigation on the left (1). Open the UI of SAP Content Agent by clicking on the link or the icon (2).

Content Agent Select Content 1 The UI of SAP Content Agent opens in a new tab or window. The Activities Performed tile is empty as expected from a new instance. The Cloud Transport Management tile shows the Connected status. This status indicates that the destination to SAP Cloud Transport Management is configured correctly in the subaccount.
In the SAP Content Agent UI, choose Export to start the Export Content Wizard.
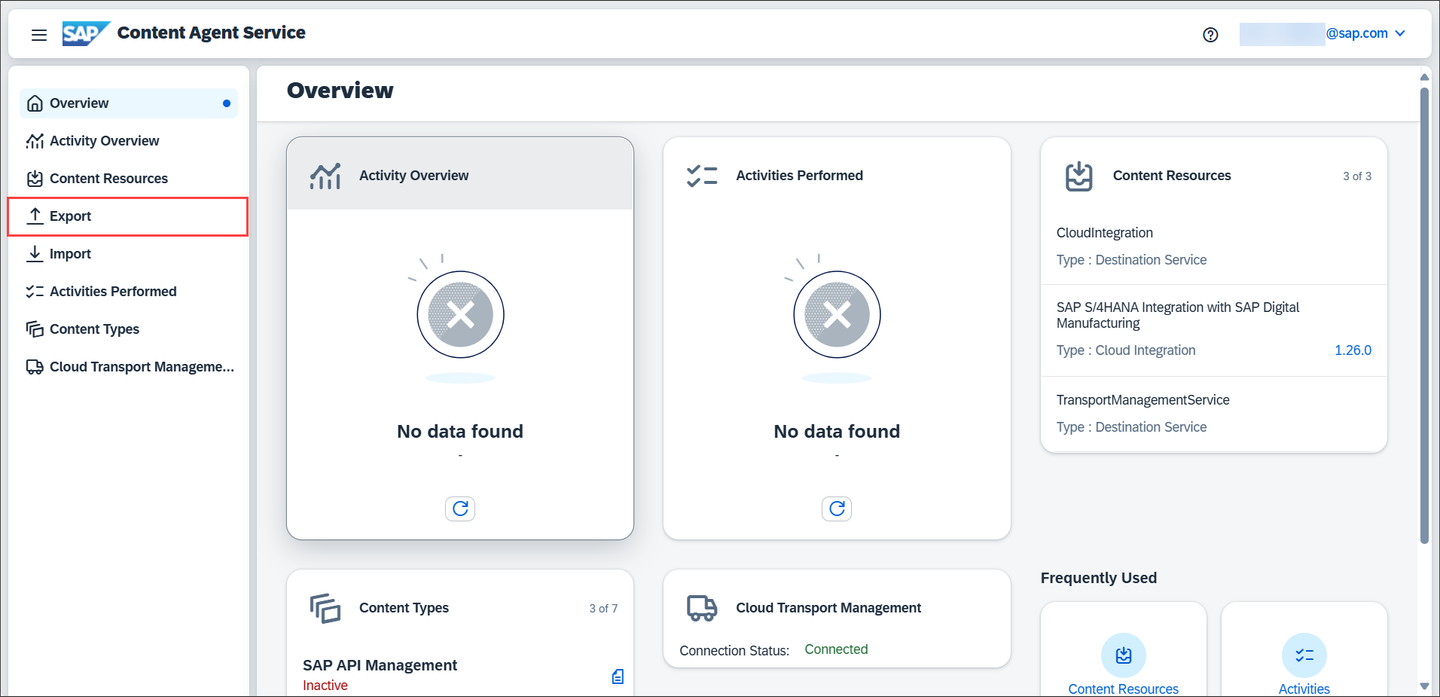
Content Agent Select Content 2 The SAP S/4HANA Integration with SAP Digital Manufacturing content package is in the list of content that can be exported. When content includes subcomponents, you can expand it to view them. Click on the arrow to do this.

Content Agent Select Content 3 When you select the content, the system automatically preselects any mandatory subcomponents. Here, no mandatory subcomponents are selected.

Content Agent Select Content 4 SAP Content Agent allows you to more effectively manage content transport by customizing and combining different subcomponents across single or multiple cloud integration packages and artifacts. For testing purposes, select some subcomponents that you want to export (1), and choose Step 2 (2).

Content Agent Select Content 5 In the Export Details step, the Export Mode: SAP Cloud Transport Management is preselected. Select the Source Node, here DEV_NODE (1). Enter a description, here
SAP S/4HANA Integration with SAP Digital Manufacturing started in Content Agent UI(2). Choose Step 3 (3).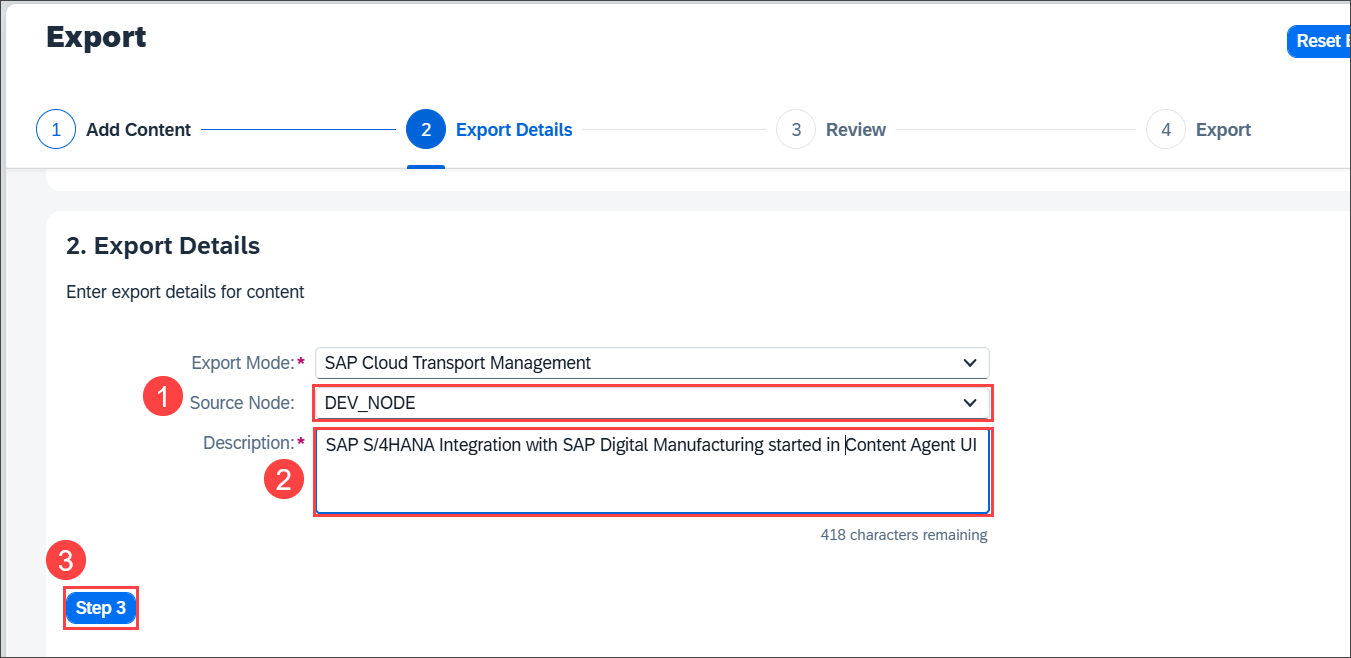
Content Agent Select Content 6 In the Review step, the content that you’ve selected for transport is displayed along with the Export Mode details. Choose Step 4.

Content Agent Select Content 7 The content is exported. SAP Content Agent displays the export progress. Once it’s completed, you see a success message. To go to the activity page, click the activity ID link.
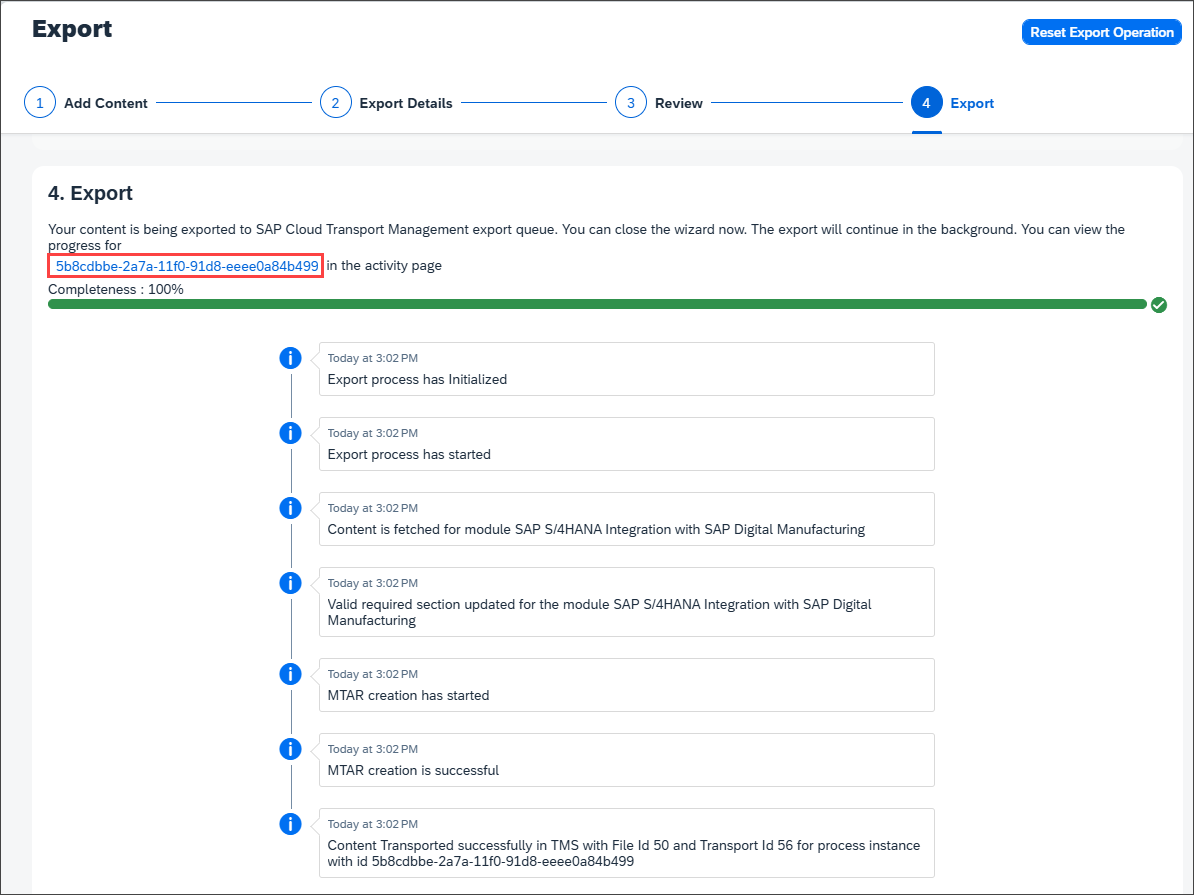
Content Agent Select Content 8 On the Activities Performed screen, the recent export activity is displayed. Click anywhere in the row to display more details.
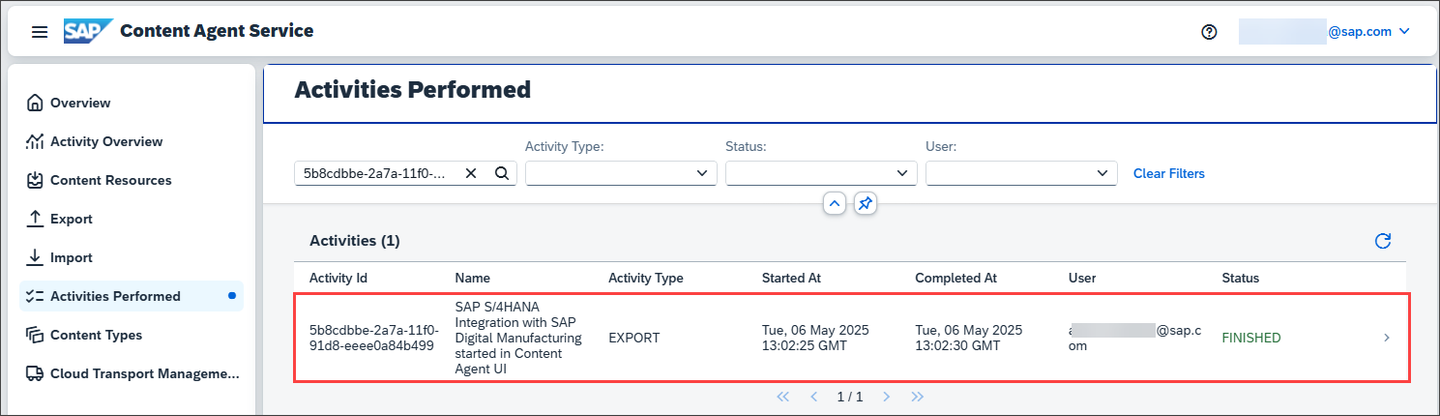
Content Agent Select Content 9 Detailed activity logs are displayed. Choose Transport Details.
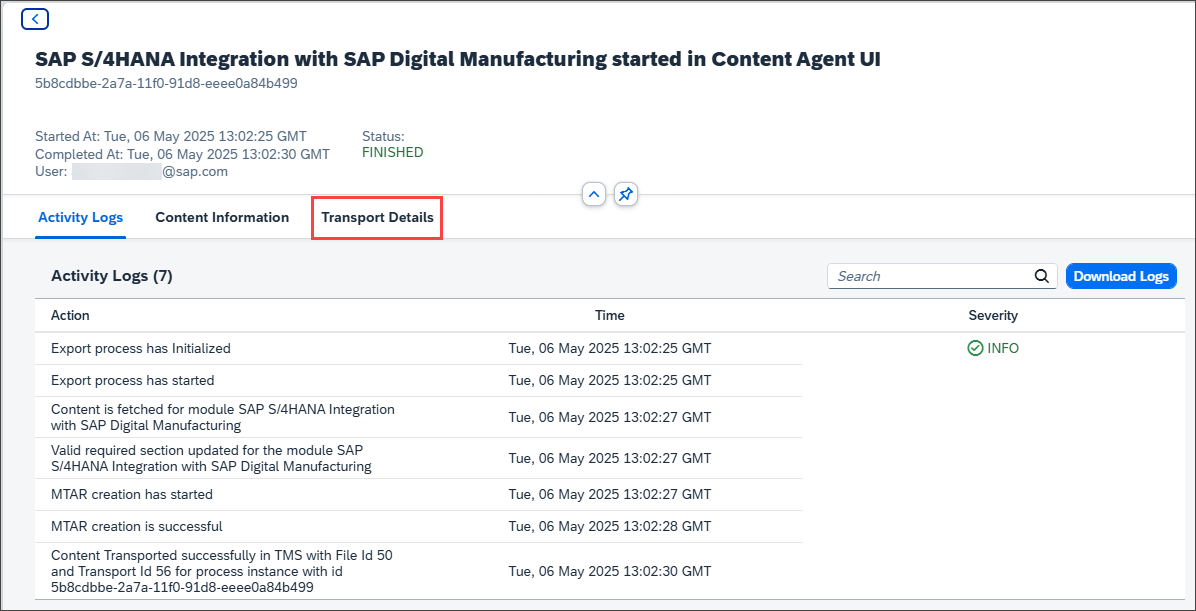
Content Agent Select Content 10 On this tab, the target node as configured in SAP Cloud Transport Management service is displayed. Choose the View Transport Request 56 link to open this request in the SAP Cloud Transport Management UI.

Content Agent Select Content 11 The SAP Cloud Transport Management UI opens in a new browser tab or window. The
TARGET_NODEis displayed.
Content Agent Select Content 12
Before importing content into the target subaccount, you can optionally verify that it doesn’t already exist there.
See also on SAP Help Portal: Export Content Wizard
To verify that the content package is not yet available in the Design section of SAP Integration Suite in the target subaccount, proceed as follows.
You or your colleague: Log on to the target SAP BTP account. Select the trial subaccount.
Choose Services > Instances and Subscriptions, and select the Integration Suite link or the corresponding icon to open the UI.
The SAP Integration Suite UI opens in a new browser tab or window. Choose Design > Integrations and API. The Design section in the SAP Integration Suite target is empty.

Run Test Transport 16
Return to the SAP Cloud Transport Management UI in the SAP BTP source account in the central administrative subaccount Central Services that you’ve opened from the SAP Content Agent UI.
To go to the import queue, click on the TARGET_NODE.

Import Integration Content 1 The import queue of the TARGET_NODE opens. The transport request created for the integration content was added to the import queue with an Initial status. The description that you’ve entered in step 2 of the Export Content Wizard in the SAP Content Agent UI is displayed as the Transport Description. Your user email address is displayed as the Owner of the transport request.
To start the import, choose Import All.

Import Integration Content 2 Approve the import.

Import Integration Content 3 When the import is successful, the status of the transport request changes to Succeeded. You can display more details about the import in the log of the transport request. To display the log, click on the log icon.

Import Integration Content 4 The log contains detailed information about the individual import steps. When you scroll down to the end, the log shows that the import has ended with the status Success.

Import Integration Content 5
Return to the SAP Integration Suite UI on the target account to verify that the integration content has arrived there. Since you had previously opened the UI, refresh the browser to reload the UI.
In the Design section in the target subaccount, you can now see the SAP S/4HANA Integration with SAP Digital Manufacturing integration package. The credentials of the client ID from the SAP Content Agent service key on the target subaccount are displayed as the user who created the integration flow. This way, you can confirm that the integration flow was imported in the target subaccount.

Import Integration Content 6
Congratulations! You’ve successfully set up the scenario to start the transport using SAP Content Agent UI. In particular, use it to transport content of multiple applications or services together, and start the transport for multiple content types at once.
Resources
Discussion
Share feedback on this tutorial or join the conversation in SAP Community.