
Overview
You will learn
- How to enable SAP Alert Notification service in your SAP BTP trial account, so that you can use its features.
- How to create an action of type email, so that you can receive notifications to a given email.
- How to create a condition with an event property Category, predicate Is Equal To and value NOTIFICATION. SAP Alert Notification service for SAP BTP uses this condition to filter all relevant events regarding notifications.
- How to create a subscription using already created actions and conditions and receive notifications about SAP BTP events to your preferred communication channel or monitoring tool.


Prerequisites
Prerequisites
- If you are new to SAP BTP, follow the tutorial View the SAP BTP from 10,000 Meters.
- If you do not have an SAP BTP account, follow the tutorial Get a Free Account on SAP BTP Trial.
Steps
Intro
Go to your SAP BTP cockpit landing page. Click the Enter Your Trial Account button to see your global account.
The name of the Enter Your Trial Account button may vary.
You can use your personal CPEA enabled global account. Add the SAP Alert Notification service with a free plan to your account from the Entitlements section in the SAP BTP Cockpit. If you are not familiar with the process see Initial Setup from the SAP Alert Notification service for SAP BTP documentation.
The global trial account contains subaccounts. Navigate to your subaccount by clicking on the tile named ’trial'
The name of the subaccount may vary if you created it manually.

Subaccounts In the left panel, choose Services > Service Marketplace.
The Service Marketplace is where you can find services to attach to any of your applications. These services are provided by SAP BTP to create and produce applications quickly and easily. Once a service has been created, it is known as a
service instance.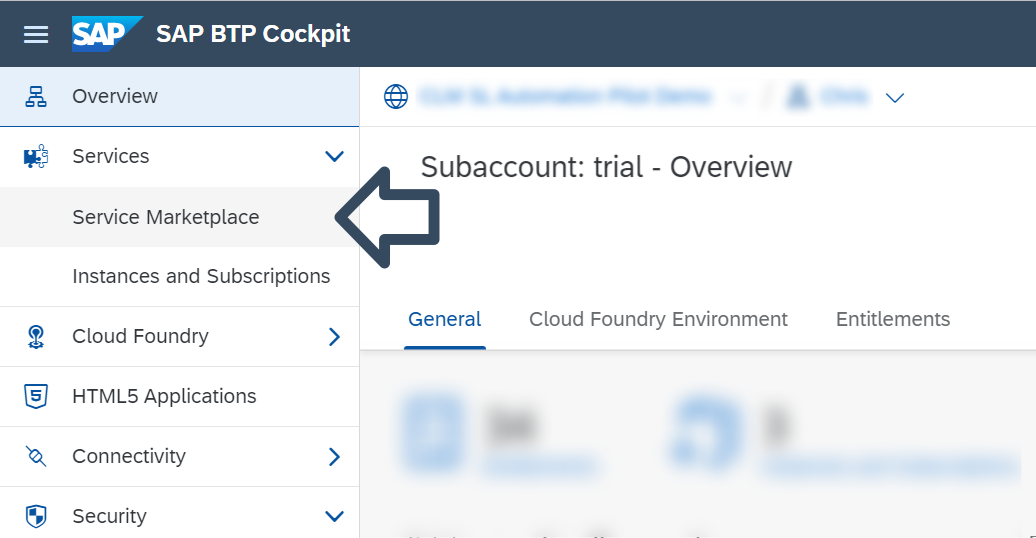
ServiceMarketplace Search for Alert Notification, and click on the Alert Notification tile.

ANS-Search
For more information see the SAP Alert Notification service for SAP BTP documentation at Initial Setup.
Click on the Create button to open the New Instance dialog.

CreateInstance Before creating an Instance you will need to create a Space. You can skip this step if you already have created a Space in your subaccount.

CreateSpace Choose a name for your Space and click on the Create button.
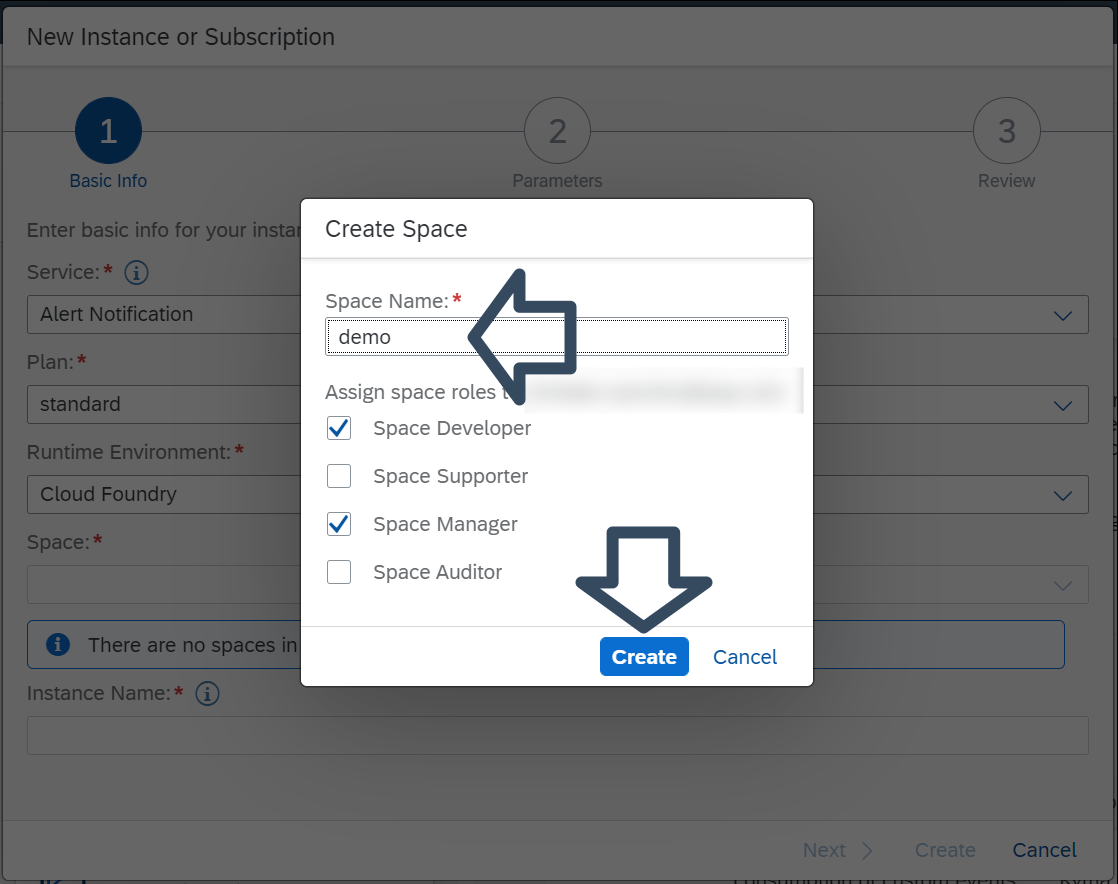
CreateSpaceTwo Enter a name for the instance and click on the Create button. No other configurations are needed.
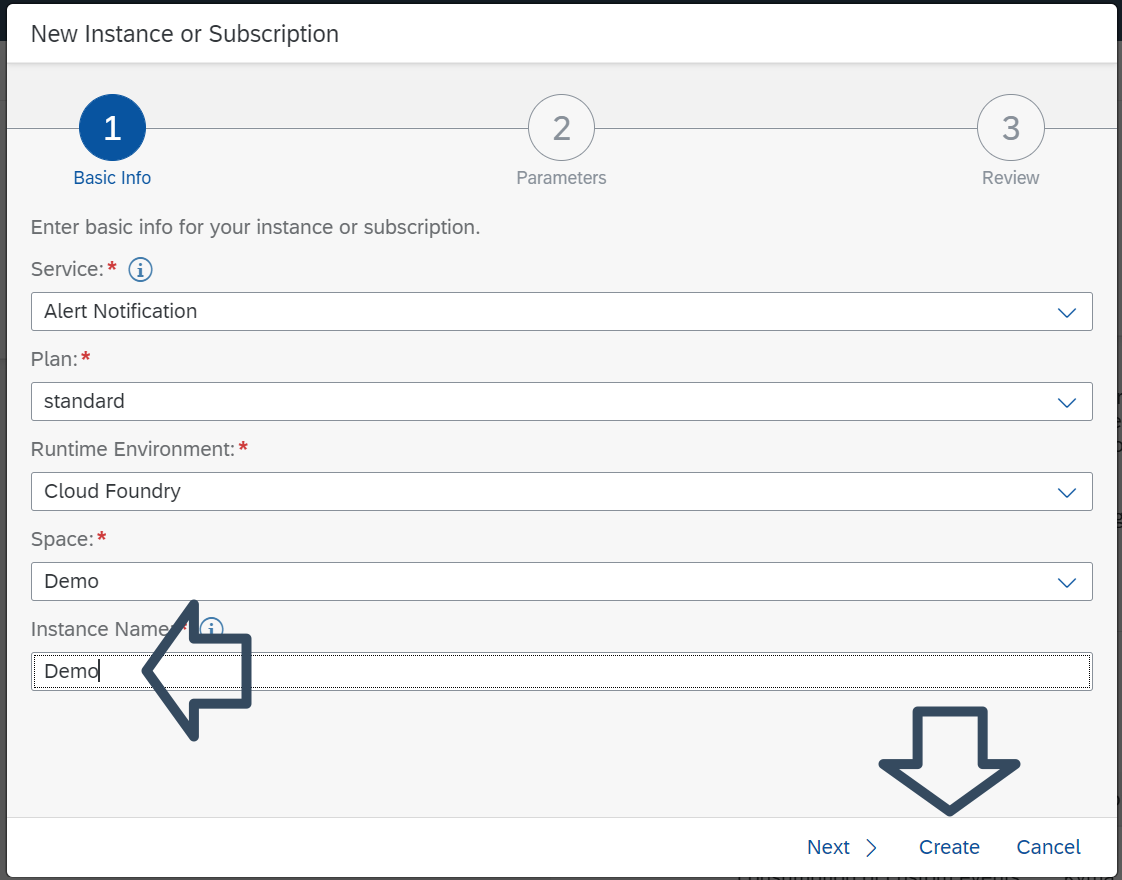
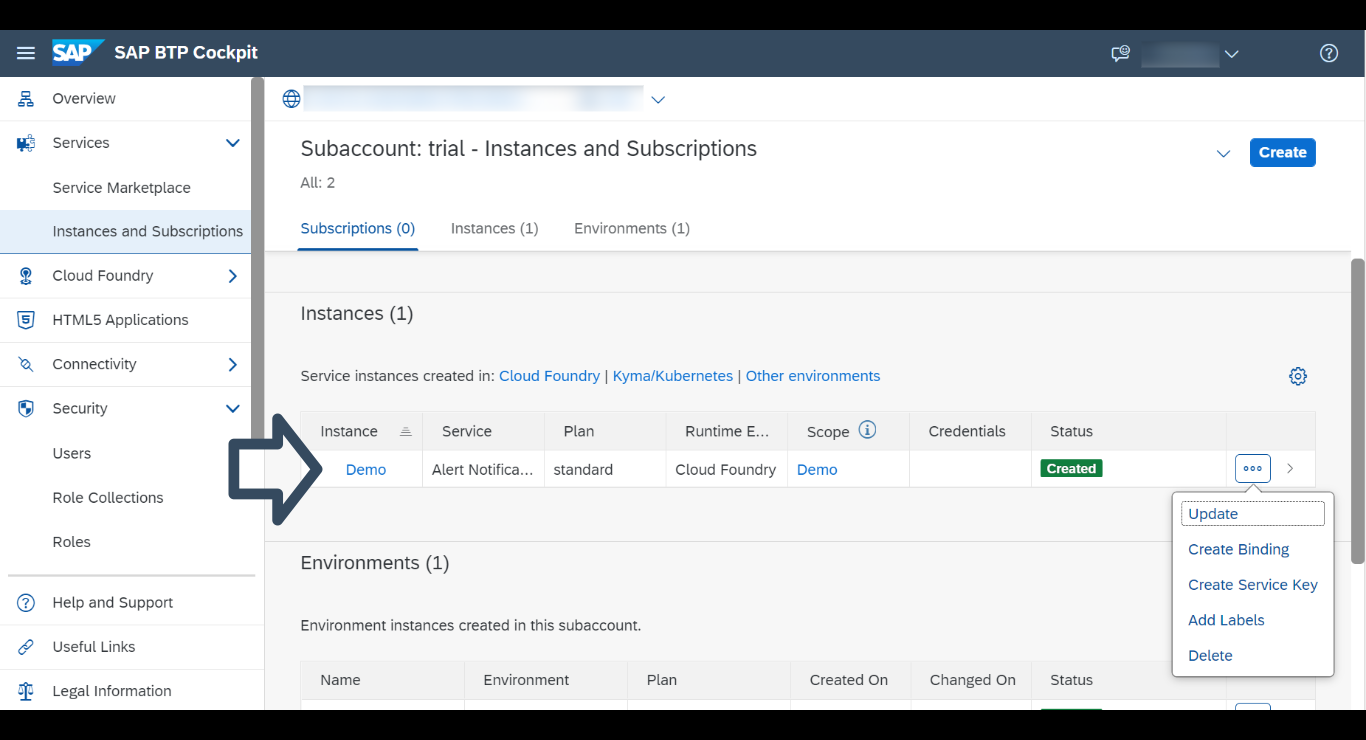
Instance To access your newly created Instance, choose Instances and Subscriptions from the left panel. Click on the Actions button, resembling three dots, to see your options for this particular Instance.
To see the details of your Instance click on the arrow next to the Actions button.

Instances-and-subscriptions To open the cockpit page of SAP Alert Notification service just click on the name of your Instance.
Cockpit
To create a Service Key choose the option Create Service Key from the Actions list and enter the following:
JSON{ "type": "BASIC", "permissions": [ "ALERT_READ" ] }
ServiceKey
If you want to receive notifications to other delivery channels, see the SAP Alert Notification service documentation at Managing Actions.
Open the Actions menu on the SAP Alert Notification service cockpit page and click on the Create button to open the dialog box.

Action In the Actions dialog box, choose the preferred email action type and then click on the Next button.

DialogBox Enter a unique name for your action in the Name field.

Name In the Email Address field, enter the destination email address to which the notification must be sent and optionally provide a custom template for customizing your notification email. Then click on the Create button.

Advanced Your newly created action is now available in the Actions menu in the left pane. Its initial state is Not Confirmed. A confirmation email with a confirmation token and a confirmation link is sent to the email address you have provided.

Email Open the automated confirmation email you have received. It contains the name of the action you have to confirm, a token, and a confirmation link you have to navigate to.
You can confirm the action in one of the following ways:
Using the Actions view:
Locate and open your new action.
In the overview that appears, click on the Confirm Action button.

Confirmation Enter the token that was sent to your email.
Using a confirmation link:
- Open the provided confirmation link that leads to the Action Confirmation page.
- Choose Confirm.
For more information see the SAP Alert Notification service for SAP BTP documentation at Store Action Type.
Open the Actions menu on the SAP Alert Notification service cockpit page and click on the Create button to open the dialog box.
Action In the Actions dialog box, choose the Store action type and then click on the Next button.

Store Enter a unique name for your action in the Name field and click on the Create button. The Description and Labels fields are optional.

StoreName You will be presented with a dialog box that confirms the Action has been created.

StoreCreated Your newly created action is now available in the Actions menu in the left pane.

StoreAvailable
If you want to use other conditions see the SAP Alert Notification service for SAP BTP documentation at Managing Conditions.
Open the Conditions menu on the SAP Alert Notification service cockpit page and click on the Create button.

Condition Once the Create Conditions dialog opens, enter the following:
A unique name for your condition in the Name field.
[Optional] You can add additional details about the condition in the Description field and assign one or more labels to your condition in the Labels field.
In the Condition field choose the Category option in the first box, Is Equal To in the second box, and in the third box set the value to NOTIFICATION.

Create
Click on the Create button. Your newly created condition is now available in the Conditions menu.

DemoConditions
For more information see the SAP Alert Notification service for SAP BTP documentation at Managing Subscriptions.
Open the Subscriptions menu on the SAP Alert Notification service cockpit page and click on the Create button to open the dialog box.

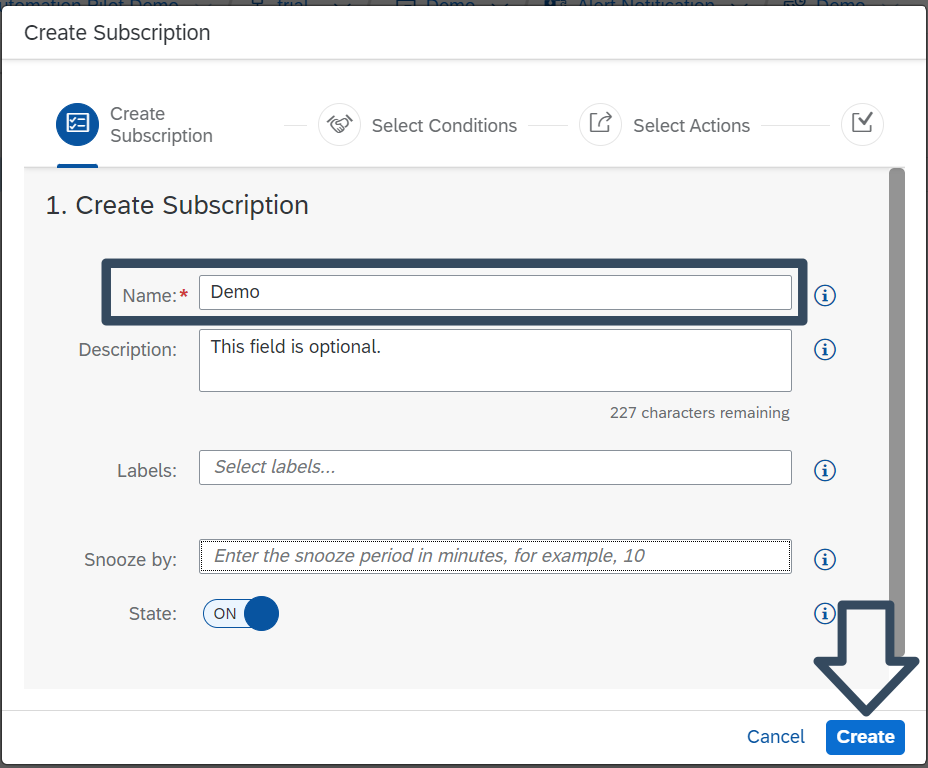
CockpitSubs Once the Create Subscription dialog box opens, enter the following:
A unique name for your subscription in the Name field.
[Optional] You can add additional details about the subscription in the Description field and assign one or more labels to your subscription in the Labels field.
[Optional] If you want to delay the matching of events on the subscription, set a period in the Snooze by field. Leave the field blank if delay is not required.
Click on the Create button.
CreateSub
In the second dialog box you will be presented with the available conditions. Select a condition and click on the Assign button.

SelectCond In the next dialog box you will be presented with the available actions. Select the actions of your choice and click on the Assign button once again.

SelectActions You will be notified your subscription was created via summary dialog box.
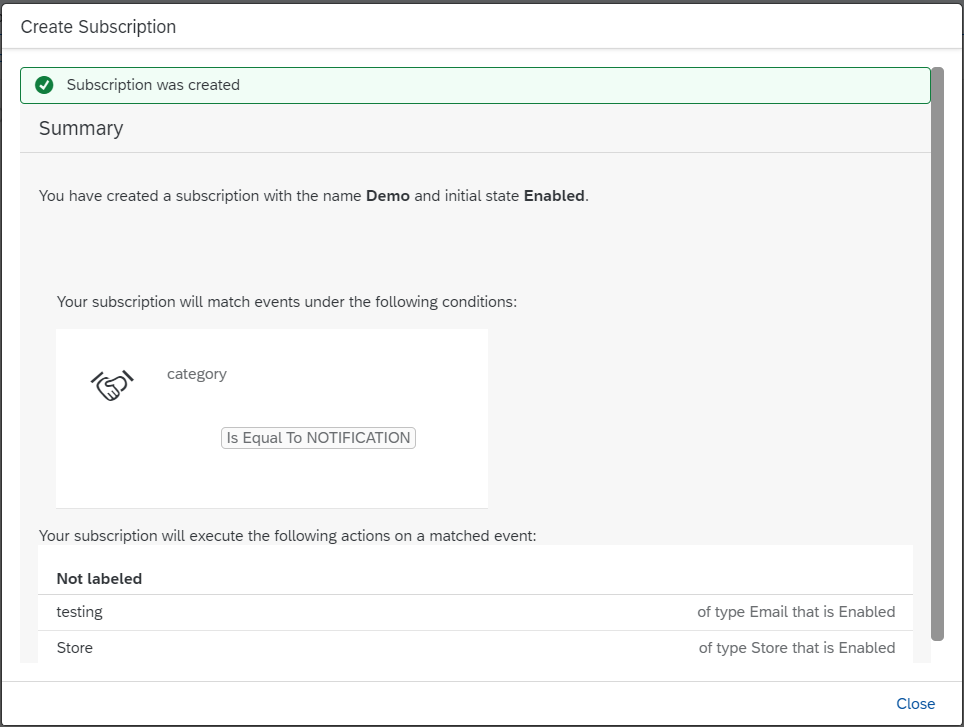
Success Close the dialog. Your newly created subscription is now available in the Subscriptions menu in the left pane.

SubsDone
Open the Subscriptions menu on the SAP Alert Notification service cockpit page and click on the subscription of your choice.
SubsDone Once the subscription opens click on the Send Test Event button.

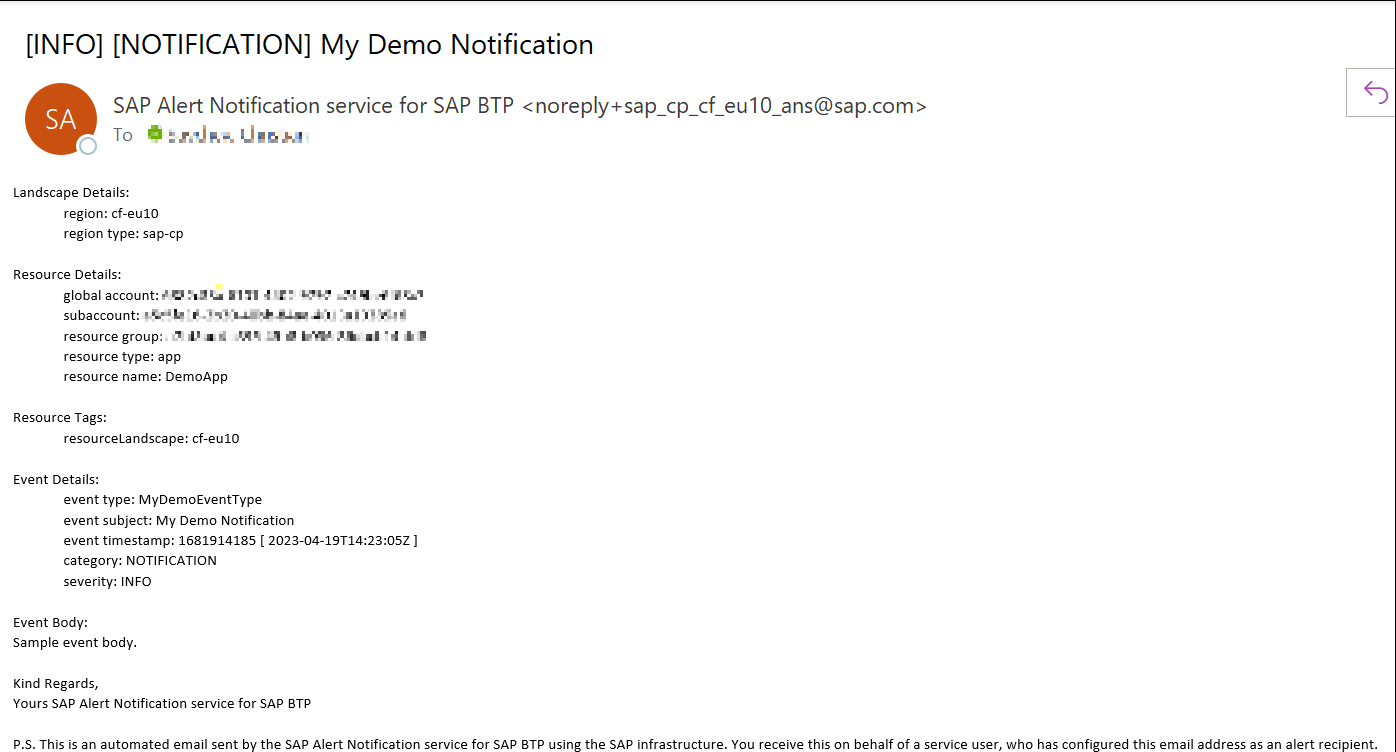
SendTestEvent Enter your Event information and click on the Send button. You can either edit the existing information or copy it directly from here:
JSON{ "eventType": "MyDemoEventType", "resource": { "resourceName": "DemoApp", "resourceType": "app" }, "severity": "INFO", "category": "NOTIFICATION", "subject": "My Demo Notification", "body": "Sample event body." }
EventInfo As a result you should receive an email similar to the one below.
ConfirmationMail
Open the Cloud Foundry Consumer API page and copy the endpoint path.
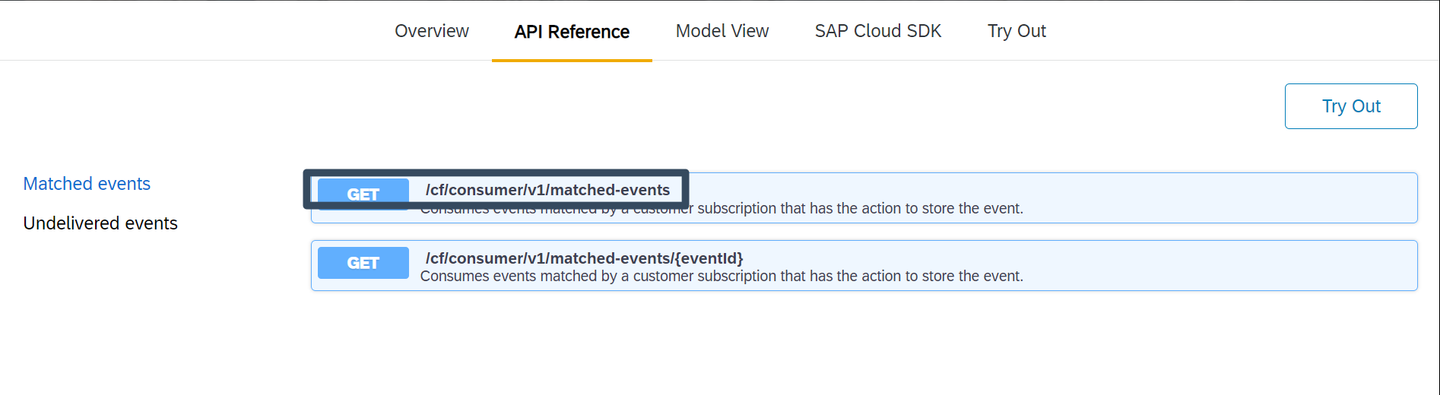
API Open your HTTP Client of choice and follow these easy steps. For this tutorial we will be using Postman.
Enter the provided URL and append the endpoint path you got from the Cloud Foundry Consumer API to the end of the URL.
From the dropdown menu on the left choose the HTTP GET method.
Click on the Authorization tab below and enter your service key details in the username and password fields.
Click on the Send button.

PostmanCredentials
The end result should look something like this:

PostmanResults
Resources
Discussion
Share feedback on this tutorial or join the conversation in SAP Community.