
Overview
You will learn
- How to create and implement a simple
BAdI - Analyze errors using ABAP Cross Trace
- How to inspect the
BAdIimplementing class in ABAP Debugger Throughout this tutorial, objects name include a suffix, such as###. Always replace this with your group number or initials. > The administrator receives an welcome e-mail after provisioning. This e-mail includes the system URL. By removing/uiyou can log into the SAP S/4HANA Cloud ABAP Environment system. Further information can be found Developer Extensibility: Connect to the ABAP System.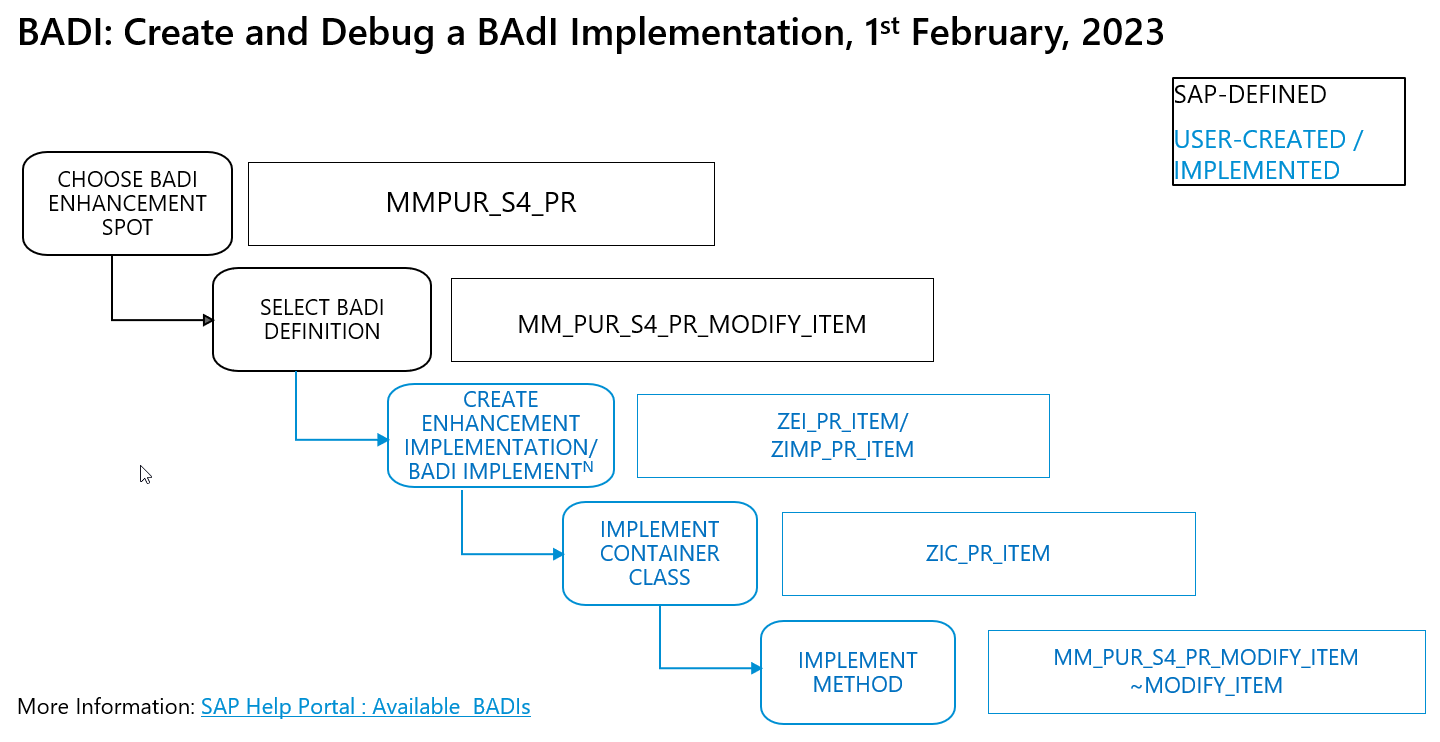
step0-overview-debug


Prerequisites
Prerequisites
- You have a license for SAP S/4HANA Cloud; have a developer user in this system and have created an ABAP Cloud Project
- You have installed SAP ABAP Development Tools (ADT), latest version, and have created an ABAP Cloud project for your SAP S/4HANA Cloud System in it
- You are familiar with the concept of extensions to the SAP standard and with
BAdIsinADTin particular. If not, work through the Tutorial: Implement a Business Add-in (BAdI) To Check a Purchase Requisition. This tutorial also contains links to more information aboutBAdIs - You have created a
BAdIenhancement implementationZEI_PR_ITEM. (abap-s4hanacloud-procurement-purchasereq-checks), steps 1-4 - You have opened the Fiori app Create Purchase Requisition
- You are familiar with the concept of debugging ABAP in ADT. If not, see the links below
- You have assigned the following roles to your user:
SAP_BR_DEVELOPER,SAP_BR_PURCHASER
Steps
Open an enhancement implementation
ZEI_PR_ITEM.Choose Add
BAdIimplementation
step1a-add-badi-impl Add the following, then choose Next:
BAdIDefinition:MM_PUR_S4_PR_MODIFY_ITEMModify Purchase Requisition Item (Add by clicking on Browse)BAdIImplementation Name:ZIMP_PR_ITEM

Your BAdI implementation appears in a new editor.

Ignore the error. You will fix this in the next step.
Choose Implementing Class.
Enter the following, then choose Next.
- Name:
ZIC_PR_ITEM - Description: Modify PR Item for Debugger
- (Added automatically): Interfaces:
if_mm_pur_s4_pr_modify_item
- Name:
Choose the transport request, then choose Finish.
The class appears in a new editor with skeleton code.
ABAPCLASS ZIC_PR_ITEM DEFINITION PUBLIC FINAL CREATE PUBLIC . PUBLIC SECTION. INTERFACES if_badi_interface . INTERFACES if_mm_pur_s4_pr_modify_item . PROTECTED SECTION. PRIVATE SECTION. ENDCLASSFormat, save, and activate the class (
Shift+F1, Ctrl+S, Ctrl+F3).Go back to your
BAdIimplementationZIMP_PR_ITEMand activate it too.
The error will disappear.
Add the following code to the method implementation
if_mm_pur_s4_pr_modify_item~modify_item:The
BAdIreturns an warning message if thedoc typeis standard. Since this triggers theBAdIalmost every time, this is useful for tracing and debugging purposes.```ABAP CLASS ZIC_PR_ITEM IMPLEMENTATION. METHOD if_mm_pur_s4_pr_modify_item~modify_item. DATA: ls_message LIKE LINE OF messages. " If <very common scenario occurs>, display Warning IF purchaserequisition-PURCHASINGDOCUMENTTYPE EQ 'NB'. ls_message-messageid = 'SampleID'. "Message ID ls_message-messagetype = 'W'. "Type of Message ls_message-messagenumber = '001'. "Message Number ls_message-messagevariable1 = 'PH1'. "Place holder APPEND ls_message TO messages. ENDIF. ENDMETHOD. ENDCLASS. ```Format, save, and activate the class (
Shift+F1, Ctrl+S, Ctrl+F3).Check that yours is the implementation that will be called:

step5d-impl-called
First you will add the relevant view to your ABAP perspective.
In ADT, search for the view ABAP Cross Trace using the magnifying glass; then add it by clicking it.

step4a-add-cross-trace-view The view appears. Now you will create the trace configuration. Select your system and choose Create Configuration… from the context menu.

step4b-create-configuration Enter the following information, then choose OK.
Field Name Value Activate Trace Yes Deactivate at … 40 Description Trace Purch Req - Modify Item Component *Choose ABAP-BAdIs > BAdI Calls; deselect all other traces.Trace Level (4) Verbose 
step4d-trace-config
The active trace appears.

You will now execute the app while the trace is active.
In the app Manage Purchase Requisitions - Professional, choose an existing purchase requisition and navigate to the detail, then to the Items tab.

step5a-pur-req-items Choose Edit.
Trigger the
BAdI, e.g. by changing the quantity; notice the message ID,BAdI.
step5c-error
Back in ADT, deactivate the trace from the context menu, then choose Refresh.

step5d-deactivate-trace In the tab Trace Results, navigate through the trace records; filter by
MODIFY_ITEM.Note the relevant
BAdIimplementation class associated withIF_MM_PUR_S4_PR_MODIFY_ITEM~MODIFY_ITEMisZIC_PR_ITEM; note theMESSAGEID = BAdI.
step6b-find-messageId
You can now edit this class in ADT.

Now, you can check the developer extension (BAdI) using ABAP Debugger.
In the backend system, search for your implementing class
ZIC_PR_ITEM.
step4a-find-class Set a breakpoint.
Position the cursor within the ruler (left bar) of the source editor at the line
IF purchaserequisition-PURCHASINGDOCUMENTTYPE EQ 'NB'., then choose Toggle Breakpoint from the context menu.
step4b-set-breakpoint Go back to the Manage Purchase Requisitions - Professional app and create a new purchase requisition (PR).

step4c-pr-tile Now that the breakpoint is set, the system suggests you change to the ABAP Debugger perspective. Choose Switch.

step5-switch-perspective The perspective appears, showing: The call stack; your code; any breakpoint(s) you have set.

step7d-debugger-perspective You can now step through the code as normal (using F5, F6, F7). When you are done, choose Terminate (F8) from the main toolbar. You will return to the ABAP perspective.

step7c-terminate
Once set, this condition is evaluated at runtime whenever the source code position of the breakpoint is reached. If the condition is fulfilled (evaluates to true), the debugger will stop execution at the breakpoint.
Place your cursor on your breakpoint and choose Breakpoint Properties from the context menu.

step8a-breakpoint-properties Add the condition
PURCHASEREQUISITIONITEM~ORDEREDQUANTITY=9, then choose Apply.
step8b-breakpoint-condition Again, run the app Manage Purchase Requisitions - Professional, create a new PR, switch to the Debugger when prompted.
The Debugger has stopped where the ORDEREDQUANTITY = 9.

Once a watchpoint is set, the Debugger stops as soon as the value of a watched variable has changed. Furthermore, you can specify conditions for watchpoints.
You can only set a
watchpointfor a variable during a running ABAP debug session.
In the class
ZIC_PR_ITEM, position the cursor on the relevant field.
step9a-set-watchpoint 
step9b-watchpoint-created To set a condition for the
watchpoint: open the Breakpoints view in the Debugger perspective, select thewatchpoint, then enter a condition.
step9c-set-watchpoint-condition
The ABAP Debugger stops as soon as the value of the variable is changed after a debug step and the specified condition for the watchpoint is fulfilled.
- SAP Help Portal: SAP Cloud Platform Concepts: ABAP Debugger
- SAP Help Portal: SAP Cloud Platform Tasks: Debugging ABAP Code in ADT
Resources
Discussion
Share feedback on this tutorial or join the conversation in SAP Community.