
Overview
You will learn
- How to create a CDS view to minimize a data set exposed to customer
- How to expose the CDS view as a web service


Prerequisites
Prerequisites
SAP_CORE_BC_EXT and SAP_CORE_BC_COM to your user.Steps
Intro
If you need access to data in your system in a way the system does not offer so far, you can create your own data access by making use of a custom Core Data Services view (custom CDS view). Usually, the data of an application is distributed across several database tables. Using CDS views allows you to model the data access without changing underlying database tables. In general, CDS views are intended to be consumed by a UI, analytics or other systems. CDS View can be built on CDS Views as well. To simplify the data access there are pre-delivered CDS Views, custom CDS views can only be built on.
Time to Complete
15 Min.
Navigate to the Extensibility category and press the Custom CDS Views tile to start the application on your Fiori Launchpad.

This brings you to the data source list of the available data sources for Custom CDS Views.
Search for a data source you want to use as a basis and select the data source (1) I_Customer.
This is the primary data source of the new Custom CDS view.

Now execute create (2) to create a new Custom CDS view.
On the general tab enter name YY1_New_Customer and label New Customer.

This step is used to tailor a given CDS View to the needs of a customer. Now switch to the Field Selection tab and select following fields (1):
CustomerCustomerNameCustomerFullNameCountryCityNamePostalCodeStreetNameThese fields will be available in the custom CDS view.

Result: This saves and activates the view. In case the primary data source is access protected, the new view is protected, too.
Switch back to the general tab to generate an OData Service by checkmarking it.
Afterwards save and publish your change. Now your OData Service is generated.
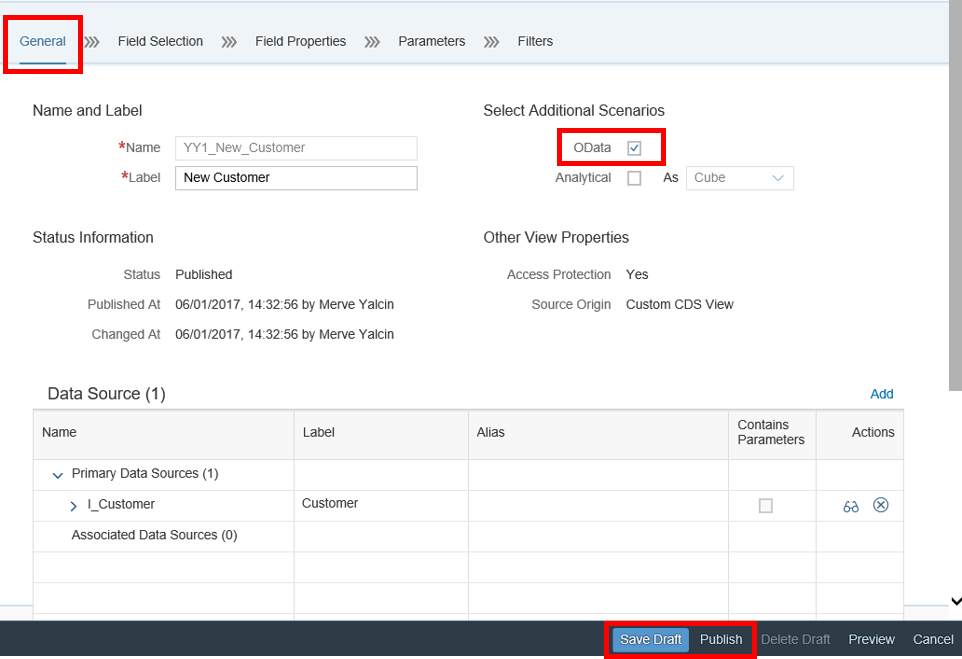
<ViewName>_CDS got created and the service is registered for further usage in the communication scenario.
Go back to Press the Custom Communication Scenarios tile to start the application.

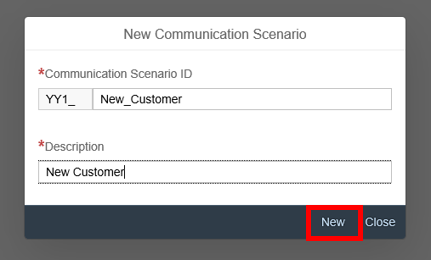
In Custom Communication Scenario add a new Scenario by clicking on new button.

A new window will open where you can define the Name of the New Scenario and its Description.
First you have to click the add button. Afterwards search for New Customer and add YY_NEW_CUSTOMER_CDS as a service.

After adding the service YY_NEW_CUSTOMER_CDS, the result will be shown in the following way:

Now you can publish your Communication Scenario.
If you already have a communication system and user then use them in the following steps. Otherwise you can create a new communication system and user by making use of the following example. Therefore go to Step 2: Creating a Communication System and User in the this blog.
Navigate to the Communication Management category and press the Communication Arrangements tile to start the application.

Click on the new button to create a new Communication Arrangement.

You can choose YY1_New_Customer as Scenario and select the create button by clicking the value help.

Now select your Service, like EXTERNAL_SYSTEM as Communication System and save the Communication Arrangement.

After you have saved your Communication Arrangement, the URL will be generated.
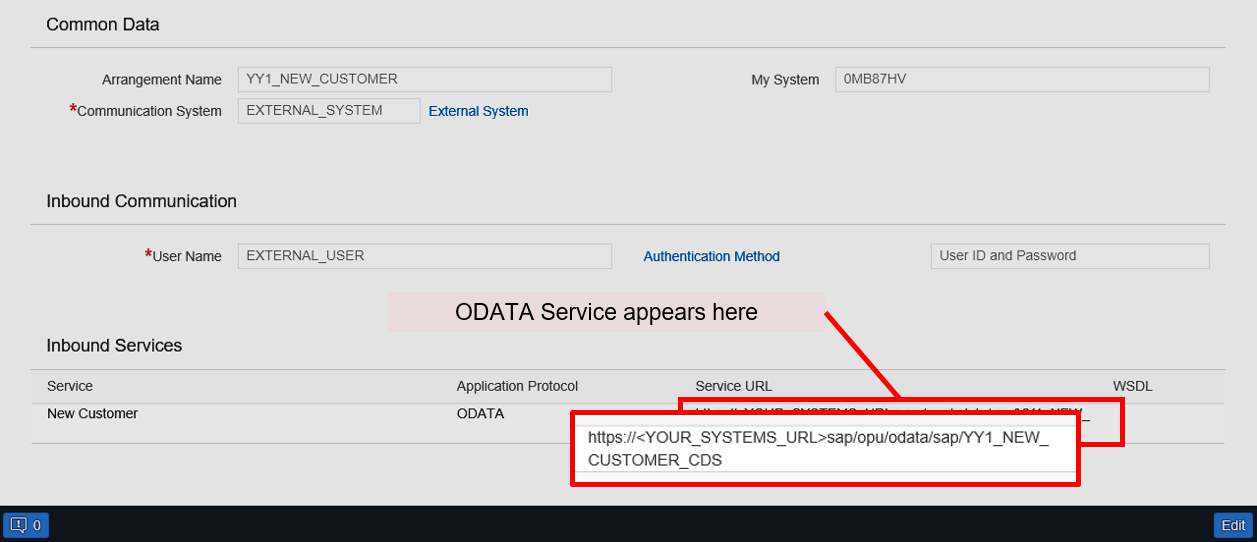
Result: The role containing the authorizations for the service(s) is assigned to a communication user. After this step, you can call the service in a web browser and logon with the communication user. You can consume this service also in tools like Excel using the comm. user logon.
Note: the communication arrangement is a configuration object that is created in test and production system separately.
Resources
Discussion
Share feedback on this tutorial or join the conversation in SAP Community.